Acer Aspire 7540 Service Guide
Page 14
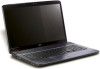
Front View 1 2 13 3 12 4 11 5 10 6 9 7 8 # Icon 1 2 3 Item Acer Crystal Eye webcam Display screen Power button Description Web camera for video communication. (only for certain models) Also called Liquid-Crystal Display (LCD), displays computer output (Configuration may vary by models). Turns the computer on and off. 6 Chapter 1 Your Acer Notebook tour After knowing your computer features, let us show you around your new computer.
Front View 1 2 13 3 12 4 11 5 10 6 9 7 8 # Icon 1 2 3 Item Acer Crystal Eye webcam Display screen Power button Description Web camera for video communication. (only for certain models) Also called Liquid-Crystal Display (LCD), displays computer output (Configuration may vary by models). Turns the computer on and off. 6 Chapter 1 Your Acer Notebook tour After knowing your computer features, let us show you around your new computer.
Acer Aspire 7540 Service Guide
Page 15
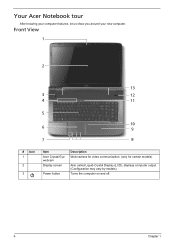
...output. Indicates the status of wireless LAN communication. Indicates the status of Bluetooth communication. (only for certain models) Launches Acer Backup Management for sound recording. 12 Acer PowerSmart Puts your computer into your computer. 6 Touchpad Touch-sensitive pointing device which functions like the left and right mouse ...buttons The left and right) buttons. 9 Palmrest Comfortable support area for your hands when you use the computer. 10 Touchpad toggle Turns the internal touchpad on and off. 11 Microphone Internal microphone for three-step data backup.
...output. Indicates the status of wireless LAN communication. Indicates the status of Bluetooth communication. (only for certain models) Launches Acer Backup Management for sound recording. 12 Acer PowerSmart Puts your computer into your computer. 6 Touchpad Touch-sensitive pointing device which functions like the left and right mouse ...buttons The left and right) buttons. 9 Palmrest Comfortable support area for your hands when you use the computer. 10 Touchpad toggle Turns the internal touchpad on and off. 11 Microphone Internal microphone for three-step data backup.

Acer Aspire 7540 Service Guide
Page 17
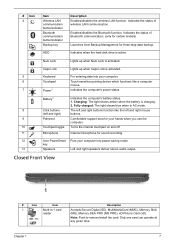
... active. Right View 1 234 56 7 # Icon Item Description 1 Optical drive Internal optical drive; button 4 Emergency eject Ejects the optical drive tray when the computer is turned off . 5 Modem Connects to a phone line. (RJ-11) port 6 USB 2.0 port Connect to USB 2.0 devices (e.g., USB mouse, USB camera). 7 Kensington lock slot Connects to a Kensington...
... active. Right View 1 234 56 7 # Icon Item Description 1 Optical drive Internal optical drive; button 4 Emergency eject Ejects the optical drive tray when the computer is turned off . 5 Modem Connects to a phone line. (RJ-11) port 6 USB 2.0 port Connect to USB 2.0 devices (e.g., USB mouse, USB camera). 7 Kensington lock slot Connects to a Kensington...
Acer Aspire 7540 Service Guide
Page 23
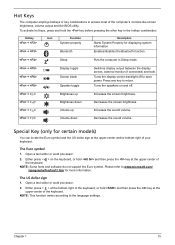
... key in Sleep mode. + + + Display toggle Screen blank Speaker toggle Switches display output between the display screen, external monitor (if connected) and both. Turns the display screen backlight off . + < > Brightness up Decreases the screen brightness. NOTE: Some fonts and software do not support the Euro symbol. Chapter... < > at the bottom-right of the keyboard, or hold and then press the key at the upper-center of the keyboard. Turns the speakers on the keyboard, or hold and then press the key at the upper-center and/or bottom-right of the computer's controls...
... key in Sleep mode. + + + Display toggle Screen blank Speaker toggle Switches display output between the display screen, external monitor (if connected) and both. Turns the display screen backlight off . + < > Brightness up Decreases the screen brightness. NOTE: Some fonts and software do not support the Euro symbol. Chapter... < > at the bottom-right of the keyboard, or hold and then press the key at the upper-center of the keyboard. Turns the speakers on the keyboard, or hold and then press the key at the upper-center and/or bottom-right of the computer's controls...
Acer Aspire 7540 Service Guide
Page 34
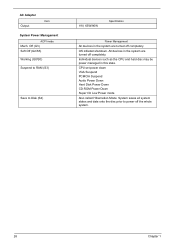
... Specification Power Management All devices in this state. Individual devices such as the CPU and hard disc may be power managed in the system are turned off the whole system. 26 Chapter 1 OS initiated shutdown. AC Adaptor Item Output System Power Management ACPI mode Mech. CPU set power down VGA Suspend... Audio Power Down Hard Disk Power Down CD-ROM Power Down Super I/O Low Power mode Also called Hibernation Mode. All devices in the system are turned off completely. Off (G3) Soft Off (G2/S5) Working (G0/S0) Suspend to RAM (S3) Save to power off completely.
... Specification Power Management All devices in this state. Individual devices such as the CPU and hard disc may be power managed in the system are turned off the whole system. 26 Chapter 1 OS initiated shutdown. AC Adaptor Item Output System Power Management ACPI mode Mech. CPU set power down VGA Suspend... Audio Power Down Hard Disk Power Down CD-ROM Power Down Super I/O Low Power mode Also called Hibernation Mode. All devices in the system are turned off completely. Off (G3) Soft Off (G2/S5) Working (G0/S0) Suspend to RAM (S3) Save to power off completely.
Acer Aspire 7540 Service Guide
Page 47
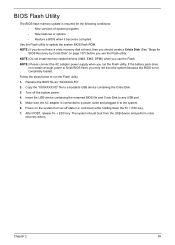
... Disk (See "Steps for the following conditions: • New versions of system programs • New features or options • Restore a BIOS when it becomes corrupted. Turn off state (i.e. cold boot) while holding down the Fn + ESC key. 7. Chapter 2 39 If the battery pack does not contain enough power to run the...
... Disk (See "Steps for the following conditions: • New versions of system programs • New features or options • Restore a BIOS when it becomes corrupted. Turn off state (i.e. cold boot) while holding down the Fn + ESC key. 7. Chapter 2 39 If the battery pack does not contain enough power to run the...

Acer Aspire 7540 Service Guide
Page 50
... a flat, stable surface. 4. Observe the order of the sequence to avoid damage to remove the main board, you want to any of the hardware components. Turn off the power to the system and all power and signal cables from the system. 3. Main Screw List Item A B C D E F G H Screw M2.5 x L4 M2 x L4 M2...
... a flat, stable surface. 4. Observe the order of the sequence to avoid damage to remove the main board, you want to any of the hardware components. Turn off the power to the system and all power and signal cables from the system. 3. Main Screw List Item A B C D E F G H Screw M2.5 x L4 M2 x L4 M2...

Acer Aspire 7540 Service Guide
Page 51
EXTERNAL MODULE DISASSEMBLY TURN OFF POWER AND PERIPHERALS UNPLUG POWER CABLES SD DUMMY CARD Cx1 ODD MODULE OPTICAL DISK DRIVE Hx1 OPTICAL LOCKER BRACKET REMOVE BATTERY PACK Cx4 BACK ...
EXTERNAL MODULE DISASSEMBLY TURN OFF POWER AND PERIPHERALS UNPLUG POWER CABLES SD DUMMY CARD Cx1 ODD MODULE OPTICAL DISK DRIVE Hx1 OPTICAL LOCKER BRACKET REMOVE BATTERY PACK Cx4 BACK ...

Acer Aspire 7540 Service Guide
Page 53
Slide the battery lock/unlock latch to pop out the battery pack, then remove the battery pack from the main unit (b). Chapter 3 45 See "Removing the SD Dummy Card" on page 44. 2. Please detach the battery and follow local regulations for disposal. 4. Note: Battery has been highlighted with the yellow circle as above image shows. Removing the Battery Pack 1. Turn the notebook over so the bottom is facing up. 3. Slide the battery release latch to the release position (a) to the unlock position.
Slide the battery lock/unlock latch to pop out the battery pack, then remove the battery pack from the main unit (b). Chapter 3 45 See "Removing the SD Dummy Card" on page 44. 2. Please detach the battery and follow local regulations for disposal. 4. Note: Battery has been highlighted with the yellow circle as above image shows. Removing the Battery Pack 1. Turn the notebook over so the bottom is facing up. 3. Slide the battery release latch to the release position (a) to the unlock position.

Acer Aspire 7540 Service Guide
Page 62
See "Removing the Battery Pack" on page 52. 8. See "Removing the Heatsink Module" on page 45. 3. Using a flat screwdriver, turn the CPU socket latch counter-clockwise to remove the CPU. 54 Chapter 3 See "Removing the Back Cover" on page 48. 5. See "Removing the Hard Disk ... the Wireless LAN Card" on page 44. 2. But the process in removing the CPU are the same for all the models. 1. Removing the CPU NOTE: Aspire 7736/7736Z/7336 Series uses the Intel® processor, while Aspire 7540 Series uses the AMD® processor. See "Removing the DIMM Module" on page 51. 7.
See "Removing the Battery Pack" on page 52. 8. See "Removing the Heatsink Module" on page 45. 3. Using a flat screwdriver, turn the CPU socket latch counter-clockwise to remove the CPU. 54 Chapter 3 See "Removing the Back Cover" on page 48. 5. See "Removing the Hard Disk ... the Wireless LAN Card" on page 44. 2. But the process in removing the CPU are the same for all the models. 1. Removing the CPU NOTE: Aspire 7736/7736Z/7336 Series uses the Intel® processor, while Aspire 7540 Series uses the AMD® processor. See "Removing the DIMM Module" on page 51. 7.
Acer Aspire 7540 Service Guide
Page 67
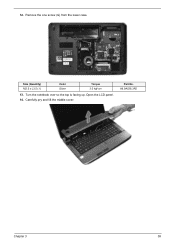
Turn the notebook over so the top is facing up. Size (Quantity) M2.5 x L3.5 (1) Color Silver Torque 3.0 kgf-cm 13. Carefully pry and lift the middle cover. Part No. 86.9A536.3R5 Chapter 3 59 Remove the one screw (G) from the lower case. Open the LCD panel. 14. 12.
Turn the notebook over so the top is facing up. Size (Quantity) M2.5 x L3.5 (1) Color Silver Torque 3.0 kgf-cm 13. Carefully pry and lift the middle cover. Part No. 86.9A536.3R5 Chapter 3 59 Remove the one screw (G) from the lower case. Open the LCD panel. 14. 12.
Acer Aspire 7540 Service Guide
Page 68
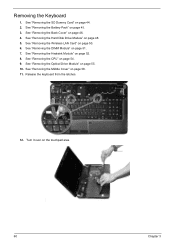
... keyboard from the latches. 12. See "Removing the DIMM Module" on page 58. 11. See "Removing the Heatsink Module" on the touchpad area. 60 Chapter 3 Turn it over on page 52. 8. See "Removing the CPU" on page 46. 4. See "Removing the Back Cover" on page 54. 9. See "Removing the Wireless LAN...
... keyboard from the latches. 12. See "Removing the DIMM Module" on page 58. 11. See "Removing the Heatsink Module" on the touchpad area. 60 Chapter 3 Turn it over on page 52. 8. See "Removing the CPU" on page 46. 4. See "Removing the Back Cover" on page 54. 9. See "Removing the Wireless LAN...
Acer Aspire 7540 Service Guide
Page 99
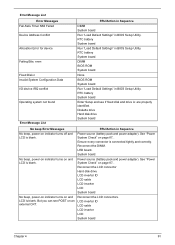
... board DIMM BIOS ROM System board None BIOS ROM System board Run "Load Default Settings" in BIOS Setup Utility. No beep, power-on indicator turns on page 87.. See "Power System Check" on and LCD is blank. LCD inverter ID LCD cable LCD inverter LCD System board Chapter 4 ... battery System board Run "Load Default Settings" in BIOS Setup Utility. See "Power System Check" on indicator turns off and LCD is connected tightly and correctly. No beep, power-on indicator turns on an external CRT. Ensure every connector is blank. FRU/Action in BIOS Setup Utility. System board. But...
... board DIMM BIOS ROM System board None BIOS ROM System board Run "Load Default Settings" in BIOS Setup Utility. No beep, power-on indicator turns on page 87.. See "Power System Check" on and LCD is blank. LCD inverter ID LCD cable LCD inverter LCD System board Chapter 4 ... battery System board Run "Load Default Settings" in BIOS Setup Utility. See "Power System Check" on indicator turns off and LCD is connected tightly and correctly. No beep, power-on indicator turns on an external CRT. Ensure every connector is blank. FRU/Action in BIOS Setup Utility. System board. But...

Acer Aspire 7540 Service Guide
Page 100
No beep during POST. System board Speaker System board 92 Chapter 4 Error Message List No beep Error Messages No beep, power-on indicator turns on and a blinking cursor shown on LCD during POST but system runs correctly. FRU/Action in Sequence Ensure every connector is connected tightly and correctly.
No beep during POST. System board Speaker System board 92 Chapter 4 Error Message List No beep Error Messages No beep, power-on indicator turns on and a blinking cursor shown on LCD during POST but system runs correctly. FRU/Action in Sequence Ensure every connector is connected tightly and correctly.
Acer Aspire 7540 Service Guide
Page 114
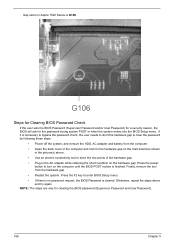
... the AC adapter while retaining the short condition on the hardware gap. If it is finished. . Press the power button to turn on the main board as shown in Aspire 7540 Series is cleared. NOTE: The steps are only for the password during system POST or when the system enters into the...
... the AC adapter while retaining the short condition on the hardware gap. If it is finished. . Press the power button to turn on the main board as shown in Aspire 7540 Series is cleared. NOTE: The steps are only for the password during system POST or when the system enters into the...
Acer Aspire 7736, Aspire 7736Z Notebook Series Start Guide
Page 5
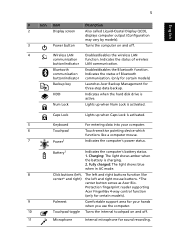
...Icon Item Description 2 Display screen Also called Liquid-Crystal Display (LCD), displays computer output (Configuration may vary by models). 3 Power button Turns the computer on and off . 4 Wireless LAN Enables/disables the wireless LAN communication function. Caps Lock Lights up when Num Lock is ... for three-step data backup. Indicates the status of Bluetooth communication. (only for certain models) Backup key Launches Acer Backup Management for sound recording. Num Lock Lights up when Caps Lock is activated. Indicates the status of wireless button/indicator...
...Icon Item Description 2 Display screen Also called Liquid-Crystal Display (LCD), displays computer output (Configuration may vary by models). 3 Power button Turns the computer on and off . 4 Wireless LAN Enables/disables the wireless LAN communication function. Caps Lock Lights up when Num Lock is ... for three-step data backup. Indicates the status of Bluetooth communication. (only for certain models) Backup key Launches Acer Backup Management for sound recording. Num Lock Lights up when Caps Lock is activated. Indicates the status of wireless button/indicator...
Acer Aspire 7736, Aspire 7736Z Notebook Series Start Guide
Page 6
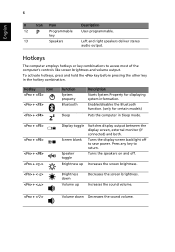
... information. Press any key to access most of the computer's controls like screen brightness and volume output. Brightness down Decreases the sound volume. Turns the display screen backlight off . Turns the speakers on and off to save power. Increases the screen brightness. Hotkeys The computer employs hotkeys or key combinations to return.
... information. Press any key to access most of the computer's controls like screen brightness and volume output. Brightness down Decreases the sound volume. Turns the display screen backlight off . Turns the speakers on and off to save power. Increases the screen brightness. Hotkeys The computer employs hotkeys or key combinations to return.

Acer Aspire 7736, Aspire 7736Z Notebook Series Start Guide
Page 9
Ejects the optical drive tray when the computer is turned off . Kensington lock slot Connects to a phone line. Ejects the optical disk from the drive. Note: Insert a paper clip to the emergency eject hole to ...
Ejects the optical drive tray when the computer is turned off . Kensington lock slot Connects to a phone line. Ejects the optical disk from the drive. Note: Insert a paper clip to the emergency eject hole to ...


