
Acer Aspire 7540 Notebook Series Start Guide
Page 5
.../disables the Bluetooth function. Fully charged: The light shows blue when in AC mode. 8 Click buttons (left, The left and right mouse buttons. *The center button serves as Acer Bio- Battery1 Indicates the computer's battery status. 1. Protection fingerprint reader supporting Acer FingerNav 4-way control function (only for certain models). 9 Palmrest Comfortable support area for your...
.../disables the Bluetooth function. Fully charged: The light shows blue when in AC mode. 8 Click buttons (left, The left and right mouse buttons. *The center button serves as Acer Bio- Battery1 Indicates the computer's battery status. 1. Protection fingerprint reader supporting Acer FingerNav 4-way control function (only for certain models). 9 Palmrest Comfortable support area for your...
Acer Aspire 7540 Notebook Series Start Guide
Page 9
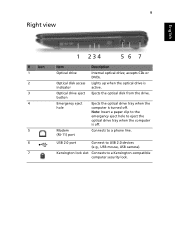
... computer is off . USB 2.0 port Connect to a phone line. 9 Right view English # Icon 1 2 3 4 5 6 7 1 234 56 7 Item Optical drive Optical disk access indicator Optical drive eject button Emergency eject hole Modem (RJ-11) port Description Internal optical drive; Ejects the optical drive tray when the computer is active. Lights up when the...
... computer is off . USB 2.0 port Connect to a phone line. 9 Right view English # Icon 1 2 3 4 5 6 7 1 234 56 7 Item Optical drive Optical disk access indicator Optical drive eject button Emergency eject hole Modem (RJ-11) port Description Internal optical drive; Ejects the optical drive tray when the computer is active. Lights up when the...
Acer Aspire 7540 Service Guide
Page 7
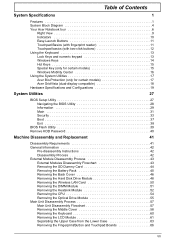
Table of Contents System Specifications 1 Features 1 System Block Diagram 4 Your Acer Notebook tour 6 Right View 9 Indicators 10 Easy-Launch Buttons 11 Touchpad Basics (with fingerprint reader 11 Touchpad basics (with two-click buttons 12 Using the Keyboard 13 Lock Keys and numeric keypad 13 Windows Keys 14 Hot Keys 15 Special Key (only for...
Table of Contents System Specifications 1 Features 1 System Block Diagram 4 Your Acer Notebook tour 6 Right View 9 Indicators 10 Easy-Launch Buttons 11 Touchpad Basics (with fingerprint reader 11 Touchpad basics (with two-click buttons 12 Using the Keyboard 13 Lock Keys and numeric keypad 13 Windows Keys 14 Hot Keys 15 Special Key (only for...
Acer Aspire 7540 Service Guide
Page 14
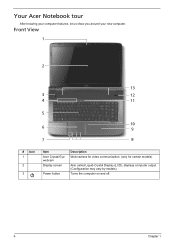
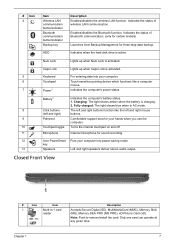
Front View 1 2 13 3 12 4 11 5 10 6 9 7 8 # Icon 1 2 3 Item Acer Crystal Eye webcam Display screen Power button Description Web camera for video communication. (only for certain models) Also called Liquid-Crystal Display (LCD), displays computer output (Configuration may vary by models). Your Acer Notebook tour After knowing your computer features, let us show you around your new computer. Turns the computer on and off. 6 Chapter 1
Front View 1 2 13 3 12 4 11 5 10 6 9 7 8 # Icon 1 2 3 Item Acer Crystal Eye webcam Display screen Power button Description Web camera for video communication. (only for certain models) Also called Liquid-Crystal Display (LCD), displays computer output (Configuration may vary by models). Your Acer Notebook tour After knowing your computer features, let us show you around your new computer. Turns the computer on and off. 6 Chapter 1
Acer Aspire 7540 Service Guide
Page 15
...Acer PowerSmart Puts your computer. 6 Touchpad Touch-sensitive pointing device which functions like a computer mouse. 7 Power1 Indicates the computer's power status. HDD Indicates when the hard disk drive is charging. 2. Closed Front View 1 # Icon Item 1 Multi-in AC mode. 8 Click buttons The left and right buttons...communication. Note: Push to remove/install the card. # Icon 4 Item Wireless LAN communication button/indicator Bluetooth communication button/indicator Backup key Description Enables/disables the wireless LAN function. Num Lock Lights up when ...
...Acer PowerSmart Puts your computer. 6 Touchpad Touch-sensitive pointing device which functions like a computer mouse. 7 Power1 Indicates the computer's power status. HDD Indicates when the hard disk drive is charging. 2. Closed Front View 1 # Icon Item 1 Multi-in AC mode. 8 Click buttons The left and right buttons...communication. Note: Push to remove/install the card. # Icon 4 Item Wireless LAN communication button/indicator Bluetooth communication button/indicator Backup key Description Enables/disables the wireless LAN function. Num Lock Lights up when ...

Acer Aspire 7540 Service Guide
Page 17
... a phone line. (RJ-11) port 6 USB 2.0 port Connect to USB 2.0 devices (e.g., USB mouse, USB camera). 7 Kensington lock slot Connects to a Kensington-compatible computer security lock. button 4 Emergency eject Ejects the optical drive tray when the computer is active. hole Note: Insert a paper clip to the emergency eject hole to stay cool...
... a phone line. (RJ-11) port 6 USB 2.0 port Connect to USB 2.0 devices (e.g., USB mouse, USB camera). 7 Kensington lock slot Connects to a Kensington-compatible computer security lock. button 4 Emergency eject Ejects the optical drive tray when the computer is active. hole Note: Insert a paper clip to the emergency eject hole to stay cool...

Acer Aspire 7540 Service Guide
Page 19
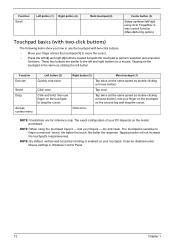
... a mouse. Main touchpad (2) Tap twice (at the same speed as clicking the left button. • Use Acer Bio-Protection fingerprint reader (3) supporting Acer FingerNav 4-way control function (only for three-step data backup. Icon Function Description Wireless LAN communication button/ indicator Enables/disables the wireless LAN function. Touchpad Basics (with fingerprint reader) The following...
... a mouse. Main touchpad (2) Tap twice (at the same speed as clicking the left button. • Use Acer Bio-Protection fingerprint reader (3) supporting Acer FingerNav 4-way control function (only for three-step data backup. Icon Function Description Wireless LAN communication button/ indicator Enables/disables the wireless LAN function. Touchpad Basics (with fingerprint reader) The following...
Acer Aspire 7540 Service Guide
Page 20
.... rest your finger on the touchpad on the model purchased. NOTE: When using Acer FingerNav 4way control function (Manufacturing option). Click and hold, then use the touchpad with two-click buttons. • Move your PC depends on the second tap and drag the cursor.... Tap twice (at the same speed as double-clicking a mouse button). Click once. dry and clean. Tapping harder will not increase the touchpad's responsiveness. Function Scroll Left button (1) Right button (4) Main touchpad (2) Center button (3) Swipe up/down/left/right using the touchpad, keep it - NOTE...
.... rest your finger on the touchpad on the model purchased. NOTE: When using Acer FingerNav 4way control function (Manufacturing option). Click and hold, then use the touchpad with two-click buttons. • Move your PC depends on the second tap and drag the cursor.... Tap twice (at the same speed as double-clicking a mouse button). Click once. dry and clean. Tapping harder will not increase the touchpad's responsiveness. Function Scroll Left button (1) Right button (4) Main touchpad (2) Center button (3) Swipe up/down/left/right using the touchpad, keep it - NOTE...
Acer Aspire 7540 Service Guide
Page 22
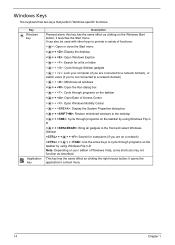
... you are on a network) + < > + : Use the arrow keys to cycle through programs on the taskbar by using Windows Flip 3-D Note: Depending on the Windows Start button; Windows Keys The keyboard has two keys that perform Windows-specific functions. This key has the same effect as described. Key Windows key Application key... alone, this key has the same effect as clicking on your edition of Windows Vista, some shortcuts may not function as clicking the right mouse button; it opens the application's context menu. 14 Chapter 1 it launches the Start menu.
... you are on a network) + < > + : Use the arrow keys to cycle through programs on the taskbar by using Windows Flip 3-D Note: Depending on the Windows Start button; Windows Keys The keyboard has two keys that perform Windows-specific functions. This key has the same effect as described. Key Windows key Application key... alone, this key has the same effect as clicking on your edition of Windows Vista, some shortcuts may not function as clicking the right mouse button; it opens the application's context menu. 14 Chapter 1 it launches the Start menu.
Acer Aspire 7540 Service Guide
Page 30
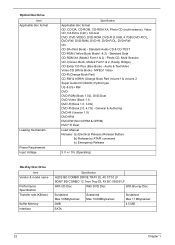
... CD-ROM XA (Mode2 Form1 & 2) - General & Authoring DVD+R (Version 1.0) DVD+RW DVD-RW (Non CPRM & CPRM) DVD°"R Dual Load: Manual Release: (a) Electrical Release (Release Button) (b) Release by ATAPI command (c) Emergency Release 5 V +/- 5% (Operating) Blu-Ray Disc Drive Item Vendor & model name Performance Specification Transfer rate (KB/sec) Buffer Memory Interface Specification...
... CD-ROM XA (Mode2 Form1 & 2) - General & Authoring DVD+R (Version 1.0) DVD+RW DVD-RW (Non CPRM & CPRM) DVD°"R Dual Load: Manual Release: (a) Electrical Release (Release Button) (b) Release by ATAPI command (c) Emergency Release 5 V +/- 5% (Operating) Blu-Ray Disc Drive Item Vendor & model name Performance Specification Transfer rate (KB/sec) Buffer Memory Interface Specification...

Acer Aspire 7540 Service Guide
Page 31
... 1.0) DVD+RW DVD-RW (Non CPRM & CPRM) DVD+/-R Dual Blu-Ray: BD-R, BD-R DL, BD-RE, BD-RE DL Load: Manual Release: (a) Electrical Release (Release Button) (b) Release by ATAPI command (c) Emergency Release 5 V +/- 5% (Operating) Audio Interface Item Audio Controller Audio onboard or optional Mono or Stereo Resolution Compatibility Sampling rate Internal microphone...
... 1.0) DVD+RW DVD-RW (Non CPRM & CPRM) DVD+/-R Dual Blu-Ray: BD-R, BD-R DL, BD-RE, BD-RE DL Load: Manual Release: (a) Electrical Release (Release Button) (b) Release by ATAPI command (c) Emergency Release 5 V +/- 5% (Operating) Audio Interface Item Audio Controller Audio onboard or optional Mono or Stereo Resolution Compatibility Sampling rate Internal microphone...

Acer Aspire 7540 Service Guide
Page 74
..." on page 52. 8. See "Removing the Heatsink Module" on page 50. 6. See "Removing the Middle Cover" on page 51. 7. Removing the Fingerprint/Button and Touchpad Boards 1. See "Removing the DIMM Module" on page 58. 11. See "Removing the CPU" on page 60. 12. See "Removing the Keyboard..." on page 54. 9. See "Separating the Upper Case from the Lower Case" on page 45. 3. Release the latch (a) and disconnect the fingerprint/ button cable (b) from the lower case. See "Removing the Battery Pack" on page 63. 14. See "Removing the Hard Disk Drive Module" on page 55...
..." on page 52. 8. See "Removing the Heatsink Module" on page 50. 6. See "Removing the Middle Cover" on page 51. 7. Removing the Fingerprint/Button and Touchpad Boards 1. See "Removing the DIMM Module" on page 58. 11. See "Removing the CPU" on page 60. 12. See "Removing the Keyboard..." on page 54. 9. See "Separating the Upper Case from the Lower Case" on page 45. 3. Release the latch (a) and disconnect the fingerprint/ button cable (b) from the lower case. See "Removing the Battery Pack" on page 63. 14. See "Removing the Hard Disk Drive Module" on page 55...
Acer Aspire 7540 Service Guide
Page 75
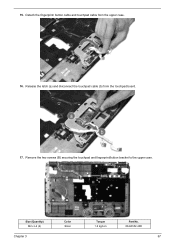
Size (Quantity) M2 x L4 (2) Chapter 3 Color Silver Torque 1.6 kgf-cm Part No. 86.9A552.4R0 67 Remove the two screws (B) securing the touchpad and fingerprint/button bracket to the upper case. Detach the fingerprint/ button cable and touchpad cable from the touchpad board. 17. 15. Release the latch (a) and disconnect the touchpad cable (b) from the upper case. 16.
Size (Quantity) M2 x L4 (2) Chapter 3 Color Silver Torque 1.6 kgf-cm Part No. 86.9A552.4R0 67 Remove the two screws (B) securing the touchpad and fingerprint/button bracket to the upper case. Detach the fingerprint/ button cable and touchpad cable from the touchpad board. 17. 15. Release the latch (a) and disconnect the touchpad cable (b) from the upper case. 16.

Acer Aspire 7540 Service Guide
Page 76
18. WARNING: The touchpad board is defective. Please detach the circuit boards and follow the local regulations for disposal. 68 Chapter 3 Lift and detach the touchpad and fingerprint/button bracket. 19. Pry to the upper case, only remove the touchpad board if it is glued to loosen the touchpad board and detach the touchpad board from the upper case. Note: Circuit boards > 10cm2 has been highlighted with the yellow square as shown in the figure above. Detach the fingerprint/button board. 20.
18. WARNING: The touchpad board is defective. Please detach the circuit boards and follow the local regulations for disposal. 68 Chapter 3 Lift and detach the touchpad and fingerprint/button bracket. 19. Pry to the upper case, only remove the touchpad board if it is glued to loosen the touchpad board and detach the touchpad board from the upper case. Note: Circuit boards > 10cm2 has been highlighted with the yellow square as shown in the figure above. Detach the fingerprint/button board. 20.
Acer Aspire 7540 Service Guide
Page 77
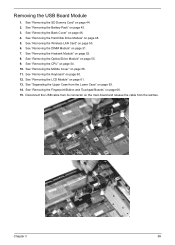
See "Removing the SD Dummy Card" on page 55. 9. See "Removing the Optical Drive Module" on page 44. 2. See "Removing the Fingerprint/Button and Touchpad Boards" on page 54. 10. Disconnect the USB cable from its connector on the main board and release the cable from the Lower ...
See "Removing the SD Dummy Card" on page 55. 9. See "Removing the Optical Drive Module" on page 44. 2. See "Removing the Fingerprint/Button and Touchpad Boards" on page 54. 10. Disconnect the USB cable from its connector on the main board and release the cable from the Lower ...
Acer Aspire 7540 Service Guide
Page 79
... Cover" on page 50. 6. Removing the Modem Board 1. See "Separating the Upper Case from its connector on the main board. 17. See "Removing the Fingerprint/Button and Touchpad Boards" on page 60. 12. See "Removing the Keyboard" on page 66. 15. See "Removing the SD Dummy Card" on page 45. 3. See...
... Cover" on page 50. 6. Removing the Modem Board 1. See "Separating the Upper Case from its connector on the main board. 17. See "Removing the Fingerprint/Button and Touchpad Boards" on page 60. 12. See "Removing the Keyboard" on page 66. 15. See "Removing the SD Dummy Card" on page 45. 3. See...

Acer Aspire 7540 Service Guide
Page 80
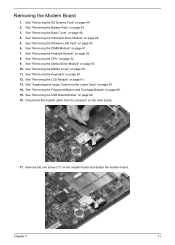
... Module" on page 50. 6. See "Removing the Keyboard" on page 66. 15. See "Separating the Upper Case from the main board. See "Removing the Fingerprint/Button and Touchpad Boards" on page 60. 12. Remove the modem board module from the Lower Case" on page 69. 16. See "Removing the USB Board...
... Module" on page 50. 6. See "Removing the Keyboard" on page 66. 15. See "Separating the Upper Case from the main board. See "Removing the Fingerprint/Button and Touchpad Boards" on page 60. 12. Remove the modem board module from the Lower Case" on page 69. 16. See "Removing the USB Board...

Acer Aspire 7540 Service Guide
Page 82
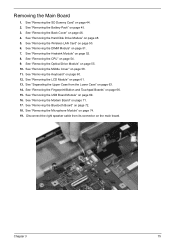
See "Removing the Battery Pack" on page 52. 8. See "Removing the Heatsink Module" on page 45. 3. See "Removing the Fingerprint/Button and Touchpad Boards" on the main board. 19. Disconnect the microphone cable from the Lower Case" on page 44. 2. See "Removing the Hard Disk Drive ...
See "Removing the Battery Pack" on page 52. 8. See "Removing the Heatsink Module" on page 45. 3. See "Removing the Fingerprint/Button and Touchpad Boards" on the main board. 19. Disconnect the microphone cable from the Lower Case" on page 44. 2. See "Removing the Hard Disk Drive ...
Acer Aspire 7540 Service Guide
Page 83
... 71. 17. See "Removing the Bluetooth Board" on page 55. 10. See "Removing the Optical Drive Module" on page 72. 18. See "Removing the Fingerprint/Button and Touchpad Boards" on page 54. 9. See "Removing the CPU" on page 66. 15. Disconnect the right speaker cable from the Lower Case" on page...
... 71. 17. See "Removing the Bluetooth Board" on page 55. 10. See "Removing the Optical Drive Module" on page 72. 18. See "Removing the Fingerprint/Button and Touchpad Boards" on page 54. 9. See "Removing the CPU" on page 66. 15. Disconnect the right speaker cable from the Lower Case" on page...
Acer Aspire 7540 Service Guide
Page 111
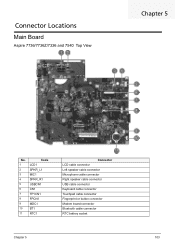
Connector Locations Main Board Aspire 7736/7736Z/7336 and 7540 Top View Chapter 5 No. 1 2 3 4 5 6 7 8 9 10 11 Code LCD1 SPKR_L1 MIC1 SPKR_R1 USBCN1 CN1 TP1CN1 FPCN1 MDC1 BT1 RTC1 Connector LCD cable connector Left speaker cable connector Microphone cable connector Right speaker cable connector USB cable connector Keyboard cable connector Touchpad cable connector Fingerprint or button connector Modem board connector Bluetooth cable connector RTC battery socket Chapter 5 103
Connector Locations Main Board Aspire 7736/7736Z/7336 and 7540 Top View Chapter 5 No. 1 2 3 4 5 6 7 8 9 10 11 Code LCD1 SPKR_L1 MIC1 SPKR_R1 USBCN1 CN1 TP1CN1 FPCN1 MDC1 BT1 RTC1 Connector LCD cable connector Left speaker cable connector Microphone cable connector Right speaker cable connector USB cable connector Keyboard cable connector Touchpad cable connector Fingerprint or button connector Modem board connector Bluetooth cable connector RTC battery socket Chapter 5 103


