Acer Aspire 7540 Service Guide
Page 7
... Features 1 System Block Diagram 4 Your Acer Notebook tour 6 Right View 9 Indicators 10 Easy-Launch Buttons 11 Touchpad Basics (with fingerprint reader 11 Touchpad basics (with two-click buttons 12 Using the Keyboard 13 Lock Keys and numeric keypad 13 Windows...Removing the Hard Disk Drive Module 48 Removing the Wireless LAN Card 50 Removing the DIMM Module 51 Removing the Heatsink Module 52 Removing the CPU 54 Removing the Optical Drive Module 55 Main Unit Disassembly Process 57 Main Unit Disassembly Flowchart 57 Removing the Middle Cover 58 Removing the Keyboard 60 Removing...
... Features 1 System Block Diagram 4 Your Acer Notebook tour 6 Right View 9 Indicators 10 Easy-Launch Buttons 11 Touchpad Basics (with fingerprint reader 11 Touchpad basics (with two-click buttons 12 Using the Keyboard 13 Lock Keys and numeric keypad 13 Windows...Removing the Hard Disk Drive Module 48 Removing the Wireless LAN Card 50 Removing the DIMM Module 51 Removing the Heatsink Module 52 Removing the CPU 54 Removing the Optical Drive Module 55 Main Unit Disassembly Process 57 Main Unit Disassembly Flowchart 57 Removing the Middle Cover 58 Removing the Keyboard 60 Removing...
Acer Aspire 7540 Service Guide
Page 8
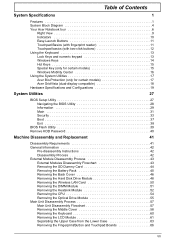
... with the Brackets 79 Removing the LCD Brackets 81 Removing the Web Camera 81 Removing the FPC Cable 82 Removing the Antennas 84 Troubleshooting 85 System Check Procedures 86 External Diskette Drive Check 86 External Optical Disk Drive Check 86 Keyboard or Auxiliary Input Device ... 105 BIOS Recovery by Crisis Disk 107 FRU (Field Replaceable Unit) List 111 Aspire 7736/7736Z/7336 Series and Aspire 7540 Series Exploded Diagram . . . . .112 Model Definition and Configuration 143 Aspire 7736/7736Z/7336 Series 144 Test Compatible Components 171 Microsoft® Windows® ...
... with the Brackets 79 Removing the LCD Brackets 81 Removing the Web Camera 81 Removing the FPC Cable 82 Removing the Antennas 84 Troubleshooting 85 System Check Procedures 86 External Diskette Drive Check 86 External Optical Disk Drive Check 86 Keyboard or Auxiliary Input Device ... 105 BIOS Recovery by Crisis Disk 107 FRU (Field Replaceable Unit) List 111 Aspire 7736/7736Z/7336 Series and Aspire 7540 Series Exploded Diagram . . . . .112 Model Definition and Configuration 143 Aspire 7736/7736Z/7336 Series 144 Test Compatible Components 171 Microsoft® Windows® ...
Acer Aspire 7540 Service Guide
Page 15
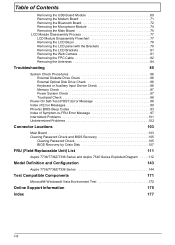
... Secure Digital (SD), MultiMediaCard (MMC), Memory Stick (MS), Memory Stick PRO (MS PRO), xD-Picture Card (xD). Note: Push to remove/install the card. key 13 Speakers Left and right speakers deliver stereo audio output. Closed Front View 1 # Icon Item 1 Multi-in AC... Management for sound recording. 12 Acer PowerSmart Puts your computer. 6 Touchpad Touch-sensitive pointing device which functions like a computer mouse. 7 Power1 Indicates the computer's power status. Caps Lock Lights up when Num Lock is activated. 5 Keyboard For entering data into your computer ...
... Secure Digital (SD), MultiMediaCard (MMC), Memory Stick (MS), Memory Stick PRO (MS PRO), xD-Picture Card (xD). Note: Push to remove/install the card. key 13 Speakers Left and right speakers deliver stereo audio output. Closed Front View 1 # Icon Item 1 Multi-in AC... Management for sound recording. 12 Acer PowerSmart Puts your computer. 6 Touchpad Touch-sensitive pointing device which functions like a computer mouse. 7 Power1 Indicates the computer's power status. Caps Lock Lights up when Num Lock is activated. 5 Keyboard For entering data into your computer ...

Acer Aspire 7540 Service Guide
Page 50
... do the following stages: • External module disassembly • Main unit disassembly • LCD module disassembly The flowcharts provided in that you must first remove the keyboard, then disassemble the inside assembly frame in the succeeding disassembly sections illustrate the entire disassembly sequence. General Information Pre-disassembly Instructions Before proceeding with the...
... do the following stages: • External module disassembly • Main unit disassembly • LCD module disassembly The flowcharts provided in that you must first remove the keyboard, then disassemble the inside assembly frame in the succeeding disassembly sections illustrate the entire disassembly sequence. General Information Pre-disassembly Instructions Before proceeding with the...

Acer Aspire 7540 Service Guide
Page 51
For example, if you must first remove the keyboard, then disassemble the inside assembly frame in that need to remove the main board, you want to be removed during servicing. External Module Disassembly Process External Modules Disassembly Flowchart The flowchart below gives you a graphic representation on ...DISASSEMBLY TURN OFF POWER AND PERIPHERALS UNPLUG POWER CABLES SD DUMMY CARD Cx1 ODD MODULE OPTICAL DISK DRIVE Hx1 OPTICAL LOCKER BRACKET REMOVE BATTERY PACK Cx4 BACK COVER Ax1 HDD MODULE DIMM MODULES Fx2 HARD DISK BRACKET HARD DISK DRIVE Screwx6 THERMAL MODULE Bx1 WLAN...
For example, if you must first remove the keyboard, then disassemble the inside assembly frame in that need to remove the main board, you want to be removed during servicing. External Module Disassembly Process External Modules Disassembly Flowchart The flowchart below gives you a graphic representation on ...DISASSEMBLY TURN OFF POWER AND PERIPHERALS UNPLUG POWER CABLES SD DUMMY CARD Cx1 ODD MODULE OPTICAL DISK DRIVE Hx1 OPTICAL LOCKER BRACKET REMOVE BATTERY PACK Cx4 BACK COVER Ax1 HDD MODULE DIMM MODULES Fx2 HARD DISK BRACKET HARD DISK DRIVE Screwx6 THERMAL MODULE Bx1 WLAN...
Acer Aspire 7540 Service Guide
Page 68
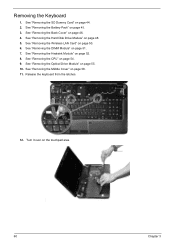
... 3 Turn it over on page 51. 7. Removing the Keyboard 1. See "Removing the CPU" on page 48. 5. Release the keyboard from the latches. 12. See "Removing the Hard Disk Drive Module" on page 54. 9. See "Removing the Wireless LAN Card" on page 45. 3. See "Removing the Battery Pack" on page 50. 6. See "Removing the Optical Drive Module" on page...
... 3 Turn it over on page 51. 7. Removing the Keyboard 1. See "Removing the CPU" on page 48. 5. Release the keyboard from the latches. 12. See "Removing the Hard Disk Drive Module" on page 54. 9. See "Removing the Wireless LAN Card" on page 45. 3. See "Removing the Battery Pack" on page 50. 6. See "Removing the Optical Drive Module" on page...

Acer Aspire 7540 Service Guide
Page 69
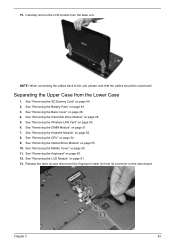
... Battery Pack" on the main board and detach the keyboard. See "Removing the Wireless LAN Card" on page 54. 9. See "Removing the CPU" on page 50. 6. See "Removing the Keyboard" on page 58. 11. 13. Removing the LCD Module 1. See "Removing the Middle Cover" on page 60. 12. See "Removing the Hard Disk Drive Module" on page 52...
... Battery Pack" on the main board and detach the keyboard. See "Removing the Wireless LAN Card" on page 54. 9. See "Removing the CPU" on page 50. 6. See "Removing the Keyboard" on page 58. 11. 13. Removing the LCD Module 1. See "Removing the Middle Cover" on page 60. 12. See "Removing the Hard Disk Drive Module" on page 52...
Acer Aspire 7540 Service Guide
Page 71
... Module" on page 46. 4. Separating the Upper Case from the base unit. See "Removing the Back Cover" on page 55. 10. See "Removing the Hard Disk Drive Module" on page 61. 13. See "Removing the LCD Module" on page 48. 5. Chapter 3 63 NOTE: When connecting the cables...cables should be routed well. See "Removing the CPU" on page 52. 8. See "Removing the Heatsink Module" on page 54. 9. See "Removing the Keyboard" on page 51. 7. See "Removing the DIMM Module" on page 60. 12. See "Removing the Middle Cover" on page 50. 6. See "Removing the Wireless LAN Card" on page ...
... Module" on page 46. 4. Separating the Upper Case from the base unit. See "Removing the Back Cover" on page 55. 10. See "Removing the Hard Disk Drive Module" on page 61. 13. See "Removing the LCD Module" on page 48. 5. Chapter 3 63 NOTE: When connecting the cables...cables should be routed well. See "Removing the CPU" on page 52. 8. See "Removing the Heatsink Module" on page 54. 9. See "Removing the Keyboard" on page 51. 7. See "Removing the DIMM Module" on page 60. 12. See "Removing the Middle Cover" on page 50. 6. See "Removing the Wireless LAN Card" on page ...

Acer Aspire 7540 Service Guide
Page 74
... "Separating the Upper Case from the Lower Case" on page 46. 4. Removing the Fingerprint/Button and Touchpad Boards 1. See "Removing the Back Cover" on page 63. 14. See "Removing the Keyboard" on page 44. 2. See "Removing the SD Dummy Card" on page 60. 12. See "Removing the Middle Cover" on page 51. 7. Release the latch (a) and...
... "Separating the Upper Case from the Lower Case" on page 46. 4. Removing the Fingerprint/Button and Touchpad Boards 1. See "Removing the Back Cover" on page 63. 14. See "Removing the Keyboard" on page 44. 2. See "Removing the SD Dummy Card" on page 60. 12. See "Removing the Middle Cover" on page 51. 7. Release the latch (a) and...
Acer Aspire 7540 Service Guide
Page 77
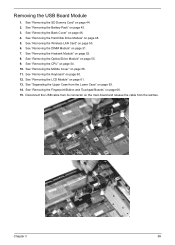
... Battery Pack" on page 55. 9. See "Removing the Optical Drive Module" on page 45. 3. See "Removing the Heatsink Module" on page 60. 12. See "Removing the Keyboard" on page 52. 8. Disconnect the USB cable from its connector on page 48. 5. See "Removing the Hard Disk Drive Module" on the main ...board and release the cable from the Lower Case" on page 58. 11. See "Removing the DIMM Module" on page...
... Battery Pack" on page 55. 9. See "Removing the Optical Drive Module" on page 45. 3. See "Removing the Heatsink Module" on page 60. 12. See "Removing the Keyboard" on page 52. 8. Disconnect the USB cable from its connector on page 48. 5. See "Removing the Hard Disk Drive Module" on the main ...board and release the cable from the Lower Case" on page 58. 11. See "Removing the DIMM Module" on page...
Acer Aspire 7540 Service Guide
Page 79
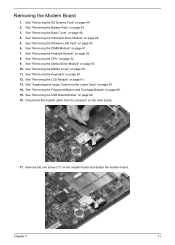
... the modem board and detach the modem board. See "Removing the CPU" on page 60. 12. See "Removing the Keyboard" on page 54. 9. See "Removing the LCD Module" on page 66. 15. Chapter 3 71 See "Removing the Fingerprint/Button and Touchpad Boards" on page 61. 13. See "Removing the USB Board Module" on page 44. 2. See...
... the modem board and detach the modem board. See "Removing the CPU" on page 60. 12. See "Removing the Keyboard" on page 54. 9. See "Removing the LCD Module" on page 66. 15. Chapter 3 71 See "Removing the Fingerprint/Button and Touchpad Boards" on page 61. 13. See "Removing the USB Board Module" on page 44. 2. See...

Acer Aspire 7540 Service Guide
Page 80
...the main board. See "Removing the Battery Pack" on page 48. 5. See "Removing the Hard Disk Drive Module" on page 45. 3. See "Removing the DIMM Module" on page 50. 6. See "Removing the Wireless LAN Card" on page 51. 7. See "Removing the Optical Drive Module" on... page 58. 11. See "Removing the Middle Cover" on page 55. 10. Removing the Bluetooth Board 1. 18. See "Removing the Keyboard...
...the main board. See "Removing the Battery Pack" on page 48. 5. See "Removing the Hard Disk Drive Module" on page 45. 3. See "Removing the DIMM Module" on page 50. 6. See "Removing the Wireless LAN Card" on page 51. 7. See "Removing the Optical Drive Module" on... page 58. 11. See "Removing the Middle Cover" on page 55. 10. Removing the Bluetooth Board 1. 18. See "Removing the Keyboard...

Acer Aspire 7540 Service Guide
Page 82
... Heatsink Module" on page 46. 4. Detach the microphone module. 74 Chapter 3 See "Removing the SD Dummy Card" on page 54. 9. See "Removing the CPU" on page 44. 2. See "Removing the Modem Board" on page 60. 12. See "Removing the Keyboard" on page 71. 17. See "Removing the Hard Disk Drive Module" on page 72. 18. See...
... Heatsink Module" on page 46. 4. Detach the microphone module. 74 Chapter 3 See "Removing the SD Dummy Card" on page 54. 9. See "Removing the CPU" on page 44. 2. See "Removing the Modem Board" on page 60. 12. See "Removing the Keyboard" on page 71. 17. See "Removing the Hard Disk Drive Module" on page 72. 18. See...
Acer Aspire 7540 Service Guide
Page 83
... Case" on page 66. 15. See "Removing the Keyboard" on the main board. Chapter 3 75 See "Removing the SD Dummy Card" on page 52. 8. See "Removing the Heatsink Module" on page 44. 2. See "Removing the Battery Pack" on page 61. 13. See "Removing the LCD Module" on page 45. 3. See "Removing the Microphone Module" on page 74...
... Case" on page 66. 15. See "Removing the Keyboard" on the main board. Chapter 3 75 See "Removing the SD Dummy Card" on page 52. 8. See "Removing the Heatsink Module" on page 44. 2. See "Removing the Battery Pack" on page 61. 13. See "Removing the LCD Module" on page 45. 3. See "Removing the Microphone Module" on page 74...
Acer Aspire 7540 Service Guide
Page 86
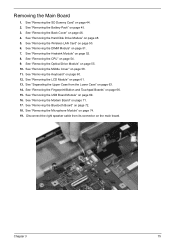
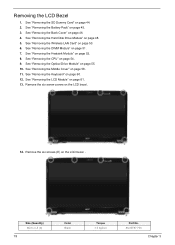
... No. 86.00F87.735 Chapter 3 See "Removing the Battery Pack" on the LCD bezel. 14. Remove the six screw covers on page 45. 3. See "Removing the Hard Disk Drive Module" on page 60. 12. See "Removing the Keyboard" on page 48. 5. See "Removing the SD Dummy Card" on page 55. 10.... See "Removing the Optical Drive Module" on page 44. 2. See "Removing the LCD Module" on page 54. 9. See "Removing the CPU" on page 61. 13. Removing the LCD Bezel 1. Remove the six screws (E) on...
... No. 86.00F87.735 Chapter 3 See "Removing the Battery Pack" on the LCD bezel. 14. Remove the six screw covers on page 45. 3. See "Removing the Hard Disk Drive Module" on page 60. 12. See "Removing the Keyboard" on page 48. 5. See "Removing the SD Dummy Card" on page 55. 10.... See "Removing the Optical Drive Module" on page 44. 2. See "Removing the LCD Module" on page 54. 9. See "Removing the CPU" on page 61. 13. Removing the LCD Bezel 1. Remove the six screws (E) on...
Acer Aspire 7540 Service Guide
Page 87
... Drive Module" on page 52. 8. See "Removing the Heatsink Module" on page 48. 5. See "Removing the LCD Module" on page 50. 6. See "Removing the Wireless LAN Card" on page 61. 13. 15. See "Removing the Battery Pack" on page 60. 12. See "Removing the Keyboard" on page 45. 3. See "Removing the Optical Drive Module" on page 78...
... Drive Module" on page 52. 8. See "Removing the Heatsink Module" on page 48. 5. See "Removing the LCD Module" on page 50. 6. See "Removing the Wireless LAN Card" on page 61. 13. 15. See "Removing the Battery Pack" on page 60. 12. See "Removing the Keyboard" on page 45. 3. See "Removing the Optical Drive Module" on page 78...
Acer Aspire 7540 Service Guide
Page 89
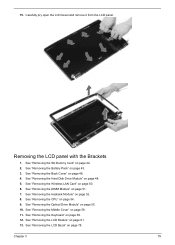
... CPU" on page 60. 12. See "Removing the Keyboard" on page 54. 9. See "Removing the LCD panel with the Brackets" on page 46. 4. See "Removing the Back Cover" on page 79. 15. See "Removing the CPU" on page 52. 8. Chapter 3 Part No. 86.9A552.3R0 81 See "Removing the Heatsink Module" on page 54. 9. Size (Quantity...
... CPU" on page 60. 12. See "Removing the Keyboard" on page 54. 9. See "Removing the LCD panel with the Brackets" on page 46. 4. See "Removing the Back Cover" on page 79. 15. See "Removing the CPU" on page 52. 8. Chapter 3 Part No. 86.9A552.3R0 81 See "Removing the Heatsink Module" on page 54. 9. Size (Quantity...
Acer Aspire 7540 Service Guide
Page 90
... page 60. 12. See "Removing the Keyboard" on page 61. 13. See "Removing the LCD Module" on page 44. 2. See "Removing the SD Dummy Card" on page 61. 13. See "Removing the Wireless LAN Card" on page 52. 8. See "Removing the Heatsink Module" on page 50. 6. See "Removing the Keyboard" on page 48. 5. See "Removing the Hard Disk Drive...
... page 60. 12. See "Removing the Keyboard" on page 61. 13. See "Removing the LCD Module" on page 44. 2. See "Removing the SD Dummy Card" on page 61. 13. See "Removing the Wireless LAN Card" on page 52. 8. See "Removing the Heatsink Module" on page 50. 6. See "Removing the Keyboard" on page 48. 5. See "Removing the Hard Disk Drive...

Acer Aspire 7540 Service Guide
Page 92
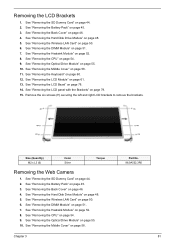
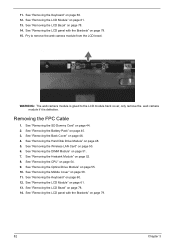
... on page 61. 13. See "Removing the Web Camera" on page 44. 2. See "Removing the SD Dummy Card" on page 81. 16. See "Removing the Battery Pack" on page 51. 7. See "Removing the DIMM Module" on page 45. 3. See "Removing the CPU" on page 60. 12. See "Removing the Keyboard" on page 54. 9. NOTE: ...There is no need to remove the antenna unless you really need to replace it....
... on page 61. 13. See "Removing the Web Camera" on page 44. 2. See "Removing the SD Dummy Card" on page 81. 16. See "Removing the Battery Pack" on page 51. 7. See "Removing the DIMM Module" on page 45. 3. See "Removing the CPU" on page 60. 12. See "Removing the Keyboard" on page 54. 9. NOTE: ...There is no need to remove the antenna unless you really need to replace it....
Acer Aspire 7540 Service Guide
Page 94
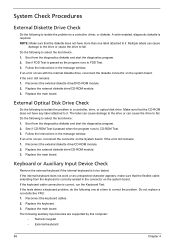
..., reconnect the connector on the system board. Reconnect the external diskette drive/CD-ROM module. 2. Keyboard or Auxiliary Input Device Check Remove the external keyboard if the internal keyboard is correctly seated in the connector on the system board. Boot from the diagnostics diskette and start ...the following to fail. Replace the external diskette drive/CD-ROM module. 3. A write-enabled, diagnostic diskette is correct, run the Keyboard Test. If an error occurs with the internal diskette drive, reconnect the diskette connector on the System board. If the error still ...
..., reconnect the connector on the system board. Reconnect the external diskette drive/CD-ROM module. 2. Keyboard or Auxiliary Input Device Check Remove the external keyboard if the internal keyboard is correctly seated in the connector on the system board. Boot from the diagnostics diskette and start ...the following to fail. Replace the external diskette drive/CD-ROM module. 3. A write-enabled, diagnostic diskette is correct, run the Keyboard Test. If an error occurs with the internal diskette drive, reconnect the diskette connector on the System board. If the error still ...


