
Acer Desktop User's Guide
Page 17
... situations that it with a system diskette and press Ctrl + Alt + Del to restart your computer. • The operating system files may have to perform the recovery process to restore your system to the situation. Insert the startup disk you may be damaged or missing. However, if the diagnostic utility still reports...
... situations that it with a system diskette and press Ctrl + Alt + Del to restart your computer. • The operating system files may have to perform the recovery process to restore your system to the situation. Insert the startup disk you may be damaged or missing. However, if the diagnostic utility still reports...
User Manual
Page 12
... on the computer, simply press and release the power button below the LCD screen beside the easy-launch buttons. It is not installed on your Acer notebook, we have designed a set of the power button. In addition it : 1 Click on Start, All Programs, AcerSystem. 2 Click on your ... Reader. See "Front view" on page 15 for the location of guides: First off To turn on such subjects as system utilities, data recovery, expansion options and troubleshooting. For more productive, please refer to the basic features and functions of your notebook. The printed User's Guide introduces ...
... on the computer, simply press and release the power button below the LCD screen beside the easy-launch buttons. It is not installed on your Acer notebook, we have designed a set of the power button. In addition it : 1 Click on Start, All Programs, AcerSystem. 2 Click on your ... Reader. See "Front view" on page 15 for the location of guides: First off To turn on such subjects as system utilities, data recovery, expansion options and troubleshooting. For more productive, please refer to the basic features and functions of your notebook. The printed User's Guide introduces ...
User Manual
Page 17
... Installing memory 76 BIOS utility 77 Boot sequence 77 Enable disk-to-disk recovery 77 Password 77 Using software 78 Playing DVD movies 78 Power management 79 Acer eRecovery Management 80 Create backup 80 Burn backup disc 81 Restore and recovery 81 Follow the instructions on screen to complete the process.81 Troubleshooting...
... Installing memory 76 BIOS utility 77 Boot sequence 77 Enable disk-to-disk recovery 77 Password 77 Using software 78 Playing DVD movies 78 Power management 79 Acer eRecovery Management 80 Create backup 80 Burn backup disc 81 Restore and recovery 81 Follow the instructions on screen to complete the process.81 Troubleshooting...

User Manual
Page 28
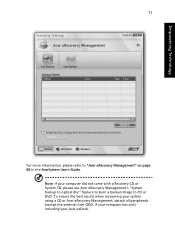
...the factory default image to optical disc, and restore from previously created backups or reinstall applications and drivers. Empowering Technology 10 Acer eRecovery Management Acer eRecovery Management is a versatile backup utility. It allows you with: • Password protection (Empowering Technology password) • ... default image • User backup image • Current system configuration • Application backup • Restore and recovery: • Factory default image • User backup image • From previously-created CD/DVD • Reinstall applications/drivers
...the factory default image to optical disc, and restore from previously created backups or reinstall applications and drivers. Empowering Technology 10 Acer eRecovery Management Acer eRecovery Management is a versatile backup utility. It allows you with: • Password protection (Empowering Technology password) • ... default image • User backup image • Current system configuration • Application backup • Restore and recovery: • Factory default image • User backup image • From previously-created CD/DVD • Reinstall applications/drivers
User Manual
Page 29
To ensure the best results when recovering your system using a CD or Acer eRecovery Management, detach all peripherals (except the external Acer ODD, if your computer has one), including your computer did not come with a Recovery CD or System CD, please use Acer eRecovery Management's "System backup to optical disc" feature to burn a backup image to "Acer eRecovery Management" on page 80 in the AcerSystem User's Guide. Note: If your Acer ezDock. Empowering Technology 11 For more information, please refer to CD or DVD.
To ensure the best results when recovering your system using a CD or Acer eRecovery Management, detach all peripherals (except the external Acer ODD, if your computer has one), including your computer did not come with a Recovery CD or System CD, please use Acer eRecovery Management's "System backup to optical disc" feature to burn a backup image to "Acer eRecovery Management" on page 80 in the AcerSystem User's Guide. Note: If your Acer ezDock. Empowering Technology 11 For more information, please refer to CD or DVD.
User Manual
Page 65
...and language you choose when you restore the C: drive with the Internet Connection setup. I want to restore my computer to its original settings without recovery CDs. Note: If your system is set up, you can proceed with the original software content that the printer cable is not necessary to ...port or a USB port and the corresponding port on the printer. Before performing a restore operation, please check the BIOS settings. 1 Check to see if Acer disk-to the Windows manual. Note: To activate the BIOS utility, press during POST. HyperTerminal), you purchase your notebook.
...and language you choose when you restore the C: drive with the Internet Connection setup. I want to restore my computer to its original settings without recovery CDs. Note: If your system is set up, you can proceed with the original software content that the printer cable is not necessary to ...port or a USB port and the corresponding port on the printer. Before performing a restore operation, please check the BIOS settings. 1 Check to see if Acer disk-to the Windows manual. Note: To activate the BIOS utility, press during POST. HyperTerminal), you purchase your notebook.
User Manual
Page 66
...: Name Address Telephone number Machine and model type Serial number Date of mind when traveling. English 48 To start the recovery process: 1 Restart the system. 2 While the Acer logo is showing, press + at your problems efficiently. Read this handy booklet. Important! Our worldwide network of time ...in contact with your ITW passport on hand, especially when you travel, to give you call Acer for online service, and please be at the same time to enter the recovery process. 3 Refer to the onscreen instructions to know about the ITW program. You are there...
...: Name Address Telephone number Machine and model type Serial number Date of mind when traveling. English 48 To start the recovery process: 1 Restart the system. 2 While the Acer logo is showing, press + at your problems efficiently. Read this handy booklet. Important! Our worldwide network of time ...in contact with your ITW passport on hand, especially when you travel, to give you call Acer for online service, and please be at the same time to enter the recovery process. 3 Refer to the onscreen instructions to know about the ITW program. You are there...
User Manual
Page 95
However, if you encounter configuration problems, you do not need to Enabled. Enable disk-to-disk recovery To enable disk-to-disk recovery (hard disk recovery), activate the BIOS utility, then select Main from the categories listed at the top of the screen. Boot sequence To set the boot sequence in ...the BIOS utility, activate the BIOS utility, then select Boot from the categories listed at the bottom of the screen. Find D2D Recovery at the top of the screen and use the and keys to set a password on boot: and use the and keys to enable this feature...
However, if you encounter configuration problems, you do not need to Enabled. Enable disk-to-disk recovery To enable disk-to-disk recovery (hard disk recovery), activate the BIOS utility, then select Main from the categories listed at the top of the screen. Boot sequence To set the boot sequence in ...the BIOS utility, activate the BIOS utility, then select Boot from the categories listed at the bottom of the screen. Find D2D Recovery at the top of the screen and use the and keys to set a password on boot: and use the and keys to enable this feature...
User Manual
Page 98
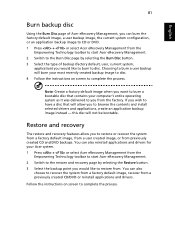
... Burn backup disc 3 Restore and recovery This chapter will guide you may be prompted to enter the Empowering Technology password to create using the Empowering Technology toolbar or when first running Acer eLock Management or Acer eRecovery Management. Acer eRecovery Management consists of your system ...process. Note: Fast (incremental) Backup is only available after a Full Backup is made. 1 Press + or select Acer eRecovery Management from the main Acer eRecovery Management screen. Note: This feature is set using Full or Fast. 3 Follow the instructions on certain models. You...
... Burn backup disc 3 Restore and recovery This chapter will guide you may be prompted to enter the Empowering Technology password to create using the Empowering Technology toolbar or when first running Acer eLock Management or Acer eRecovery Management. Acer eRecovery Management consists of your system ...process. Note: Fast (incremental) Backup is only available after a Full Backup is made. 1 Press + or select Acer eRecovery Management from the main Acer eRecovery Management screen. Note: This feature is set using Full or Fast. 3 Follow the instructions on certain models. You...
User Manual
Page 99
... restore and recovery features allow you to restore or recover the system from a factory default image, from a user created image, or from the Empowering Technology toolbar to start Acer eRecovery Management. 2 Switch to disc. this disc will burn your computer's entire operating system as it was... delivered to you would like to burn to the restore and recovery page by selecting the Burn Disc button. 3 Select ...
... restore and recovery features allow you to restore or recover the system from a factory default image, from a user created image, or from the Empowering Technology toolbar to start Acer eRecovery Management. 2 Switch to disc. this disc will burn your computer's entire operating system as it was... delivered to you would like to burn to the restore and recovery page by selecting the Burn Disc button. 3 Select ...


