Aspire 4720, 4720Z User's Guide EN
Page 12
... tips for the location of the power button. Note: Viewing the file requires Adobe Reader. Follow these steps to complete the installation. Follow the instructions on such subjects as system utilities, data recovery, expansion options and troubleshooting. The printed User's Guide introduces you get started with setting up your notebook. For more productive, please refer to use your Acer notebook, we have designed a set of your new computer. See "Front...
... tips for the location of the power button. Note: Viewing the file requires Adobe Reader. Follow these steps to complete the installation. Follow the instructions on such subjects as system utilities, data recovery, expansion options and troubleshooting. The printed User's Guide introduces you get started with setting up your notebook. For more productive, please refer to use your Acer notebook, we have designed a set of your new computer. See "Front...
Aspire 4720, 4720Z User's Guide EN
Page 19
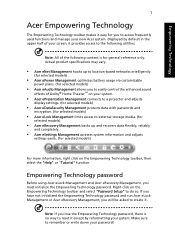
... by default in the upper half of Dolby® Home Theater™ on your system. • Acer ePresentation Management connects to a projector and adjusts display settings. (for selected models) • Acer eDataSecurity Management protects data with passwords and encryption. (for selected models) • Acer eLock Management limits access to external storage media. (for selected models) • Acer eRecovery Management backs up to location-based networks intelligently. (for selected models) • Acer ePower Management optimizes battery usage...
... by default in the upper half of Dolby® Home Theater™ on your system. • Acer ePresentation Management connects to a projector and adjusts display settings. (for selected models) • Acer eDataSecurity Management protects data with passwords and encryption. (for selected models) • Acer eLock Management limits access to external storage media. (for selected models) • Acer eRecovery Management backs up to location-based networks intelligently. (for selected models) • Acer ePower Management optimizes battery usage...
Aspire 4720, 4720Z User's Guide EN
Page 22
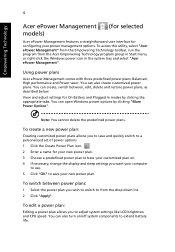
... turn on . 4 If necessary, change the display and sleep settings you to adjust system settings like LCD brightness and CPU speed. To switch between , edit, delete and restore power plans, as described below. You can open Windows power options by clicking the appropriate tabs. To edit a power plan: Editing a power plan allows you want your computer to use. 5 Click "OK" to save and quickly switch to a personalized set of power options. 1 Click the Create Power Plan icon. 2 Enter...
... turn on . 4 If necessary, change the display and sleep settings you to adjust system settings like LCD brightness and CPU speed. To switch between , edit, delete and restore power plans, as described below. You can open Windows power options by clicking the appropriate tabs. To edit a power plan: Editing a power plan allows you want your computer to use. 5 Click "OK" to save and quickly switch to a personalized set of power options. 1 Click the Create Power Plan icon. 2 Enter...
Aspire 4720, 4720Z User's Guide EN
Page 58
...; If the Sleep indicator is lit, the computer is in the external USB floppy drive? Nothing appears on the power, but the computer does not start or boot up. Press any key to turn the display back on the taskbar. No audio is being supplied to restart the system. If it with a system disk and press + + to the computer. Connect the AC adapter to recharge...
...; If the Sleep indicator is lit, the computer is in the external USB floppy drive? Nothing appears on the power, but the computer does not start or boot up. Press any key to turn the display back on the taskbar. No audio is being supplied to restart the system. If it with a system disk and press + + to the computer. Connect the AC adapter to recharge...
Aspire 4720, 4720Z User's Guide EN
Page 75
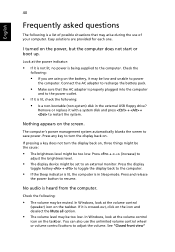
... only. Click Restore Default Settings to return your settings to select the country or region where your region. press again to bring up . Channel settings If no channel list exists, click Scan Channels. Using TeleText functions For regions with the TeleText service, TeleText can be activated by channel number or category. There are four types of TV settings: "Signal," "Channel," "Recording" and "Guide" settings. This...
... only. Click Restore Default Settings to return your settings to select the country or region where your region. press again to bring up . Channel settings If no channel list exists, click Scan Channels. Using TeleText functions For regions with the TeleText service, TeleText can be activated by channel number or category. There are four types of TV settings: "Signal," "Channel," "Recording" and "Guide" settings. This...
Aspire 4720, 4720Z User's Guide EN
Page 97
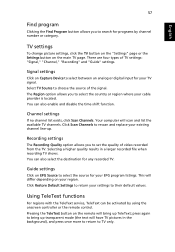
... from the factory. English 79 Burn backup disc Using the Burn Disc page of Acer eRecovery Management, you can burn the factory default image, a user backup image, the current system configuration, or an application backup image to CD or DVD. 1 Press + or select Acer eRecovery Management from the Empowering Technology toolbar to start Acer eRecovery Management. 2 Switch to the restore and recovery page by selecting the Burn Disc button. 3 Select the type of backup (factory default, user, current system...
... from the factory. English 79 Burn backup disc Using the Burn Disc page of Acer eRecovery Management, you can burn the factory default image, a user backup image, the current system configuration, or an application backup image to CD or DVD. 1 Press + or select Acer eRecovery Management from the Empowering Technology toolbar to start Acer eRecovery Management. 2 Switch to the restore and recovery page by selecting the Burn Disc button. 3 Select the type of backup (factory default, user, current system...
Aspire 4720, G, Z, 4320 Service Guide
Page 22
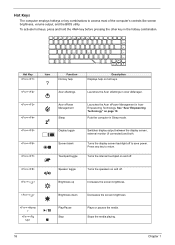
... power. Hot Keys The computer employs hotkeys or key combinations to return. To activate hot keys, press and hold the key before pressing the other key in Sleep mode. + + + Display toggle Screen blank Touchpad toggle Switches display output between the display screen, external monitor (if connected) and both. Hot Key + Icon Function Hot key help Description Displays help on page 18. Press any key to access most of the computer's controls like screen brightness, volume output, and the BIOS utility. Stops the media playing. 16 Chapter 1 Turns the display screen...
... power. Hot Keys The computer employs hotkeys or key combinations to return. To activate hot keys, press and hold the key before pressing the other key in Sleep mode. + + + Display toggle Screen blank Touchpad toggle Switches display output between the display screen, external monitor (if connected) and both. Hot Key + Icon Function Hot key help Description Displays help on page 18. Press any key to access most of the computer's controls like screen brightness, volume output, and the BIOS utility. Stops the media playing. 16 Chapter 1 Turns the display screen...

Aspire 4720, G, Z, 4320 Service Guide
Page 38
... system memory configurations. On above specifications. System Memory Item Memory controller Memory size DIMM socket number Supports memory size per socket Supports maximum memory size Supports DIMM type Supports DIMM Speed Supports DIMM voltage Supports DIMM package Memory module combinations Specification Built-in Intel® PM965 0MB (no on-board memory) 2 sockets 2GB 4GB (by two 1024MB SO-DIMM module) DDR 2 Synchronous DRAM 533/667 MHz 1.8V JEDEC 200-pin soDIMM You can install memory modules...
... system memory configurations. On above specifications. System Memory Item Memory controller Memory size DIMM socket number Supports memory size per socket Supports maximum memory size Supports DIMM type Supports DIMM Speed Supports DIMM voltage Supports DIMM package Memory module combinations Specification Built-in Intel® PM965 0MB (no on-board memory) 2 sockets 2GB 4GB (by two 1024MB SO-DIMM module) DDR 2 Synchronous DRAM 533/667 MHz 1.8V JEDEC 200-pin soDIMM You can install memory modules...
Aspire 4720, G, Z, 4320 Service Guide
Page 49
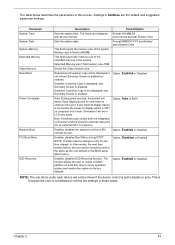
shows Summary Screen is connected on external video port. If any display device is disabled or enabled. This is because the user is set to control the settings in these cases. The table below describes the parameters in CRT (or projector) only mode. Option: Enabled or Disabled Auto: During power process, the system will detect if any external display device is connected, the power on hard disc drive to store operation system and restore the system to 640MB This...
shows Summary Screen is connected on external video port. If any display device is disabled or enabled. This is because the user is set to control the settings in these cases. The table below describes the parameters in CRT (or projector) only mode. Option: Enabled or Disabled Auto: During power process, the system will detect if any external display device is connected, the power on hard disc drive to store operation system and restore the system to 640MB This...
Aspire 4720, G, Z, 4320 Service Guide
Page 51
When set, this password protects the internal hard disk from unauthorized access. The user can not exceed 8 alphanumeric characters (A-Z, a-z, 0-9, not case sensitive). If you have to return your notebook computer to change the value of parameters. Type a password in the "Confirm New Password" field. The password length can not either enter the Setup menu nor change the value of parameters. Shows the setting of the user password. Press Enter to reset it. When user password is...
When set, this password protects the internal hard disk from unauthorized access. The user can not exceed 8 alphanumeric characters (A-Z, a-z, 0-9, not case sensitive). If you have to return your notebook computer to change the value of parameters. Type a password in the "Confirm New Password" field. The password length can not either enter the Setup menu nor change the value of parameters. Shows the setting of the user password. Press Enter to reset it. When user password is...
Aspire 4720, G, Z, 4320 Service Guide
Page 52
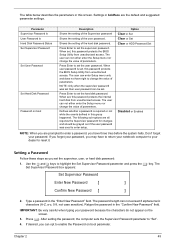
...: Set Supervisor Password Enter Current Password [ ] Enter New Password [ ] Confirm New Password [ ] 2. Setup Notice Changes have changed the settings, press u to highlight the Set Supervisor Password parameter and press the e key. When you have been saved. [Continue] The password setting is OK, the screen will display as following. Type the current password in the Confirm New Password field. 4. 5. Use the w and y keys to save the changes and exit the BIOS Setup Utility. If the verification is complete after the user presses...
...: Set Supervisor Password Enter Current Password [ ] Enter New Password [ ] Confirm New Password [ ] 2. Setup Notice Changes have changed the settings, press u to highlight the Set Supervisor Password parameter and press the e key. When you have been saved. [Continue] The password setting is OK, the screen will display as following. Type the current password in the Confirm New Password field. 4. 5. Use the w and y keys to save the changes and exit the BIOS Setup Utility. If the verification is complete after the user presses...
Aspire 4720, G, Z, 4320 Service Guide
Page 55
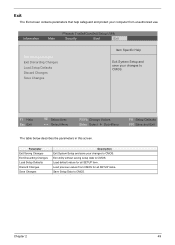
... all SETUP items. Save Setup Data to CMOS. Information Main Phoenix TrustedCore(tm) Setup Utility Security Boot Exit Exit Saving Changes Exit Discarding Changes Load Setup Defaults Discard Changes Save Changes Item Specific Help Exit System Setup and save your changes to CMOS. Load default values for all SETUP item. Load previous values from unauthorized use. F1 Help Esc Exit Select Item Select Menu F5/F6 Change Values Enter Select Sub-Menu F9 Setup Defaults...
... all SETUP items. Save Setup Data to CMOS. Information Main Phoenix TrustedCore(tm) Setup Utility Security Boot Exit Exit Saving Changes Exit Discarding Changes Load Setup Defaults Discard Changes Save Changes Item Specific Help Exit System Setup and save your changes to CMOS. Load default values for all SETUP item. Load previous values from unauthorized use. F1 Help Esc Exit Select Item Select Menu F5/F6 Change Values Enter Select Sub-Menu F9 Setup Defaults...
Aspire 4720, G, Z, 4320 Service Guide
Page 68
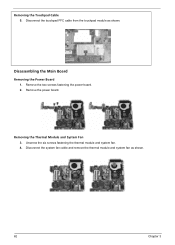
Remove the power board. Disconnect the system fan cable and remove the thermal module and system fan as shown. Removing the Touchpad Cable 5. Disassembling the Main Board Removing the Power Board 1. Unscrew the six screws fastening the thermal module and system fan. 4. Removing the Thermal Module and System Fan 3. Remove the two screws fastening the power board. 2. Disconnect the touchpad FFC cable from the touchpad module as shown. 62 Chapter 3
Remove the power board. Disconnect the system fan cable and remove the thermal module and system fan as shown. Removing the Touchpad Cable 5. Disassembling the Main Board Removing the Power Board 1. Unscrew the six screws fastening the thermal module and system fan. 4. Removing the Thermal Module and System Fan 3. Remove the two screws fastening the power board. 2. Disconnect the touchpad FFC cable from the touchpad module as shown. 62 Chapter 3
Aspire 4720, G, Z, 4320 Service Guide
Page 79
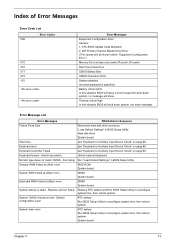
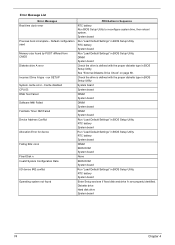
... Default Settings" in BIOS Setup Utility. Default configuration used RTC battery Run BIOS Setup Utility to reconfigure system time, then reboot system. System CMOS checksum bad - Hard disk drive System board Stuck Key see "Keyboard or Auxiliary Input Device Check" on page 68. Error Message List Error Messages FRU/Action in Sequence Failure Fixed Disk Reconnect hard disk drive connector. Keyboard Controller Failed see "Keyboard or Auxiliary Input Device Check" on page 68. Unlock key switch Unlock external keyboard Monitor type does not match CMOS - Index of Error...
... Default Settings" in BIOS Setup Utility. Default configuration used RTC battery Run BIOS Setup Utility to reconfigure system time, then reboot system. System CMOS checksum bad - Hard disk drive System board Stuck Key see "Keyboard or Auxiliary Input Device Check" on page 68. Error Message List Error Messages FRU/Action in Sequence Failure Fixed Disk Reconnect hard disk drive connector. Keyboard Controller Failed see "Keyboard or Auxiliary Input Device Check" on page 68. Unlock key switch Unlock external keyboard Monitor type does not match CMOS - Index of Error...
Aspire 4720, G, Z, 4320 Service Guide
Page 80
..." in BIOS Setup Utility. Cache disabled CPU ID: DMA Test Failed Software NMI Failed Fail-Safe Timer NMI Failed Device Address Conflict Allocation Error for device Failing Bits: nnnn Fixed Disk n Invalid System Configuration Data I/O device IRQ conflict Operating system not found by POST differed from CMOS Diskette drive A error Incorrect Drive A type - RTC battery System board DIMM BIOS ROM System board None BIOS ROM System board Run "Load Default Settings" in BIOS Setup Utility. System board Run "Load Default Settings" in BIOS Setup Utility. Default configuration used Memory size...
..." in BIOS Setup Utility. Cache disabled CPU ID: DMA Test Failed Software NMI Failed Fail-Safe Timer NMI Failed Device Address Conflict Allocation Error for device Failing Bits: nnnn Fixed Disk n Invalid System Configuration Data I/O device IRQ conflict Operating system not found by POST differed from CMOS Diskette drive A error Incorrect Drive A type - RTC battery System board DIMM BIOS ROM System board None BIOS ROM System board Run "Load Default Settings" in BIOS Setup Utility. System board Run "Load Default Settings" in BIOS Setup Utility. Default configuration used Memory size...
Aspire 4720, G, Z, 4320 Service Guide
Page 83
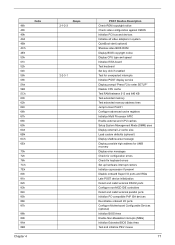
... devices Initialize all video adapters in system QuietBoot start (optional) Shadow video BIOS ROM Display BIOS copyright notice Display CPU type and speed Initialize EISA board Test keyboard Set key click if enabled Test for unexpected interrupts Initialize POST display service Display prompt "Press F2 to enter SETUP" Disable CPU cache Test RAM between 512 and 640 KB Test extended memory Test extended memory address lines Jump to User Patch1 Configure advanced cache registers Initialize Multi Processor APIC Enable external and CPU caches Setup...
... devices Initialize all video adapters in system QuietBoot start (optional) Shadow video BIOS ROM Display BIOS copyright notice Display CPU type and speed Initialize EISA board Test keyboard Set key click if enabled Test for unexpected interrupts Initialize POST display service Display prompt "Press F2 to enter SETUP" Disable CPU cache Test RAM between 512 and 640 KB Test extended memory Test extended memory address lines Jump to User Patch1 Configure advanced cache registers Initialize Multi Processor APIC Enable external and CPU caches Setup...
Aspire 4720, G, Z, 4320 Service Guide
Page 85
... the CPU Initialize the system timer Initialize system I/O Check force recovery boot Checksum BIOS ROM Go to BIOS Set Huge Segment Initialize Multi Processor Initialize OEM special code Initialize PIC and DMA Initialize Memory type Initialize Memory size Shadow Boot Block System memory test Initialize interrupt vectors Initialize Run Time Clock Initialize video Initialize System Management Mode Output one beep before boot Boot to Mini DOS Clear Huge Segment Boot...
... the CPU Initialize the system timer Initialize system I/O Check force recovery boot Checksum BIOS ROM Go to BIOS Set Huge Segment Initialize Multi Processor Initialize OEM special code Initialize PIC and DMA Initialize Memory type Initialize Memory size Shadow Boot Block System memory test Initialize interrupt vectors Initialize Run Time Clock Initialize video Initialize System Management Mode Output one beep before boot Boot to Mini DOS Clear Huge Segment Boot...

Aspire 4720, G, Z, 4320 Service Guide
Page 86
... power adapter). Hold and press the power switch for more than 4 seconds. System board 80 Chapter 4 Keyboard (if contrast and brightness function key doesn't work LCD is too dark LCD brightness cannot be adjusted LCD contrast cannot be adjusted Unreadable LCD screen Missing pels in characters Abnormal screen Wrong color displayed LCD has extra horizontal or vertical lines displayed. See "Power System Check" on page 69. See "Power System Check" on . Action in Sequence Enter BIOS Utility...
... power adapter). Hold and press the power switch for more than 4 seconds. System board 80 Chapter 4 Keyboard (if contrast and brightness function key doesn't work LCD is too dark LCD brightness cannot be adjusted LCD contrast cannot be adjusted Unreadable LCD screen Missing pels in characters Abnormal screen Wrong color displayed LCD has extra horizontal or vertical lines displayed. See "Power System Check" on page 69. See "Power System Check" on . Action in Sequence Enter BIOS Utility...
Aspire 4720, G, Z, 4320 Service Guide
Page 87
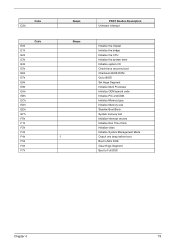
.... LCD cover switch System board Chapter 4 81 Internal speakers make noise or emit no sound comes from standby mode after closing the LCD The system doesn't resume from the keyboard) Hard disk drive System board Press Fn+oand see if the computer enters hibernation mode. Hard disk connection board Hard disk drive System board See "Save to execute "Load Default Settings, then reboot system. Battery pack System board PCMCIA-Related Symptoms Symptom / Error System cannot detect the PC Card (PCMCIA) PCMCIA slot...
.... LCD cover switch System board Chapter 4 81 Internal speakers make noise or emit no sound comes from standby mode after closing the LCD The system doesn't resume from the keyboard) Hard disk drive System board Press Fn+oand see if the computer enters hibernation mode. Hard disk connection board Hard disk drive System board See "Save to execute "Load Default Settings, then reboot system. Battery pack System board PCMCIA-Related Symptoms Symptom / Error System cannot detect the PC Card (PCMCIA) PCMCIA slot...
Aspire 4720, G, Z, 4320 Service Guide
Page 89
... the system board in loop mode at least 10 times. 2. Rerun the test to do with a hardware defect, such as: cosmic radiation, electrostatic discharge, or software errors. FRU replacement should be caused by a variety of reasons that have nothing to verify that there are no error is detected, replace the FRU. If no more errors. If any error is detected...
... the system board in loop mode at least 10 times. 2. Rerun the test to do with a hardware defect, such as: cosmic radiation, electrostatic discharge, or software errors. FRU replacement should be caused by a variety of reasons that have nothing to verify that there are no error is detected, replace the FRU. If no more errors. If any error is detected...


