
Aspire 4220 / 4520 User's Guide EN
Page 17
Scheduling recordings 56 Program guide 56 Find program 57 TV settings 57 Using TeleText functions 57 Acer Arcade Deluxe (for selected models) 59 Remote control (for selected models) 60 Remote functions 61 Starting Acer Arcade Deluxe 62 VideoMagician 62 TV Joy (selected models only) 62 SportsCap (selected models only) 62 DV Wizard 62... options 70 Fax/data modem 70 Built-in network feature 71 Universal Serial Bus (USB) 71 IEEE 1394 port 72 ExpressCard 73 Installing memory 74 BIOS utility 75
Scheduling recordings 56 Program guide 56 Find program 57 TV settings 57 Using TeleText functions 57 Acer Arcade Deluxe (for selected models) 59 Remote control (for selected models) 60 Remote functions 61 Starting Acer Arcade Deluxe 62 VideoMagician 62 TV Joy (selected models only) 62 SportsCap (selected models only) 62 DV Wizard 62... options 70 Fax/data modem 70 Built-in network feature 71 Universal Serial Bus (USB) 71 IEEE 1394 port 72 ExpressCard 73 Installing memory 74 BIOS utility 75
Aspire 4220 / 4520 User's Guide EN
Page 31
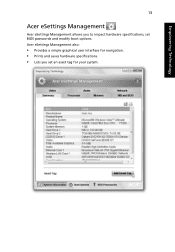
Empowering Technology 13 Acer eSettings Management Acer eSettings Management allows you set BIOS passwords and modify boot options. Acer eSettings Management also: • Provides a simple graphical user interface for navigation. • Prints and saves hardware specifications. • Lets you to inspect hardware specifications, set an asset tag for your system.
Empowering Technology 13 Acer eSettings Management Acer eSettings Management allows you set BIOS passwords and modify boot options. Acer eSettings Management also: • Provides a simple graphical user interface for navigation. • Prints and saves hardware specifications. • Lets you to inspect hardware specifications, set an asset tag for your system.

Aspire 4220 / 4520 User's Guide EN
Page 50
... Description Displays help on page 1. Acer eSettings Acer ePower Management Sleep Launches Acer eSettings in Acer Empowering Technology. See "Acer Empowering Technology" on hotkeys. Launches Acer ePower Management in Acer Empowering Technology. Press any key to access most of the computer's controls like screen brightness, volume output and the BIOS utility. See "Acer Empowering Technology" on and off. Touchpad...
... Description Displays help on page 1. Acer eSettings Acer ePower Management Sleep Launches Acer eSettings in Acer Empowering Technology. See "Acer Empowering Technology" on hotkeys. Launches Acer ePower Management in Acer Empowering Technology. Press any key to access most of the computer's controls like screen brightness, volume output and the BIOS utility. See "Acer Empowering Technology" on and off. Touchpad...
Aspire 4220 / 4520 User's Guide EN
Page 61
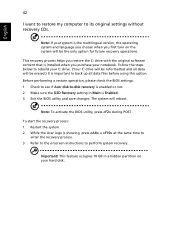
...operating system and language you choose when you purchase your hard disk. Important! Before performing a restore operation, please check the BIOS settings. 1 Check to see if Acer disk-to rebuild your system is important to its original settings without recovery CDs. To start the recovery process: 1 Restart... the system. 2 While the Acer logo is Enabled. 3 Exit the BIOS utility and save changes. Follow the steps below to -disk recovery is enabled or not. 2 Make sure the D2D Recovery...
...operating system and language you choose when you purchase your hard disk. Important! Before performing a restore operation, please check the BIOS settings. 1 Check to see if Acer disk-to rebuild your system is important to its original settings without recovery CDs. To start the recovery process: 1 Restart... the system. 2 While the Acer logo is Enabled. 3 Exit the BIOS utility and save changes. Follow the steps below to -disk recovery is enabled or not. 2 Make sure the D2D Recovery...

Aspire 4220 / 4520 User's Guide EN
Page 87
...the notch and turn the key to take care of a locked drawer. Combine the use . Important! Some keyless models are also available. See "BIOS utility" on Boot secures your computer against unauthorized use of . If you forget your password, please get in touch with password checkpoints on boot-up...your computer. Combine the use . Do not forget your Supervisor Password! Security features include hardware and software locks - Insert the lock into the BIOS utility. English 68 Securing your computer Your computer is a valuable investment that you need to secure the lock.
...the notch and turn the key to take care of a locked drawer. Combine the use . Important! Some keyless models are also available. See "BIOS utility" on Boot secures your computer against unauthorized use of . If you forget your password, please get in touch with password checkpoints on boot-up...your computer. Combine the use . Do not forget your Supervisor Password! Security features include hardware and software locks - Insert the lock into the BIOS utility. English 68 Securing your computer Your computer is a valuable investment that you need to secure the lock.

Aspire 4220 / 4520 User's Guide EN
Page 88
If you enter the password incorrectly, a warning message appears. Setting passwords You can set passwords using the BIOS utility. Try again and press . If you fail to enter the password correctly after three tries, the system halts. Try again and press . • When ... Password is enabled, a prompt appears at boot-up . • Type the User Password and press to use the computer. If you press to enter the BIOS utility at boot-up . • Type the Supervisor Password and press to access the...
If you enter the password incorrectly, a warning message appears. Setting passwords You can set passwords using the BIOS utility. Try again and press . If you fail to enter the password correctly after three tries, the system halts. Try again and press . • When ... Password is enabled, a prompt appears at boot-up . • Type the User Password and press to use the computer. If you press to enter the BIOS utility at boot-up . • Type the Supervisor Password and press to access the...

Aspire 4220 / 4520 User's Guide EN
Page 94
..., if you encounter configuration problems, you do not need to set the boot sequence in the BIOS utility, activate the BIOS utility, then select Boot from the categories listed at the top of the screen. Enable disk-...sequence To set this value to -disk recovery (hard disk recovery), activate the BIOS utility, then select Main from the categories listed at the top of the screen. Find Password on boot,... activate the BIOS utility, then select Security from the categories listed at the bottom of the screen and ...
..., if you encounter configuration problems, you do not need to set the boot sequence in the BIOS utility, activate the BIOS utility, then select Boot from the categories listed at the top of the screen. Enable disk-...sequence To set this value to -disk recovery (hard disk recovery), activate the BIOS utility, then select Main from the categories listed at the top of the screen. Find Password on boot,... activate the BIOS utility, then select Security from the categories listed at the bottom of the screen and ...

Aspire 4220 / 4520 User's Guide EN
Page 99
... to more serious problems require opening up the computer. Equipment configuration error Press (during POST) to enter the BIOS utility, then press Exit in the BIOS utility to reboot. type error I/O parity error Contact your dealer or authorized service center for assistance. Memory size... mismatch Press (during POST) to enter the BIOS utility, then press Exit in alphabetical order together with common system problems. Read it before calling a technician if a problem occurs....
... to more serious problems require opening up the computer. Equipment configuration error Press (during POST) to enter the BIOS utility, then press Exit in the BIOS utility to reboot. type error I/O parity error Contact your dealer or authorized service center for assistance. Memory size... mismatch Press (during POST) to enter the BIOS utility, then press Exit in alphabetical order together with common system problems. Read it before calling a technician if a problem occurs....

Aspire 4220 / 4520 User's Guide EN
Page 100
81 If you still encounter problems after going through the corrective measures, please contact your dealer or an authorized service center for assistance. English English Some problems may be solved using the BIOS utility.
81 If you still encounter problems after going through the corrective measures, please contact your dealer or an authorized service center for assistance. English English Some problems may be solved using the BIOS utility.
Aspire 4220 / 4520 User's Guide EN
Page 113
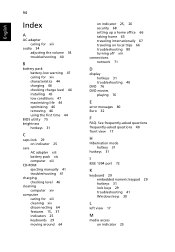
... characteristics 44 charging 46 checking charge level 46 installing 45 low conditions 47 maximizing life 44 optimizing 46 removing 46 using the first time 44 BIOS utility 75 brightness hotkeys 31 C caps lock 29 on indicator 25 care AC adapter xiii battery pack xiv computer xiii CD-ROM ejecting manually 41...
... characteristics 44 charging 46 checking charge level 46 installing 45 low conditions 47 maximizing life 44 optimizing 46 removing 46 using the first time 44 BIOS utility 75 brightness hotkeys 31 C caps lock 29 on indicator 25 care AC adapter xiii battery pack xiv computer xiii CD-ROM ejecting manually 41...

Service Guide
Page 23
Puts the computer in Acer Empowering Technology. It can also be used with other key in the hotkey combination. To activate hot keys, press and hold the key before pressing ... provide a variety of the computer's controls like screen brightness, volume output, and the BIOS utility. it opens the application's context menu. See "Acer Empowering Technology" on hot keys. + Acer eSettings Launches the Acer eSettings in Acer eManager. + + Acer ePower Management Sleep Launches the Acer ePower Management in Sleep mode. Key Windows key Application key Icon Description Pressed...
Puts the computer in Acer Empowering Technology. It can also be used with other key in the hotkey combination. To activate hot keys, press and hold the key before pressing ... provide a variety of the computer's controls like screen brightness, volume output, and the BIOS utility. it opens the application's context menu. See "Acer Empowering Technology" on hot keys. + Acer eSettings Launches the Acer eSettings in Acer eManager. + + Acer ePower Management Sleep Launches the Acer ePower Management in Sleep mode. Key Windows key Application key Icon Description Pressed...
Service Guide
Page 37
... 2.2, System/HDD Password Security Control, INT 15 Extensions, PnP BIOS 1.0a, SMBIOS 2.3, Simple Boot Flag 1.0, Boot Block, PCI Bus Power Management Interface Specification, USB1.1/2.0, IEEE 1394 1.0, USB/1394 CD-ROM Boot Up support, PC Card 95 (PCMCIA 3.0 Compliant Device), Acer WMI, Acer LED, Acer VRAM, Acer MDA 2007 requirements, WfM 2.0, PXE (Preboot Execution Environment), BIS...
... 2.2, System/HDD Password Security Control, INT 15 Extensions, PnP BIOS 1.0a, SMBIOS 2.3, Simple Boot Flag 1.0, Boot Block, PCI Bus Power Management Interface Specification, USB1.1/2.0, IEEE 1394 1.0, USB/1394 CD-ROM Boot Up support, PC Card 95 (PCMCIA 3.0 Compliant Device), Acer WMI, Acer LED, Acer VRAM, Acer MDA 2007 requirements, WfM 2.0, PXE (Preboot Execution Environment), BIS...

Service Guide
Page 41
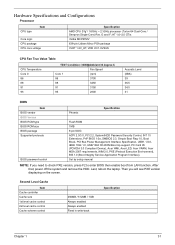
... 87383 Built-in ICH7-M Built-in ICH7-M Foxconn TI PCI 7412 Realtek ALC268S Winbond WPC8769 Specification 35 two on the right side Enable/Disable by BIOS Setup TI PCI 7412 Type-II One type-II Left side No ZV support Yes Specification Controller nVidia MCP67MV Realtek RTL8211B PHY Integrated with MCP67M...
... 87383 Built-in ICH7-M Built-in ICH7-M Foxconn TI PCI 7412 Realtek ALC268S Winbond WPC8769 Specification 35 two on the right side Enable/Disable by BIOS Setup TI PCI 7412 Type-II One type-II Left side No ZV support Yes Specification Controller nVidia MCP67MV Realtek RTL8211B PHY Integrated with MCP67M...

Service Guide
Page 45
... : v0.3204 VGA BIOS Version : nVidia 5.67.32.02.06 KBC Version : V0.013 Serial Number : xxxxxxxxxxxxxxxxxxxxxx Asset Tag Number : Product Name : Manufacturer Name : Acer UUID: xxxxxxxxxxxxxxxxxxxxxxxxxxxxxxxx F1 Help Esc Exit Chapter 2 Select Item Select Menu F5/F6 Change Values ...Enter Select Sub-Menu F9 Setup Defaults F10 Save and Exit 39 To activate the BIOS Utility, press m during POST to run Setup....
... : v0.3204 VGA BIOS Version : nVidia 5.67.32.02.06 KBC Version : V0.013 Serial Number : xxxxxxxxxxxxxxxxxxxxxx Asset Tag Number : Product Name : Manufacturer Name : Acer UUID: xxxxxxxxxxxxxxxxxxxxxxxxxxxxxxxx F1 Help Esc Exit Chapter 2 Select Item Select Menu F5/F6 Change Values ...Enter Select Sub-Menu F9 Setup Defaults F10 Save and Exit 39 To activate the BIOS Utility, press m during POST to run Setup....

Service Guide
Page 46
... Item Specific Help part of a parameter if it is subject to expand this carefully when making changes to save any changes made and exit the BIOS Setup Utility. T A plus sign (+) indicates the item has sub-items. Press e to different models. 40 Chapter 2 Please note that system ...information is enclosed in any menu, you are seven menu options: Info., Main, System Devices, Security, Power, Boot, and Exit. Navigating the BIOS Utility There are in square brackets. Follow these instructions: T To choose a menu, use the cursor up/down keys (wy). You can also press ...
... Item Specific Help part of a parameter if it is subject to expand this carefully when making changes to save any changes made and exit the BIOS Setup Utility. T A plus sign (+) indicates the item has sub-items. Press e to different models. 40 Chapter 2 Please note that system ...information is enclosed in any menu, you are seven menu options: Info., Main, System Devices, Security, Power, Boot, and Exit. Navigating the BIOS Utility There are in square brackets. Follow these instructions: T To choose a menu, use the cursor up/down keys (wy). You can also press ...

Service Guide
Page 47
... : v0.3204 VGA BIOS Version : nVidia 5.67.32.02.06 KBC Version : V0.013 Serial Number : xxxxxxxxxxxxxxxxxxxxxx Asset Tag Number : Product Name : Manufacturer Name : Acer UUID: xxxxxxxxxxxxxxxxxxxxxxxxxxxxxxxx F1 Help Esc Exit Select Item Select Menu F5/F6 Change Values Enter Select Sub-Menu NOTE: The system information is presenting. F9 ...
... : v0.3204 VGA BIOS Version : nVidia 5.67.32.02.06 KBC Version : V0.013 Serial Number : xxxxxxxxxxxxxxxxxxxxxx Asset Tag Number : Product Name : Manufacturer Name : Acer UUID: xxxxxxxxxxxxxxxxxxxxxxxxxxxxxxxx F1 Help Esc Exit Select Item Select Menu F5/F6 Change Values Enter Select Sub-Menu NOTE: The system information is presenting. F9 ...
Service Guide
Page 51
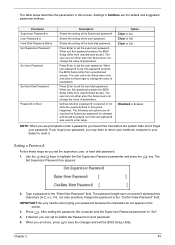
... forget your password because the characters do not appear on boot parameter. 5. If you set , this password protects the BIOS Setup Utility from unauthorized access. IMPORTANT: Be very careful when typing your password. Parameter Supervisor Password is User Password is ...user can not exceed 8 alphanumeric characters (A-Z, a-z, 0-9, not case sensitive). Defines whether a password is set, this password protects the BIOS Setup Utility from unauthorized access. The Set Supervisor Password box appears: 2. After setting the password, the computer sets the Supervisor Password parameter...
... forget your password because the characters do not appear on boot parameter. 5. If you set , this password protects the BIOS Setup Utility from unauthorized access. IMPORTANT: Be very careful when typing your password. Parameter Supervisor Password is User Password is ...user can not exceed 8 alphanumeric characters (A-Z, a-z, 0-9, not case sensitive). Defines whether a password is set, this password protects the BIOS Setup Utility from unauthorized access. The Set Supervisor Password box appears: 2. After setting the password, the computer sets the Supervisor Password parameter...

Service Guide
Page 52
...current password in the Enter New Password field. Changing a Password 1. If desired, you are done, press u to save the changes and exit the BIOS Setup Utility. If the verification is complete after the user presses u. Type a password in the Enter Current Password field and press e. 3. The ...Press e. The password setting is OK, the screen will show you have changed the settings, press u to save the changes and exit the BIOS Setup Utility. When you can enable the Password on boot parameter. 6. Type the current password in the Enter New Password and Confirm New Password...
...current password in the Enter New Password field. Changing a Password 1. If desired, you are done, press u to save the changes and exit the BIOS Setup Utility. If the verification is complete after the user presses u. Type a password in the Enter Current Password field and press e. 3. The ...Press e. The password setting is OK, the screen will show you have changed the settings, press u to save the changes and exit the BIOS Setup Utility. When you can enable the Password on boot parameter. 6. Type the current password in the Enter New Password and Confirm New Password...

Service Guide
Page 58
... DPMI) when you use the Phlash. The flash utility has auto-execution function. 52 Chapter 2 Copy the flash utilities to update the system BIOS flash ROM. NOTE: If you do not have a crisis recovery diskette at hand, then you should create a Crisis Recovery Diskette before you use... to run the Phlash utility. Then boot the system from the bootable diskette. BIOS Flash Utility The BIOS flash memory update is not completely loaded. Prepare a bootable diskette. 2. Follow the steps below to finish BIOS flash, you run the Phlash. 1. NOTE: Please use the AC adaptor power...
... DPMI) when you use the Phlash. The flash utility has auto-execution function. 52 Chapter 2 Copy the flash utilities to update the system BIOS flash ROM. NOTE: If you do not have a crisis recovery diskette at hand, then you should create a Crisis Recovery Diskette before you use... to run the Phlash utility. Then boot the system from the bootable diskette. BIOS Flash Utility The BIOS flash memory update is not completely loaded. Prepare a bootable diskette. 2. Follow the steps below to finish BIOS flash, you run the Phlash. 1. NOTE: Please use the AC adaptor power...

Service Guide
Page 80
... actions in the sequence shown in FRU/Action column, if the FRU replacement does not solve the problem, put the original part back in the BIOS Setup Utility menus, reset the computer, enter Setup and install Setup defaults or correct the error. 74 Chapter 4 Some of them display information about a hardware... cause is not listed, see "Undetermined Problems" on the screen and the error symptoms classified by function. The following lists the error messages that the BIOS displays on page 86. Do not replace a non-defective FRU.
... actions in the sequence shown in FRU/Action column, if the FRU replacement does not solve the problem, put the original part back in the BIOS Setup Utility menus, reset the computer, enter Setup and install Setup defaults or correct the error. 74 Chapter 4 Some of them display information about a hardware... cause is not listed, see "Undetermined Problems" on the screen and the error symptoms classified by function. The following lists the error messages that the BIOS displays on page 86. Do not replace a non-defective FRU.


