Aspire 4220 / 4520 User's Guide EN
Page 12
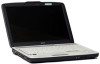
...Turning your notebook. Basic care and tips for the location of guides: First off To turn on such subjects as system utilities, data recovery, expansion options and troubleshooting. poster helps you use Adobe Reader, access the Help and Support menu. This guide contains detailed information on ...1 Click on Start, All Programs, AcerSystem. 2 Click on the screen to complete the installation. Your guides To help you for making an Acer notebook your choice for Starters... The printed User's Guide introduces you to thank you to be more on AcerSystem User's Guide will run the ...
...Turning your notebook. Basic care and tips for the location of guides: First off To turn on such subjects as system utilities, data recovery, expansion options and troubleshooting. poster helps you use Adobe Reader, access the Help and Support menu. This guide contains detailed information on ...1 Click on Start, All Programs, AcerSystem. 2 Click on the screen to complete the installation. Your guides To help you for making an Acer notebook your choice for Starters... The printed User's Guide introduces you to thank you to be more on AcerSystem User's Guide will run the ...
Aspire 4220 / 4520 User's Guide EN
Page 18
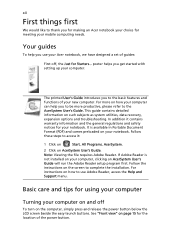
... panel ergonomic specifications 93 Index 94 Boot sequence 75 Enable disk-to-disk recovery 75 Password 75 Using software 76 Playing DVD movies 76 Power management 77 Acer eRecovery Management 78 Create backup 78 Burn backup disc 79 Restore and recovery 79 Troubleshooting 80 Troubleshooting tips 80 Error messages 80 Regulations and safety...
... panel ergonomic specifications 93 Index 94 Boot sequence 75 Enable disk-to-disk recovery 75 Password 75 Using software 76 Playing DVD movies 76 Power management 77 Acer eRecovery Management 78 Create backup 78 Burn backup disc 79 Restore and recovery 79 Troubleshooting 80 Troubleshooting tips 80 Error messages 80 Regulations and safety...
Aspire 4220 / 4520 User's Guide EN
Page 29
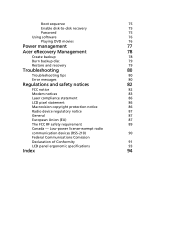
... default image • User backup image • Current system configuration • Application backup • Restore and recovery: • Factory default image • User backup image • From previously-created CD/DVD • Reinstall applications/drivers Acer eRecovery Management provides you to create full or incremental backups, burn the factory default image to...
... default image • User backup image • Current system configuration • Application backup • Restore and recovery: • Factory default image • User backup image • From previously-created CD/DVD • Reinstall applications/drivers Acer eRecovery Management provides you to create full or incremental backups, burn the factory default image to...
Aspire 4220 / 4520 User's Guide EN
Page 30
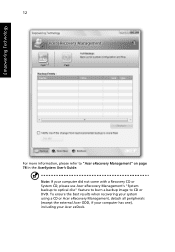
Note: If your Acer ezDock. To ensure the best results when recovering your system using a CD or Acer eRecovery Management, detach all peripherals (except the external Acer ODD, if your computer has one), including your computer did not come with a Recovery CD or System CD, please use Acer eRecovery Management's "System backup to optical disc" feature to burn a backup image to "Acer eRecovery Management" on page 78 in the AcerSystem User's Guide. Empowering Technology 12 For more information, please refer to CD or DVD.
Note: If your Acer ezDock. To ensure the best results when recovering your system using a CD or Acer eRecovery Management, detach all peripherals (except the external Acer ODD, if your computer has one), including your computer did not come with a Recovery CD or System CD, please use Acer eRecovery Management's "System backup to optical disc" feature to burn a backup image to "Acer eRecovery Management" on page 78 in the AcerSystem User's Guide. Empowering Technology 12 For more information, please refer to CD or DVD.
Aspire 4220 / 4520 User's Guide EN
Page 61
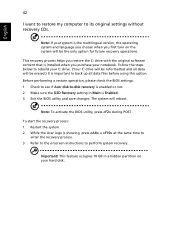
.... English 42 I want to restore my computer to perform system recovery. The system will be the only option for future recovery operations. Important! To start the recovery process: 1 Restart the system. 2 While the Acer logo is enabled or not. 2 Make sure the D2D Recovery setting in a hidden partition on the system will be erased.) It...
.... English 42 I want to restore my computer to perform system recovery. The system will be the only option for future recovery operations. Important! To start the recovery process: 1 Restart the system. 2 While the Acer logo is enabled or not. 2 Make sure the D2D Recovery setting in a hidden partition on the system will be erased.) It...

Aspire 4220 / 4520 User's Guide EN
Page 94
... enable disk-to Enabled. Find D2D Recovery at the top of the screen. Find Password on boot, activate the BIOS utility, then select Security from the categories listed at the bottom of ... BIOS utility, press during the POST; Boot sequence To set a password on boot: and use the and keys to set this value to -disk recovery (hard disk recovery), activate the BIOS utility, then select Main from the categories listed at the top of the screen. However, if you encounter configuration problems, you...
... enable disk-to Enabled. Find D2D Recovery at the top of the screen. Find Password on boot, activate the BIOS utility, then select Security from the categories listed at the bottom of ... BIOS utility, press during the POST; Boot sequence To set a password on boot: and use the and keys to set this value to -disk recovery (hard disk recovery), activate the BIOS utility, then select Main from the categories listed at the top of the screen. However, if you encounter configuration problems, you...

Aspire 4220 / 4520 User's Guide EN
Page 97
...after a Full Backup is set using the Empowering Technology toolbar or when first running Acer eLock Management or Acer eRecovery Management. Acer eRecovery Management consists of backup you want to create using Acer eRecovery Management, you through each process. The Empowering Technology password is made. 1...hard disk from the Empowering Technology toolbar to start Acer eRecovery Management. 2 In the Acer eRecovery Management window, select the type of the following functions: 1 Create backup 2 Burn backup disc 3 Restore and recovery This chapter will guide you may be prompted ...
...after a Full Backup is set using the Empowering Technology toolbar or when first running Acer eLock Management or Acer eRecovery Management. Acer eRecovery Management consists of backup you want to create using Acer eRecovery Management, you through each process. The Empowering Technology password is made. 1...hard disk from the Empowering Technology toolbar to start Acer eRecovery Management. 2 In the Acer eRecovery Management window, select the type of the following functions: 1 Create backup 2 Burn backup disc 3 Restore and recovery This chapter will guide you may be prompted ...

Aspire 4220 / 4520 User's Guide EN
Page 98
... to you from the factory. this disc will burn your Acer system. 1 Press + or select Acer eRecovery Management from the Empowering Technology toolbar to start Acer eRecovery Management. 2 Switch to the restore and recovery page by selecting the Burn Disc button. 3 Select the type of Acer eRecovery Management, you can also choose to recover the...
... to you from the factory. this disc will burn your Acer system. 1 Press + or select Acer eRecovery Management from the Empowering Technology toolbar to start Acer eRecovery Management. 2 Switch to the restore and recovery page by selecting the Burn Disc button. 3 Select the type of Acer eRecovery Management, you can also choose to recover the...

Service Guide
Page 32
... system's HDD. For more information, please refer to "Acer eRecovery Management" NOTE: If your Acer ezDock. 26 Chapter 1 T Recovery of applications and drivers. T Image/data recovery tools: T Recover from a hidden partition (factory defaults). The Acer eRecovery Management utility occupies space in a hidden partition on D:\ drive. Acer eRecovery Management Acer eRecovery Management is a powerful utility that does away...
... system's HDD. For more information, please refer to "Acer eRecovery Management" NOTE: If your Acer ezDock. 26 Chapter 1 T Recovery of applications and drivers. T Image/data recovery tools: T Recover from a hidden partition (factory defaults). The Acer eRecovery Management utility occupies space in a hidden partition on D:\ drive. Acer eRecovery Management Acer eRecovery Management is a powerful utility that does away...

Service Guide
Page 48
... Security Boot Power Exit System Time: System Date : System Memory : Extended Memory : Video Memory : Quiet Boot : Power On Display : Network Boot : F12 Boot Menu : D2D Recovery : [19:03:49] Item Specific Help [04/25/2007] , , or selects field. 634 KB Shows system base memory size 767 MB Shows extended memory size...
... Security Boot Power Exit System Time: System Date : System Memory : Extended Memory : Video Memory : Quiet Boot : Power On Display : Network Boot : F12 Boot Menu : D2D Recovery : [19:03:49] Item Specific Help [04/25/2007] , , or selects field. 634 KB Shows system base memory size 767 MB Shows extended memory size...
Service Guide
Page 49
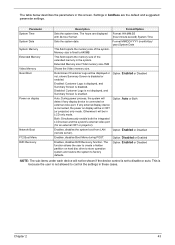
...640MB This field reports the memory size of the system. Otherwise it will be in these cases. Option: Disabled or Enabled Enables, disables D2D Recovery function. Format: HH:MM:SS (hour:minute:second) System Time Sets the system date. Memory size is fixed to control the settings in ... process, the system will detect if any external display device is set to create a hidden partition on display Network Boot F12 Boot Menu D2D Recovery Description Format/Option Sets the system time. Option: Auto or Both Enables, disables the system boot from LAN (remote server). This is because...
...640MB This field reports the memory size of the system. Otherwise it will be in these cases. Option: Disabled or Enabled Enables, disables D2D Recovery function. Format: HH:MM:SS (hour:minute:second) System Time Sets the system date. Memory size is fixed to control the settings in ... process, the system will detect if any external display device is set to create a hidden partition on display Network Boot F12 Boot Menu D2D Recovery Description Format/Option Sets the system time. Option: Auto or Both Enables, disables the system boot from LAN (remote server). This is because...

Service Guide
Page 58
..., DPMI) when you use the AC adaptor power supply when you run the Phlash. 1. NOTE: If you do not have a crisis recovery diskette at hand, then you should create a Crisis Recovery Diskette before you may not boot the system because the BIOS is required for the following conditions: T New versions of system...
..., DPMI) when you use the AC adaptor power supply when you run the Phlash. 1. NOTE: If you do not have a crisis recovery diskette at hand, then you should create a Crisis Recovery Diskette before you may not boot the system because the BIOS is required for the following conditions: T New versions of system...

Service Guide
Page 85
... Setup System Management Mode (SMM) area Display external L2 cache size Load custom defaults (optional) Display shadow-area message Display possible high address for UMB recovery Display error messages Check for configuration errors Check for keyboard errors Set up hardware interrupt vectors Initialize coprocessor if present Disable onboard Super I/O ports and...
... Setup System Management Mode (SMM) area Display external L2 cache size Load custom defaults (optional) Display shadow-area message Display possible high address for UMB recovery Display error messages Check for configuration errors Check for keyboard errors Set up hardware interrupt vectors Initialize coprocessor if present Disable onboard Super I/O ports and...
Service Guide
Page 87
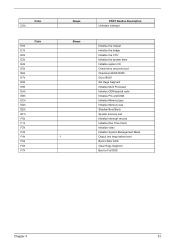
... F7h Beeps Beeps 1 POST Routine Description Unknown interrupt Initialize the chipset Initialize the bridge Initialize the CPU Initialize the system timer Initialize system I/O Check force recovery boot Checksum BIOS ROM Go to BIOS Set Huge Segment Initialize Multi Processor Initialize OEM special code Initialize PIC and DMA Initialize Memory type Initialize...
... F7h Beeps Beeps 1 POST Routine Description Unknown interrupt Initialize the chipset Initialize the bridge Initialize the CPU Initialize the system timer Initialize system I/O Check force recovery boot Checksum BIOS ROM Go to BIOS Set Huge Segment Initialize Multi Processor Initialize OEM special code Initialize PIC and DMA Initialize Memory type Initialize...


