
Aspire 4220 / 4520 User's Guide EN
Page 6
... (refer to the ear with hearing aids should position the device the above separation distance instructions are positioned at least 1.5 centimeters (5/8 inches) away from your laptop under the following conditions. Ensure that could be attracted to the device, and persons with the hearing aid. Use the device only in its antenna...
... (refer to the ear with hearing aids should position the device the above separation distance instructions are positioned at least 1.5 centimeters (5/8 inches) away from your laptop under the following conditions. Ensure that could be attracted to the device, and persons with the hearing aid. Use the device only in its antenna...
Service Guide
Page 37
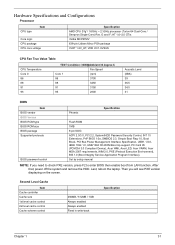
Last, reboot the laptop. HT 1.6~2.0 GT/s nVidia MCP67MV 638-pin Lidless Mirco PGA package VLDT 1.2V_HT, VDD I/O 1.8VSUS CPU Fan True Value Table CPU Temperature Core 0 86 88 91 ... Block, PCI Bus Power Management Interface Specification, USB1.1/2.0, IEEE 1394 1.0, USB/1394 CD-ROM Boot Up support, PC Card 95 (PCMCIA 3.0 Compliant Device), Acer WMI, Acer LED, Acer VRAM, Acer MDA 2007 requirements, WfM 2.0, PXE (Preboot Execution Environment), BIS 1.0 (Boot Integrity Service Application Program Interface), Set by setup manual NOTE: If you will see...
Last, reboot the laptop. HT 1.6~2.0 GT/s nVidia MCP67MV 638-pin Lidless Mirco PGA package VLDT 1.2V_HT, VDD I/O 1.8VSUS CPU Fan True Value Table CPU Temperature Core 0 86 88 91 ... Block, PCI Bus Power Management Interface Specification, USB1.1/2.0, IEEE 1394 1.0, USB/1394 CD-ROM Boot Up support, PC Card 95 (PCMCIA 3.0 Compliant Device), Acer WMI, Acer LED, Acer VRAM, Acer MDA 2007 requirements, WfM 2.0, PXE (Preboot Execution Environment), BIS 1.0 (Boot Integrity Service Application Program Interface), Set by setup manual NOTE: If you will see...

Service Guide
Page 64
...shown. Removing the ODD Module 6. Removing the HDD Module/ODD Module/Memory/Wireless LAN Card/ Keyboard and the LCD Module 1. Turn over the laptop and remove the nine screws fastening the back panel. 3. Remove the two screws fastening the HDD module bracket. 5. Remove the screw fastening the... ODD module. 7. To access the internal laptop components, you have to gently push out the ODD module as shown. 2. Pull out the HDD module by the two bracket as shown. ...
...shown. Removing the ODD Module 6. Removing the HDD Module/ODD Module/Memory/Wireless LAN Card/ Keyboard and the LCD Module 1. Turn over the laptop and remove the nine screws fastening the back panel. 3. Remove the two screws fastening the HDD module bracket. 5. Remove the screw fastening the... ODD module. 7. To access the internal laptop components, you have to gently push out the ODD module as shown. 2. Pull out the HDD module by the two bracket as shown. ...


