Aspire 4315 / 4715Z User's Guide EN
Page 30
It allows you with: • Password protection (Empowering Technology password) • Full and incremental backups to hard disk or optical disc • Creation of backups: • Factory default image • User backup image • Current system...CD/DVD • Reinstall applications/drivers Empowering Technology 10 Acer eRecovery Management Acer eRecovery Management is a versatile backup utility. Acer eRecovery Management provides you to create full or incremental backups, burn the factory default image to the D:\ drive. By default, user-created backups are stored to optical...
It allows you with: • Password protection (Empowering Technology password) • Full and incremental backups to hard disk or optical disc • Creation of backups: • Factory default image • User backup image • Current system...CD/DVD • Reinstall applications/drivers Empowering Technology 10 Acer eRecovery Management Acer eRecovery Management is a versatile backup utility. Acer eRecovery Management provides you to create full or incremental backups, burn the factory default image to the D:\ drive. By default, user-created backups are stored to optical...

Aspire 4315 / 4715Z User's Guide EN
Page 39
...® 64 architecture (for selected models) • Mobile Intel® GL960 Express Chipset • Acer InviLink™ 802.11b/g Wi-Fi CERTIFIED® solution, supporting Acer SignalUp™ wireless technology Support Dual Channel DDR2 SDRAM Up to 1 GB of DDR2 533 MHz memory...) support • Acer Arcade™ featuring Acer CinemaVision™ and Acer ClearVision™ technologies • 80/120/160 GB or larger hard disk drive • Optical drive options: • DVD-Super Multi double-layer drive • DVD/CD-RW combo drive • Two built-in Acer 3DSonic stereo speakers &#...
...® 64 architecture (for selected models) • Mobile Intel® GL960 Express Chipset • Acer InviLink™ 802.11b/g Wi-Fi CERTIFIED® solution, supporting Acer SignalUp™ wireless technology Support Dual Channel DDR2 SDRAM Up to 1 GB of DDR2 533 MHz memory...) support • Acer Arcade™ featuring Acer CinemaVision™ and Acer ClearVision™ technologies • 80/120/160 GB or larger hard disk drive • Optical drive options: • DVD-Super Multi double-layer drive • DVD/CD-RW combo drive • Two built-in Acer 3DSonic stereo speakers &#...

Aspire 4315 / 4715Z User's Guide EN
Page 42
Num Lock Lights up . Fully charged: The light shows green when in AC mode. English The front panel indicators are visible even when the computer cover is closed up when Num Lock is active. 22 Indicators The computer has serveral easy-to-read status indicators. Indicates the computer's power status. Caps Lock Power Lights up when Caps Lock is charging. 2. Battery Indicates the computer's batttery status. 1. Charging: The light shows amber when the battery is activated. Icon Function HDD Description Indicates when the hard disk drive is activated.
Num Lock Lights up . Fully charged: The light shows green when in AC mode. English The front panel indicators are visible even when the computer cover is closed up when Num Lock is active. 22 Indicators The computer has serveral easy-to-read status indicators. Indicates the computer's power status. Caps Lock Power Lights up when Caps Lock is charging. 2. Battery Indicates the computer's batttery status. 1. Charging: The light shows amber when the battery is activated. Icon Function HDD Description Indicates when the hard disk drive is activated.

Aspire 4315 / 4715Z User's Guide EN
Page 57
... helps you restore the C: drive with the original software content that is installed when you first turn on your hard disk. Note: If your system is important to back up all data will reboot. Before performing a restore operation, please check the BIOS settings. 1 Check to see if Acer disk-to rebuild your notebook...
... helps you restore the C: drive with the original software content that is installed when you first turn on your hard disk. Note: If your system is important to back up all data will reboot. Before performing a restore operation, please check the BIOS settings. 1 Check to see if Acer disk-to rebuild your notebook...

Aspire 4315 / 4715Z User's Guide EN
Page 75
... Center. You can design, organize, then burn your computer's hard drive or directly burned to DVD. When you want to edit video files (in the DVD format. VideoMagician VideoMagician allows you can select Videos, Pictures or Music. Note: For detailed information about specific Acer Arcade Deluxe utiltiies, use the built-in just a few...
... Center. You can design, organize, then burn your computer's hard drive or directly burned to DVD. When you want to edit video files (in the DVD format. VideoMagician VideoMagician allows you can select Videos, Pictures or Music. Note: For detailed information about specific Acer Arcade Deluxe utiltiies, use the built-in just a few...

Aspire 4315 / 4715Z User's Guide EN
Page 87
... launch the DVD player for DVD movie region code information. 2 The DVD movie will automatically play after which the last region code set . Once your hard disk does not reset the number of a different region into 6 regions. Refer to a region code, it will remain permanent. Region code 1 2 3 4 5 6 Country or region USA... times the region code has been set will play DVD movies on your computer. 1 Eject the DVD disk. DVD disks are divided into the DVD drive. Recovering your DVD drive is installed in the optical drive bay, you to the online help for more information.
... launch the DVD player for DVD movie region code information. 2 The DVD movie will automatically play after which the last region code set . Once your hard disk does not reset the number of a different region into 6 regions. Refer to a region code, it will remain permanent. Region code 1 2 3 4 5 6 Country or region USA... times the region code has been set will play DVD movies on your computer. 1 Eject the DVD disk. DVD disks are divided into the DVD drive. Recovering your DVD drive is installed in the optical drive bay, you to the online help for more information.
Aspire 4315 / 4715Z User's Guide EN
Page 91
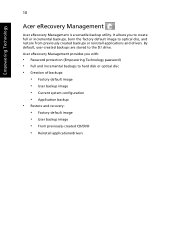
...to reboot. contact your dealer or an authorized service center. CMOS checksum error Contact your dealer or authorized service center for assistance. Hard disk 0 extended Contact your dealer. If the problem cannot be resolved, contact your dealer or an authorized service center. The ...Contact your dealer or an authorized service center. Disk boot failure Insert a system (bootable) disk into the floppy drive (A:), then press to open the computer yourself; Hard disk 0 error Contact your dealer or an authorized service center. Error messages If you solve problems. If the...
...to reboot. contact your dealer or an authorized service center. CMOS checksum error Contact your dealer or authorized service center for assistance. Hard disk 0 extended Contact your dealer. If the problem cannot be resolved, contact your dealer or an authorized service center. The ...Contact your dealer or an authorized service center. Disk boot failure Insert a system (bootable) disk into the floppy drive (A:), then press to open the computer yourself; Hard disk 0 error Contact your dealer or an authorized service center. Error messages If you solve problems. If the...
Aspire 4315 / 4715Z Service Guide
Page 8
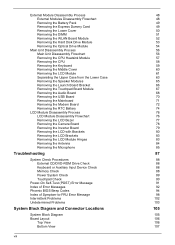
...Pack Removing the Express Dummy Card Removing the Lower Cover Removing the DIMM Removing the WLAN Board Module Removing the Hard Disk Drive Module Removing the Optical Drive Module Main Unit Disassembly Process Main Unit Disassembly Flowchart Removing the CPU Heatsink Module Removing the CPU Removing the ... the LCD Brackets Removing the LCD Module Hinges Removing the Antenna Removing the Microphone Troubleshooting System Check Procedures External CD/DVD-ROM Drive Check Keyboard or Auxiliary Input Device Check Memory Check Power System Check Touchpad Check Power-On Self-Test (POST) Error Message ...
...Pack Removing the Express Dummy Card Removing the Lower Cover Removing the DIMM Removing the WLAN Board Module Removing the Hard Disk Drive Module Removing the Optical Drive Module Main Unit Disassembly Process Main Unit Disassembly Flowchart Removing the CPU Heatsink Module Removing the CPU Removing the ... the LCD Brackets Removing the LCD Module Hinges Removing the Antenna Removing the Microphone Troubleshooting System Check Procedures External CD/DVD-ROM Drive Check Keyboard or Auxiliary Input Device Check Memory Check Power System Check Touchpad Check Power-On Self-Test (POST) Error Message ...

Aspire 4315 / 4715Z Service Guide
Page 11
...Express chipset Display and Graphics T 14.1" WXGA high brightness (200-nits) Acer CrystalBrite™ TFT LCD, 1280 x 800 pixel resolution, 16 ms response time, supporting simultaneous multi-window viewing via Acer GridVista™ T Mobile Intel GL960 Express Chipset with integrated 3D graphics, ...-out (NTSC/PAL) support T Acer Arcade™ featuring Acer CinemaVision™ and Acer ClearVision™ technologies Storage Subsystem T 80/120/160 GB or larger hard disk drive T DVD-Super Multi double-layer drive or DVD/CD-RW combo drive Audio T Two built-in Acer 3D Sonic stereo speakers T Intel ...
...Express chipset Display and Graphics T 14.1" WXGA high brightness (200-nits) Acer CrystalBrite™ TFT LCD, 1280 x 800 pixel resolution, 16 ms response time, supporting simultaneous multi-window viewing via Acer GridVista™ T Mobile Intel GL960 Express Chipset with integrated 3D graphics, ...-out (NTSC/PAL) support T Acer Arcade™ featuring Acer CinemaVision™ and Acer ClearVision™ technologies Storage Subsystem T 80/120/160 GB or larger hard disk drive T DVD-Super Multi double-layer drive or DVD/CD-RW combo drive Audio T Two built-in Acer 3D Sonic stereo speakers T Intel ...

Aspire 4315 / 4715Z Service Guide
Page 17
Indicators The computer has four easy-to-read status indicators: The front panel indicators are visible even when the computer cover is active. Icon Function HDD Num lock Caps lock Power Battery Description Indicates when the hard disk drive is closed up. Indicates the computer's power status. Chapter 1 7 NOTE: Battery LED status during charging: • Amber: Charging. • Green: Charging complete. Indicates the computer's batttery status. Lights up when Num Lock is activated. Lights up when Caps Lock is activated.
Indicators The computer has four easy-to-read status indicators: The front panel indicators are visible even when the computer cover is active. Icon Function HDD Num lock Caps lock Power Battery Description Indicates when the hard disk drive is closed up. Indicates the computer's power status. Chapter 1 7 NOTE: Battery LED status during charging: • Amber: Charging. • Green: Charging complete. Indicates the computer's batttery status. Lights up when Num Lock is activated. Lights up when Caps Lock is activated.

Aspire 4315 / 4715Z Service Guide
Page 33
Chapter 1 23 It allows you with a Recovery CD or System CD, please use Acer eRecovery Management's "System backup to optical disc" feature to burn a backup image to hard disk or optical disc T Creation of backups: t Factory default image t User backup image t Current system ... T Password protection (Empowering Technology password) T Full and incremental backups to CD or DVD. Acer eRecovery Management provides you to create full or incremental backups, burn the factory default image to the D:\ drive. Acer eRecovery Management Acer eRecovery Management is a versatile backup utility.
Chapter 1 23 It allows you with a Recovery CD or System CD, please use Acer eRecovery Management's "System backup to optical disc" feature to burn a backup image to hard disk or optical disc T Creation of backups: t Factory default image t User backup image t Current system ... T Password protection (Empowering Technology password) T Full and incremental backups to CD or DVD. Acer eRecovery Management provides you to create full or incremental backups, burn the factory default image to the D:\ drive. Acer eRecovery Management Acer eRecovery Management is a versatile backup utility.

Aspire 4315 / 4715Z Service Guide
Page 38
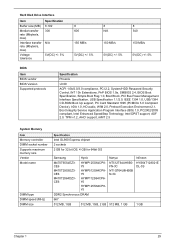
... Express chipset Intel GL960 Express chipset Codec ALC268 chipset Intel ICH8-M chipset Marvell Yukon 88E8039 PCI-E Fast Ethernet Controller Intel ICH8-M chipset Winbond WPC8763L chipset Hard Disk Drive Interface Item Product Model Name Capacity (GB) Form factor and Interface type Bytes per sector Data heads Data disks Spindle speed (RPM) Specification Toshiba...
... Express chipset Intel GL960 Express chipset Codec ALC268 chipset Intel ICH8-M chipset Marvell Yukon 88E8039 PCI-E Fast Ethernet Controller Intel ICH8-M chipset Winbond WPC8763L chipset Hard Disk Drive Interface Item Product Model Name Capacity (GB) Form factor and Interface type Bytes per sector Data heads Data disks Spindle speed (RPM) Specification Toshiba...
Aspire 4315 / 4715Z Service Guide
Page 39
Hard Disk Drive Interface Item Buffer size (MB) Media transfer rate (Mbytes/s, max) Interface transfer rate (Mbytes/s, max) Voltage tolerance Specification 8.192 300 N/A 5V(DC) +/- 5% 8 600 150 MB/s ...
Hard Disk Drive Interface Item Buffer size (MB) Media transfer rate (Mbytes/s, max) Interface transfer rate (Mbytes/s, max) Voltage tolerance Specification 8.192 300 N/A 5V(DC) +/- 5% 8 600 150 MB/s ...
Aspire 4315 / 4715Z Service Guide
Page 48
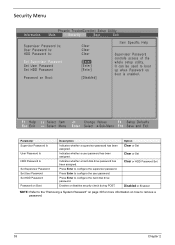
... HDD Password Is Set Supervisor Password Set User Password Set HDD Password Password on how to remove a password. 38 Chapter 2 Press Enter to configure the hard disk drive password. Press Enter to the "Removing a System Password" on page 39 for more information on Boot Description Indicates whether a supervisor password has been assigned...
... HDD Password Is Set Supervisor Password Set User Password Set HDD Password Password on how to remove a password. 38 Chapter 2 Press Enter to configure the hard disk drive password. Press Enter to the "Removing a System Password" on page 39 for more information on Boot Description Indicates whether a supervisor password has been assigned...

Aspire 4315 / 4715Z Service Guide
Page 63
Removing the Hard Disk Drive Module 1. See "Removing the Lower Cover" on top of it. 5. NOTE: To prevent damage to device, avoid pressing down on it (1), gently slide-out the ...
Removing the Hard Disk Drive Module 1. See "Removing the Lower Cover" on top of it. 5. NOTE: To prevent damage to device, avoid pressing down on it (1), gently slide-out the ...

Aspire 4315 / 4715Z Service Guide
Page 64
Remove the hard disk drive. See "Removing the Lower Cover" on the bottom side of the module forward, then slide out the optical drive module from the main unit. 54 Chapter 3 Remove the screw (C) on page 50. 3. 6. Removing the Optical Drive Module 1. See "Removing the Battery Pack" on page 49. 2. Step 1 Size (Quantity) M2 x L6 (1) Color Black Torque 2.0 kgf-cm 4. Using the flat-blade screwdriver, press the end of the unit, as shown.
Remove the hard disk drive. See "Removing the Lower Cover" on the bottom side of the module forward, then slide out the optical drive module from the main unit. 54 Chapter 3 Remove the screw (C) on page 50. 3. 6. Removing the Optical Drive Module 1. See "Removing the Battery Pack" on page 49. 2. Step 1 Size (Quantity) M2 x L6 (1) Color Black Torque 2.0 kgf-cm 4. Using the flat-blade screwdriver, press the end of the unit, as shown.

Aspire 4315 / 4715Z Service Guide
Page 73
See "Removing the Optical Drive Module" on page 60. 12. See "Removing the Middle Cover" on page 54. 8. See "Removing the Battery Pack" on page 52. 6. See "Removing the WLAN ... the three screws (A) on page 58. 10. Color Black Torque 1.6 kgf-cm Chapter 3 63 See "Removing the Lower Cover" on page 53. 7. See "Removing the Hard Disk Drive Module" on page 50. 4. Separating the Upper Case from the mainboard. See "Removing the Keyboard" on page 59. 11.
See "Removing the Optical Drive Module" on page 60. 12. See "Removing the Middle Cover" on page 54. 8. See "Removing the Battery Pack" on page 52. 6. See "Removing the WLAN ... the three screws (A) on page 58. 10. Color Black Torque 1.6 kgf-cm Chapter 3 63 See "Removing the Lower Cover" on page 53. 7. See "Removing the Hard Disk Drive Module" on page 50. 4. Separating the Upper Case from the mainboard. See "Removing the Keyboard" on page 59. 11.

Aspire 4315 / 4715Z Service Guide
Page 75
See "Removing the Optical Drive Module" on page 58. 10. See "Removing the CPU" on page 54. 8. See "Separating the Upper Case from the Lower Case" on page 51. 5. Remove ... LCD Module" on page 52. 6. Color Silver Torque 1.6 kgf-cm Chapter 3 65 See "Removing the WLAN Board Module" on page 61. 13. See "Removing the Hard Disk Drive Module" on page 49. 2. Removing the Speaker Modules 1. See "Removing the Battery Pack" on page 53. 7.
See "Removing the Optical Drive Module" on page 58. 10. See "Removing the CPU" on page 54. 8. See "Separating the Upper Case from the Lower Case" on page 51. 5. Remove ... LCD Module" on page 52. 6. Color Silver Torque 1.6 kgf-cm Chapter 3 65 See "Removing the WLAN Board Module" on page 61. 13. See "Removing the Hard Disk Drive Module" on page 49. 2. Removing the Speaker Modules 1. See "Removing the Battery Pack" on page 53. 7.

Aspire 4315 / 4715Z Service Guide
Page 76
... page 63. 14. See "Removing the Keyboard" on page 49. 2. See "Removing the Battery Pack" on page 59. 11. See "Removing the Optical Drive Module" on page 61. 13. See "Removing the LCD Module" on page 54. 8. See "Removing the Express Dummy Card" on page 60. 12.... See "Removing the Middle Cover" on page 49. 3. Step 1~2 15. Removing the Launch Board Bracket 1. See "Removing the Hard Disk Drive Module" on page 50. 4. See "Removing the Lower Cover" on page 53. 7. Size (Quantity) M2 x L4 (2) Color Black Torque 1.6 kgf-cm 66...
... page 63. 14. See "Removing the Keyboard" on page 49. 2. See "Removing the Battery Pack" on page 59. 11. See "Removing the Optical Drive Module" on page 61. 13. See "Removing the LCD Module" on page 54. 8. See "Removing the Express Dummy Card" on page 60. 12.... See "Removing the Middle Cover" on page 49. 3. Step 1~2 15. Removing the Launch Board Bracket 1. See "Removing the Hard Disk Drive Module" on page 50. 4. See "Removing the Lower Cover" on page 53. 7. Size (Quantity) M2 x L4 (2) Color Black Torque 1.6 kgf-cm 66...

Aspire 4315 / 4715Z Service Guide
Page 77
... page 50. 4. See "Removing the LCD Module" on the touchpad bracket. Remove the two screws (A) on page 61. 13. See "Removing the Optical Drive Module" on page 60. 12. See "Removing the Middle Cover" on page 54. 8. Removing the Touchpad Board Module 1. See "Removing the DIMM" on... page 53. 7. Step 1~2 Size (Quantity) M2 x L4 (2) 15. Color Black Torque 1.6 kgf-cm Chapter 3 67 See "Removing the Hard Disk Drive Module" on page 51. 5. Remove the touchpad bracket from the Lower Case" on page 58. 10. See "Separating the Upper Case from the upper case...
... page 50. 4. See "Removing the LCD Module" on the touchpad bracket. Remove the two screws (A) on page 61. 13. See "Removing the Optical Drive Module" on page 60. 12. See "Removing the Middle Cover" on page 54. 8. Removing the Touchpad Board Module 1. See "Removing the DIMM" on... page 53. 7. Step 1~2 Size (Quantity) M2 x L4 (2) 15. Color Black Torque 1.6 kgf-cm Chapter 3 67 See "Removing the Hard Disk Drive Module" on page 51. 5. Remove the touchpad bracket from the Lower Case" on page 58. 10. See "Separating the Upper Case from the upper case...


