
Aspire 3680/5570/5570Z/5580 User's Guide EN
Page 10
... placing your display in one fixed posture • avoid slouching forward and/or leaning backward • stand up and walk around regularly to remove the strain on your leg muscles • take short rests to relax your neck and shoulders • avoid tensing your muscles or shrugging ...your shoulders • install the external display, keyboard and mouse properly and within comfortable reach • if you view your monitor more than your documents, place the display at bright light sources,...
... placing your display in one fixed posture • avoid slouching forward and/or leaning backward • stand up and walk around regularly to remove the strain on your leg muscles • take short rests to relax your neck and shoulders • avoid tensing your muscles or shrugging ...your shoulders • install the external display, keyboard and mouse properly and within comfortable reach • if you view your monitor more than your documents, place the display at bright light sources,...
Aspire 3680/5570/5570Z/5580 User's Guide EN
Page 16
Touchpad basics 28 Using the keyboard 30 Lock keys and embedded numeric keypad 30 Windows keys 31 Hotkeys 32 Special keys 34 Ejecting the optical (CD or DVD) drive tray 35 Using a computer security lock 35 Audio 36 Adjusting the volume 36 Using Acer Bluetooth® VoIP Phone 37 ...Travelers Warranty (ITW) 48 Before you call 48 Battery pack 49 Battery pack characteristics 49 Maximizing the battery's life 49 Installing and removing the battery pack 50 Charging the battery 51 Checking the battery level 51 Optimising battery life 51 Battery-low warning 52...
Touchpad basics 28 Using the keyboard 30 Lock keys and embedded numeric keypad 30 Windows keys 31 Hotkeys 32 Special keys 34 Ejecting the optical (CD or DVD) drive tray 35 Using a computer security lock 35 Audio 36 Adjusting the volume 36 Using Acer Bluetooth® VoIP Phone 37 ...Travelers Warranty (ITW) 48 Before you call 48 Battery pack 49 Battery pack characteristics 49 Maximizing the battery's life 49 Installing and removing the battery pack 50 Charging the battery 51 Checking the battery level 51 Optimising battery life 51 Battery-low warning 52...
Aspire 3680/5570/5570Z/5580 User's Guide EN
Page 93
...mode. Or: You can now safely take the computer anywhere you go within short distances, for example, from the AC adapter. 6 Disconnect the keyboard, pointing device, printer, external monitor and other external devices. 7 Disconnect the Kensington lock if you are just moving within the building. then press... to disconnect your computer from external accessories: 1 Save any open the display; To bring the computer out of Sleep mode, open files. 2 Remove any media, floppy disks or compact disks from the drive(s). 3 Shut down the computer: Click on Start, Turn Off Computer, then click on...
...mode. Or: You can now safely take the computer anywhere you go within short distances, for example, from the AC adapter. 6 Disconnect the keyboard, pointing device, printer, external monitor and other external devices. 7 Disconnect the Kensington lock if you are just moving within the building. then press... to disconnect your computer from external accessories: 1 Save any open the display; To bring the computer out of Sleep mode, open files. 2 Remove any media, floppy disks or compact disks from the drive(s). 3 Shut down the computer: Click on Start, Turn Off Computer, then click on...
Aspire 3680/5570/5570Z/5580 User's Guide EN
Page 123
...-low warning 52 caring for xiv characteristics 49 charging 51 checking charge level 51 installing 50 low conditions 52 maximizing life 49 optimizing 51 removing 51 using the first time 49 BIOS utility 83 brightness hotkeys 33 C caps lock 30 on indicator 26 care AC adapter xiii battery... manually 46 troubleshooting 46 charging checking level 51 cleaning computer xiv computer caring for xiii cleaning xiv disconnecting 73 features 14, 42 indicators 26 keyboards 30 moving around 73 on indicator 15, 26 103 security 77 setting up a home office 75 taking home 74 traveling internationally 76 traveling ...
...-low warning 52 caring for xiv characteristics 49 charging 51 checking charge level 51 installing 50 low conditions 52 maximizing life 49 optimizing 51 removing 51 using the first time 49 BIOS utility 83 brightness hotkeys 33 C caps lock 30 on indicator 26 care AC adapter xiii battery... manually 46 troubleshooting 46 charging checking level 51 cleaning computer xiv computer caring for xiii cleaning xiv disconnecting 73 features 14, 42 indicators 26 keyboards 30 moving around 73 on indicator 15, 26 103 security 77 setting up a home office 75 taking home 74 traveling internationally 76 traveling ...

Aspire 5600 - 3680 User's Guide
Page 6
... inadequate working in one fixed posture • avoid slouching forward and/or leaning backward • stand up and walk around regularly to remove the strain on how to reduce eyestrain. The following sections provide suggestions on your leg muscles • take short rests to relax your ...neck and shoulders • avoid tensing your muscles or shrugging your shoulders • install the external display, keyboard and mouse properly and within comfortable reach • if you have these symptoms, or any other recurring or persistent discomfort and/or pain ...
... inadequate working in one fixed posture • avoid slouching forward and/or leaning backward • stand up and walk around regularly to remove the strain on how to reduce eyestrain. The following sections provide suggestions on your leg muscles • take short rests to relax your ...neck and shoulders • avoid tensing your muscles or shrugging your shoulders • install the external display, keyboard and mouse properly and within comfortable reach • if you have these symptoms, or any other recurring or persistent discomfort and/or pain ...

Aspire 5600 - 3680 User's Guide
Page 72
...and hints to consider when moving around When you are ready to disconnect your computer from external accessories: 1 Save any open files. 2 Remove any media, floppy disks or compact disks from your computer. If you are taking the computer to a client's office or a different building..., you may choose to shut down the computer. 4 Close the display cover. 5 Disconnect the cord from the AC adapter. 6 Disconnect the keyboard, pointing device, printer, external monitor and other external devices. 7 Disconnect the Kensington lock if you are just moving the computer, close and latch...
...and hints to consider when moving around When you are ready to disconnect your computer from external accessories: 1 Save any open files. 2 Remove any media, floppy disks or compact disks from your computer. If you are taking the computer to a client's office or a different building..., you may choose to shut down the computer. 4 Close the display cover. 5 Disconnect the cord from the AC adapter. 6 Disconnect the keyboard, pointing device, printer, external monitor and other external devices. 7 Disconnect the Kensington lock if you are just moving the computer, close and latch...
Aspire 3680, Aspire 5600, TravelMate 4220, and TravelMate 2480 Service Guide
Page 6
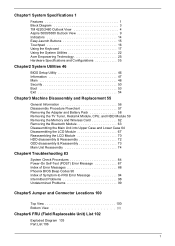
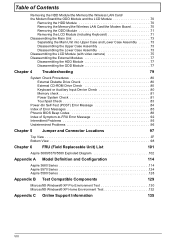
... 1 Features 1 Block Diagram 3 TM 4220/2480 Outlook View 4 Aspire 5600/3680 Outlook View 9 Indicators 14 Easy-Launch Buttons 15 Touchpad 16 Using the Keyboard 17 Using the System Utilities 22 Acer Empowering Technology 25 Hardware Specifications and Configurations 35 Chapter2 System Utilities 46 BIOS...Replacement 55 General Information 56 Disassembly Procedure Flowchart 57 Removing the Adapter and Battery Pack 58 Removing the TV Tuner, Heatsink Module, CPU, and HDD Module 59 Removing the Memory and Wireless Card 62 Removing the Bluetooth Module 63 Disassembling the Main Unit into...
... 1 Features 1 Block Diagram 3 TM 4220/2480 Outlook View 4 Aspire 5600/3680 Outlook View 9 Indicators 14 Easy-Launch Buttons 15 Touchpad 16 Using the Keyboard 17 Using the System Utilities 22 Acer Empowering Technology 25 Hardware Specifications and Configurations 35 Chapter2 System Utilities 46 BIOS...Replacement 55 General Information 56 Disassembly Procedure Flowchart 57 Removing the Adapter and Battery Pack 58 Removing the TV Tuner, Heatsink Module, CPU, and HDD Module 59 Removing the Memory and Wireless Card 62 Removing the Bluetooth Module 63 Disassembling the Main Unit into...
Aspire 3680, Aspire 5600, TravelMate 4220, and TravelMate 2480 Service Guide
Page 43
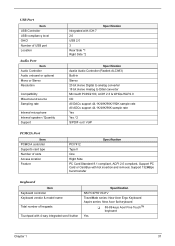
... 8.1 compliant, ACPI 2.0 compliant, Support PC Card or CardBus with hot insertion and removal, Support 132MBps burst transfer Keyboard Item Keyboard controller Keyboard vendor & model name Total number of keypads Touchpad with 4-way integrated scroll button Specification NS PC97551/541V TravelMate series: New Acer Ergo Keyboard Aspire series: New Acer flat keyboard T 88-89 keys Acer Fine TouchTM keyboard Yes Chapter 1 37
... 8.1 compliant, ACPI 2.0 compliant, Support PC Card or CardBus with hot insertion and removal, Support 132MBps burst transfer Keyboard Item Keyboard controller Keyboard vendor & model name Total number of keypads Touchpad with 4-way integrated scroll button Specification NS PC97551/541V TravelMate series: New Acer Ergo Keyboard Aspire series: New Acer flat keyboard T 88-89 keys Acer Fine TouchTM keyboard Yes Chapter 1 37

Aspire 3680, Aspire 5600, TravelMate 4220, and TravelMate 2480 Service Guide
Page 63
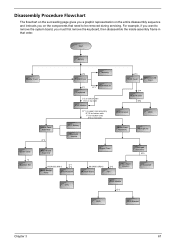
For example, if you want to remove the main board, you on the entire disassembly sequence and instructs you must first remove the keyboard, then disassemble the inside assembly frame in that need to be removed during servicing. Disassembly Procedure Flowchart The flowchart on the succeeding page gives you a graphic representation on the components that order. Chapter 3 57
For example, if you want to remove the main board, you on the entire disassembly sequence and instructs you must first remove the keyboard, then disassemble the inside assembly frame in that need to be removed during servicing. Disassembly Procedure Flowchart The flowchart on the succeeding page gives you a graphic representation on the components that order. Chapter 3 57

Aspire 3680, Aspire 5600, TravelMate 4220, and TravelMate 2480 Service Guide
Page 70
Disconnect the power cable from the main unit. 64 Chapter 3 Remove the three screws securing the middle cover on the rear panel. 2. Open the notebook. . 3. Remove the two screws securing the keyboard. 5. Unlatch the keyboard FFC latch and remove the keyboard from the mainboard. 1. Turn the keyboard over. 6. Disassembling the Main Unit into Upper Case and Lower Case 1. Release the clasp of middle cover and remove the middle cover from the main unit. 4.
Disconnect the power cable from the main unit. 64 Chapter 3 Remove the three screws securing the middle cover on the rear panel. 2. Open the notebook. . 3. Remove the two screws securing the keyboard. 5. Unlatch the keyboard FFC latch and remove the keyboard from the mainboard. 1. Turn the keyboard over. 6. Disassembling the Main Unit into Upper Case and Lower Case 1. Release the clasp of middle cover and remove the middle cover from the main unit. 4.
Aspire 3680, Aspire 5600, TravelMate 4220, and TravelMate 2480 Service Guide
Page 91
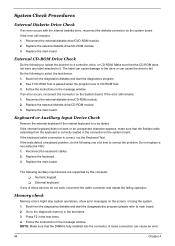
...to the drive or can cause an error. 84 Chapter 4 Reconnect the external diskette drive/CD-ROM module. 2. Keyboard or Auxiliary Input Device Check Remove the external keyboard if the internal keyboard is passed when the program runs to a controller, drive, or CD-ROM. Do not replace a non-defective ... a time to correct the problem. If the error still remains: 1. Replace the external diskette drive/CD-ROM module. 3. If the keyboard cable connection is fully installed into the connector. Replace the main board. NOTE: Make sure that the flexible cable extending from the diagnostics ...
...to the drive or can cause an error. 84 Chapter 4 Reconnect the external diskette drive/CD-ROM module. 2. Keyboard or Auxiliary Input Device Check Remove the external keyboard if the internal keyboard is passed when the program runs to a controller, drive, or CD-ROM. Do not replace a non-defective ... a time to correct the problem. If the error still remains: 1. Replace the external diskette drive/CD-ROM module. 3. If the keyboard cable connection is fully installed into the connector. Replace the main board. NOTE: Make sure that the flexible cable extending from the diagnostics ...
Aspire 3680/5570/5580 Service Guide
Page 7
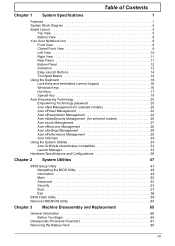
...Keyboard 16 Lock Keys and embedded numeric keypad 16 Windows Keys 16 Hot Keys 17 Special Key 18 Acer Empowering Technology 20 Empowering Technology password 20 Acer eNet Management (for selected models 20 Acer ePower Management 22 Acer ePresentation Management 24 Acer eDataSecurity Management (for selected models 25 Acer eLock Management 27 Acer eRecovery Management 28 Acer...BIOS Flash Utility 59 Remove HDD/BIOS Utility 60 Chapter 3 Machine Disassembly and Replacement 65 General Information 66 Before You Begin 66 Disassembly Procedure Flowchart 67 Removing the Battery Pack ...
...Keyboard 16 Lock Keys and embedded numeric keypad 16 Windows Keys 16 Hot Keys 17 Special Key 18 Acer Empowering Technology 20 Empowering Technology password 20 Acer eNet Management (for selected models 20 Acer ePower Management 22 Acer ePresentation Management 24 Acer eDataSecurity Management (for selected models 25 Acer eLock Management 27 Acer eRecovery Management 28 Acer...BIOS Flash Utility 59 Remove HDD/BIOS Utility 60 Chapter 3 Machine Disassembly and Replacement 65 General Information 66 Before You Begin 66 Disassembly Procedure Flowchart 67 Removing the Battery Pack ...
Aspire 3680/5570/5580 Service Guide
Page 8
...Modem Board/the ODD Module and the LCD Module 70 Removing the HDD Module 70 Removing the Memory/the Wireless LAN Card/the Modem Board 70 Removing the ODD Module 71 Removing the LCD Module (including Keyboard 71 Disassembling the Main Uint 73 Separating the Main Unit ...Top View 97 Bottom View 98 Chapter 6 FRU (Field Replaceable Unit) List 101 Aspire 3680/5570/5580 Exploded Diagram 102 Appendix A Model Definition and Configuration 114 Aspire 3680 Series 114 Aspire 5570 Series 124 Aspire 5580 Series 128 Appendix B Test Compatible Components 129 Microsoft® Windows® XP...
...Modem Board/the ODD Module and the LCD Module 70 Removing the HDD Module 70 Removing the Memory/the Wireless LAN Card/the Modem Board 70 Removing the ODD Module 71 Removing the LCD Module (including Keyboard 71 Disassembling the Main Uint 73 Separating the Main Unit ...Top View 97 Bottom View 98 Chapter 6 FRU (Field Replaceable Unit) List 101 Aspire 3680/5570/5580 Exploded Diagram 102 Appendix A Model Definition and Configuration 114 Aspire 3680 Series 114 Aspire 5570 Series 124 Aspire 5580 Series 128 Appendix B Test Compatible Components 129 Microsoft® Windows® XP...
Aspire 3680/5570/5580 Service Guide
Page 75
Start Battery Middle Cover H*2 DIMM Cover Memory P*1 Keyboard ODD Module E*1 J*2 on bottom side K*2 on top side LCD Module E*1 on upper case assemby E*12 on bottom side F*3 on bottom side A*2 on rear side H*3 HDD ... CPU Heatsink 86.9A353.3R0*2 O*2 Modem Board Fan Touchpad Bracket Touchpad CPU ODD Module G*2 ODD ODD Bracket Chapter 3 67 For example, if you want to remove the system board, you on the components that order. Disassembly Procedure Flowchart The flowchart on the succeeding page gives you a graphic representation on the entire...
Start Battery Middle Cover H*2 DIMM Cover Memory P*1 Keyboard ODD Module E*1 J*2 on bottom side K*2 on top side LCD Module E*1 on upper case assemby E*12 on bottom side F*3 on bottom side A*2 on rear side H*3 HDD ... CPU Heatsink 86.9A353.3R0*2 O*2 Modem Board Fan Touchpad Bracket Touchpad CPU ODD Module G*2 ODD ODD Bracket Chapter 3 67 For example, if you want to remove the system board, you on the components that order. Disassembly Procedure Flowchart The flowchart on the succeeding page gives you a graphic representation on the entire...

Aspire 3680/5570/5580 Service Guide
Page 79
... two screws holidng the modem board to the main unit. 2. Removing the ODD Module 1. Removing the LCD Module (including Keyboard) 1. Remove the two screws holding the ODD module on the bottom side. 2. Chapter 3 71 Push the ODD module outwards then remove it. Carefully detach the keyboard cover from the main board then disconnect the modem board...
... two screws holidng the modem board to the main unit. 2. Removing the ODD Module 1. Removing the LCD Module (including Keyboard) 1. Remove the two screws holding the ODD module on the bottom side. 2. Chapter 3 71 Push the ODD module outwards then remove it. Carefully detach the keyboard cover from the main board then disconnect the modem board...
Aspire 3680/5570/5580 Service Guide
Page 80
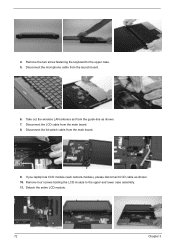
Remove the two screw fastening the keyboard to the upper and lower case assembly. 11. Disconnect the microphone cable from the main board. . 9. Disconnect the lid switch cable from the launch board. 6. Take out the wireless LAN antenna set from the main board. 8. If you laptop has CCD module (web camera module), please disconnect CCD cable as shown. 7. Remove four screws holding the LCD module to the upper case. 5. Disconnect the LCD cable from the guide-line as shown. 10. Detach the entire LCD module. 72 Chapter 3 4.
Remove the two screw fastening the keyboard to the upper and lower case assembly. 11. Disconnect the microphone cable from the main board. . 9. Disconnect the lid switch cable from the launch board. 6. Take out the wireless LAN antenna set from the main board. 8. If you laptop has CCD module (web camera module), please disconnect CCD cable as shown. 7. Remove four screws holding the LCD module to the upper case. 5. Disconnect the LCD cable from the guide-line as shown. 10. Detach the entire LCD module. 72 Chapter 3 4.

Aspire 3680/5570/5580 Service Guide
Page 88
.../CD-ROM module. 3. Replace the main board. See if CD-ROM Test is correct, run the Keyboard Test. Keyboard or Auxiliary Input Device Check Remove the external keyboard if the internal keyboard is required. Replace the main board. A write-enabled, diagnostic diskette is to be tested. If an... the system board. Do the following to isolate the problem to a controller, driver, or diskette. Replace the main board. Reconnect the keyboard cables. 2. System Check Procedures External Diskette Drive Check Do the following to select the test device: 1. See if FDD Test is correctly...
.../CD-ROM module. 3. Replace the main board. See if CD-ROM Test is correct, run the Keyboard Test. Keyboard or Auxiliary Input Device Check Remove the external keyboard if the internal keyboard is required. Replace the main board. A write-enabled, diagnostic diskette is to be tested. If an... the system board. Do the following to isolate the problem to a controller, driver, or diskette. Replace the main board. Reconnect the keyboard cables. 2. System Check Procedures External Diskette Drive Check Do the following to select the test device: 1. See if FDD Test is correctly...

Aspire 3680/5570/5580 Service Guide
Page 102
...Settings", then reboot system. Touchpad does not work correctly Print problems. Serial or parallel port device problems. Action in Sequence Internal modem does not work . Keyboard System board Reconnect touchpad cable. Hard disk connection board System board Peripheral-Related Symptoms Symptom / Error System configuration does not match the installed devices. Battery... board Ensure the "Parallel Port" in Windows doesn't go higher than 90%. External display does not work correctly. Reconnect hard disk/CD-ROM drives. Remove battery pack and let it cool for 2 hours.
...Settings", then reboot system. Touchpad does not work correctly Print problems. Serial or parallel port device problems. Action in Sequence Internal modem does not work . Keyboard System board Reconnect touchpad cable. Hard disk connection board System board Peripheral-Related Symptoms Symptom / Error System configuration does not match the installed devices. Battery... board Ensure the "Parallel Port" in Windows doesn't go higher than 90%. External display does not work correctly. Reconnect hard disk/CD-ROM drives. Remove battery pack and let it cool for 2 hours.

