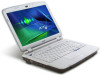
Aspire 2420, 2920, 2920Z Service Guide
Page 7
... Keys 13 Hot Keys 14 Special Key 15 Acer Empowering Technology 16 Empowering Technology password 16 Acer eNet Management 16 Acer ePower Management 18 Acer eAudio Management 20 Acer ePresentation Management 20 Acer eDataSecurity Management (for selected models 21 Acer eLock Management 22 Acer eRecovery Management 23 Acer eSettings Management 24 Windows Mobility Center 25 Using ...53 General Information 54 Pre-disassembly Instructions 54 Disassembly Process 54 External Module Disassembly Process 55 External Modules Disassembly Flowchart 55 Removing the Battery Pack 56 VII
Aspire 2420, 2920, 2920Z Service Guide
Page 18
Bottom View Icon Item Description 1 Battery bay Houses the computer's battery pack. 2 Battery release Releases the battery for removal. Note: Do not cover or obstruct the opening of the fan. 8 Chapter 1 latch 3 Battery lock Locks the battery in position. 4 Memory Houses the computer's main memory. compartment 5 Hard disk bay Houses the computer's hard disk (secured with screws). 6 Ventilation slots Enable the computer to stay cool, even after and cooling fan prolonged use.
Aspire 2420, 2920, 2920Z Service Guide
Page 19
... hard disk drive is charging. 2. Fully charged: The light shows green when in AC mode. Charging: The light shows amber when the battery is active. Chapter 1 9 Lights up when Caps Lock is activated. They are called easy-launch buttons. To set to -read status ... is closed. Icon Function Power Description Indicates the computer's power status. Battery HDD Num Lock Caps Lock Indicates the computer's batttery status. NOTE: 1. These buttons are : WLAN, Internet, email, Bluetooth, Arcade and Acer Empowering Technology. Lights up when Num Lock is activated. The mail and...
Aspire 2420, 2920, 2920Z Service Guide
Page 26
... Management backs up your password! Make sure to remember or write down your PC. K Acer ePower Management optimizes battery usage via customizable power plans. K Acer eSettings Management accesses system information and adjusts settings easily. If you have not initialized the Empowering Technology password and run the program from the Empowering ...
Aspire 2420, 2920, 2920Z Service Guide
Page 28
You can open Windows power options by clicking the appropriate tabs. View and adjust settings for On Battery and Plugged In modes by clicking "More Power Options". Enter a name for configuring your power management options. Click "OK" to a personalized set of power options. 1. ... new power plan. 18 Chapter 1 You can create, switch between, edit, delete and restore power plans, as described below. Click the Create Power Plan icon. 2. Acer ePower Management Acer ePower Management features a straightforward user interface for your new power plan. 3. To access this utility, select...
Aspire 2420, 2920, 2920Z Service Guide
Page 29
Click "Apply" to adjust system settings like LCD brightness and CPU speed. Battery status For real-time battery life estimates based on /off system components to extend battery life. 1. To edit a power plan: Editing a power plan allows you wish to another one first. 1. Adjust settings as required. 3. Click "Apply".... plan you wish to switch to delete from the drop-down list. 2. You can also turn on current usage, refer to view estimated battery life in the upper half of the window. Chapter 1 19 Switch to the power plan you to save your new settings. Select the...
Aspire 2420, 2920, 2920Z Service Guide
Page 45
... Internal & external keyboard work simultaneously Specification NS PC97541V 84-/85-key Yes Plug USB keyboard to the USB port directly: Yes Battery Item Vendor & model name Battery Type Pack capacity Number of battery cell Package configuration Normal voltage Charge voltage Specification SANYO (6cell) 2.0 SIMPLO (6cell) 2.0 Sanyo (6cell) 2.4 SONY (6cell) 2.4 Li-ion 2.0 AH SANYO...
Aspire 2420, 2920, 2920Z Service Guide
Page 60
... the BIOS is required for the following conditions: K New versions of system programs K New features or options K Restore a BIOS when it becomes corrupted. If the battery pack does not contain enough power to the bootable diskette. 3. Then boot the system from the bootable diskette. The flash utility has auto-execution function...
Aspire 2420, 2920, 2920Z Service Guide
Page 64
... 86.9A524.4R0 86.00E32.725 86.00F87.735 86.00F24.724 86.9A552.3R0 86.00E34.738 86.00E41.134 54 Chapter 3 Remove the battery pack. Unplug the AC adapter and all peripherals. 2. Turn off the power to remove the main board, you must first remove the keyboard, then disassemble...
Aspire 2420, 2920, 2920Z Service Guide
Page 65
EXTERNAL MODULE DISASSEMBLY TURN OFF POWER AND PERIPHERALS UNPLUG POWER CABLES REMOVE BATTERY PACK SD DUMMY CARD ExpressCard DUMMY CARD Bx4, Captive Screwx5 LOWER COVER Ax2 WLAN BOARD DIMM MODULES OPTICAL DISK DRIVE MODULE OPTICAL DISK DRIVE Ax2 ...
Aspire 2420, 2920, 2920Z Service Guide
Page 66
Removing the SD dummy card 1. Push the SD dummy card all the way in to the release position (1), then slide out the battery pack from the main unit (2). Turn base unit over. 2. Slide and hold the battery release latch to eject it (1, 2). 56 Chapter 3 Slide the battery lock/unlock latch to the unlock position. 3. Removing the Battery Pack 1.
Aspire 2420, 2920, 2920Z Service Guide
Page 67
Removing the Lower Cover 1. Pull it out from the slot. See "Removing the Battery Pack" on page 56. 2. Chapter 3 57 Pull it out from the slot. Push the ExpressCard dummy card all the way in to eject it. 2. Removing the ExpressCard dummy card 1.
Aspire 2420, 2920, 2920Z Service Guide
Page 69
See "Removing the SD dummy card" on both sides of the DIMM socket to release the DIMM. Push out the latches on page 56. 3. See "Removing the Battery Pack" on page 57.. 5. Chapter 3 59 Remove the lower cover from the lower case. See "Removing the Lower Cover" on page 56. 2. See "Removing the ExpressCard dummy card" on page 57. 4. 6. Removing the DIMM 1.
Aspire 2420, 2920, 2920Z Service Guide
Page 70
Removing the WLAN Board Modules 1. See "Removing the Lower Cover" on page 56. 2. See "Removing the Battery Pack" on page 57. 5. Disconnect the antenna cables from the WLAN board. 60 Chapter 3 Remove the DIMM module. See "Removing the SD dummy card" on page 57. 4. See "Removing the ExpressCard dummy card" on page 56. 3. 6.
Aspire 2420, 2920, 2920Z Service Guide
Page 71
... Lower Cover" on page 56. 3. See "Removing the SD dummy card" on page 57. Chapter 3 61 Step 1~2 Size (Quantity) M2 x L3 (2) Black 7. See "Removing the Battery Pack" on page 57. 4. Detach the WLAN board from the WLAN board and remove the two screws (A) on the WLAN board to the WLAN board...
Aspire 2420, 2920, 2920Z Service Guide
Page 73
Remove the four screws (C) securing the hard disk to eject the optical drive tray. Torque 3.0 kgf-cm Chapter 3 63 See "Removing the Lower Cover" on page 56. 2. See "Removing the Battery Pack" on page 57. 3. Step 1~4 Size (Quantity) M3 x L4 (4) Color Silver Removing the Optical Drive Module 1. Carefully use a plastic screw driver to the bracket. 7.
Aspire 2420, 2920, 2920Z Service Guide
Page 75
... Black Part No. 86.00D29.620 86.00E32.725 86.00F24.724 86.00E34.738 Removing the CPU and VGA Heatsink Module 1. See "Removing the Battery Pack" on page 57. Chapter 3 65
Aspire 2420, 2920, 2920Z Service Guide
Page 77
Removing the CPU 1. Chapter 3 67 See "Removing the Lower Cover" on page 65. See "Removing the CPU and VGA Heatsink Module" on page 57.. 3. See "Removing the Battery Pack" on page 56.. 2. 5. Slide out and remove the heatsink module.
Aspire 2420, 2920, 2920Z Service Guide
Page 79
Turn over the keyboard on the lock and release the latches securing the keyboard to the upper case. 3. Chapter 3 69 Push down on the touchpad area. See "Removing the Battery Pack" on page 56.. 2. Removing the Keyboard 1.
Aspire 2420, 2920, 2920Z Service Guide
Page 80
See "Removing the Battery Pack" on page 69. 5. See "Removing the Keyboard" on page 56. 2. Removing the LCD Module 1. See "Removing the LCD Module" on page 57. 3. See "Removing the Lower Cover" on page 70. 70 Chapter 3 See "Removing the WLAN Board Modules" on page 60. 4. 4. Disconnect the keyboard cable from the main board to remove the keyboard.