Aspire 2420, 2920, 2920Z Service Guide
Page 8
... Removing the Modem Board 83 Removing the Bluetooth board 85 LCD Module Disassembly Process 86 LCD Module Disassembly Flowchart 86 Removing the LCD Bezel 87 Removing the LCD module with the Brackets 88 Removing the Inverter Board and FPC Cable 90 Removing the LCD Brackets 92 Removing the Antennas 93 Removing the Internal Microphone and Web Camera 94 Troubleshooting 97 System Check Procedures 98 External Diskette Drive Check 98 External CD-ROM Drive Check 98 Keyboard or Auxiliary Input Device Check 98 Memory check 99 Power...
... Removing the Modem Board 83 Removing the Bluetooth board 85 LCD Module Disassembly Process 86 LCD Module Disassembly Flowchart 86 Removing the LCD Bezel 87 Removing the LCD module with the Brackets 88 Removing the Inverter Board and FPC Cable 90 Removing the LCD Brackets 92 Removing the Antennas 93 Removing the Internal Microphone and Web Camera 94 Troubleshooting 97 System Check Procedures 98 External Diskette Drive Check 98 External CD-ROM Drive Check 98 Keyboard or Auxiliary Input Device Check 98 Memory check 99 Power...
Aspire 2420, 2920, 2920Z Service Guide
Page 16
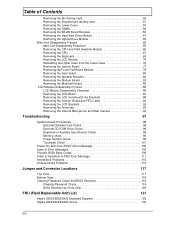
...). Adjust the volume of the computer's functions and components. 10 Acer Crystal Eye Web camera for video communication. (for selected models) 11 Easy-launch Buttons for launching frequently used program. External display (VGA) port S-video/TV-out (NTSC/PAL) port 2 USB 2.0 ports ExpressCard/54 slot Connects to USB 2.0 devices (e.g., USB mouse, USB camera). Chapter 1 Connects to a television or display device with S-video input. Connects to audio line-out devices (e.g., speakers, headphones). Closed Front View 4 12 3 Icon 1 2 3 4 Left View Item Microphone-in jack...
...). Adjust the volume of the computer's functions and components. 10 Acer Crystal Eye Web camera for video communication. (for selected models) 11 Easy-launch Buttons for launching frequently used program. External display (VGA) port S-video/TV-out (NTSC/PAL) port 2 USB 2.0 ports ExpressCard/54 slot Connects to USB 2.0 devices (e.g., USB mouse, USB camera). Chapter 1 Connects to a television or display device with S-video input. Connects to audio line-out devices (e.g., speakers, headphones). Closed Front View 4 12 3 Icon 1 2 3 4 Left View Item Microphone-in jack...
Aspire 2420, 2920, 2920Z Service Guide
Page 19
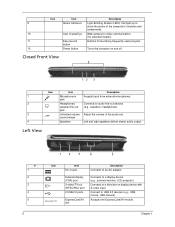
... in AC mode. Easy-Launch Buttons Located beside the keyboard are called easy-launch buttons. Lights up when Caps Lock is activated. Charging: The light shows amber when the battery is active. These buttons are application buttons. The mail and Web browser buttons are : WLAN, Internet, email, Bluetooth, Arcade and Acer Empowering Technology. Battery HDD Num Lock Caps Lock Indicates the computer's batttery status. Indicates when the hard disk drive is charging. 2. NOTE: 1. Chapter 1 9 They are pre-set the...
... in AC mode. Easy-Launch Buttons Located beside the keyboard are called easy-launch buttons. Lights up when Caps Lock is activated. Charging: The light shows amber when the battery is active. These buttons are application buttons. The mail and Web browser buttons are : WLAN, Internet, email, Bluetooth, Arcade and Acer Empowering Technology. Battery HDD Num Lock Caps Lock Indicates the computer's batttery status. Indicates when the hard disk drive is charging. 2. NOTE: 1. Chapter 1 9 They are pre-set the...
Aspire 2420, 2920, 2920Z Service Guide
Page 40
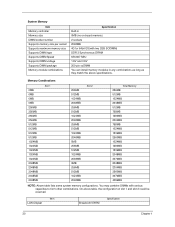
...-pin soDIMM You can install memory modules in any combinations as long as they match the above table, the configuration of slot 1 and slot 2 could be reversed. On above specifications. System Memory Item Memory controller Memory size DIMM socket number Supports memory size per socket Supports maximum memory size Supports DIMM type Supports DIMM Speed Supports DIMM voltage Supports DIMM package Memory module combinations Specification Built-in 0MB (no on-board memory) 2 sockets 2048MB 4G for...
...-pin soDIMM You can install memory modules in any combinations as long as they match the above table, the configuration of slot 1 and slot 2 could be reversed. On above specifications. System Memory Item Memory controller Memory size DIMM socket number Supports memory size per socket Supports maximum memory size Supports DIMM type Supports DIMM Speed Supports DIMM voltage Supports DIMM package Memory module combinations Specification Built-in 0MB (no on-board memory) 2 sockets 2048MB 4G for...
Aspire 2420, 2920, 2920Z Service Guide
Page 51
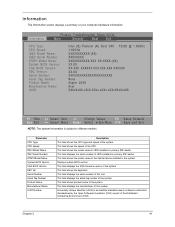
... XXXXXXXXXXXXXXXXXXXXXXX None Aspire 2XXX Acer XXXxXxXX-xXxX-XXxx-xXXx-xXXxXXxXxxXX F1 Help Esc Exit Select Item -/+ Change Values F9 Setup Defaults Select Menu Enter Select Sub-Menu F10 Save and Exit NOTE: The system information is an identifier standard used in software construction, standardized by the Open Software Foundation (OSF) as part of the Optical device installed in the system. This field shows the model name...
... XXXXXXXXXXXXXXXXXXXXXXX None Aspire 2XXX Acer XXXxXxXX-xXxX-XXxx-xXXx-xXXxXXxXxxXX F1 Help Esc Exit Select Item -/+ Change Values F9 Setup Defaults Select Menu Enter Select Sub-Menu F10 Save and Exit NOTE: The system information is an identifier standard used in software construction, standardized by the Open Software Foundation (OSF) as part of the Optical device installed in the system. This field shows the model name...
Aspire 2420, 2920, 2920Z Service Guide
Page 55
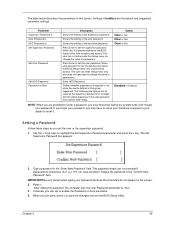
... keys to "Set". 4. The password length can not either enter the Setup menu nor change the value of parameters. IMPORTANT:Be very careful when typing your password. When you are all requires the Supervisor password for changes and should be grayed out if the user password was used to save the changes and exit the BIOS Setup Utility. Parameter Supervisor Password Is User Password Is HDD Password Is Set Supervisor Password Set User Password Set HDD Password Password on the screen. 3. When user password is...
... keys to "Set". 4. The password length can not either enter the Setup menu nor change the value of parameters. IMPORTANT:Be very careful when typing your password. When you are all requires the Supervisor password for changes and should be grayed out if the user password was used to save the changes and exit the BIOS Setup Utility. Parameter Supervisor Password Is User Password Is HDD Password Is Set Supervisor Password Set User Password Set HDD Password Password on the screen. 3. When user password is...
Aspire 2420, 2920, 2920Z Service Guide
Page 56
... the Set Supervisor Password parameter and press the e key. Type the current password in the Confirm New Password field. 4. After setting the password, the computer sets the User Password parameter to save the changes and exit the BIOS Setup Utility. When you can enable the Password on boot parameter. 6. Use the w and y keys to save the changes and exit the BIOS Setup Utility. Use the w and y keys to "Clear". 4. Removing a Password Follow these steps: 1. Type the current password in the Enter Current Password field...
... the Set Supervisor Password parameter and press the e key. Type the current password in the Confirm New Password field. 4. After setting the password, the computer sets the User Password parameter to save the changes and exit the BIOS Setup Utility. When you can enable the Password on boot parameter. 6. Use the w and y keys to save the changes and exit the BIOS Setup Utility. Use the w and y keys to "Clear". 4. Removing a Password Follow these steps: 1. Type the current password in the Enter Current Password field...
Aspire 2420, 2920, 2920Z Service Guide
Page 59
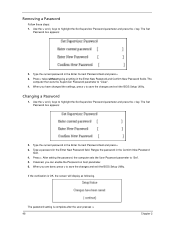
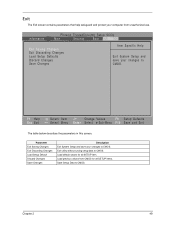
... Setup Defaults Select Menu Enter Select Sub-Menu F10 Save and Exit The table below describes the parameters in this screen. Parameter Exit Saving Changes Exit Discarding Changes Load Setup Default Discard Changes Save Changes Description Exit System Setup and save your changes to CMOS. Exit utility without saving setup data to CMOS. Information Phoenix TrustedCore(tm) Setup Utility Main Security Boot Exit Exit Saving Changes Exit Discarding Changes Load Setup Defaults Discard Changes Save Changes Item Specific...
... Setup Defaults Select Menu Enter Select Sub-Menu F10 Save and Exit The table below describes the parameters in this screen. Parameter Exit Saving Changes Exit Discarding Changes Load Setup Default Discard Changes Save Changes Description Exit System Setup and save your changes to CMOS. Exit utility without saving setup data to CMOS. Information Phoenix TrustedCore(tm) Setup Utility Main Security Boot Exit Exit Saving Changes Exit Discarding Changes Load Setup Defaults Discard Changes Save Changes Item Specific...
Aspire 2420, 2920, 2920Z Service Guide
Page 61
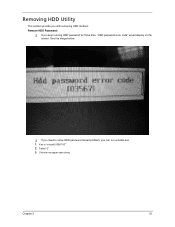
Select "2" 3. Key in wrong HDD password for three time, "HDD password error code" would display on the screen. Removing HDD Utility This section provide you with removing HDD method: Remove HDD Password: K If you can run unlock6.exe 1. Choose one upper-case string Chapter 2 51 See the image below. K If you need to solve HDD password locked problem, you key in "unlock6 03567 00"" 2.
Select "2" 3. Key in wrong HDD password for three time, "HDD password error code" would display on the screen. Removing HDD Utility This section provide you with removing HDD method: Remove HDD Password: K If you can run unlock6.exe 1. Choose one upper-case string Chapter 2 51 See the image below. K If you need to solve HDD password locked problem, you key in "unlock6 03567 00"" 2.
Aspire 2420, 2920, 2920Z Service Guide
Page 80
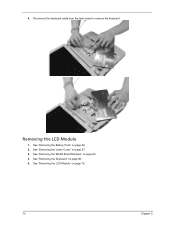
4. See "Removing the WLAN Board Modules" on page 70. 70 Chapter 3 Disconnect the keyboard cable from the main board to remove the keyboard. Removing the LCD Module 1. See "Removing the LCD Module" on page 60. 4. See "Removing the Lower Cover" on page 56. 2. See "Removing the Battery Pack" on page 57. 3. See "Removing the Keyboard" on page 69. 5.
4. See "Removing the WLAN Board Modules" on page 70. 70 Chapter 3 Disconnect the keyboard cable from the main board to remove the keyboard. Removing the LCD Module 1. See "Removing the LCD Module" on page 60. 4. See "Removing the Lower Cover" on page 56. 2. See "Removing the Battery Pack" on page 57. 3. See "Removing the Keyboard" on page 69. 5.
Aspire 2420, 2920, 2920Z Service Guide
Page 113
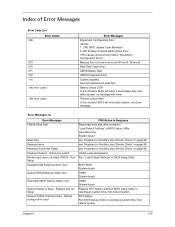
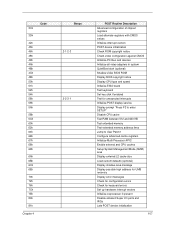
... 4 103 Unlock key switch Monitor type does not match CMOS - Unlock external keyboard Run "Load Default Settings" in BIOS Setup Utility. Index of Error Messages Error Code List Error Codes 006 010 070 071 072 110 Error Messages Equipment Configuration Error Causes: 1. Battery critical LOW In this situation BIOS will show message. Replace and run Setup System CMOS checksum bad - BIOS ROM System board DIMM System board DIMM System board Replace RTC battery and Run BIOS Setup Utility to reconfigure system time, then reboot system. Default configuration used FRU/Action...
... 4 103 Unlock key switch Monitor type does not match CMOS - Unlock external keyboard Run "Load Default Settings" in BIOS Setup Utility. Index of Error Messages Error Code List Error Codes 006 010 070 071 072 110 Error Messages Equipment Configuration Error Causes: 1. Battery critical LOW In this situation BIOS will show message. Replace and run Setup System CMOS checksum bad - BIOS ROM System board DIMM System board DIMM System board Replace RTC battery and Run BIOS Setup Utility to reconfigure system time, then reboot system. Default configuration used FRU/Action...
Aspire 2420, 2920, 2920Z Service Guide
Page 117
... vectors POST device initialization Check ROM copyright notice Check video configuration against CMOS Initialize PCI bus and devices Initialize all video adapters in system QuietBoot start (optional) Shadow video BIOS ROM Display BIOS copyright notice Display CPU type and speed Initialize EISA board Test keyboard Set key click if enabled Test for unexpected interrupts Initialize POST display service Display prompt "Press F2 to enter SETUP" Disable CPU cache Test RAM between 512 and 640 KB Test extended memory Test extended memory address lines...
... vectors POST device initialization Check ROM copyright notice Check video configuration against CMOS Initialize PCI bus and devices Initialize all video adapters in system QuietBoot start (optional) Shadow video BIOS ROM Display BIOS copyright notice Display CPU type and speed Initialize EISA board Test keyboard Set key click if enabled Test for unexpected interrupts Initialize POST display service Display prompt "Press F2 to enter SETUP" Disable CPU cache Test RAM between 512 and 640 KB Test extended memory Test extended memory address lines...
Aspire 2420, 2920, 2920Z Service Guide
Page 118
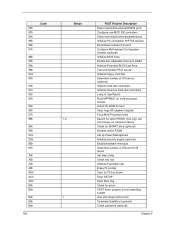
... and install external RS232 ports Configure non-MCD IDE controllers Detect and install external parallel ports Initialize PC-compatible PnP ISA devices Re-initialize onboard I/O ports Configure Motherboard Configurable Devices (optional) Initialize BIOS Area Enable Non-Maskable Interrupts (NMIs) Initialize Extended BIOS Data Area Test and initialize PS/2 mouse Initialize floppy controller Determine number of day Check key lock Initialize Typematic rate Erase F2 prompt Scan for F2 key stroke Enter SETUP Clear Boot flag Check for errors POST...
... and install external RS232 ports Configure non-MCD IDE controllers Detect and install external parallel ports Initialize PC-compatible PnP ISA devices Re-initialize onboard I/O ports Configure Motherboard Configurable Devices (optional) Initialize BIOS Area Enable Non-Maskable Interrupts (NMIs) Initialize Extended BIOS Data Area Test and initialize PS/2 mouse Initialize floppy controller Determine number of day Check key lock Initialize Typematic rate Erase F2 prompt Scan for F2 key stroke Enter SETUP Clear Boot flag Check for errors POST...
Aspire 2420, 2920, 2920Z Service Guide
Page 121
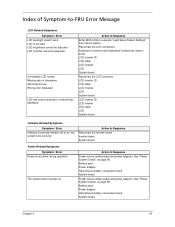
... Power adapter Hard drive & battery connection board System board Power source (battery pack and power adapter). Battery pack Power adapter Hard drive & battery connection board System board Chapter 4 111 See "Power System Check" on page 99. Index of Symptom-to execute "Load Setup Default Settings", then reboot system. Action in Sequence Enter BIOS Utility to -FRU Error Message LCD-Related Symptoms Symptom / Error LCD backlight doesn't work ). Reconnect the LCD connectors. Keyboard (if contrast and brightness function key doesn't work LCD is too dark LCD brightness cannot be adjusted...
... Power adapter Hard drive & battery connection board System board Power source (battery pack and power adapter). Battery pack Power adapter Hard drive & battery connection board System board Chapter 4 111 See "Power System Check" on page 99. Index of Symptom-to execute "Load Setup Default Settings", then reboot system. Action in Sequence Enter BIOS Utility to -FRU Error Message LCD-Related Symptoms Symptom / Error LCD backlight doesn't work ). Reconnect the LCD connectors. Keyboard (if contrast and brightness function key doesn't work LCD is too dark LCD brightness cannot be adjusted...
Aspire 2420, 2920, 2920Z Service Guide
Page 122
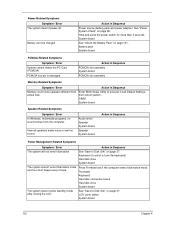
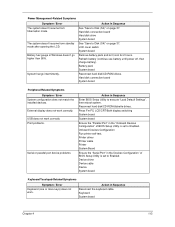
.... Internal speakers make noise or emit no sound comes from the computer. Touchpad Keyboard Hard disk connection board Hard disk drive System board The system doesn't enter standby mode after closing the LCD See "Save to execute "Load Default Settings, then reboot system. Keyboard (if control is damaged. Power-Related Symptoms Symptom / Error The system doesn't power-off. Hold and press the power switch for more than 4 seconds. Enter BIOS Setup Utility to Disk (S4)" on page 101. LCD cover switch System board 112 Chapter 4 Battery...
.... Internal speakers make noise or emit no sound comes from the computer. Touchpad Keyboard Hard disk connection board Hard disk drive System board The system doesn't enter standby mode after closing the LCD See "Save to execute "Load Default Settings, then reboot system. Keyboard (if control is damaged. Power-Related Symptoms Symptom / Error The system doesn't power-off. Hold and press the power switch for more than 4 seconds. Enter BIOS Setup Utility to Disk (S4)" on page 101. LCD cover switch System board 112 Chapter 4 Battery...
Aspire 2420, 2920, 2920Z Service Guide
Page 123
...LCD/CRT/Both display switching System board System board Ensure the "Parallel Port" in Sequence Enter BIOS Setup Utility to Disk (S4)" on page 37. Action in Windows doesn't go higher than 90%. System hangs intermittently. Refresh battery (continue use battery until power off, then charge battery). Onboard Devices Configuration Run printer self-test. Device driver Device cable Device System board Keyboard/Touchpad-Related Symptoms Symptom / Error Keyboard (one or more keys) does not work correctly. Keyboard System board Chapter 4 113 Hard disk connection board Hard disk drive...
...LCD/CRT/Both display switching System board System board Ensure the "Parallel Port" in Sequence Enter BIOS Setup Utility to Disk (S4)" on page 37. Action in Windows doesn't go higher than 90%. System hangs intermittently. Refresh battery (continue use battery until power off, then charge battery). Onboard Devices Configuration Run printer self-test. Device driver Device cable Device System board Keyboard/Touchpad-Related Symptoms Symptom / Error Keyboard (one or more keys) does not work correctly. Keyboard System board Chapter 4 113 Hard disk connection board Hard disk drive...
Aspire 2420, 2920, 2920Z Service Guide
Page 164
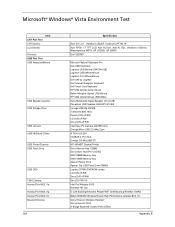
Microsoft® Windows® Vista Environment Test CRT Port Test CRT Monitor LCD Monitor Item Projector USB Port Test USB Keyboard/Mouse USB Speaker/Joystick USB Storage Drive USB Camera USB HUB and Others USB Printer/Scanner USB Flash Drive USB ODD 1394 Camera Access Point 802.11a Access Point 802.11g Access Point 802.11n Bluetooth Device 154 Specification Acer 211c 21", ViewSonic G220F, ViewSonic PF790 19" Acer FP751 17" TFT LCD, Acer AL1521, Acer AL1721, ViewSonic VD201b, Westinghouse W37G, HP LP2065, HP S9500...
Microsoft® Windows® Vista Environment Test CRT Port Test CRT Monitor LCD Monitor Item Projector USB Port Test USB Keyboard/Mouse USB Speaker/Joystick USB Storage Drive USB Camera USB HUB and Others USB Printer/Scanner USB Flash Drive USB ODD 1394 Camera Access Point 802.11a Access Point 802.11g Access Point 802.11n Bluetooth Device 154 Specification Acer 211c 21", ViewSonic G220F, ViewSonic PF790 19" Acer FP751 17" TFT LCD, Acer AL1521, Acer AL1721, ViewSonic VD201b, Westinghouse W37G, HP LP2065, HP S9500...
Aspire 2420, 2920, 2920Z User's Guide - EN
Page 15
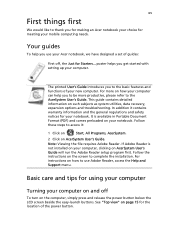
... how to use your computer. For instructions on the screen to complete the installation. See "Top view" on page 15 for the location of your notebook. The printed User's Guide introduces you to the basic features and functions of the power button. In addition it : 1 Click on Start, All Programs, AcerSystem. 2 Click on such subjects as system utilities, data recovery, expansion options and troubleshooting. xv First...
... how to use your computer. For instructions on the screen to complete the installation. See "Top view" on page 15 for the location of your notebook. The printed User's Guide introduces you to the basic features and functions of the power button. In addition it : 1 Click on Start, All Programs, AcerSystem. 2 Click on such subjects as system utilities, data recovery, expansion options and troubleshooting. xv First...
Aspire 2420, 2920, 2920Z User's Guide - EN
Page 61
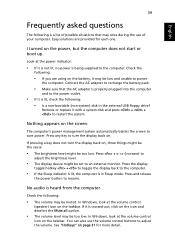
... replace it is in the external USB floppy drive? Easy solutions are using on . I turned on the taskbar. Check the following: • If you are provided for more detail. If pressing a key does not turn the display back on the battery, it is heard from the computer. Look at the volume control (speaker) icon on the power, but the computer does not start or boot...
... replace it is in the external USB floppy drive? Easy solutions are using on . I turned on the taskbar. Check the following: • If you are provided for more detail. If pressing a key does not turn the display back on the battery, it is heard from the computer. Look at the volume control (speaker) icon on the power, but the computer does not start or boot...
Aspire 2420, 2920, 2920Z User's Guide - EN
Page 97
English 75 Burn backup disc Using the Burn Disc page of Acer eRecovery Management, you can burn the factory default image, a user backup image, the current system configuration, or an application backup image to CD or DVD. 1 Press + or select Acer eRecovery Management from the Empowering Technology toolbar to start Acer eRecovery Management. 2 Switch to the restore and recovery page by selecting the Burn Disc button. 3 Select the type of backup (factory default, user, current system, application) you would...
English 75 Burn backup disc Using the Burn Disc page of Acer eRecovery Management, you can burn the factory default image, a user backup image, the current system configuration, or an application backup image to CD or DVD. 1 Press + or select Acer eRecovery Management from the Empowering Technology toolbar to start Acer eRecovery Management. 2 Switch to the restore and recovery page by selecting the Burn Disc button. 3 Select the type of backup (factory default, user, current system, application) you would...


