Aspire 2420, 2920, 2920Z Service Guide
Page 8
... the ExpressCard dummy card 57 Removing the Lower Cover 57 Removing the DIMM 59 Removing the WLAN Board Modules 60 Removing the Hard Disk Drive Module 61 Removing the Optical Drive Module 63 Main Unit Disassembly Process 65 Main Unit Disassembly Flowchart 65 Removing the CPU and VGA Heatsink Module 65 Removing the... View 118 Clearing Password Check and BIOS Recovery 119 Clearing Password Check 119 BIOS Recovery by Crisis Disk 120 FRU (Field Replaceable Unit) List 121 Aspire 2920/2920Z/2420 Exploded Diagram 122 Aspire 2920/2920Z/2420 Series 130 VIII
... the ExpressCard dummy card 57 Removing the Lower Cover 57 Removing the DIMM 59 Removing the WLAN Board Modules 60 Removing the Hard Disk Drive Module 61 Removing the Optical Drive Module 63 Main Unit Disassembly Process 65 Main Unit Disassembly Flowchart 65 Removing the CPU and VGA Heatsink Module 65 Removing the... View 118 Clearing Password Check and BIOS Recovery 119 Clearing Password Check 119 BIOS Recovery by Crisis Disk 120 FRU (Field Replaceable Unit) List 121 Aspire 2920/2920Z/2420 Exploded Diagram 122 Aspire 2920/2920Z/2420 Series 130 VIII
Aspire 2420, 2920, 2920Z Service Guide
Page 12
...-out (NTSC/PAL) support K AcerArcade™, featuring Acer CinemaVision™ and Acer ClearVision™ technologies Storage subsystem K 80/120/160/250 GB or larger hard disk drive K Optical drive options: jDVD-Super Multi double-layer drive jDVD/CD-RW combo drive K 5-in-1 card reader, supporting Secure Digital™...keys (printed on keyboard): play/pause, stop, previous, next K Empowering Key K Easy-launch buttons: WLAN, Internet, Bluetooth, email, Acer Arcade ™ K Volume wheel Audio K Dolby®-certified surround sound system with two built-in stereo speakers K Dolby® Home ...
...-out (NTSC/PAL) support K AcerArcade™, featuring Acer CinemaVision™ and Acer ClearVision™ technologies Storage subsystem K 80/120/160/250 GB or larger hard disk drive K Optical drive options: jDVD-Super Multi double-layer drive jDVD/CD-RW combo drive K 5-in-1 card reader, supporting Secure Digital™...keys (printed on keyboard): play/pause, stop, previous, next K Empowering Key K Easy-launch buttons: WLAN, Internet, Bluetooth, email, Acer Arcade ™ K Volume wheel Audio K Dolby®-certified surround sound system with two built-in stereo speakers K Dolby® Home ...
Aspire 2420, 2920, 2920Z Service Guide
Page 19
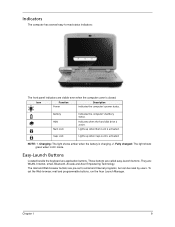
Indicates when the hard disk drive is charging. 2. Lights up when Caps Lock is activated. These buttons are ...when in AC mode. The mail and Web browser buttons are : WLAN, Internet, email, Bluetooth, Arcade and Acer Empowering Technology. To set to -read status indicators: The front panel indicators are visible even when the computer cover... Num Lock is closed. They are pre-set the Web browser, mail and programmable buttons, run the Acer Launch Manager. Icon Function Power Description Indicates the computer's power status. Indicators The computer has several easy-...
Indicates when the hard disk drive is charging. 2. Lights up when Caps Lock is activated. These buttons are ...when in AC mode. The mail and Web browser buttons are : WLAN, Internet, email, Bluetooth, Arcade and Acer Empowering Technology. To set to -read status indicators: The front panel indicators are visible even when the computer cover... Num Lock is closed. They are pre-set the Web browser, mail and programmable buttons, run the Acer Launch Manager. Icon Function Power Description Indicates the computer's power status. Indicators The computer has several easy-...
Aspire 2420, 2920, 2920Z Service Guide
Page 33
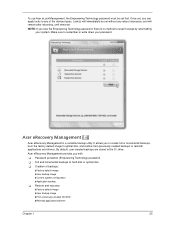
..., burn the factory default image to any reboot necessary, and will remain after rebooting, until removed. Acer eRecovery Management Acer eRecovery Management is no method to hard disk or optical disc K Creation of the devices types. By default, user-created backups are stored ...(Empowering Technology password) K Full and incremental backups to reset it except by reformatting your password. Make sure to the D:\ drive. To use Acer eLock Management, the Empowering Technology password must be set without any of backups: jFactory default image jUser backup image jCurrent system ...
..., burn the factory default image to any reboot necessary, and will remain after rebooting, until removed. Acer eRecovery Management Acer eRecovery Management is no method to hard disk or optical disc K Creation of the devices types. By default, user-created backups are stored ...(Empowering Technology password) K Full and incremental backups to reset it except by reformatting your password. Make sure to the D:\ drive. To use Acer eLock Management, the Empowering Technology password must be set without any of backups: jFactory default image jUser backup image jCurrent system ...
Aspire 2420, 2920, 2920Z Service Guide
Page 41
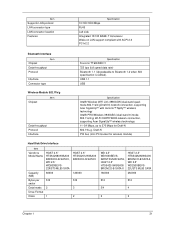
... throughput Protocol Interface Specification Intel® Wireless WiFi Link 4965AGN (dual-band quadmode 802.11a/b/g/Draft-N) network connection, supporting Acer SignalUp™ with ACPI 2.0 PCI v2.2 Bluetooth Interface Item Chipset Data throughput Protocol Interface Connector type Specification Foxconn TT60H928.... Bluetooth 1.1 (Upgradeable to 270 Mbps for Draft-N 802.11b+g, Draft-N PCI bus (mini PCI socket for wireless module) Hard Disk Drive Interface Item Vendor & Model Name HGST 2.5" HTS542580K9SA00 BRONCO-B SATA II, WD 2.5" WD800BEVS22RST0 ML80 SATA Capacity (MB) 80000 Bytes ...
... throughput Protocol Interface Specification Intel® Wireless WiFi Link 4965AGN (dual-band quadmode 802.11a/b/g/Draft-N) network connection, supporting Acer SignalUp™ with ACPI 2.0 PCI v2.2 Bluetooth Interface Item Chipset Data throughput Protocol Interface Connector type Specification Foxconn TT60H928.... Bluetooth 1.1 (Upgradeable to 270 Mbps for Draft-N 802.11b+g, Draft-N PCI bus (mini PCI socket for wireless module) Hard Disk Drive Interface Item Vendor & Model Name HGST 2.5" HTS542580K9SA00 BRONCO-B SATA II, WD 2.5" WD800BEVS22RST0 ML80 SATA Capacity (MB) 80000 Bytes ...

Aspire 2420, 2920, 2920Z Service Guide
Page 42
...(Single and multi session) 3. Ultra DMA mode-5 150 MB/Sec. Ultra DMA mode-5 5V(DC) +/- 5% 5V(DC) +/- 5% Combo Drive module Item Vendor & model name Performance Specification Transfer rate (KB/sec) Buffer Memory Interface Applicable disc format Specification SONY COMBO 12.7mm Tray 24X... Mode-2 Form-2, CD-i, Video-CD CD-Text 32 Chapter 1 Reads and writes CD-R discs conforming to "Orange Book Part 3" 6. Hard Disk Drive Interface Item Spindle speed (RPM) 5400 RPM Performance Specifications Buffer size 8MB Interface SATA Max. media 540 transfer rate (disk-buffer, Mbytes/s)...
...(Single and multi session) 3. Ultra DMA mode-5 150 MB/Sec. Ultra DMA mode-5 5V(DC) +/- 5% 5V(DC) +/- 5% Combo Drive module Item Vendor & model name Performance Specification Transfer rate (KB/sec) Buffer Memory Interface Applicable disc format Specification SONY COMBO 12.7mm Tray 24X... Mode-2 Form-2, CD-i, Video-CD CD-Text 32 Chapter 1 Reads and writes CD-R discs conforming to "Orange Book Part 3" 6. Hard Disk Drive Interface Item Spindle speed (RPM) 5400 RPM Performance Specifications Buffer size 8MB Interface SATA Max. media 540 transfer rate (disk-buffer, Mbytes/s)...

Aspire 2420, 2920, 2920Z Service Guide
Page 53
... each device will be shown if the device control is fixed to factory defaults. The function allows the user to create a hidden partition on hard disc drive to store operation system and restore the system to 640MB This field reports the memory size of the system. shows Summary Screen is disabled. Extended...
... each device will be shown if the device control is fixed to factory defaults. The function allows the user to create a hidden partition on hard disc drive to store operation system and restore the system to 640MB This field reports the memory size of the system. shows Summary Screen is disabled. Extended...

Aspire 2420, 2920, 2920Z Service Guide
Page 58
... -/+ Change Values F9 Setup Defaults Select Menu Enter Select Sub-Menu F10 Save and Exit 48 Chapter 2 Bootable devices includes the distette drive in module bay, the onboard hard disk drive and the CD-ROM in module bay. Press to move it down the list. Information Phoenix TrustedCore(tm) Setup Utility Main Security...
... -/+ Change Values F9 Setup Defaults Select Menu Enter Select Sub-Menu F10 Save and Exit 48 Chapter 2 Bootable devices includes the distette drive in module bay, the onboard hard disk drive and the CD-ROM in module bay. Press to move it down the list. Information Phoenix TrustedCore(tm) Setup Utility Main Security...
Aspire 2420, 2920, 2920Z Service Guide
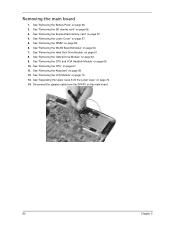
Page 65
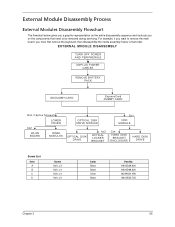
... SD DUMMY CARD ExpressCard DUMMY CARD Bx4, Captive Screwx5 LOWER COVER Ax2 WLAN BOARD DIMM MODULES OPTICAL DISK DRIVE MODULE OPTICAL DISK DRIVE Ax2 OPTICAL LOCKER BRACKET Dx1 HDD MODULE Cx4 HARD DISK BRACKET ENCLOSURE HARD DISK DRIVE Screw List Item A B C D Screw M2 x L3 M2 x L4 M3 x L4 M2 x L5 Color Black Black Silver Black...
... SD DUMMY CARD ExpressCard DUMMY CARD Bx4, Captive Screwx5 LOWER COVER Ax2 WLAN BOARD DIMM MODULES OPTICAL DISK DRIVE MODULE OPTICAL DISK DRIVE Ax2 OPTICAL LOCKER BRACKET Dx1 HDD MODULE Cx4 HARD DISK BRACKET ENCLOSURE HARD DISK DRIVE Screw List Item A B C D Screw M2 x L3 M2 x L4 M3 x L4 M2 x L5 Color Black Black Silver Black...
Aspire 2420, 2920, 2920Z Service Guide
Page 71
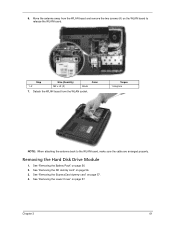
... WLAN board from the WLAN board and remove the two screws (A) on page 57. See "Removing the SD dummy card" on page 56. 2. Removing the Hard Disk Drive Module 1. Step 1~2 Size (Quantity) M2 x L3 (2) Black 7. Color Torque 1.6 kgf-cm NOTE: When attaching the antenna back to release the WLAN board. See "Removing...
... WLAN board from the WLAN board and remove the two screws (A) on page 57. See "Removing the SD dummy card" on page 56. 2. Removing the Hard Disk Drive Module 1. Step 1~2 Size (Quantity) M2 x L3 (2) Black 7. Color Torque 1.6 kgf-cm NOTE: When attaching the antenna back to release the WLAN board. See "Removing...

Aspire 2420, 2920, 2920Z Service Guide
Page 72
Slide and lift up the hard disk drive module to device, avoid pressing down on it or placing heavy objects on top of it. 62 Chapter 3 Remove the one screw (D) securing the hard disk drive module. Torque 1.6 kgf-cm NOTE: To prevent damage to remove. Step 1 Size (Quantity) M2 x L5 (1) Color Black 6. 5.
Slide and lift up the hard disk drive module to device, avoid pressing down on it or placing heavy objects on top of it. 62 Chapter 3 Remove the one screw (D) securing the hard disk drive module. Torque 1.6 kgf-cm NOTE: To prevent damage to remove. Step 1 Size (Quantity) M2 x L5 (1) Color Black 6. 5.
Aspire 2420, 2920, 2920Z Service Guide
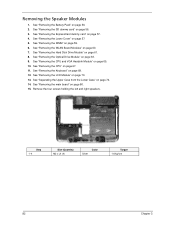
Page 73
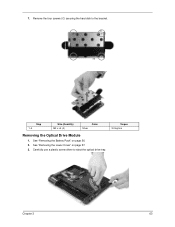
7. See "Removing the Lower Cover" on page 56. 2. Torque 3.0 kgf-cm Chapter 3 63 See "Removing the Battery Pack" on page 57. 3. Carefully use a plastic screw driver to the bracket. Step 1~4 Size (Quantity) M3 x L4 (4) Color Silver Removing the Optical Drive Module 1. Remove the four screws (C) securing the hard disk to eject the optical drive tray.
7. See "Removing the Lower Cover" on page 56. 2. Torque 3.0 kgf-cm Chapter 3 63 See "Removing the Battery Pack" on page 57. 3. Carefully use a plastic screw driver to the bracket. Step 1~4 Size (Quantity) M3 x L4 (4) Color Silver Removing the Optical Drive Module 1. Remove the four screws (C) securing the hard disk to eject the optical drive tray.
Aspire 2420, 2920, 2920Z Service Guide
Page 84
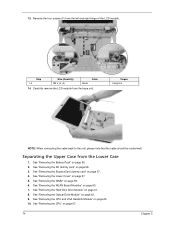
See "Removing the Battery Pack" on page 57. 5. See "Removing the Lower Cover" on page 56. 2. See "Removing the Optical Drive Module" on page 65. 10. Carefully remove the LCD module from the left and right hinge of the LCD module. Step 1~4 Size (Quantity) M2 x L4 ...Modules" on page 57. 4. Remove the four screws (F) from the base unit. See "Removing the ExpressCard dummy card" on page 60. 7. See "Removing the Hard Disk Drive Module" on page 59. 6. Separating the Upper Case from the Lower Case 1. 13. Torque 1.6 kgf-cm NOTE: When connecting the cable back to the unit...
See "Removing the Battery Pack" on page 57. 5. See "Removing the Lower Cover" on page 56. 2. See "Removing the Optical Drive Module" on page 65. 10. Carefully remove the LCD module from the left and right hinge of the LCD module. Step 1~4 Size (Quantity) M2 x L4 ...Modules" on page 57. 4. Remove the four screws (F) from the base unit. See "Removing the ExpressCard dummy card" on page 60. 7. See "Removing the Hard Disk Drive Module" on page 59. 6. Separating the Upper Case from the Lower Case 1. 13. Torque 1.6 kgf-cm NOTE: When connecting the cable back to the unit...
Aspire 2420, 2920, 2920Z Service Guide
Page 87
... disconnect the launch board cable from the Lower Case" on page 70. 13. See "Removing the Lower Cover" on page 69. 12. See "Removing the Hard Disk Drive Module" on page 56. 3. Chapter 3 77 See "Removing the SD dummy card" on page 61. 8. See "Removing the CPU" on page 56. 2. See "Removing... the Battery Pack" on page 67. 11. See "Removing the Optical Drive Module" on page 59. 6. See "Removing the DIMM" on page 63. 9. See "Removing the LCD Module" on page 74. 14. See "Separating the Upper Case...
... disconnect the launch board cable from the Lower Case" on page 70. 13. See "Removing the Lower Cover" on page 69. 12. See "Removing the Hard Disk Drive Module" on page 56. 3. Chapter 3 77 See "Removing the SD dummy card" on page 61. 8. See "Removing the CPU" on page 56. 2. See "Removing... the Battery Pack" on page 67. 11. See "Removing the Optical Drive Module" on page 59. 6. See "Removing the DIMM" on page 63. 9. See "Removing the LCD Module" on page 74. 14. See "Separating the Upper Case...
Aspire 2420, 2920, 2920Z Service Guide
Page 88
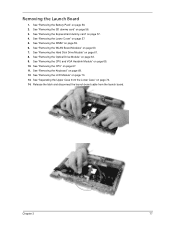
...launch board from the upper cover. See "Removing the Battery Pack" on page 57. 5. See "Removing the Lower Cover" on page 56. 2. See "Removing the Hard Disk Drive Module" on page 65. 10. See "Removing the CPU and VGA Heatsink Module" on page 61. 8. See "Removing the CPU" on page 56. 3. See..." on page 59. 6. See "Removing the DIMM" on page 69. 12. See "Removing the WLAN Board Modules" on page 63. 9. See "Removing the Optical Drive Module" on page 60. 7. Step 1~4 Size (Quantity) M2 x L3 (4) Color Black Torque 1.6 kgf-cm Removing theTouch Pad Board Module 1.
...launch board from the upper cover. See "Removing the Battery Pack" on page 57. 5. See "Removing the Lower Cover" on page 56. 2. See "Removing the Hard Disk Drive Module" on page 65. 10. See "Removing the CPU and VGA Heatsink Module" on page 61. 8. See "Removing the CPU" on page 56. 3. See..." on page 59. 6. See "Removing the DIMM" on page 69. 12. See "Removing the WLAN Board Modules" on page 63. 9. See "Removing the Optical Drive Module" on page 60. 7. Step 1~4 Size (Quantity) M2 x L3 (4) Color Black Torque 1.6 kgf-cm Removing theTouch Pad Board Module 1.
Aspire 2420, 2920, 2920Z Service Guide
Page 90
.... See "Separating the Upper Case from the SPKR1 on page 69. 12. See "Removing the WLAN Board Modules" on page 74. 14. See "Removing the Hard Disk Drive Module" on page 57. 5. See "Removing the Lower Cover" on page 61. 8. See "Removing the SD dummy card" on page 63. 9. See "...Removing the Optical Drive Module" on page 56. 3. See "Removing the CPU" on page 57. 4. See "Removing the ExpressCard dummy card" on page 67. 11. See "Removing the ...
.... See "Separating the Upper Case from the SPKR1 on page 69. 12. See "Removing the WLAN Board Modules" on page 74. 14. See "Removing the Hard Disk Drive Module" on page 57. 5. See "Removing the Lower Cover" on page 61. 8. See "Removing the SD dummy card" on page 63. 9. See "...Removing the Optical Drive Module" on page 56. 3. See "Removing the CPU" on page 57. 4. See "Removing the ExpressCard dummy card" on page 67. 11. See "Removing the ...
Aspire 2420, 2920, 2920Z Service Guide
Page 92
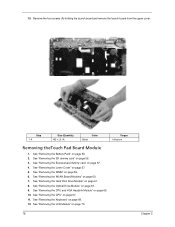
... on page 60. 7. See "Removing the Keyboard" on page 57. 4. See "Removing the ExpressCard dummy card" on page 69. 12. See "Removing the Optical Drive Module" on page 70. 13. See "Removing the LCD Module" on page 63. 9. See "Removing the Battery Pack" on page 56. 3. See "Removing the... SD dummy card" on page 56. 2. Step 1~4 Size (Quantity) M2 x L4 (4) Color Silver Torque 1.6 kgf-cm 82 Chapter 3 See "Removing the Hard Disk Drive Module" on page 74. 14. See "Separating the Upper Case from the Lower Case" on page 61. 8. See "Removing the Lower Cover" on page 67...
... on page 60. 7. See "Removing the Keyboard" on page 57. 4. See "Removing the ExpressCard dummy card" on page 69. 12. See "Removing the Optical Drive Module" on page 70. 13. See "Removing the LCD Module" on page 63. 9. See "Removing the Battery Pack" on page 56. 3. See "Removing the... SD dummy card" on page 56. 2. Step 1~4 Size (Quantity) M2 x L4 (4) Color Silver Torque 1.6 kgf-cm 82 Chapter 3 See "Removing the Hard Disk Drive Module" on page 74. 14. See "Separating the Upper Case from the Lower Case" on page 61. 8. See "Removing the Lower Cover" on page 67...
Aspire 2420, 2920, 2920Z Service Guide
Page 93
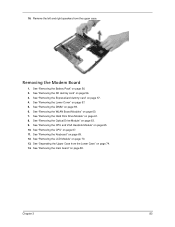
... dummy card" on page 69. 12. 16. See "Removing the Keyboard" on page 57. 4. See "Removing the Lower Cover" on page 61. 8. See "Removing the Hard Disk Drive Module" on page 57. 5. Removing the Modem Board 1. See "Removing the Optical...
... dummy card" on page 69. 12. 16. See "Removing the Keyboard" on page 57. 4. See "Removing the Lower Cover" on page 61. 8. See "Removing the Hard Disk Drive Module" on page 57. 5. Removing the Modem Board 1. See "Removing the Optical...
Aspire 2420, 2920, 2920Z Service Guide
Page 121
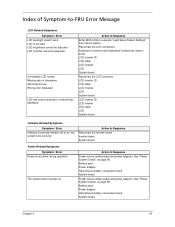
...-Related Symptoms Symptom / Error Power shuts down during operation The system doesn't power-on page 99. Battery pack Power adapter Hard drive & battery connection board System board Power source (battery pack and power adapter). Action in characters Abnormal screen Wrong color displayed ... to -FRU Error Message LCD-Related Symptoms Symptom / Error LCD backlight doesn't work ). Reconnect the LCD connectors. Battery pack Power adapter Hard drive & battery connection board System board Chapter 4 111 See "Power System Check" on . Index of Symptom-to execute "Load Setup Default ...
...-Related Symptoms Symptom / Error Power shuts down during operation The system doesn't power-on page 99. Battery pack Power adapter Hard drive & battery connection board System board Power source (battery pack and power adapter). Action in characters Abnormal screen Wrong color displayed ... to -FRU Error Message LCD-Related Symptoms Symptom / Error LCD backlight doesn't work ). Reconnect the LCD connectors. Battery pack Power adapter Hard drive & battery connection board System board Chapter 4 111 See "Power System Check" on . Index of Symptom-to execute "Load Setup Default ...
Aspire 2420, 2920, 2920Z User's Guide - EN
Page 81
...of High Definition video to your computer's hard drive or directly burned to create exciting movies in the DVD format. English 59 Starting Acer Arcade Deluxe You can run the Acer Arcade Deluxe utilities outside of Windows Media Center, double-click the Acer Arcade Deluxe icon from the Windows desktop.... To do this, scroll up/down from DV camcorders and webcams to your computer's hard disk in just a...
...of High Definition video to your computer's hard drive or directly burned to create exciting movies in the DVD format. English 59 Starting Acer Arcade Deluxe You can run the Acer Arcade Deluxe utilities outside of Windows Media Center, double-click the Acer Arcade Deluxe icon from the Windows desktop.... To do this, scroll up/down from DV camcorders and webcams to your computer's hard disk in just a...


