
Acer Aspire 1410 and Aspire 1680 Service Guide
Page 11
T Internal removable optical drive (AcerMedia bay) T Li-ion main battery pack Display T T T T T T The TFT LCD panel providing a lare ...feature that automatically decides the best settings for your display and conserves pwer Dual indenpendent display Multimedia T T T High-speed drive: DVD/CD-RW Combo, DVD-Dual or DVD-Super Multi 16-bit high-fidelity AC'97 stereo audio Built-in microphone...1680x1050) resolution ATI MOBILITYTM RADEONTM 9700 with dual soDimm modules T 30 GB and above high-capacity, Enhanced-IDE hard disk T Advanced Configuration Power Interface (ACPI) power management system.
T Internal removable optical drive (AcerMedia bay) T Li-ion main battery pack Display T T T T T T The TFT LCD panel providing a lare ...feature that automatically decides the best settings for your display and conserves pwer Dual indenpendent display Multimedia T T T High-speed drive: DVD/CD-RW Combo, DVD-Dual or DVD-Super Multi 16-bit high-fidelity AC'97 stereo audio Built-in microphone...1680x1050) resolution ATI MOBILITYTM RADEONTM 9700 with dual soDimm modules T 30 GB and above high-capacity, Enhanced-IDE hard disk T Advanced Configuration Power Interface (ACPI) power management system.

Acer Aspire 1410 and Aspire 1680 Service Guide
Page 76
Remove the four screws as shown. 4. Disconnect the ODD connector board then remove it. Detach the ODD holder. 5. Chapter 3 66 Remove the two screws that secure the optical disc drive and the ODD holder. 3. Push the ODD holder as the picture shows. 2. Then take the hard disc drive out from the HDD bracket. Remove another two screws holding the HDD bracket on the other side. 3. Disassembling the Optical Drive Module 1. Remove the two screws holding the HDD bracket on one side. 2. Disassembling the External Modules Disassembling the HDD Module 1.
Remove the four screws as shown. 4. Disconnect the ODD connector board then remove it. Detach the ODD holder. 5. Chapter 3 66 Remove the two screws that secure the optical disc drive and the ODD holder. 3. Push the ODD holder as the picture shows. 2. Then take the hard disc drive out from the HDD bracket. Remove another two screws holding the HDD bracket on the other side. 3. Disassembling the Optical Drive Module 1. Remove the two screws holding the HDD bracket on one side. 2. Disassembling the External Modules Disassembling the HDD Module 1.

Acer Aspire 1410 and Aspire 1680 Service Guide
Page 90
.... Onboard Devices Configuration Run printer self-test. Chapter 4 80 Remove battery pack and let it cool for 2 hours. Battery pack System board System hangs intermittently. Reconnect hard disk/CD-ROM drives. Device driver Device cable Device System board Keyboard/Touchpad-Related Symptoms...Onboard Devices Configuration" of BIOS Setup Utility is set to execute "Load Default Settings", then reboot system. Reconnect hard disk/CD-ROM/diskette drives. External display does not work correctly Print problems. Serial or parallel port device problems. Action in Windows doesn...
.... Onboard Devices Configuration Run printer self-test. Chapter 4 80 Remove battery pack and let it cool for 2 hours. Battery pack System board System hangs intermittently. Reconnect hard disk/CD-ROM drives. Device driver Device cable Device System board Keyboard/Touchpad-Related Symptoms...Onboard Devices Configuration" of BIOS Setup Utility is set to execute "Load Default Settings", then reboot system. Reconnect hard disk/CD-ROM/diskette drives. External display does not work correctly Print problems. Serial or parallel port device problems. Action in Windows doesn...

Acer Aspire 1410 and Aspire 1680 Service Guide
Page 92
If the problem remains, replace the following devices: T Non-Acer devices T Printer, mouse, and other external devices T Battery pack T Hard disk drive T DIMM T CD-ROM/Diskette drive Module T PC Cards 4. NOTE: Verify that the power supply being used at a time. Visually check them for damage... problem has changed. 6. Do not replace a non-defective FRU: T System board T LCD assembly Chapter 4 82 Power-off the computer. 2. Remove or disconnect all attached devices are found, replace the FRU. 3. Follow these procedures to isolate the failing FRU (do not isolate non-defective FRU...
If the problem remains, replace the following devices: T Non-Acer devices T Printer, mouse, and other external devices T Battery pack T Hard disk drive T DIMM T CD-ROM/Diskette drive Module T PC Cards 4. NOTE: Verify that the power supply being used at a time. Visually check them for damage... problem has changed. 6. Do not replace a non-defective FRU: T System board T LCD assembly Chapter 4 82 Power-off the computer. 2. Remove or disconnect all attached devices are found, replace the FRU. 3. Follow these procedures to isolate the failing FRU (do not isolate non-defective FRU...

Aspire 1410/1680 User Guide
Page 57
English English 49 Windows Arcade Aspire Arcade is an integrated player for music, photos, DVD movies, and videos. Cinema - listen to music. Music, Video, etc...) on your screensaver and power-saving ... home page. watch and/or edit video clips Music - create CDs and/or DVDs to your preferences Note: While watching videos, DVDs, or slideshows your hard drive or any removable media Video- adjust Aspire Arcade according to share or archive data Advanced Settings - To watch or listen, click a content button (e.g.
English English 49 Windows Arcade Aspire Arcade is an integrated player for music, photos, DVD movies, and videos. Cinema - listen to music. Music, Video, etc...) on your screensaver and power-saving ... home page. watch and/or edit video clips Music - create CDs and/or DVDs to your preferences Note: While watching videos, DVDs, or slideshows your hard drive or any removable media Video- adjust Aspire Arcade according to share or archive data Advanced Settings - To watch or listen, click a content button (e.g.

Acer Aspire 1410, 1810T, and 1810TZ Service Guide
Page 7
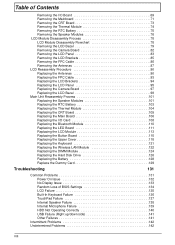
... Replacement Requirements 41 Pre-disassembly Instructions 42 Disassembly Process 43 External Module Disassembly Process 44 External Modules Disassembly Flowchart 44 Removing the Battery Pack 45 Removing the Dummy Card 46 Removing the Hard Disk Drive Module 47 Removing the DIMM Module 50 Removing the WLAN Module 52 Main Unit Disassembly Process 54 Main Unit Disassembly Flowchart 54...
... Replacement Requirements 41 Pre-disassembly Instructions 42 Disassembly Process 43 External Module Disassembly Process 44 External Modules Disassembly Flowchart 44 Removing the Battery Pack 45 Removing the Dummy Card 46 Removing the Hard Disk Drive Module 47 Removing the DIMM Module 50 Removing the WLAN Module 52 Main Unit Disassembly Process 54 Main Unit Disassembly Flowchart 54...
Acer Aspire 1410, 1810T, and 1810TZ Service Guide
Page 8
...Modules 76 LCD Module Disassembly Process 78 LCD Module Disassembly Flowchart 78 Removing the LCD Bezel 79 Removing the Camera Board 82 Removing the LCD Panel 83 Removing the LCD Brackets 85 Removing the FPC Cable 86 Removing the Antennas 87 LCD Reassembly Procedure 90 Replacing the Antennas 90 ... the Upper Cover 118 Replacing the Keyboard 121 Replacing the Wireless LAN Module 122 Replacing the DIMM Module 124 Replacing the Hard Disk Drive 126 Replacing the Battery 128 Replace the Dummy Card 129 Troubleshooting 131 Common Problems 131 Power On Issue 132 No Display ...
...Modules 76 LCD Module Disassembly Process 78 LCD Module Disassembly Flowchart 78 Removing the LCD Bezel 79 Removing the Camera Board 82 Removing the LCD Panel 83 Removing the LCD Brackets 85 Removing the FPC Cable 86 Removing the Antennas 87 LCD Reassembly Procedure 90 Replacing the Antennas 90 ... the Upper Cover 118 Replacing the Keyboard 121 Replacing the Wireless LAN Module 122 Replacing the DIMM Module 124 Replacing the Hard Disk Drive 126 Replacing the Battery 128 Replace the Dummy Card 129 Troubleshooting 131 Common Problems 131 Power On Issue 132 No Display ...

Acer Aspire 1410, 1810T, and 1810TZ Service Guide
Page 46
...enter the UnlockHD.EXE command and input the key to reappear. 7. Reboot to the hard disk and wait for example 46548274. 6. Select Enter Unlock Password and press Enter. 9. Save and exit the BIOS to a removable bootable drive containing DOS and the UnlockHD.EXE program and open a DOS prompt. Boot up the ... password, perform the following error code to user. Make a note of the result, for the error code to create an unlock code. Remove HDD/BIOS Password Utilities This section provide you with removing HDD/BIOS method: Remove HDD Password: When the user keys in the example. 4.
...enter the UnlockHD.EXE command and input the key to reappear. 7. Reboot to the hard disk and wait for example 46548274. 6. Select Enter Unlock Password and press Enter. 9. Save and exit the BIOS to a removable bootable drive containing DOS and the UnlockHD.EXE program and open a DOS prompt. Boot up the ... password, perform the following error code to user. Make a note of the result, for the error code to create an unlock code. Remove HDD/BIOS Password Utilities This section provide you with removing HDD/BIOS method: Remove HDD Password: When the user keys in the example. 4.

Acer Aspire 1410, 1810T, and 1810TZ Service Guide
Page 57
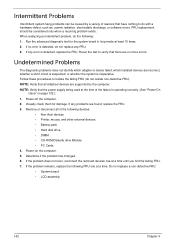
Lift the HDD cover up and away by the corner. 4. Removing the Hard Disk Drive Module DISCLAIMER: The notebook sample in the following images may differ from the actual sample. The actual model includes an FPC as pictured in the following images shows an FFC. NOTE: The cable pictured in the image on page 45. 2. Chapter 3 47 See "Removing the Battery Pack" on the right. 1. Loosen the two captive screws. 3. Grasp the FPC cable and lift to remove.
Lift the HDD cover up and away by the corner. 4. Removing the Hard Disk Drive Module DISCLAIMER: The notebook sample in the following images may differ from the actual sample. The actual model includes an FPC as pictured in the following images shows an FFC. NOTE: The cable pictured in the image on page 45. 2. Chapter 3 47 See "Removing the Battery Pack" on the right. 1. Loosen the two captive screws. 3. Grasp the FPC cable and lift to remove.

Acer Aspire 1410, 1810T, and 1810TZ Service Guide
Page 66
See "Removing the Hard Disk Drive Module" on page 45. 2. Using the plastic pry, press in the four latches along the top of the keyboard to prevent damage. 1. Removing the Keyboard IMPORTANT: The keyboard is easily warped or damaged during the removal process. See "Removing the Battery Pack" on page 47. 3. Take care not to use excessive...
See "Removing the Hard Disk Drive Module" on page 45. 2. Using the plastic pry, press in the four latches along the top of the keyboard to prevent damage. 1. Removing the Keyboard IMPORTANT: The keyboard is easily warped or damaged during the removal process. See "Removing the Battery Pack" on page 47. 3. Take care not to use excessive...
Acer Aspire 1410, 1810T, and 1810TZ Service Guide
Page 152
..., replace the FRU. If any error is detected, do the following devices: • Non-Acer devices • Printer, mouse, and other external devices • Battery pack • Hard disk drive • DIMM • CD-ROM/Diskette drive Module • PC Cards 4. Visually check them for the system board in loop mode at...FRU (do with a hardware defect, such as: cosmic radiation, electrostatic discharge, or software errors. If the problem does not recur, reconnect the removed devices one at the time of reasons that the power supply being used at a time. Determine if the problem has changed...
..., replace the FRU. If any error is detected, do the following devices: • Non-Acer devices • Printer, mouse, and other external devices • Battery pack • Hard disk drive • DIMM • CD-ROM/Diskette drive Module • PC Cards 4. Visually check them for the system board in loop mode at...FRU (do with a hardware defect, such as: cosmic radiation, electrostatic discharge, or software errors. If the problem does not recur, reconnect the removed devices one at the time of reasons that the power supply being used at a time. Determine if the problem has changed...

Acer Aspire 1410, 1810T, and 1810TZ Service Guide
Page 235
... hotkeys 13 E Euro Key 14 External Module Disassembly Index Flowchart 44 F Features 1 FLASH Utility 33 Flash Utility 33 FRU (Field Replaceable Unit) List 151 H Hard Disk Drive Module Removing 47 Hibernation mode hotkey 13 Hot Keys 11 I Indicators 9 Intermittent Problems 142 Internal Microphone Failure 139 Internal Speaker Failure 138 J Jumper and Connector Locations...
... hotkeys 13 E Euro Key 14 External Module Disassembly Index Flowchart 44 F Features 1 FLASH Utility 33 Flash Utility 33 FRU (Field Replaceable Unit) List 151 H Hard Disk Drive Module Removing 47 Hibernation mode hotkey 13 Hot Keys 11 I Indicators 9 Intermittent Problems 142 Internal Microphone Failure 139 Internal Speaker Failure 138 J Jumper and Connector Locations...


