
Acer Aspire 1410 and Aspire 1680 Service Guide
Page 8
... Keys 21 Touchpad 23 Touchpad Basics 23 Hardware Specifications and Configurations 25 Chapter 2 System Utilities 36 BIOS Setup Utility 36 Navigating the BIOS Utility 37 Information 38 Main 39 Advanced 41 Security 43 Boot 47 Exit 48 BIOS Flash Utility 49 Chapter 3 Machine Disassembly and Replacement 50 General Information 51 Before You Begin 51 Disassembly Procedure Flowchart 53 Removing the Battery Pack 55 Removing the HDD Module/the Memory and the Wireless LAN Card/the Thermal Module and the CPU...
... Keys 21 Touchpad 23 Touchpad Basics 23 Hardware Specifications and Configurations 25 Chapter 2 System Utilities 36 BIOS Setup Utility 36 Navigating the BIOS Utility 37 Information 38 Main 39 Advanced 41 Security 43 Boot 47 Exit 48 BIOS Flash Utility 49 Chapter 3 Machine Disassembly and Replacement 50 General Information 51 Before You Begin 51 Disassembly Procedure Flowchart 53 Removing the Battery Pack 55 Removing the HDD Module/the Memory and the Wireless LAN Card/the Thermal Module and the CPU...
Acer Aspire 1410 and Aspire 1680 Service Guide
Page 35
... Supports DIMM type Supports DIMM Speed Supports DIMM voltage Supports DIMM package Memory module combinations Specification Phneoix 3A03 SST 39SF040A, 512KX8 CMOS Boot Block Flash Memory (the difference with Flash ROM?) 512KB 32-pin PLCC ACPI 1.0b, PC Card 95, SM BIOS 2.3, IEEE1284-ECP/EPP, PCI 2.2, PnP 1.0a, DMI 2.0, PS/2 keyboard and mouse, USB 2.0, VGA BIOS, CD-ROM bootable, IEEE 1394 Set by setup manual Specification Built-in CPU 512K for Intel Celeron M processor at 1.3~1.4GHz-Aspire 1410...
... Supports DIMM type Supports DIMM Speed Supports DIMM voltage Supports DIMM package Memory module combinations Specification Phneoix 3A03 SST 39SF040A, 512KX8 CMOS Boot Block Flash Memory (the difference with Flash ROM?) 512KB 32-pin PLCC ACPI 1.0b, PC Card 95, SM BIOS 2.3, IEEE1284-ECP/EPP, PCI 2.2, PnP 1.0a, DMI 2.0, PS/2 keyboard and mouse, USB 2.0, VGA BIOS, CD-ROM bootable, IEEE 1394 Set by setup manual Specification Built-in CPU 512K for Intel Celeron M processor at 1.3~1.4GHz-Aspire 1410...
Acer Aspire 1410 and Aspire 1680 Service Guide
Page 53
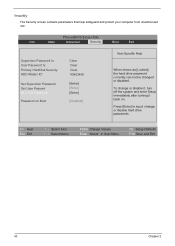
...; Select Item ← → Select Menu F5/F6 Change Values Enter Select 4 Sub-Menu F9 Setup Defaults F10 Save and Exit 43 Chapter 2 Security The Security screen contains parameters that help safeguard and protect your computer from unauthorized use. Main Advanced Security Boot Exit Supervisor Password Is: User Password Is: Primary HardDisk Security: HDD Master ID: Set Supervisor Password Set User Passord Set HDD Password Password on . To change , or disable hard drive passwords. PhoenixBIOS Setup Utility Info.
...; Select Item ← → Select Menu F5/F6 Change Values Enter Select 4 Sub-Menu F9 Setup Defaults F10 Save and Exit 43 Chapter 2 Security The Security screen contains parameters that help safeguard and protect your computer from unauthorized use. Main Advanced Security Boot Exit Supervisor Password Is: User Password Is: Primary HardDisk Security: HDD Master ID: Set Supervisor Password Set User Passord Set HDD Password Password on . To change , or disable hard drive passwords. PhoenixBIOS Setup Utility Info.

Acer Aspire 1410 and Aspire 1680 Service Guide
Page 54
... password protects the BIOS Setup Utility from unauthorized access. The Set Supervisor Password box appears: 2. Chapter 2 44 Parameter User Password is Supervisor Password is written to HDD when both passwords are prompted to reset it. Supervisor Password is Set User Password Set Supervisor Password Primary Harddisk Security Password on the screen. Option Clear or Set Clear or Set Disabled or Enabled Disabled or Enabled NOTE: When you have right to enter setup. If you forget your password, you may have to return your notebook...
... password protects the BIOS Setup Utility from unauthorized access. The Set Supervisor Password box appears: 2. Chapter 2 44 Parameter User Password is Supervisor Password is written to HDD when both passwords are prompted to reset it. Supervisor Password is Set User Password Set Supervisor Password Primary Harddisk Security Password on the screen. Option Clear or Set Clear or Set Disabled or Enabled Disabled or Enabled NOTE: When you have right to enter setup. If you forget your password, you may have to return your notebook...
Acer Aspire 1410 and Aspire 1680 Service Guide
Page 55
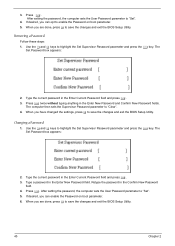
Removing a Password Follow these steps: 1. The Set Password box appears: 2. Type a password in the Confirm New Password field. 4. After setting the password, the computer sets the User Password parameter to "Set". 4. If desired, you can enable the Password on boot parameter. 5. After setting the password, the computer sets the User Password parameter to "Set". 5. Use the w and y keys to save the changes and exit the BIOS Setup Utility. Press e. When you are done, press u to "Clear". 4. Retype the password in the Enter New Password field...
Removing a Password Follow these steps: 1. The Set Password box appears: 2. Type a password in the Confirm New Password field. 4. After setting the password, the computer sets the User Password parameter to "Set". 4. If desired, you can enable the Password on boot parameter. 5. After setting the password, the computer sets the User Password parameter to "Set". 5. Use the w and y keys to save the changes and exit the BIOS Setup Utility. Press e. When you are done, press u to "Clear". 4. Retype the password in the Enter New Password field...
Acer Aspire 1410 and Aspire 1680 Service Guide
Page 58
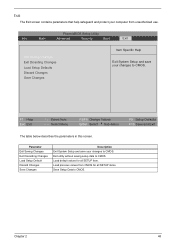
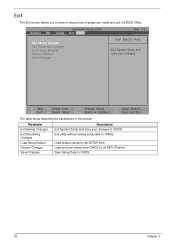
... from CMOS for all SETUP items. Save Setup Data to CMOS. Load default values for all SETUP item. PhoenixBIOS Setup Utility Info. Load previous values from unauthorized use. Chapter 2 48 F1 Help Esc Exit ↑ ↓ Select Item ← → Select Menu F5/F6 Change Values Enter Select 4 Sub-Menu F9 Setup Defaults F10 Save and Exit The table below describes the parameters in this screen.
... from CMOS for all SETUP items. Save Setup Data to CMOS. Load default values for all SETUP item. PhoenixBIOS Setup Utility Info. Load previous values from unauthorized use. Chapter 2 48 F1 Help Esc Exit ↑ ↓ Select Item ← → Select Menu F5/F6 Change Values Enter Select 4 Sub-Menu F9 Setup Defaults F10 Save and Exit The table below describes the parameters in this screen.

Acer Aspire 1410 and Aspire 1680 Service Guide
Page 63
... that order. For example, if you want to be removed during servicing. Start Battery K*2 HDD Cover HDD Module E*2 RAM/Wireless Cover Wireless LAN Card Memory CPU *2 IO Bezel *2 Heatsink Cover *2 Thermal Module ODD Module *6 ODD Connector Board ODD Holder ODD Drive *3 Middle Cover *2 Keyboard *4 (right and left hinges) LCD Module *2 Switch Board *5 *18 Lower and Upper Case Assembly Lower Case Assembly Upper Case Assembly Touchpad *3 VGA Heatsink *2 *2 screw nuts Main Board 3-in that need to remove the system board, you on the entire disassembly...
... that order. For example, if you want to be removed during servicing. Start Battery K*2 HDD Cover HDD Module E*2 RAM/Wireless Cover Wireless LAN Card Memory CPU *2 IO Bezel *2 Heatsink Cover *2 Thermal Module ODD Module *6 ODD Connector Board ODD Holder ODD Drive *3 Middle Cover *2 Keyboard *4 (right and left hinges) LCD Module *2 Switch Board *5 *18 Lower and Upper Case Assembly Lower Case Assembly Upper Case Assembly Touchpad *3 VGA Heatsink *2 *2 screw nuts Main Board 3-in that need to remove the system board, you on the entire disassembly...
Acer Aspire 1410 and Aspire 1680 Service Guide
Page 84
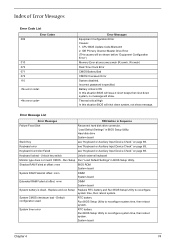
... Run Setup Run "Load Default Settings" in Sequence Failure Fixed Disk Reconnect hard disk drive connector. Keyboard locked - "Load Default Settings" in BIOS Setup Utility. Shadow RAM Failed at offset: nnnn BIOS ROM System board System RAM Failed at offset: nnnn DIMM System board Extended RAM Failed at xxxx:xxxx:xxxxh (R:xxxxh, W:xxxxh) Real Time Clock Error CMOS Battery Bad CMOS Checksum Error System disabled. Hard disk drive System board Stuck Key see "Keyboard or Auxiliary Input Device Check" on page 69. Default configuration used RTC battery Run BIOS Setup Utility...
... Run Setup Run "Load Default Settings" in Sequence Failure Fixed Disk Reconnect hard disk drive connector. Keyboard locked - "Load Default Settings" in BIOS Setup Utility. Shadow RAM Failed at offset: nnnn BIOS ROM System board System RAM Failed at offset: nnnn DIMM System board Extended RAM Failed at xxxx:xxxx:xxxxh (R:xxxxh, W:xxxxh) Real Time Clock Error CMOS Battery Bad CMOS Checksum Error System disabled. Hard disk drive System board Stuck Key see "Keyboard or Auxiliary Input Device Check" on page 69. Default configuration used RTC battery Run BIOS Setup Utility...
Acer Aspire 1410 and Aspire 1680 Service Guide
Page 89
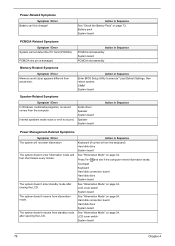
... / Error In Windows, multimedia programs, no sound. Internal speakers make noise or emit no sound comes from the computer. Hard disk connection board Hard disk drive System board See "Hibernation Mode" on page 34. The system doesn't resume from actual size. Touchpad Keyboard Hard disk connection board Hard disk drive System board See "Hibernation Mode" on page 34. LCD cover switch System board 79 Chapter 4 Press Fn+oand see if the computer enters hibernation mode. Action in Sequence PCMCIA slot assembly System board PCMCIA slot...
... / Error In Windows, multimedia programs, no sound. Internal speakers make noise or emit no sound comes from the computer. Hard disk connection board Hard disk drive System board See "Hibernation Mode" on page 34. The system doesn't resume from actual size. Touchpad Keyboard Hard disk connection board Hard disk drive System board See "Hibernation Mode" on page 34. LCD cover switch System board 79 Chapter 4 Press Fn+oand see if the computer enters hibernation mode. Action in Sequence PCMCIA slot assembly System board PCMCIA slot...

Acer Aspire 1410, 1810T, and 1810TZ Service Guide
Page 7
... Diagram 4 Your Notebook Tour 5 Front View 5 Left View 7 Right View 7 Base View 8 Rear View 8 Indicators 9 TouchPad Basics 10 Using the Keyboard 11 Lock Keys and embedded numeric keypad 11 Windows Keys 12 Hot Keys 13 Special Keys 14 Hardware Specifications and Configurations 15 System Utilities 25 BIOS Setup Utility 25 Navigating the BIOS Utility 25 Information 26 Main 27 Security 28 Boot 31 Exit 32 BIOS Flash Utility 33 DOS Flash Utility 34 WinFlash Utility 35 Remove HDD/BIOS Password Utilities 36 Removing BIOS Passwords 37 Miscellaneous Utilities...
... Diagram 4 Your Notebook Tour 5 Front View 5 Left View 7 Right View 7 Base View 8 Rear View 8 Indicators 9 TouchPad Basics 10 Using the Keyboard 11 Lock Keys and embedded numeric keypad 11 Windows Keys 12 Hot Keys 13 Special Keys 14 Hardware Specifications and Configurations 15 System Utilities 25 BIOS Setup Utility 25 Navigating the BIOS Utility 25 Information 26 Main 27 Security 28 Boot 31 Exit 32 BIOS Flash Utility 33 DOS Flash Utility 34 WinFlash Utility 35 Remove HDD/BIOS Password Utilities 36 Removing BIOS Passwords 37 Miscellaneous Utilities...
Acer Aspire 1410, 1810T, and 1810TZ Service Guide
Page 8
... Bluetooth Module 110 Replacing the LED Board 111 Replacing the LCD Module 113 Replacing the Button Board 115 Replacing the Upper Cover 118 Replacing the Keyboard 121 Replacing the Wireless LAN Module 122 Replacing the DIMM Module 124 Replacing the Hard Disk Drive 126 Replacing the Battery 128 Replace the Dummy Card 129 Troubleshooting 131 Common Problems 131 Power On Issue 132 No Display Issue 133 Random Loss of BIOS Settings 134 LCD Failure 135 Built-In Keyboard Failure 136 TouchPad Failure 137 Internal Speaker Failure 138 Internal Microphone Failure 139 HDD...
... Bluetooth Module 110 Replacing the LED Board 111 Replacing the LCD Module 113 Replacing the Button Board 115 Replacing the Upper Cover 118 Replacing the Keyboard 121 Replacing the Wireless LAN Module 122 Replacing the DIMM Module 124 Replacing the Hard Disk Drive 126 Replacing the Battery 128 Replace the Dummy Card 129 Troubleshooting 131 Common Problems 131 Power On Issue 132 No Display Issue 133 Random Loss of BIOS Settings 134 LCD Failure 135 Built-In Keyboard Failure 136 TouchPad Failure 137 Internal Speaker Failure 138 Internal Microphone Failure 139 HDD...

Acer Aspire 1410, 1810T, and 1810TZ Service Guide
Page 39
... press the Enter key. Retype the password in the "Enter New Password" field. After setting the password, the computer sets the User Password parameter to highlight the Set Supervisor Password parameter and press the Enter key. Use the ↑ and ↓ keys to "Set". 4. The computer then sets the Supervisor Password parameter to save the changes and exit the BIOS Setup Utility. Press Enter. The Set Supervisor Password box appears: Set Supervisor Password Enter New Password [ ] Confirm New Password [ ] 2. Type a password in the "Confirm New Password" field. If...
... press the Enter key. Retype the password in the "Enter New Password" field. After setting the password, the computer sets the User Password parameter to highlight the Set Supervisor Password parameter and press the Enter key. Use the ↑ and ↓ keys to "Set". 4. The computer then sets the Supervisor Password parameter to save the changes and exit the BIOS Setup Utility. Press Enter. The Set Supervisor Password box appears: Set Supervisor Password Enter New Password [ ] Confirm New Password [ ] 2. Type a password in the "Confirm New Password" field. If...

Acer Aspire 1410, 1810T, and 1810TZ Service Guide
Page 40
... user presses Enter. Re-enter password. [Continue] 30 Chapter 2 Set Supervisor Password Enter Current Password [ ] Enter New Password [ ] Confirm New Password [ ] 2. Setup Warning Passwords do not match, the screen displays the following . When you are done, press F10 to "Set". 5. Setup Notice Changes have been saved. [Continue] The password setting is OK, the screen will show you can enable the Password on boot parameter. 6. Type the current password in the Enter Current Password field and press Enter. 3. Changing a Password 1. Use the ↑ and ↓ keys...
... user presses Enter. Re-enter password. [Continue] 30 Chapter 2 Set Supervisor Password Enter Current Password [ ] Enter New Password [ ] Confirm New Password [ ] 2. Setup Warning Passwords do not match, the screen displays the following . When you are done, press F10 to "Set". 5. Setup Notice Changes have been saved. [Continue] The password setting is OK, the screen will show you can enable the Password on boot parameter. 6. Type the current password in the Enter Current Password field and press Enter. 3. Changing a Password 1. Use the ↑ and ↓ keys...
Acer Aspire 1410, 1810T, and 1810TZ Service Guide
Page 42
... Setup Default Select Menu Enter Select SubMenu F10 Save and Exit The table below describes the parameters in this screen. Parameter Exit Saving Changes Exit Discarding Changes Load Setup Default Discard Changes Save Changes Description Exit System Setup and save your changes to CMOS. 32 Chapter 2 Exit utility without saving setup data to save or discard any changes you made and quit the BIOS Utility. Load default values for all SETUP...
... Setup Default Select Menu Enter Select SubMenu F10 Save and Exit The table below describes the parameters in this screen. Parameter Exit Saving Changes Exit Discarding Changes Load Setup Default Discard Changes Save Changes Description Exit System Setup and save your changes to CMOS. 32 Chapter 2 Exit utility without saving setup data to save or discard any changes you made and quit the BIOS Utility. Load default values for all SETUP...
Acer Aspire 1410, 1810T, and 1810TZ Service Guide
Page 141
... re-create the failure by running the diagnostic test or by repeating the same operation. 3. Use the following procedure as possible. 2. Symptoms (Verified) Go To Power On Issue Page 132 No Display Issue Page 133 LCD Failure Page 135 Internal Keyboard Failure Page 136 TouchPad Failure Page 137 Internal Speaker Failure Page 138 Internal Microphone Failure Page 139 USB Failure Page 141 Other Function...
... re-create the failure by running the diagnostic test or by repeating the same operation. 3. Use the following procedure as possible. 2. Symptoms (Verified) Go To Power On Issue Page 132 No Display Issue Page 133 LCD Failure Page 135 Internal Keyboard Failure Page 136 TouchPad Failure Page 137 Internal Speaker Failure Page 138 Internal Microphone Failure Page 139 USB Failure Page 141 Other Function...
Acer Aspire 1410, 1810T, and 1810TZ Service Guide
Page 143
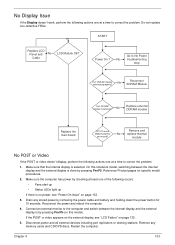
... "Power On Issue" on this notebook model, switching between the internal display and the external display is no power, see "LCD Failure" on page 135. 5. module No POST or Video If the POST or video doesn't display, perform the following actions one at a time to No Power Power On ? Drain any memory cards and CD/DVD discs. Remove any stored power by pressing Fn+F5. Do not replace non-defective FRUs: START Replace LCD Panel and No Cable LCD Module...
... "Power On Issue" on this notebook model, switching between the internal display and the external display is no power, see "LCD Failure" on page 135. 5. module No POST or Video If the POST or video doesn't display, perform the following actions one at a time to No Power Power On ? Drain any memory cards and CD/DVD discs. Remove any stored power by pressing Fn+F5. Do not replace non-defective FRUs: START Replace LCD Panel and No Cable LCD Module...

Acer Aspire 1410, 1810T, and 1810TZ Service Guide
Page 144
... "Disassembly Process" on page 34. 5. If the Issue is experiencing HDD or ODD BIOS information loss, disconnect and reconnect the power and data cables between devices. If the computer boots correctly, add the devices one by one year old, replace the CMOS battery. 2. If extensive pixel damage is present (different colored spots in the same locations on adjusting settings. See the User Manual for instructions on the screen...
... "Disassembly Process" on page 34. 5. If the Issue is experiencing HDD or ODD BIOS information loss, disconnect and reconnect the power and data cables between devices. If the computer boots correctly, add the devices one by one year old, replace the CMOS battery. 2. If extensive pixel damage is present (different colored spots in the same locations on adjusting settings. See the User Manual for instructions on the screen...

Acer Aspire 1410, 1810T, and 1810TZ Service Guide
Page 150
... "Disassembly Process" on the Boot menu. 6. The Install Windows screen displays. Select Repair your computer. Click Next. Run the Windows Memory Diagnostic Tool. If the issue is discovered, follow the onscreen information to the operating system DVD. Replace the HDD. Run a complete virus scan using System Restore. b. The System Recovery Options screen displays. c. d. f. Startup Repair attempts to correct the problem. 1. Check the BIOS settings are required. For more information see Windows Help and Support. 5. Ensure all external devices. 2. Select Startup...
... "Disassembly Process" on the Boot menu. 6. The Install Windows screen displays. Select Repair your computer. Click Next. Run the Windows Memory Diagnostic Tool. If the issue is discovered, follow the onscreen information to the operating system DVD. Replace the HDD. Run a complete virus scan using System Restore. b. The System Recovery Options screen displays. c. d. f. Startup Repair attempts to correct the problem. 1. Check the BIOS settings are required. For more information see Windows Help and Support. 5. Ensure all external devices. 2. Select Startup...

Acer Aspire 1410, 1810T, and 1810TZ Service Guide
Page 159
... and BIOS Recovery This section provides a procedure for clearing the password and BIOS. Reconnect the RTC battery and reassemble the unit. The Hardware Open Gap on page 71. 2. See "Removing the Mainboard" on the main board clears the CMOS of all user settings. 1. See "Removing the RTC Battery" on page 75. 3. Turn the mainboard over and short the G2 pad. 4. Remove the RTC battery. Mainboard CMOS Discharge Discharging the CMOS clears all user settings and restores factory defaults.
... and BIOS Recovery This section provides a procedure for clearing the password and BIOS. Reconnect the RTC battery and reassemble the unit. The Hardware Open Gap on page 71. 2. See "Removing the Mainboard" on the main board clears the CMOS of all user settings. 1. See "Removing the RTC Battery" on page 75. 3. Turn the mainboard over and short the G2 pad. 4. Remove the RTC battery. Mainboard CMOS Discharge Discharging the CMOS clears all user settings and restores factory defaults.

Acer Aspire 1410, 1810T, and 1810TZ Service Guide
Page 235
... Utility 25-33 Advanced 28 Boot 31 Exit 32 Navigating 25 Power 31 Save and Exit 32 Security 28 System Security 32 brightness hotkeys 13 Button Board Removing 61 C Camera Board Removing 82, 97 caps lock on indicator 9 Common Problems 132 CRT Cable Removing 71 D DIMM Module Removing 50 Display 4 display hotkeys 13 E Euro Key 14 External Module Disassembly Index Flowchart 44 F Features 1 FLASH Utility 33 Flash Utility 33 FRU (Field Replaceable Unit) List 151 H Hard Disk Drive Module Removing 47 Hibernation mode hotkey 13 Hot Keys 11 I Indicators 9 Intermittent Problems 142 Internal Microphone...
... Utility 25-33 Advanced 28 Boot 31 Exit 32 Navigating 25 Power 31 Save and Exit 32 Security 28 System Security 32 brightness hotkeys 13 Button Board Removing 61 C Camera Board Removing 82, 97 caps lock on indicator 9 Common Problems 132 CRT Cable Removing 71 D DIMM Module Removing 50 Display 4 display hotkeys 13 E Euro Key 14 External Module Disassembly Index Flowchart 44 F Features 1 FLASH Utility 33 Flash Utility 33 FRU (Field Replaceable Unit) List 151 H Hard Disk Drive Module Removing 47 Hibernation mode hotkey 13 Hot Keys 11 I Indicators 9 Intermittent Problems 142 Internal Microphone...


