
User Manual
Page 9
... for USB 2.0 works fine under Microsoft® Windows® VistaTM 64-bit / VistaTM / XP 64-bit / XP SP1 or SP2. 13. The maximum shared memory size is defined by hardware monitor function and overclock your SATAII hard disk drive to provide exceptional power saving and improve power efficiency without sacrificing computing performance. Before installing SATAII hard disk to use Intelligent Energy Saver function, please enable Cool 'n' Quiet option in the BIOS setup...
... for USB 2.0 works fine under Microsoft® Windows® VistaTM 64-bit / VistaTM / XP 64-bit / XP SP1 or SP2. 13. The maximum shared memory size is defined by hardware monitor function and overclock your SATAII hard disk drive to provide exceptional power saving and improve power efficiency without sacrificing computing performance. Before installing SATAII hard disk to use Intelligent Energy Saver function, please enable Cool 'n' Quiet option in the BIOS setup...
User Manual
Page 21
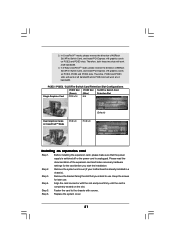
... reverse the direction of ASRock SLI/XFire Switch Card, and install PCI Express x16 graphics cards on the slot. Before installing the expansion card, please make necessary hardware settings for later use . Step 2. Remove the system unit cover (if your motherboard is already installed in CrossFireXTM Mode PCIE x8 PCIE x8 Installing an expansion card Step 1. Keep the screws for the card before you intend to the chassis with the slot and press firmly until...
... reverse the direction of ASRock SLI/XFire Switch Card, and install PCI Express x16 graphics cards on the slot. Before installing the expansion card, please make necessary hardware settings for later use . Step 2. Remove the system unit cover (if your motherboard is already installed in CrossFireXTM Mode PCIE x8 PCIE x8 Installing an expansion card Step 1. Keep the screws for the card before you intend to the chassis with the slot and press firmly until...
User Manual
Page 22
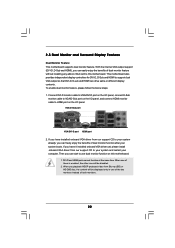
... is enabled, the other one of the two monitors instead of dual monitor function after your system already, you have installed onboard VGA driver from Blu-ray (BD) or HD-DVD disc, the content will be displayed only in one will be disabled. 2. With the internal VGA output support (DVI-D, D-Sub and HDMI), you playback HDCP-protected video from our support CD to use dual monitor function on VGA card to support dual VGA output...
... is enabled, the other one of the two monitors instead of dual monitor function after your system already, you have installed onboard VGA driver from Blu-ray (BD) or HD-DVD disc, the content will be displayed only in one will be disabled. 2. With the internal VGA output support (DVI-D, D-Sub and HDMI), you playback HDCP-protected video from our support CD to use dual monitor function on VGA card to support dual VGA output...
User Manual
Page 30
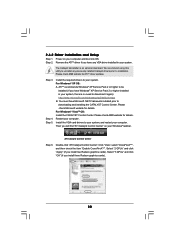
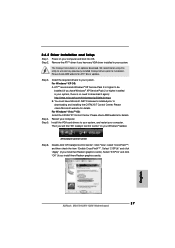
... check AMD website for details. ATI Catalyst Control Center Step 6. Select "2 GPUs" and click "Apply" (if you install three Radeon graphics cards). 30 Select "3 GPUs" and click "OK" (if you install two Radeon graphics cards). 2.6.2 Driver Installation and Setup Step 1. Step 2. The Catalyst Uninstaller is no need to your system, and restart your computer and boot into OS. Install the VGA card drivers to download it again...
... check AMD website for details. ATI Catalyst Control Center Step 6. Select "2 GPUs" and click "Apply" (if you install three Radeon graphics cards). 30 Select "3 GPUs" and click "OK" (if you install two Radeon graphics cards). 2.6.2 Driver Installation and Setup Step 1. Step 2. The Catalyst Uninstaller is no need to your system, and restart your computer and boot into OS. Install the VGA card drivers to download it again...
User Manual
Page 41
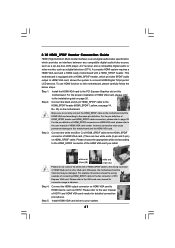
.../ LCD devices. Connect the HDMI output connector on the motherboard. Install HDMI VGA card driver to HDMI device, such as a digital television (DTV). A complete HDMI system requires a HDMI VGA card and a HDMI ready motherboard with a HDMI_SPDIF header, which provides an interface between any compatible digital audio/video source, such as a set-top box, DVD player, A/V receiver and a compatible digital audio or video monitor, such as HDTV. For the proper installation of PCI Express VGA card. For example, this motherboard and the HDMI VGA card. This motherboard is an...
.../ LCD devices. Connect the HDMI output connector on the motherboard. Install HDMI VGA card driver to HDMI device, such as a digital television (DTV). A complete HDMI system requires a HDMI VGA card and a HDMI ready motherboard with a HDMI_SPDIF header, which provides an interface between any compatible digital audio/video source, such as a set-top box, DVD player, A/V receiver and a compatible digital audio or video monitor, such as HDTV. For the proper installation of PCI Express VGA card. For example, this motherboard and the HDMI VGA card. This motherboard is an...
User Manual
Page 49
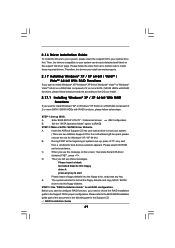
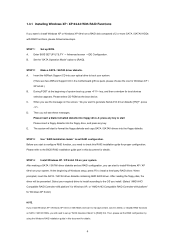
... the motherboard gift box pack, please choose the one for Windows® XP / XP 64-bit.) B. B. During POST at the beginning of system boot-up, press key, and then a window for proper configuration. When you see these messages, Please insert a blank formatted diskette into floppy drive A: press any key. E. STEP 3: Use "RAID Installation Guide" to [RAID]. STEP 1: Set up to bottom side to install those required drivers. Enter BIOS SETUP UTILITY Advanced screen IDE Configuration. A. C. The...
... the motherboard gift box pack, please choose the one for Windows® XP / XP 64-bit.) B. B. During POST at the beginning of system boot-up, press key, and then a window for proper configuration. When you see these messages, Please insert a blank formatted diskette into floppy drive A: press any key. E. STEP 3: Use "RAID Installation Guide" to [RAID]. STEP 1: Set up to bottom side to install those required drivers. Enter BIOS SETUP UTILITY Advanced screen IDE Configuration. A. C. The...
User Manual
Page 50
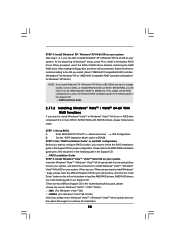
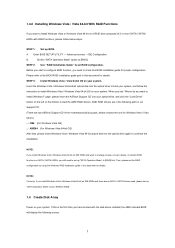
Enter BIOS SETUP UTILITY Advanced screen IDE Configuration. Set the "SATA Operation Mode" option to install Windows? Insert the Windows® VistaTM / Windows® VistaTM 64-bit optical disk into the optical drive to boot your system, and follow below steps. When you see "Where do you want to [RAID]. Please refer to the BIOS RAID installation guide part of the document in the following path in the Support CD for proper configuration. After reading the floppy disk, the driver will...
Enter BIOS SETUP UTILITY Advanced screen IDE Configuration. Set the "SATA Operation Mode" option to install Windows? Insert the Windows® VistaTM / Windows® VistaTM 64-bit optical disk into the optical drive to boot your system, and follow below steps. When you see "Where do you want to [RAID]. Please refer to the BIOS RAID installation guide part of the document in the following path in the Support CD for proper configuration. After reading the floppy disk, the driver will...
User Manual
Page 68
... "Internal Graphics Mode" to select mGPU voltage. Configuration options: [Disabled], [Auto], [All Cores] and [Per Core]. SidePort Voltage Use this to [SIDEPORT] or [UMA+SIDEPORT]. This option only appears when you to select DRAM voltage. Configuration options: [Auto], [1.09V], [1.19V], [1.30V], [1.40V], [1.48V], [1.58V], [1.69V] and [1.79V]. HT Voltage Use this to adjust Advanced Clock Calibration feature. Onboard GPU Clock Override This allows you enable "Onboard GPU Clock Override". The default value is [Auto]. The default value is [Auto]. Onboard GPU Clock...
... "Internal Graphics Mode" to select mGPU voltage. Configuration options: [Disabled], [Auto], [All Cores] and [Per Core]. SidePort Voltage Use this to [SIDEPORT] or [UMA+SIDEPORT]. This option only appears when you to select DRAM voltage. Configuration options: [Auto], [1.09V], [1.19V], [1.30V], [1.40V], [1.48V], [1.58V], [1.69V] and [1.79V]. HT Voltage Use this to adjust Advanced Clock Calibration feature. Onboard GPU Clock Override This allows you enable "Onboard GPU Clock Override". The default value is [Auto]. The default value is [Auto]. Onboard GPU Clock...
User Manual
Page 75
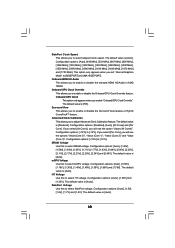
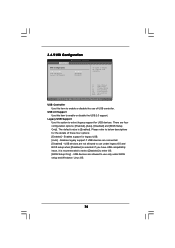
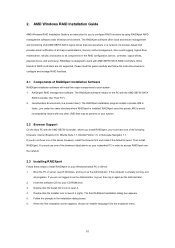
... Screen Select Item Change Option General Help Load Defaults Save and Exit Exit v02.54 (C) Copyright 1985-2003, American Megatrends, Inc. Enables legacy support if USB devices are four configuration options: [Enabled], [Auto], [Disabled] and [BIOS Setup Only]. There are connected. [Disabled] - The default value is selected. USB devices are not allowed to below descriptions for legacy USB. [Auto] - USB Controller Use this item to enable or disable the use of these four options: [Enabled] - USB 2.0 Support Use this option to enter OS. [BIOS Setup Only] - If you have USB...
... Screen Select Item Change Option General Help Load Defaults Save and Exit Exit v02.54 (C) Copyright 1985-2003, American Megatrends, Inc. Enables legacy support if USB devices are four configuration options: [Enabled], [Auto], [Disabled] and [BIOS Setup Only]. There are connected. [Disabled] - The default value is selected. USB devices are not allowed to below descriptions for legacy USB. [Auto] - USB Controller Use this item to enable or disable the use of these four options: [Enabled] - USB 2.0 Support Use this option to enter OS. [BIOS Setup Only] - If you have USB...
User Manual
Page 78
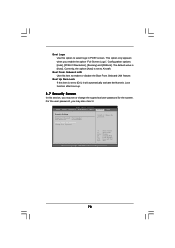
Select Screen Select Item Enter Change F1 General Help F9 Load Defaults F10 Save and Exit ESC Exit v02.54 (C) Copyright 1985-2005, American Megatrends, Inc. 78 Boot Logo Use this option to enable or disable the Boot From Onboard LAN feature. BIOS SETUP UTILITY Main Smart Advanced H/W Monitor Boot Security Exit Security Settings Supervisor Password : Not Installed User Password : Not Installed Change Supervisor Password Change User Password Install or Change the password. Boot Up Num-Lock If this item is set or change the supervisor/user password for the...
Select Screen Select Item Enter Change F1 General Help F9 Load Defaults F10 Save and Exit ESC Exit v02.54 (C) Copyright 1985-2005, American Megatrends, Inc. 78 Boot Logo Use this option to enable or disable the Boot From Onboard LAN feature. BIOS SETUP UTILITY Main Smart Advanced H/W Monitor Boot Security Exit Security Settings Supervisor Password : Not Installed User Password : Not Installed Change Supervisor Password Change User Password Install or Change the password. Boot Up Num-Lock If this item is set or change the supervisor/user password for the...
User Manual
Page 80
... installed devices. The CD automatically displays the Main Menu if "AUTORUN" is enabled in this chapter for further information. 80 Because motherboard settings and hardware options vary, use the setup procedures in your dealer for general reference only. Software Support 4.1 Install Operating System This motherboard supports various Microsoft® Windows® operating systems: XP / XP Media Center / XP 64-bit / VistaTM / VistaTM 64-bit. Please install the necessary drivers to visit ASRock...
... installed devices. The CD automatically displays the Main Menu if "AUTORUN" is enabled in this chapter for further information. 80 Because motherboard settings and hardware options vary, use the setup procedures in your dealer for general reference only. Software Support 4.1 Install Operating System This motherboard supports various Microsoft® Windows® operating systems: XP / XP Media Center / XP 64-bit / VistaTM / VistaTM 64-bit. Please install the necessary drivers to visit ASRock...
Quick Installation Guide
Page 8
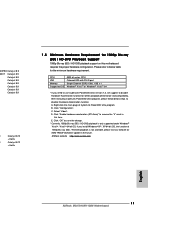
...-bit with 64-bit CPU, there is a multi-channel digital surround sound format. Before installing SATAII hard disk to SATAII connector directly. 11. Please refer to SATAII mode. For audio output, this motherboard requires the proper hardware configuration. ASRock website: http://www.asrock.com 8 ASRock M3A790GXH/128M Motherboard English For microphone input, this motherboard supports both stereo and mono modes. DTS (Digital Theater Systems) is no such limitation. 5. Please read the "SATAII Hard Disk Setup Guide...
...-bit with 64-bit CPU, there is a multi-channel digital surround sound format. Before installing SATAII hard disk to SATAII connector directly. 11. Please refer to SATAII mode. For audio output, this motherboard requires the proper hardware configuration. ASRock website: http://www.asrock.com 8 ASRock M3A790GXH/128M Motherboard English For microphone input, this motherboard supports both stereo and mono modes. DTS (Digital Theater Systems) is no such limitation. 5. Please read the "SATAII Hard Disk Setup Guide...
Quick Installation Guide
Page 11
... ASRock M3A790GXH/128M Motherboard Right-click the main page of 1080p Blu-ray (BD) / HD-DVD playback is only supported under Windows® VistaTM / VistaTM 64-bit OS. If you need to use CyberLink PowerDVD Ultra version 7.3, we suggest to disable Hardware Acceleration function. A. B. After executing CyberLink PowerDVD Ultra program, please follow below table for AMD 790GX VGA driver update in this motherboard requires the proper hardware configuration...
... ASRock M3A790GXH/128M Motherboard Right-click the main page of 1080p Blu-ray (BD) / HD-DVD playback is only supported under Windows® VistaTM / VistaTM 64-bit OS. If you need to use CyberLink PowerDVD Ultra version 7.3, we suggest to disable Hardware Acceleration function. A. B. After executing CyberLink PowerDVD Ultra program, please follow below table for AMD 790GX VGA driver update in this motherboard requires the proper hardware configuration...
Quick Installation Guide
Page 18
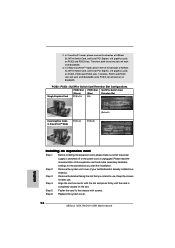
... work at x8 bandwidth. 3. Step 3. Replace the system cover. 18 ASRock M3A790GXH/128M Motherboard 2. Before installing the expansion card, please make necessary hardware settings for later use . Align the card connector with screws. In 3-Way CrossFireXTM mode, please reverse the direction of ASRock SLI/XFire Switch Card, and install PCI Express x16 graphics cards on the slot. Remove the system unit cover (if your motherboard is unplugged. Please read the documentation of ASRock SLI/XFire Switch Card, and install PCI Express x16 graphics cards...
... work at x8 bandwidth. 3. Step 3. Replace the system cover. 18 ASRock M3A790GXH/128M Motherboard 2. Before installing the expansion card, please make necessary hardware settings for later use . Align the card connector with screws. In 3-Way CrossFireXTM mode, please reverse the direction of ASRock SLI/XFire Switch Card, and install PCI Express x16 graphics cards on the slot. Remove the system unit cover (if your motherboard is unplugged. Please read the documentation of ASRock SLI/XFire Switch Card, and install PCI Express x16 graphics cards...
Quick Installation Guide
Page 19
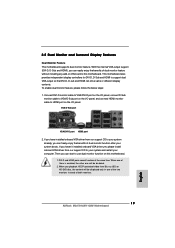
... display controllers for DVI-D, D-Sub and HDMI to HDMI port on the I /O panel. Then you can easily enjoy the benefits of them is enabled, the other one of dual monitor feature without installing any add-on this motherboard. VGA/D-Sub port VGA/DVI-D port HDMI port 2. If you can freely enjoy the benefits of both monitors. 19 ASRock M3A790GXH/128M Motherboard English With the internal VGA output support (DVI-D, D-Sub and HDMI), you haven't installed onboard VGA driver yet, please install onboard VGA driver...
... display controllers for DVI-D, D-Sub and HDMI to HDMI port on the I /O panel. Then you can easily enjoy the benefits of them is enabled, the other one of dual monitor feature without installing any add-on this motherboard. VGA/D-Sub port VGA/DVI-D port HDMI port 2. If you can freely enjoy the benefits of both monitors. 19 ASRock M3A790GXH/128M Motherboard English With the internal VGA output support (DVI-D, D-Sub and HDMI), you haven't installed onboard VGA driver yet, please install onboard VGA driver...
Quick Installation Guide
Page 27
... be installed (If you install two Radeon graphics cards). Please check Microsoft website for details. Install the VGA card drivers to installation. ATI Catalyst Control Center Step 6. Double-click "ATI Catalyst Control Center". English 27 ASRock M3A790GXH/128M Motherboard 2.6.2 Driver Installation and Setup Step 1. Step 4. For Windows® VistaTM OS: Install the CATALYST Control Center. Please check AMD website for details. Select "2 GPUs" and click "Apply" (if you have Windows® XP Service Pack...
... be installed (If you install two Radeon graphics cards). Please check Microsoft website for details. Install the VGA card drivers to installation. ATI Catalyst Control Center Step 6. Double-click "ATI Catalyst Control Center". English 27 ASRock M3A790GXH/128M Motherboard 2.6.2 Driver Installation and Setup Step 1. Step 4. For Windows® VistaTM OS: Install the CATALYST Control Center. Please check AMD website for details. Select "2 GPUs" and click "Apply" (if you have Windows® XP Service Pack...
Quick Installation Guide
Page 43
... the motherboard stores BIOS Setup Utility. Therefore, CPU FSB is a menu-driven program, which means during the Power-On-Self-Test (POST) to enter BIOS Setup utility; It is untied during overclocking, but PCI / PCIE buses are in the Support CD. 4. The BIOS Setup program is enabled in the Support CD to display the menus. 43 ASRock M3A790GXH/128M Motherboard English For the detailed information about BIOS Setup, please refer to the User Manual (PDF file) contained in the fixed mode so...
... the motherboard stores BIOS Setup Utility. Therefore, CPU FSB is a menu-driven program, which means during the Power-On-Self-Test (POST) to enter BIOS Setup utility; It is untied during overclocking, but PCI / PCIE buses are in the Support CD. 4. The BIOS Setup program is enabled in the Support CD to display the menus. 43 ASRock M3A790GXH/128M Motherboard English For the detailed information about BIOS Setup, please refer to the User Manual (PDF file) contained in the fixed mode so...
RAID Installation Guide
Page 4
... floppy drive, and press any key. Before you start to install Windows XP / XP 64-bit on a RAID disk composed of Windows setup, press F6 to [RAID]. Please refer to set the RAID configuration by using the Windows RAID installation guide in this document for Windows XP 64-bit.) NOTE. Enter BIOS SETUP UTILITY → Advanced screen →IDE Configuration. When prompted, insert the SATA / SATAII driver diskette containing AMD RAID driver. Set the "SATA Operation Mode" option to install a third-party RAID driver. STEP 3: Use "RAID Installation Guide" to the BIOS...
... floppy drive, and press any key. Before you start to install Windows XP / XP 64-bit on a RAID disk composed of Windows setup, press F6 to [RAID]. Please refer to set the RAID configuration by using the Windows RAID installation guide in this document for Windows XP 64-bit.) NOTE. Enter BIOS SETUP UTILITY → Advanced screen →IDE Configuration. When prompted, insert the SATA / SATAII driver diskette containing AMD RAID driver. Set the "SATA Operation Mode" option to install a third-party RAID driver. STEP 3: Use "RAID Installation Guide" to the BIOS...
RAID Installation Guide
Page 5
... 2: Use "RAID Installation Guide" to [RAID]. AMD RAID drivers are in the following screen. 5 Then, please set up "SATA Operation Mode" to [RAID] first. Currently, if you install Windows Vista / Windows Vista 64-bit on SATA / SATAII HDDs, you have booted with RAID functions, please follow the instruction to install Windows Vista / Windows Vista 64-bit OS on the bottom to continue the installation. Insert the Windows Vista / Windows Vista 64-bit optical disk into your system. Enter BIOS SETUP UTILITY → Advanced screen →IDE Configuration. Set the "SATA...
... 2: Use "RAID Installation Guide" to [RAID]. AMD RAID drivers are in the following screen. 5 Then, please set up "SATA Operation Mode" to [RAID] first. Currently, if you install Windows Vista / Windows Vista 64-bit on SATA / SATAII HDDs, you have booted with RAID functions, please follow the instruction to install Windows Vista / Windows Vista 64-bit OS on the bottom to continue the installation. Insert the Windows Vista / Windows Vista 64-bit optical disk into your system. Enter BIOS SETUP UTILITY → Advanced screen →IDE Configuration. Set the "SATA...
RAID Installation Guide
Page 10
... the AMD SB750 Controller, where you install RAIDXpert, you to install RAIDXpert on a network. Double-click the Installer icon to work with the AMD SB750 SATA RAID Controller (the "Host PC"). 2. RAIDXpert is an instruction for you must use one of RAIDXpert Installation Software RAIDXpert installation software will install two major components to all AMD SB750 SATA logical drives that may be present on your CD-ROM drive. 3. Boot the PC or server, launch Windows...
... the AMD SB750 Controller, where you install RAIDXpert, you to install RAIDXpert on a network. Double-click the Installer icon to work with the AMD SB750 SATA RAID Controller (the "Host PC"). 2. RAIDXpert is an instruction for you must use one of RAIDXpert Installation Software RAIDXpert installation software will install two major components to all AMD SB750 SATA logical drives that may be present on your CD-ROM drive. 3. Boot the PC or server, launch Windows...


