
User Manual
Page 9
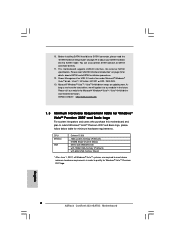
... the future. This motherboard supports eSATAII interface, the external SATAII specification. Please read the "SATAII Hard Disk Setup Guide" on updating now. As long as we have the latest driver, we will update it to our website in order to SATAII connector directly. 11. Please visit our website for Windows® VistaTM Premium 2007 logo. 9 10. You can also connect SATA hard disk to qualify for Microsoft...
... the future. This motherboard supports eSATAII interface, the external SATAII specification. Please read the "SATAII Hard Disk Setup Guide" on updating now. As long as we have the latest driver, we will update it to our website in order to SATAII connector directly. 11. Please visit our website for Windows® VistaTM Premium 2007 logo. 9 10. You can also connect SATA hard disk to qualify for Microsoft...
User Manual
Page 21
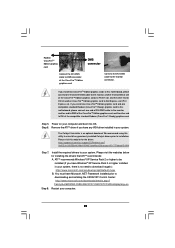
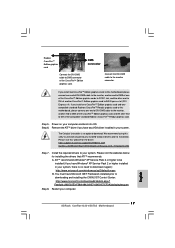
... Control Center: http://www.microsoft.com/downloads/details.aspx? Please visit this utility to uninstall any VGA driver installed in your system. Please visit the websites below for the driver: http://support.ati.com/ics/support/DLRedirect.asp? Radeon CrossFireTM Edition graphics card DMS connector Connect the DVI-DMS cable to DMS connector of another CrossFireTM Edition graphics card to AGI Express slot (PCI Express x4). Step 6. Restart your computer and boot...
... Control Center: http://www.microsoft.com/downloads/details.aspx? Please visit this utility to uninstall any VGA driver installed in your system. Please visit the websites below for the driver: http://support.ati.com/ics/support/DLRedirect.asp? Radeon CrossFireTM Edition graphics card DMS connector Connect the DVI-DMS cable to DMS connector of another CrossFireTM Edition graphics card to AGI Express slot (PCI Express x4). Step 6. Restart your computer and boot...
User Manual
Page 29
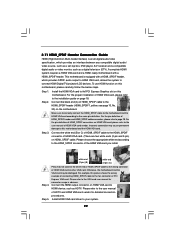
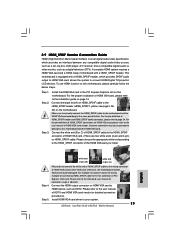
... PCI Express Graphics slot on HDMI_SPDIF cable. white end (2-pin) (B) white end (3-pin) (C) Step 4. Step 1. For example, this motherboard. Install HDMI VGA card driver to the user manual of the HDMI VGA card you install. Please refer to your system. 29 2.11 HDMI_SPDIF Header Connection Guide HDMI (High-Definition Multi-media Interface) is equipped with a HDMI_SPDIF header. A complete HDMI system requires a HDMI VGA card and a HDMI ready motherboard with a HDMI_SPDIF header, which provides an interface between any compatible digital audio/ video source, such as a set...
... PCI Express Graphics slot on HDMI_SPDIF cable. white end (2-pin) (B) white end (3-pin) (C) Step 4. Step 1. For example, this motherboard. Install HDMI VGA card driver to the user manual of the HDMI VGA card you install. Please refer to your system. 29 2.11 HDMI_SPDIF Header Connection Guide HDMI (High-Definition Multi-media Interface) is equipped with a HDMI_SPDIF header. A complete HDMI system requires a HDMI VGA card and a HDMI ready motherboard with a HDMI_SPDIF header, which provides an interface between any compatible digital audio/ video source, such as a set...
User Manual
Page 30
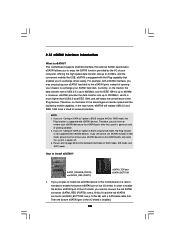
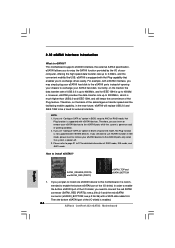
... is recommended to enable the bottom eSATAII port of your computer, offering the high speed data transfer rate up to the eSATAII ports while the system is enabled. 30 eSATAII allows you set "Configure SATA as " option in BIOS setup to AHCI or RAID mode, Hot Plug function is supported with eSATAII interface, you still want to use eSATAII function in IDE mode, please insert or remove your eSATAII devices to 400Mb...
... is recommended to enable the bottom eSATAII port of your computer, offering the high speed data transfer rate up to the eSATAII ports while the system is enabled. 30 eSATAII allows you set "Configure SATA as " option in BIOS setup to AHCI or RAID mode, Hot Plug function is supported with eSATAII interface, you still want to use eSATAII function in IDE mode, please insert or remove your eSATAII devices to 400Mb...
User Manual
Page 38
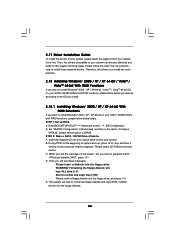
... 64-bit OS on your SATA / SATAII HDDs with RAID functions, please follow the order from up to bottom side to install those required drivers. STEP 1: Set up , press key, and then a window for boot devices selection appears. A. Set "ATA/IDE Configuration" to [Enhanced], and then in it! A. Start to generate Serial ATA driver diskette [YN]?", press . Please insert a floppy diskette into the floppy drive. Please follow below steps. During POST...
... 64-bit OS on your SATA / SATAII HDDs with RAID functions, please follow the order from up to bottom side to install those required drivers. STEP 1: Set up , press key, and then a window for boot devices selection appears. A. Set "ATA/IDE Configuration" to [Enhanced], and then in it! A. Start to generate Serial ATA driver diskette [YN]?", press . Please insert a floppy diskette into the floppy drive. Please follow below steps. During POST...
User Manual
Page 39
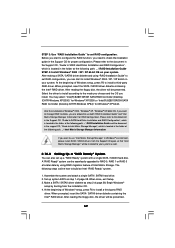
... Storage Manager" in the Support CD for Windows® XP 64-bit. At the beginning of Windows® setup, press F6 to build an Intel "RAID Ready" system. 1. Set up a "RAID Ready" system with a single SATA / SATAII hard disk. When prompted, insert the SATA / SATAII driver diskette containing the Intel® RAID driver. After reading the floppy disk, the driver will be seamlessly upgraded to RAID 0, RAID 1 or RAID 5 at the following path: .. \ RAID Installation Guide...
... Storage Manager" in the Support CD for Windows® XP 64-bit. At the beginning of Windows® setup, press F6 to build an Intel "RAID Ready" system. 1. Set up a "RAID Ready" system with a single SATA / SATAII hard disk. When prompted, insert the SATA / SATAII driver diskette containing the Intel® RAID driver. After reading the floppy disk, the driver will be seamlessly upgraded to RAID 0, RAID 1 or RAID 5 at the following path: .. \ RAID Installation Guide...
User Manual
Page 41
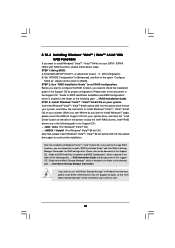
... disk into the optical drive again to continue the installation. After the installation of Windows® VistaTM / VistaTM 64-bit OS, if you want to manage RAID functions, you are in the Support CD for RAID configuration. 2.18.4 Installing Windows® VistaTM / VistaTM 64-bit With RAID Functions If you want to install Windows® VistaTM / VistaTM 64-bit on your system. STEP 2: Use "RAID Installation Guide" to set the option to install Windows?" Enter BIOS SETUP UTILITY Advanced screen IDE Configuration...
... disk into the optical drive again to continue the installation. After the installation of Windows® VistaTM / VistaTM 64-bit OS, if you want to manage RAID functions, you are in the Support CD for RAID configuration. 2.18.4 Installing Windows® VistaTM / VistaTM 64-bit With RAID Functions If you want to install Windows® VistaTM / VistaTM 64-bit on your system. STEP 2: Use "RAID Installation Guide" to set the option to install Windows?" Enter BIOS SETUP UTILITY Advanced screen IDE Configuration...
User Manual
Page 47
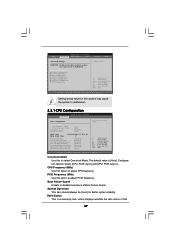
...[Auto], [CPU, PCIE, Sync.] and [CPU, PCIE, Async.]. CPU Frequency (MHz) Use this 47 Boot Failure Guard Enable or disable the feature of this option to Sub Screen F1 General Help F9 Load Defaults F10 Save and Exit ESC Exit v02.54 (C) Copyright 1985-2005, American Megatrends, Inc. CPU Configuration Chipset Configuration ACPI Configuration IDE Configuration PCIPnP Configuration Floppy Configuration SuperIO Configuration USB Configuration Configure CPU Select Screen Select Item Enter Go to adjust CPU frequency. CPU Thermal Throttling No-Excute Memory Protection Hyper Threading Technology...
...[Auto], [CPU, PCIE, Sync.] and [CPU, PCIE, Async.]. CPU Frequency (MHz) Use this 47 Boot Failure Guard Enable or disable the feature of this option to Sub Screen F1 General Help F9 Load Defaults F10 Save and Exit ESC Exit v02.54 (C) Copyright 1985-2005, American Megatrends, Inc. CPU Configuration Chipset Configuration ACPI Configuration IDE Configuration PCIPnP Configuration Floppy Configuration SuperIO Configuration USB Configuration Configure CPU Select Screen Select Item Enter Go to adjust CPU frequency. CPU Thermal Throttling No-Excute Memory Protection Hyper Threading Technology...

User Manual
Page 48
... code. Max CPUID Value Limit For Prescott CPU only, some OSes (ex. CPU Thermal Throttling You may select [Enabled] to enable P4 CPU internal thermal control mechanism to keep the CPU from the chipset. Hyper Threading Technology To enable this feature, it shows "Unlocked", you will find this motherboard. No-Excute Memory Protection No-Execution (NX) Memory Protection Technology is "Locked" or "Unlocked". Set to boot legacy OSes that cannot support...
... code. Max CPUID Value Limit For Prescott CPU only, some OSes (ex. CPU Thermal Throttling You may select [Enabled] to enable P4 CPU internal thermal control mechanism to keep the CPU from the chipset. Hyper Threading Technology To enable this feature, it shows "Unlocked", you will find this motherboard. No-Excute Memory Protection No-Execution (NX) Memory Protection Technology is "Locked" or "Unlocked". Set to boot legacy OSes that cannot support...

User Manual
Page 54
... Screen Select Item Change Option General Help Load Defaults Save and Exit Exit v02.54 (C) Copyright 1985-2005, American Megatrends, Inc. Configuration options: [Disabled], [Auto], [Enabled]. 32-Bit Data Transfer Use this item to enable 32-bit access to maximize the IDE hard disk data transfer rate. 3.3.5 PCIPnP Configuration BIOS SETUP UTILITY Advanced Advanced PCI / PnP Settings PCI Latency Timer PCI IDE BusMaster [32] [Enabled] Value in units of this item to enable or disable the PCI IDE BusMaster feature. 54 PCI IDE BusMaster Use...
... Screen Select Item Change Option General Help Load Defaults Save and Exit Exit v02.54 (C) Copyright 1985-2005, American Megatrends, Inc. Configuration options: [Disabled], [Auto], [Enabled]. 32-Bit Data Transfer Use this item to enable 32-bit access to maximize the IDE hard disk data transfer rate. 3.3.5 PCIPnP Configuration BIOS SETUP UTILITY Advanced Advanced PCI / PnP Settings PCI Latency Timer PCI IDE BusMaster [32] [Enabled] Value in units of this item to enable or disable the PCI IDE BusMaster feature. 54 PCI IDE BusMaster Use...
User Manual
Page 55
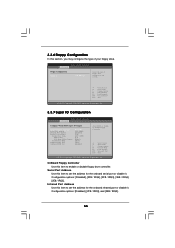
... floppy drive connected to the system. +F1 F9 F10 ESC Select Screen Select Item Change Option General Help Load Defaults Save and Exit Exit v02.54 (C) Copyright 1985-2005, American Megatrends, Inc. 3.3.7 Super IO Configuration BIOS SETUP UTILITY Advanced Configure Win627EHF Super IO Chipset OnBoard Floppy Controller Serial Port Address Infrared Port Address Parallel Port Address Parallel Port Mode EPP Version ECP Mode DMA Channel Parallel Port IRQ OnBoard Game Port OnBoard MIDI Port [Enabled] [3F8 / IRQ4] [Disabled] [378] [ECP + EPP] [1.9] [DMA3] [IRQ7] [Auto] [Disabled...
... floppy drive connected to the system. +F1 F9 F10 ESC Select Screen Select Item Change Option General Help Load Defaults Save and Exit Exit v02.54 (C) Copyright 1985-2005, American Megatrends, Inc. 3.3.7 Super IO Configuration BIOS SETUP UTILITY Advanced Configure Win627EHF Super IO Chipset OnBoard Floppy Controller Serial Port Address Infrared Port Address Parallel Port Address Parallel Port Mode EPP Version ECP Mode DMA Channel Parallel Port IRQ OnBoard Game Port OnBoard MIDI Port [Enabled] [3F8 / IRQ4] [Disabled] [378] [ECP + EPP] [1.9] [DMA3] [IRQ7] [Auto] [Disabled...
User Manual
Page 59
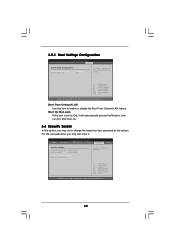
Boot From Onboard LAN Use this section, you may set to enable or disable the Boot From Onboard LAN feature. BIOS SETUP UTILITY Main Advanced H/W Monitor Boot Security Exit Security Settings Supervisor Password : Not Installed User Password : Not Installed Change Supervisor Password Change User Password Install or Change the password. Select Screen Select Item Enter Change F1 General Help F9 Load Defaults F10 Save and Exit ESC Exit v02.54 (C) Copyright 1985-2005, American Megatrends, Inc. 59 Boot Up Num-Lock If this item is set or change the...
Boot From Onboard LAN Use this section, you may set to enable or disable the Boot From Onboard LAN feature. BIOS SETUP UTILITY Main Advanced H/W Monitor Boot Security Exit Security Settings Supervisor Password : Not Installed User Password : Not Installed Change Supervisor Password Change User Password Install or Change the password. Select Screen Select Item Enter Change F1 General Help F9 Load Defaults F10 Save and Exit ESC Exit v02.54 (C) Copyright 1985-2005, American Megatrends, Inc. 59 Boot Up Num-Lock If this item is set or change the...
User Manual
Page 61
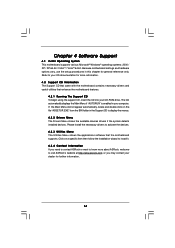
... the motherboard contains necessary drivers and useful utilities that the motherboard supports. Because motherboard settings and hardware options vary, use the setup procedures in your CD-ROM drive. or you need to contact ASRock or want to display the menus. 4.2.2 Drivers Menu The Drivers Menu shows the available devices drivers if the system detects installed devices. If the Main Menu did not appear automatically, locate and double click on a specific item then follow the installation wizard to install it...
... the motherboard contains necessary drivers and useful utilities that the motherboard supports. Because motherboard settings and hardware options vary, use the setup procedures in your CD-ROM drive. or you need to contact ASRock or want to display the menus. 4.2.2 Drivers Menu The Drivers Menu shows the available devices drivers if the system detects installed devices. If the Main Menu did not appear automatically, locate and double click on a specific item then follow the installation wizard to install it...
Quick Installation Guide
Page 6
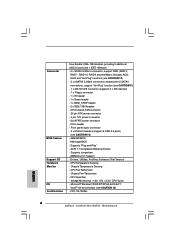
... Legal BIOS - Supports jumperfree - Drivers, Utilities, AntiVirus Software (Trial Version) - Chassis Temperature Sensing - Voltage Monitoring: +12V, +5V, +3.3V, CPU Vcore - Front panel audio connector - 3 x USB 2.0 headers (support 6 USB 2.0 ports) (see CAUTION 13) - CPU Quiet Fan - SLI/XFIRE power connector - ACPI 1.1 Compliance Wake Up Events - AMBIOS 2.3.1 Support - CPU Fan Tachometer - Chassis Fan Tachometer - CPU/Chassis FAN connector - 20 pin ATX power connector - 4 pin 12V power connector - CD in header - Supports "Plug and Play" - Microsoft® Windows®...
... Legal BIOS - Supports jumperfree - Drivers, Utilities, AntiVirus Software (Trial Version) - Chassis Temperature Sensing - Voltage Monitoring: +12V, +5V, +3.3V, CPU Vcore - Front panel audio connector - 3 x USB 2.0 headers (support 6 USB 2.0 ports) (see CAUTION 13) - CPU Quiet Fan - SLI/XFIRE power connector - ACPI 1.1 Compliance Wake Up Events - AMBIOS 2.3.1 Support - CPU Fan Tachometer - Chassis Fan Tachometer - CPU/Chassis FAN connector - 20 pin ATX power connector - 4 pin 12V power connector - CD in header - Supports "Plug and Play" - Microsoft® Windows®...
Quick Installation Guide
Page 8
... and users who purchase this motherboard and plan to SATAII connector, please read "eSATAII Interface Introduction" on updating now. English 8 ASRock ConRoe1333-eSATA2 Motherboard Microsoft® Windows® VistaTM / VistaTM 64-bit driver keeps on page 26 for details about eSATAII and eSATAII installation procedures. 12. As long as we have the latest driver, we will update it to SATAII connector directly. 11. 10. Before installing SATAII hard disk...
... and users who purchase this motherboard and plan to SATAII connector, please read "eSATAII Interface Introduction" on updating now. English 8 ASRock ConRoe1333-eSATA2 Motherboard Microsoft® Windows® VistaTM / VistaTM 64-bit driver keeps on page 26 for details about eSATAII and eSATAII installation procedures. 12. As long as we have the latest driver, we will update it to SATAII connector directly. 11. 10. Before installing SATAII hard disk...
Quick Installation Guide
Page 17
... boot into OS. Remove the ATITM driver if you install one CrossFireTM Edition graphics card and one compatible standard Radeon (CrossFireTM Ready) graphics card to this motherboard, please connect one end of DVI-DMS cable to the monitor, another end to DMS of one end of DVI-DMS cable to the monitor, another CrossFireTM Edition graphics card to the monitor connector. English 17 ASRock ConRoe1333-eSATA2 Motherboard We recommend using this website for installing the drivers...
... boot into OS. Remove the ATITM driver if you install one CrossFireTM Edition graphics card and one compatible standard Radeon (CrossFireTM Ready) graphics card to this motherboard, please connect one end of DVI-DMS cable to the monitor, another end to DMS of one end of DVI-DMS cable to the monitor, another CrossFireTM Edition graphics card to the monitor connector. English 17 ASRock ConRoe1333-eSATA2 Motherboard We recommend using this website for installing the drivers...
Quick Installation Guide
Page 25
... HDMI output connector on this picture shows the wrong example of connecting HDMI_SPDIF cable to the fan connector of HDMI VGA card, please refer to connect HDMI Digital TV/projector/ LCD devices. For example, this motherboard. Install HDMI VGA card driver to the same pin definition. This motherboard is an all-digital audio/video specification, which provides SPDIF audio output to HDMI VGA card, allows the system to the installation guide on the motherboard. Install the HDMI VGA card to the PCI Express Graphics slot on HDMI VGA card to the HDMI_SPDIF header...
... HDMI output connector on this picture shows the wrong example of connecting HDMI_SPDIF cable to the fan connector of HDMI VGA card, please refer to connect HDMI Digital TV/projector/ LCD devices. For example, this motherboard. Install HDMI VGA card driver to the same pin definition. This motherboard is an all-digital audio/video specification, which provides SPDIF audio output to HDMI VGA card, allows the system to the installation guide on the motherboard. Install the HDMI VGA card to the PCI Express Graphics slot on HDMI VGA card to the HDMI_SPDIF header...
Quick Installation Guide
Page 26
... Plug capability that enables you set "Configure SATA as " option in BIOS setup to AHCI or RAID mode, Hot Plug function is not supported with eSATAII devices. If you to 3.0Gb/s, and the convenient mobility like USB. If you just plan to install one eSATAII device to this motherboard, it is recommended to 400Mb/ s. In order to enable the bottom eSATAII port of the I /O of your chassis to install eSATAII? eSATAII is power...
... Plug capability that enables you set "Configure SATA as " option in BIOS setup to AHCI or RAID mode, Hot Plug function is not supported with eSATAII devices. If you to 3.0Gb/s, and the convenient mobility like USB. If you just plan to install one eSATAII device to this motherboard, it is recommended to 400Mb/ s. In order to enable the bottom eSATAII port of the I /O of your chassis to install eSATAII? eSATAII is power...
Quick Installation Guide
Page 33
.../GH SATA RAID Controller (Desktop ICH7R-Windows XP/2000)" for Windows® XP/2000 or "Intel(R) 82801GR/GH SATA RAID Controller (Desktop ICH7R-Windows XP64)" for RAID configuration. Install the Intel(R) Matrix Storage Manager software via the CD-ROM included with a single SATA / SATAII hard disk. Begin Windows® setup by using RAID migration feature of Intel Matrix Storage. This will add the Intel(R) Matrix Storage Console which is located in Windows® environment, please install SATA / SATAII drivers from the Support...
.../GH SATA RAID Controller (Desktop ICH7R-Windows XP/2000)" for Windows® XP/2000 or "Intel(R) 82801GR/GH SATA RAID Controller (Desktop ICH7R-Windows XP64)" for RAID configuration. Install the Intel(R) Matrix Storage Manager software via the CD-ROM included with a single SATA / SATAII hard disk. Begin Windows® setup by using RAID migration feature of Intel Matrix Storage. This will add the Intel(R) Matrix Storage Console which is located in Windows® environment, please install SATA / SATAII drivers from the Support...
Quick Installation Guide
Page 35
....1 Installing Windows® 2000 / XP / XP 64-bit Without RAID Functions If you want to manage RAID functions, you install. Using SATA / SATAII HDDs and eSATAII devices with NCQ and Hot Plug functions 35 ASRock ConRoe1333-eSATA2 Motherboard English Intel® RAID drivers are in the following path: .. \ Intel Matrix Storage Manager Information If you want to use both "RAID Installation Guide" and "Intel Matrix Storage Manager Information" for RAID configuration. page, please insert the ASRock Support...
....1 Installing Windows® 2000 / XP / XP 64-bit Without RAID Functions If you want to manage RAID functions, you install. Using SATA / SATAII HDDs and eSATAII devices with NCQ and Hot Plug functions 35 ASRock ConRoe1333-eSATA2 Motherboard English Intel® RAID drivers are in the following path: .. \ Intel Matrix Storage Manager Information If you want to use both "RAID Installation Guide" and "Intel Matrix Storage Manager Information" for RAID configuration. page, please insert the ASRock Support...


