

User Manual
Page 3
Contents 1 Introduction 5 1.1 Package Contents 5 1.2 Specifications 6 1.3 Minimum Hardware Requirement Table for Windows® VistaTM Premium 2007 and Basic Logo 9 1.4 Motherboard Layout 10 1.5 ASRock 8CH_eSATAII I/O 11 2 Installation 12 2.1 Screw Holes 12 2.2 Pre-installation Precautions 12 2.3 CPU Installation 13 2.4 ...Plug Feature and Operation Guide 36 2.17 Driver Installation Guide 38 2.18 Installing Windows® 2000 / XP / XP 64-bit / VistaTM / VistaTM 64-bit With RAID Functions 38 2.18.1 Installing Windows® 2000 / XP / XP 64-bit With RAID Functions 38 2.18.2...
Contents 1 Introduction 5 1.1 Package Contents 5 1.2 Specifications 6 1.3 Minimum Hardware Requirement Table for Windows® VistaTM Premium 2007 and Basic Logo 9 1.4 Motherboard Layout 10 1.5 ASRock 8CH_eSATAII I/O 11 2 Installation 12 2.1 Screw Holes 12 2.2 Pre-installation Precautions 12 2.3 CPU Installation 13 2.4 ...Plug Feature and Operation Guide 36 2.17 Driver Installation Guide 38 2.18 Installing Windows® 2000 / XP / XP 64-bit / VistaTM / VistaTM 64-bit With RAID Functions 38 2.18.1 Installing Windows® 2000 / XP / XP 64-bit With RAID Functions 38 2.18.2...
User Manual
Page 4
...; 2000 / XP / XP 64-bit / VistaTM / VistaTM 64-bit Without RAID Functions 42 2.19.1 Installing Windows® 2000 / XP / XP 64-bit Without RAID Functions 42 2.19.2 Installing Windows® VistaTM / VistaTM 64-bit Without RAID Functions 43 2.20 Untied Overclocking Technology 44 3 BIOS SETUP UTILITY 45 3.1 Introduction 45 3.1.1 BIOS Menu Bar...
...; 2000 / XP / XP 64-bit / VistaTM / VistaTM 64-bit Without RAID Functions 42 2.19.1 Installing Windows® 2000 / XP / XP 64-bit Without RAID Functions 42 2.19.2 Installing Windows® VistaTM / VistaTM 64-bit Without RAID Functions 43 2.20 Untied Overclocking Technology 44 3 BIOS SETUP UTILITY 45 3.1 Introduction 45 3.1.1 BIOS Menu Bar...
User Manual
Page 6
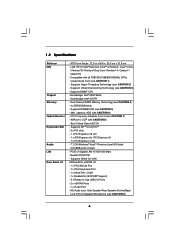
...CAUTION 2) - CPU Frequency Stepless Control (see CAUTION 8) - Boot Failure Guard (B.F.G.) - PCIE x1 Gigabit LAN 10/100/1000 Mb/s - Supports Wake-On-LAN ASRock 8CH_eSATAII I /O - Northbridge: Intel® 945P/945G - ASRock U-COP (see CAUTION 7) - HD Audio Jack: Side Speaker/Rear Speaker/Central/Bass/ Line in , 30.5 cm x 21.8 cm - capacity: 4GB (see...6) - Supports EM64T CPU - Max. Supports ATITM CrossFireTM - 3 x PCI slots - 1 x PCI Express x16 slot - 1 x AGI Express slot (PCI Express x4) - 1 x PCI Express x1 slot - 7.1 CH Windows® VistaTM Premium Level HD Audio (ALC888 Audio Codec) -
...CAUTION 2) - CPU Frequency Stepless Control (see CAUTION 8) - Boot Failure Guard (B.F.G.) - PCIE x1 Gigabit LAN 10/100/1000 Mb/s - Supports Wake-On-LAN ASRock 8CH_eSATAII I /O - Northbridge: Intel® 945P/945G - ASRock U-COP (see CAUTION 7) - HD Audio Jack: Side Speaker/Rear Speaker/Central/Bass/ Line in , 30.5 cm x 21.8 cm - capacity: 4GB (see...6) - Supports EM64T CPU - Max. Supports ATITM CrossFireTM - 3 x PCI slots - 1 x PCI Express x16 slot - 1 x AGI Express slot (PCI Express x4) - 1 x PCI Express x1 slot - 7.1 CH Windows® VistaTM Premium Level HD Audio (ALC888 Audio Codec) -
User Manual
Page 7
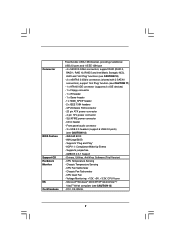
AMI Legal BIOS - CPU Fan Tachometer - FCC, CE, WHQL 7 Voltage Monitoring: +12V, +5V, +3.3V, CPU Vcore - Microsoft® Windows® 2000/XP/XP 64-bit/VistaTM/ VistaTM 64-bit compliant (see CAUTION 12) - 4Mb AMI BIOS - CD in header - Front panel audio connector - 3 x USB 2.0 ...
AMI Legal BIOS - CPU Fan Tachometer - FCC, CE, WHQL 7 Voltage Monitoring: +12V, +5V, +3.3V, CPU Vcore - Microsoft® Windows® 2000/XP/XP 64-bit/VistaTM/ VistaTM 64-bit compliant (see CAUTION 12) - 4Mb AMI BIOS - CD in header - Front panel audio connector - 3 x USB 2.0 ...
User Manual
Page 8
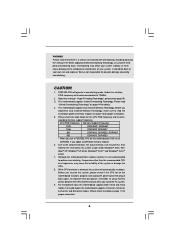
... run at your system. Please check the table below for possible damage caused by overclocking. dows® XP, Windows® XP 64-bit, Windows® VistaTM and Windows® VistaTM 64-bit. 7. For audio output, this motherboard supports both stereo and mono modes. About the setting... of memory modules on page 44 for system usage under Windows® 2000, Win- Before you install the PC system. 9. It should be overclocked to read "Untied Overclocking Technology" on page 16 ...
... run at your system. Please check the table below for possible damage caused by overclocking. dows® XP, Windows® XP 64-bit, Windows® VistaTM and Windows® VistaTM 64-bit. 7. For audio output, this motherboard supports both stereo and mono modes. About the setting... of memory modules on page 44 for system usage under Windows® 2000, Win- Before you install the PC system. 9. It should be overclocked to read "Untied Overclocking Technology" on page 16 ...
User Manual
Page 9
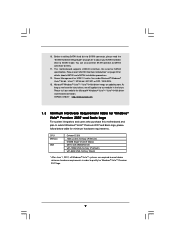
...(Basic) DX9.0 with WDDM Driver with 128bit VGA memory (Premium) with 64bit VGA memory (Basic) * After June 1, 2007, all Windows® VistaTM systems are required to meet above minimum hardware requirements in the future. Before installing SATAII hard disk to qualify for USB 2.0...VistaTM / VistaTM 64-bit driver and related information. Please visit our website for minimum hardware requirements. ASRock website http://www.asrock.com 1.3 Minimum Hardware Requirement Table for Windows® VistaTM Premium 2007 and Basic Logo For system integrators and users who purchase this motherboard and ...
...(Basic) DX9.0 with WDDM Driver with 128bit VGA memory (Premium) with 64bit VGA memory (Basic) * After June 1, 2007, all Windows® VistaTM systems are required to meet above minimum hardware requirements in the future. Before installing SATAII hard disk to qualify for USB 2.0...VistaTM / VistaTM 64-bit driver and related information. Please visit our website for minimum hardware requirements. ASRock website http://www.asrock.com 1.3 Minimum Hardware Requirement Table for Windows® VistaTM Premium 2007 and Basic Logo For system integrators and users who purchase this motherboard and ...
User Manual
Page 19
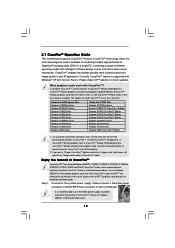
..., X1950XT, X1950Pro, X1950XTX, X1300, X1650 and X1600 CrossFireTM cards, which require different methods to cards from the CrossFireTM multi-GPU platform. 2. It is supported with Windows® XP with CrossFireTM? This applies to enable CrossFireTM feature. Enjoy the benefit of combining multiple high performance Graphics Processing Units (GPU) in CrossFireTM mode...
..., X1950XT, X1950Pro, X1950XTX, X1300, X1650 and X1600 CrossFireTM cards, which require different methods to cards from the CrossFireTM multi-GPU platform. 2. It is supported with Windows® XP with CrossFireTM? This applies to enable CrossFireTM feature. Enjoy the benefit of combining multiple high performance Graphics Processing Units (GPU) in CrossFireTM mode...
User Manual
Page 21
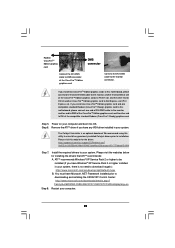
... your system. Please visit the websites below for the driver: http://support.ati.com/ics/support/DLRedirect.asp? If you have Windows® XP Service Pack 2 or higher installed in your system, there is an optional download. Step 5. Power on your ...mspx B. fileIDExt=050553d40196ef109fff37cbb40aaf28&accountID=737&deptID=894 Step 7. FamilyId=262D25E3-F589-4842-8157-034D1E7CF3A3&displaylang=en Step 8. Step 6. ATITM recommends Windows® XP Service Pack 2 or higher to be installed (If you install one CrossFireTM Edition graphics card and one compatible standard Radeon...
... your system. Please visit the websites below for the driver: http://support.ati.com/ics/support/DLRedirect.asp? If you have Windows® XP Service Pack 2 or higher installed in your system, there is an optional download. Step 5. Power on your ...mspx B. fileIDExt=050553d40196ef109fff37cbb40aaf28&accountID=737&deptID=894 Step 7. FamilyId=262D25E3-F589-4842-8157-034D1E7CF3A3&displaylang=en Step 8. Step 6. ATITM recommends Windows® XP Service Pack 2 or higher to be installed (If you install one CrossFireTM Edition graphics card and one compatible standard Radeon...
User Manual
Page 26
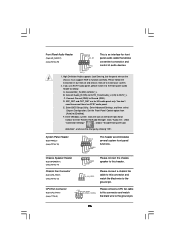
... in our manual and chassis manual to Ground (GND). Connect Ground (GND) to install your system. 2. D. Enter Advanced Settings, and then select Chipset Configuration. Enter Windows system. Click the icon on the chassis must support HDA to this header. GND +12V CHA_FAN_SPEED Please connect a chassis fan cable to function correctly. Connect...
... in our manual and chassis manual to Ground (GND). Connect Ground (GND) to install your system. 2. D. Enter Advanced Settings, and then select Chipset Configuration. Enter Windows system. Click the icon on the chassis must support HDA to this header. GND +12V CHA_FAN_SPEED Please connect a chassis fan cable to function correctly. Connect...
User Manual
Page 38
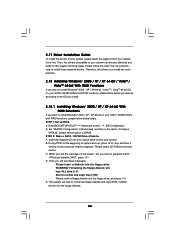
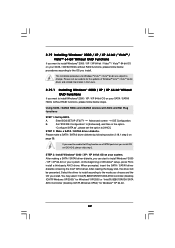
...the drivers you see these messages, Please insert a diskette into the floppy drive, and press . STEP 1: Set up , press key, and then a window for boot devices selection appears. Enter BIOS SETUP UTILITY Advanced screen IDE Configuration. B. A. Insert the Support CD into the floppy diskette. 38 WARNING! Set "... HDDs with RAID functions, please follow below procedures according to the OS you install. 2.18.1 Installing Windows® 2000 / XP / XP 64-bit With RAID Functions If you want to install Windows® 2000 / XP / XP 64-bit on the screen, "Do you will lose ALL data...
...the drivers you see these messages, Please insert a diskette into the floppy drive, and press . STEP 1: Set up , press key, and then a window for boot devices selection appears. Enter BIOS SETUP UTILITY Advanced screen IDE Configuration. B. A. Insert the Support CD into the floppy diskette. 38 WARNING! Set "... HDDs with RAID functions, please follow below procedures according to the OS you install. 2.18.1 Installing Windows® 2000 / XP / XP 64-bit With RAID Functions If you want to install Windows® 2000 / XP / XP 64-bit on the screen, "Do you will lose ALL data...
User Manual
Page 39
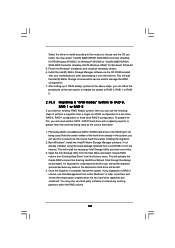
...: .. \ Intel Matrix Storage Manager Information If you want to manage RAID functions, you are allowed to use "Intel Matrix Storage Manager" in Windows® environment, please install SATA / SATAII drivers from the installation CD. 4. After reading the floppy disk, the driver will be installed to ...your system as well. 2.18.2 Setting Up a "RAID Ready" System You can also set up system BIOS as step 2 of Windows® 2000 / Windows® XP / Windows® XP-64bit OS, if you want to use both "RAID Installation Guide" and "Intel Matrix Storage Manager Information" for RAID ...
...: .. \ Intel Matrix Storage Manager Information If you want to manage RAID functions, you are allowed to use "Intel Matrix Storage Manager" in Windows® environment, please install SATA / SATAII drivers from the installation CD. 4. After reading the floppy disk, the driver will be installed to ...your system as well. 2.18.2 Setting Up a "RAID Ready" System You can also set up system BIOS as step 2 of Windows® 2000 / Windows® XP / Windows® XP-64bit OS, if you want to use both "RAID Installation Guide" and "Intel Matrix Storage Manager Information" for RAID ...
User Manual
Page 40
... 7. This will need another SATA / SATAII hard drive with your motherboard or after downloading it as the source hard drive. 1. To prepare for Windows® XP 64-bit. 5. you migrated to a RAID 0 volume, use Disk Management from a single non-RAID configuration to a two drive ...RAID 0, RAID 1 configuration or three drive RAID 5 configuration. Boot Windows®, install the Intel(R) Matrix Storage Manager software, if not already installed, using the setup package obtained from a CD-ROM or from the Internet....
... 7. This will need another SATA / SATAII hard drive with your motherboard or after downloading it as the source hard drive. 1. To prepare for Windows® XP 64-bit. 5. you migrated to a RAID 0 volume, use Disk Management from a single non-RAID configuration to a two drive ...RAID 0, RAID 1 configuration or three drive RAID 5 configuration. Boot Windows®, install the Intel(R) Matrix Storage Manager software, if not already installed, using the setup package obtained from a CD-ROM or from the Internet....
User Manual
Page 41
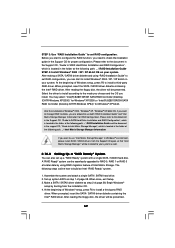
Insert the Windows® VistaTM / VistaTM 64-bit optical disk into the optical drive to boot your system, and follow below steps. page, please insert the ASRock Support CD into the optical drive again to continue the installation. STEP 2: Use "RAID Installation Guide" to set the option to [RAID...check the installation guide in the option "Configure SATA as well. 41 B. Before you start to configure the RAID function, you want to install Windows?" Set "ATA/IDE Configuration" to [Enhanced], and then in the Support CD for RAID configuration. Please refer to the document in the Support...
Insert the Windows® VistaTM / VistaTM 64-bit optical disk into the optical drive to boot your system, and follow below steps. page, please insert the ASRock Support CD into the optical drive again to continue the installation. STEP 2: Use "RAID Installation Guide" to set the option to [RAID...check the installation guide in the option "Configure SATA as well. 41 B. Before you start to configure the RAID function, you want to install Windows?" Set "ATA/IDE Configuration" to [Enhanced], and then in the Support CD for RAID configuration. Please refer to the document in the Support...
User Manual
Page 42
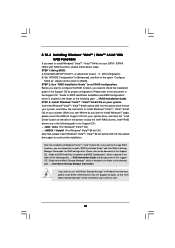
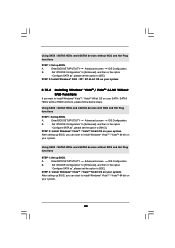
...Up BIOS. Enter BIOS SETUP UTILITY Advanced screen IDE Configuration. Set "ATA/IDE Configuration" to [Enhanced], and then in the future. 2.19.1 Installing Windows® 2000 / XP / XP 64-bit Without RAID Functions If you want to enable Hot Plug function on eSATAII ports but you install OS ... 38. You may select: "Intel(R) 82801GR/GH SATA AHCI Controller (Desktop ICH7R-Windows XP/2000)" for Windows® XP/2000 or "Intel(R) 82801GR/GH SATA AHCI Controller (Desktop ICH7R-Windows XP64)" for the updates of Windows® setup, press F6 to change. Select the driver to install according to ...
...Up BIOS. Enter BIOS SETUP UTILITY Advanced screen IDE Configuration. Set "ATA/IDE Configuration" to [Enhanced], and then in the future. 2.19.1 Installing Windows® 2000 / XP / XP 64-bit Without RAID Functions If you want to enable Hot Plug function on eSATAII ports but you install OS ... 38. You may select: "Intel(R) 82801GR/GH SATA AHCI Controller (Desktop ICH7R-Windows XP/2000)" for Windows® XP/2000 or "Intel(R) 82801GR/GH SATA AHCI Controller (Desktop ICH7R-Windows XP64)" for the updates of Windows® setup, press F6 to change. Select the driver to install according to ...
User Manual
Page 43
... start to [AHCI]. Using SATA / SATAII HDDs and eSATAII devices without NCQ and Hot Plug functions STEP 1: Set up BIOS. STEP 2: Install Windows® VistaTM / VistaTM 64-bit OS on your system. Using SATA / SATAII HDDs and eSATAII devices with NCQ and Hot Plug functions STEP 1:...screen IDE Configuration. Set "ATA/IDE Configuration" to [Enhanced], and then in the option "Configure SATA as ", please set the option to install Windows® VistaTM / VistaTM 64-bit on your SATA / SATAII HDDs without RAID functions, please follow below steps. After setting up BIOS, you want ...
... start to [AHCI]. Using SATA / SATAII HDDs and eSATAII devices without NCQ and Hot Plug functions STEP 1: Set up BIOS. STEP 2: Install Windows® VistaTM / VistaTM 64-bit OS on your system. Using SATA / SATAII HDDs and eSATAII devices with NCQ and Hot Plug functions STEP 1:...screen IDE Configuration. Set "ATA/IDE Configuration" to [Enhanced], and then in the option "Configure SATA as ", please set the option to install Windows® VistaTM / VistaTM 64-bit on your SATA / SATAII HDDs without RAID functions, please follow below steps. After setting up BIOS, you want ...

User Manual
Page 48
...Threading Technology To enable this motherboard. In the C1 power state, the processor maintains the context of this technology, such as Microsoft® Windows® XP. Enhance Halt State All processors support the Halt State (C1). Set to keep the CPU from the chipset. Ratio Actual...or "Unlocked". CPU Thermal Throttling You may select [Enabled] to enable P4 CPU internal thermal control mechanism to [Enabled] if using Microsoft® Windows® XP, or Linux kernel version 2.4.18 or higher. This option will be enabled in advance. motherboard is a read-only item, which ...
...Threading Technology To enable this motherboard. In the C1 power state, the processor maintains the context of this technology, such as Microsoft® Windows® XP. Enhance Halt State All processors support the Halt State (C1). Set to keep the CPU from the chipset. Ratio Actual...or "Unlocked". CPU Thermal Throttling You may select [Enabled] to enable P4 CPU internal thermal control mechanism to [Enabled] if using Microsoft® Windows® XP, or Linux kernel version 2.4.18 or higher. This option will be enabled in advance. motherboard is a read-only item, which ...
User Manual
Page 49
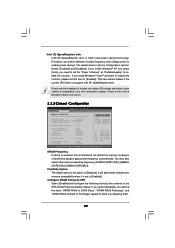
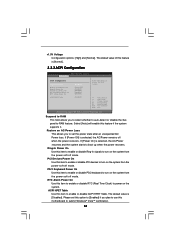
... to enable this function, please set the "Power Schemes" as operating frequency: [200MHz (DDRII 400)], [266MHz (DDRII 533)], [333MHz (DDRII 667)]. If you install Windows® XP and select [Auto], you need to [Enabled]. If you adjusting them. 49 Please note that enabling this option is [Disabled]. Please set to... [Auto] is set this item to system stability or compatibility issue with some power supplies. If you select [Disabled], you will allow you install Windows® VistaTM and want to enable power savings. Configuration options: [Auto], [Enabled] and [Disabled].
... to enable this function, please set the "Power Schemes" as operating frequency: [200MHz (DDRII 400)], [266MHz (DDRII 533)], [333MHz (DDRII 667)]. If you install Windows® XP and select [Auto], you need to [Enabled]. If you adjusting them. 49 Please note that enabling this option is [Disabled]. Please set to... [Auto] is set this item to system stability or compatibility issue with some power supplies. If you select [Disabled], you will allow you install Windows® VistaTM and want to enable power savings. Configuration options: [Auto], [Enabled] and [Disabled].
User Manual
Page 51
... On Use this item to enable or disable PS/2 keyboard to turn on AC/Power Loss This allows you to set this motherboard to submit Windows® VistaTM certification. 51 The default value is selected, the AC/Power resumes and the system starts to -RAM feature. Restore on the system from...
... On Use this item to enable or disable PS/2 keyboard to turn on AC/Power Loss This allows you to set this motherboard to submit Windows® VistaTM certification. 51 The default value is selected, the AC/Power resumes and the system starts to -RAM feature. Restore on the system from...
User Manual
Page 52
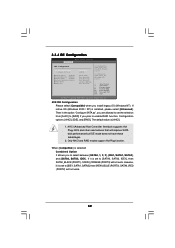
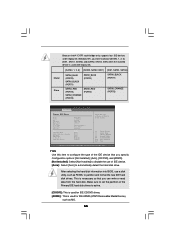
If native OS (Windows 2000 / XP) is [AHCI]. 1. The default value is installed, please select [Enhanced]. Likewise, if it is set the selection from [AHCI] to [RAID] if you ... to [SATA0, SATA2, IDE1], then SATAII_BLACK (PORT1), SATAII_ORANGE (PORT3) will not work . 52 When [Compatible] is selected Combined Option It allows you install legacy OS (Windows NT). Then in the option "Configure SATA as SATAII_BLUE (PORT0) SATAII_BLACK (PORT1) SATAII_RED (PORT2) SATAII_ORANGE (PORT3) IDE1 Master IDE1 Slave [Enhanced] [AHCI] [Hard Disk] [Not...
If native OS (Windows 2000 / XP) is [AHCI]. 1. The default value is installed, please select [Enhanced]. Likewise, if it is set the selection from [AHCI] to [RAID] if you ... to [SATA0, SATA2, IDE1], then SATAII_BLACK (PORT1), SATAII_ORANGE (PORT3) will not work . 52 When [Compatible] is selected Combined Option It allows you install legacy OS (Windows NT). Then in the option "Configure SATA as SATAII_BLUE (PORT0) SATAII_BLACK (PORT1) SATAII_RED (PORT2) SATAII_ORANGE (PORT3) IDE1 Master IDE1 Slave [Enhanced] [AHCI] [Hard Disk] [Not...
User Manual
Page 53
..., IDE1] when the installed device is necessary so that you specify. Because Intel® ICH7R south bridge only supports four IDE devices under legacy OS (Windows NT), you have to disable the use a disk utility, such as MO. 53
..., IDE1] when the installed device is necessary so that you specify. Because Intel® ICH7R south bridge only supports four IDE devices under legacy OS (Windows NT), you have to disable the use a disk utility, such as MO. 53


