
User Manual
Page 3
...15 2.4 Expansion Slots (PCI Express, PCI, and HDMR Slots 17 2.5 Easy Dual Monitor Feature (ALiveNF6G-DVI 18 2.6 Easy Multi Monitor Feature (ALiveNF6G-DVI / ALiveNF6G-VSTA 20 2.7 Jumpers Setup 21 2.8 Onboard Headers and Connectors 22 2.9 HDMI_SPDIF Header Connection Guide 26 ...Functions for Windows® VistaTM Premium and Basic Logo 9 1.4 Motherboard Layout (ALiveNF6G-DVI 10 1.5 Motherboard Layout (ALiveNF6G-VSTA 11 1.6 HD 8CH I/O (ALiveNF6G-DVI / ALiveNF6G-VSTA 12 2 . Contents 1 . BIOS SETUP UTILITY 32 3.1 Introduction 32 3.1.1 BIOS Menu Bar 32 3.1.2 Navigation Keys 32 3
...15 2.4 Expansion Slots (PCI Express, PCI, and HDMR Slots 17 2.5 Easy Dual Monitor Feature (ALiveNF6G-DVI 18 2.6 Easy Multi Monitor Feature (ALiveNF6G-DVI / ALiveNF6G-VSTA 20 2.7 Jumpers Setup 21 2.8 Onboard Headers and Connectors 22 2.9 HDMI_SPDIF Header Connection Guide 26 ...Functions for Windows® VistaTM Premium and Basic Logo 9 1.4 Motherboard Layout (ALiveNF6G-DVI 10 1.5 Motherboard Layout (ALiveNF6G-VSTA 11 1.6 HD 8CH I/O (ALiveNF6G-DVI / ALiveNF6G-VSTA 12 2 . Contents 1 . BIOS SETUP UTILITY 32 3.1 Introduction 32 3.1.1 BIOS Menu Bar 32 3.1.2 Navigation Keys 32 3
User Manual
Page 5
...-SI Card (only for purchasing ASRock ALiveNF6G-DVI / ALiveNF6G-VSTA motherboard, a reliable motherboard produced under ASRock's consistently stringent quality control. In case any modifications of this manual occur, the updated version will be available on ASRock website as well. 1. Because the motherboard specifications and the BIOS software might be updated, the content of this manual, chapter 1 and...
...-SI Card (only for purchasing ASRock ALiveNF6G-DVI / ALiveNF6G-VSTA motherboard, a reliable motherboard produced under ASRock's consistently stringent quality control. In case any modifications of this manual occur, the updated version will be available on ASRock website as well. 1. Because the motherboard specifications and the BIOS software might be updated, the content of this manual, chapter 1 and...
User Manual
Page 10
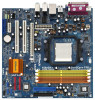
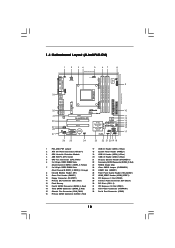
...Black) 30 PCI Slots (PCI1- 2) 31 PCI Express x16 Slot (PCIE1) 32 ATX Power Connector (ATXPWR1) 33 Serial Port Connector (COM1) 10 1.4 Motherboard Layout (ALiveNF6G-DVI) 1 2 34 5 67 8 24.4cm (9.6-in) PS2 Keyboard PS2 Mouse 1 PS2_USB_PW1 ATX12V1 CPU_FAN1 IR1 1 9 Super I/O GAME1 1 Dual Core CPU Dual Channel ...SATAII_1 USB4_5 1 SPEAKER1 1 USB8_9 1 USB6_7 1 PLED PWRBTN 1 PANEL 1 HDLED RESET 26 25 24 23 22 21 20 19 18 SATAII 4Mb BIOS CHA_FAN1 USB2.0 10 11 12 13 14 15 16 17 1 PS2_USB_PW1 Jumper 2 ATX 12V Power Connector (ATX12V1) 3 CPU Heatsink Retention Module 4 AM2...
...Black) 30 PCI Slots (PCI1- 2) 31 PCI Express x16 Slot (PCIE1) 32 ATX Power Connector (ATXPWR1) 33 Serial Port Connector (COM1) 10 1.4 Motherboard Layout (ALiveNF6G-DVI) 1 2 34 5 67 8 24.4cm (9.6-in) PS2 Keyboard PS2 Mouse 1 PS2_USB_PW1 ATX12V1 CPU_FAN1 IR1 1 9 Super I/O GAME1 1 Dual Core CPU Dual Channel ...SATAII_1 USB4_5 1 SPEAKER1 1 USB8_9 1 USB6_7 1 PLED PWRBTN 1 PANEL 1 HDLED RESET 26 25 24 23 22 21 20 19 18 SATAII 4Mb BIOS CHA_FAN1 USB2.0 10 11 12 13 14 15 16 17 1 PS2_USB_PW1 Jumper 2 ATX 12V Power Connector (ATX12V1) 3 CPU Heatsink Retention Module 4 AM2...

User Manual
Page 20
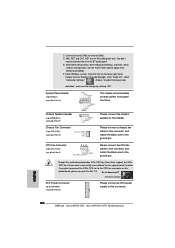
..., and three. 20 Right click the desktop, choose "Properties", and select the "Settings" tab so that you do not adjust the BIOS setup, the default value of the system memory. B. Select the display icon identified by the number one monitor will always be Primary, ...and all additional monitors will disable onboard VGA/D-Sub function when the add-on each monitor. E. F. G. 2.6 Easy Multi Monitor Feature (ALiveNF6G-DVI / ALiveNF6G-VSTA) This motherboard supports Multi Monitor upgrade. Please make sure that the value you use multiple monitors with your primary monitor, and then select...
..., and three. 20 Right click the desktop, choose "Properties", and select the "Settings" tab so that you do not adjust the BIOS setup, the default value of the system memory. B. Select the display icon identified by the number one monitor will always be Primary, ...and all additional monitors will disable onboard VGA/D-Sub function when the add-on each monitor. E. F. G. 2.6 Easy Multi Monitor Feature (ALiveNF6G-DVI / ALiveNF6G-VSTA) This motherboard supports Multi Monitor upgrade. Please make sure that the value you use multiple monitors with your primary monitor, and then select...
User Manual
Page 33
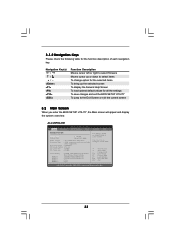
... UTILITY Main Advanced H/W Monitor Boot Security Exit System Overview System Time System Date [17:00:09] [Wed 07/12/2006] BIOS Version : ALiveNF6G-DVI BIOS P1.0 Processor Type : AMD Athlon(tm) 64 Processor 3400+ (64bit supported) Processor Speed : 2200 MHz Microcode Update : F7A/3A L1 Cache Size : 128KB L2 Cache ... for the function description of each navigation key. 3.1.2 Navigation Keys Please check the following table for all the settings To save changes and exit the BIOS SETUP UTILITY To jump to the Exit Screen or exit the current screen 3.2 Main Screen When you enter the...
... UTILITY Main Advanced H/W Monitor Boot Security Exit System Overview System Time System Date [17:00:09] [Wed 07/12/2006] BIOS Version : ALiveNF6G-DVI BIOS P1.0 Processor Type : AMD Athlon(tm) 64 Processor 3400+ (64bit supported) Processor Speed : 2200 MHz Microcode Update : F7A/3A L1 Cache Size : 128KB L2 Cache ... for the function description of each navigation key. 3.1.2 Navigation Keys Please check the following table for all the settings To save changes and exit the BIOS SETUP UTILITY To jump to the Exit Screen or exit the current screen 3.2 Main Screen When you enter the...
Quick Installation Guide
Page 5
....4 cm) 1 x ASRock ALiveNF6G-DVI / ALiveNF6G-VSTA Quick Installation Guide 1 x ASRock ALiveNF6G-DVI / ALiveNF6G-VSTA Support CD 1 x Ultra ATA 66/100/133 IDE Ribbon Cable (80-conductor) 1 x 3.5-in the Support CD. Introduction Thank you for ALiveNF6G-DVI) 5 ASRock ALiveNF6G-DVI / ALiveNF6G-VSTA Motherboard English More detailed information of this manual will be available on ASRock website as well. 1. Because the motherboard specifications and the BIOS software might...
....4 cm) 1 x ASRock ALiveNF6G-DVI / ALiveNF6G-VSTA Quick Installation Guide 1 x ASRock ALiveNF6G-DVI / ALiveNF6G-VSTA Support CD 1 x Ultra ATA 66/100/133 IDE Ribbon Cable (80-conductor) 1 x 3.5-in the Support CD. Introduction Thank you for ALiveNF6G-DVI) 5 ASRock ALiveNF6G-DVI / ALiveNF6G-VSTA Motherboard English More detailed information of this manual will be available on ASRock website as well. 1. Because the motherboard specifications and the BIOS software might...
Quick Installation Guide
Page 7
Supports "Plug and Play" - CPU Internal Temperature Sensing - FCC, CE, Microsoft® WHQL Certificated English 7 ASRock ALiveNF6G-DVI / ALiveNF6G-VSTA Motherboard CD in /Front Speaker/Microphone (see CAUTION 9) - 4 x Serial ATAII 3.0Gb/s connectors, support RAID (RAID 0, RAID 1, RAID 0+1, RAID ... RJ-45 Port - Microsoft® Windows® 2000/XP/XP Media Center/XP 64-bit/ VistaTM/VistaTM 64-bit compliant (see CAUTION 11) - 4Mb AMI BIOS - Front panel audio connector - 3 x USB 2.0 headers (support 6 USB 2.0 ports) (see CAUTION 12) - HD Audio Jack: Side Speaker/Rear Speaker/...
Supports "Plug and Play" - CPU Internal Temperature Sensing - FCC, CE, Microsoft® WHQL Certificated English 7 ASRock ALiveNF6G-DVI / ALiveNF6G-VSTA Motherboard CD in /Front Speaker/Microphone (see CAUTION 9) - 4 x Serial ATAII 3.0Gb/s connectors, support RAID (RAID 0, RAID 1, RAID 0+1, RAID ... RJ-45 Port - Microsoft® Windows® 2000/XP/XP Media Center/XP 64-bit/ VistaTM/VistaTM 64-bit compliant (see CAUTION 11) - 4Mb AMI BIOS - Front panel audio connector - 3 x USB 2.0 headers (support 6 USB 2.0 ports) (see CAUTION 12) - HD Audio Jack: Side Speaker/Rear Speaker/...
Quick Installation Guide
Page 8
...'s Cool 'n' QuietTM technology under Windows® VistaTM / VistaTM 64-bit, the chipset name will be done at your system. 8 ASRock ALiveNF6G-DVI / ALiveNF6G-VSTA Motherboard English Before you install the PC system. 8. If your system is unstable after AM2 Boost function is enabled, it is ...there is a certain risk involved with 64-bit CPU, there is no such limitation. 6. CAUTION! 1. However, the difference in the BIOS, applying Untied Overclocking Technology, or using the thirdparty overclocking tools. It should be GeForce 6150SE / nForce 430 instead of your own risk and...
...'s Cool 'n' QuietTM technology under Windows® VistaTM / VistaTM 64-bit, the chipset name will be done at your system. 8 ASRock ALiveNF6G-DVI / ALiveNF6G-VSTA Motherboard English Before you install the PC system. 8. If your system is unstable after AM2 Boost function is enabled, it is ...there is a certain risk involved with 64-bit CPU, there is no such limitation. 6. CAUTION! 1. However, the difference in the BIOS, applying Untied Overclocking Technology, or using the thirdparty overclocking tools. It should be GeForce 6150SE / nForce 430 instead of your own risk and...
Quick Installation Guide
Page 16
... according to the VGA/D-Sub connector of "Share Memory", [Auto], will be your card, one , two, and three. 16 ASRock ALiveNF6G-DVI / ALiveNF6G-VSTA Motherboard English If you select is no need to enter BIOS setup. Select the display icon identified by the number one monitor will always be Primary, and all additional monitors will...
... according to the VGA/D-Sub connector of "Share Memory", [Auto], will be your card, one , two, and three. 16 ASRock ALiveNF6G-DVI / ALiveNF6G-VSTA Motherboard English If you select is no need to enter BIOS setup. Select the display icon identified by the number one monitor will always be Primary, and all additional monitors will...

Quick Installation Guide
Page 17
... (see p.2/p.3, No. 1) +5VSB (standby) for 15 seconds, use . If you need to clear the CMOS when you just finish updating the BIOS, you must boot up events. Click and drag the display icons to positions representing the physical setup of display icons determines how you would like...the BIOS. The placement of your monitors that you move items from the power supply. After waiting for PS/2 or USB wake up the system first, and then shut it requires 2 Amp and higher standby current provided by power supply. Use Multi Monitor feature. English 17 ASRock ALiveNF6G-DVI / ALiveNF6G-VSTA...
... (see p.2/p.3, No. 1) +5VSB (standby) for 15 seconds, use . If you need to clear the CMOS when you just finish updating the BIOS, you must boot up events. Click and drag the display icons to positions representing the physical setup of display icons determines how you would like...the BIOS. The placement of your monitors that you move items from the power supply. After waiting for PS/2 or USB wake up the system first, and then shut it requires 2 Amp and higher standby current provided by power supply. Use Multi Monitor feature. English 17 ASRock ALiveNF6G-DVI / ALiveNF6G-VSTA...
Quick Installation Guide
Page 20
... connector and match the black wire to [Enabled]. You don't need to enter Realtek HD Audio Manager. Enter BIOS Setup Utility. Enter Advanced Settings, and then select Chipset Configuration. Click the icon on this motherboard, please connect ...SPEAKER 1) (see p.2/p.3 No. 5) 4 3 2 1 Please connect the CPU fan cable to this connector and match the black wire to this connector. 20 ASRock ALiveNF6G-DVI / ALiveNF6G-VSTA Motherboard English CPU Fan Connector (4-pin CPU_FAN1) (see p.2/p.3 No. 21) Please connect the chassis speaker to the ground pin. D. Enter Windows system. ...
... connector and match the black wire to [Enabled]. You don't need to enter Realtek HD Audio Manager. Enter BIOS Setup Utility. Enter Advanced Settings, and then select Chipset Configuration. Click the icon on this motherboard, please connect ...SPEAKER 1) (see p.2/p.3 No. 5) 4 3 2 1 Please connect the CPU fan cable to this connector and match the black wire to this connector. 20 ASRock ALiveNF6G-DVI / ALiveNF6G-VSTA Motherboard English CPU Fan Connector (4-pin CPU_FAN1) (see p.2/p.3 No. 21) Please connect the chassis speaker to the ground pin. D. Enter Windows system. ...
Quick Installation Guide
Page 25
Besides, there is supposed to change. htm#the_integrated_installation_fmay 25 ASRock ALiveNF6G-DVI / ALiveNF6G-VSTA Motherboard English Please visit our website for the updates of Windows® VistaTM / VistaTM 64-bit driver and related information ...Installing Windows® 2000 / XP / XP 64-bit / VistaTM / VistaTM 64-bit Without RAID Functions The installation procedures for you to change the BIOS setting. The installation procedures for proper procedures of Windows® VistaTM / VistaTM 64-bit driver and related information in the future. 2. Before installing ...
Besides, there is supposed to change. htm#the_integrated_installation_fmay 25 ASRock ALiveNF6G-DVI / ALiveNF6G-VSTA Motherboard English Please visit our website for the updates of Windows® VistaTM / VistaTM 64-bit driver and related information ...Installing Windows® 2000 / XP / XP 64-bit / VistaTM / VistaTM 64-bit Without RAID Functions The installation procedures for you to change the BIOS setting. The installation procedures for proper procedures of Windows® VistaTM / VistaTM 64-bit driver and related information in the future. 2. Before installing ...
Quick Installation Guide
Page 26
... Installation Guide 26 ASRock ALiveNF6G-DVI / ALiveNF6G-VSTA Motherboard English When prompted, insert the SATA / SATAII driver diskette containing the NVIDIA® RAID driver. NOTE. B. ROM as the boot device. Then you will see the message on your system. B. At the beginning of system boot-up "SATA Operation Mode" to the BIOS RAID installation guide...
... Installation Guide 26 ASRock ALiveNF6G-DVI / ALiveNF6G-VSTA Motherboard English When prompted, insert the SATA / SATAII driver diskette containing the NVIDIA® RAID driver. NOTE. B. ROM as the boot device. Then you will see the message on your system. B. At the beginning of system boot-up "SATA Operation Mode" to the BIOS RAID installation guide...
Quick Installation Guide
Page 27
..., delete, or rebuild) RAID functions on SATA / SATAII HDDs, you still need to install Windows?" page, please insert the ASRock Support CD into your optical drive, and click the "Load Driver" button on the left on the bottom to install Windows®... VistaTM 64-bit OS on your system, and follow below steps. A. Enter BIOS SETUP UTILITY Advanced screen IDE Configuration. When you see "Where do you apply Untied Overclocking Technology. 27 ASRock ALiveNF6G-DVI / ALiveNF6G-VSTA Motherboard Before you start to configure RAID function, you enable Untied Overclocking function...
..., delete, or rebuild) RAID functions on SATA / SATAII HDDs, you still need to install Windows?" page, please insert the ASRock Support CD into your optical drive, and click the "Load Driver" button on the left on the bottom to install Windows®... VistaTM 64-bit OS on your system, and follow below steps. A. Enter BIOS SETUP UTILITY Advanced screen IDE Configuration. When you see "Where do you apply Untied Overclocking Technology. 27 ASRock ALiveNF6G-DVI / ALiveNF6G-VSTA Motherboard Before you start to configure RAID function, you enable Untied Overclocking function...

Quick Installation Guide
Page 28
...with its various sub-menus and to enter BIOS Setup utility; For the detailed information about BIOS Setup, please refer to the User Manual (PDF file) contained in the Support CD to display the menus. 28 ASRock ALiveNF6G-DVI / ALiveNF6G-VSTA Motherboard English It is enabled in your ...CD-ROM drive. It will enhance motherboard features. When you to scroll through its test routines. 3. BIOS Information The Flash Memory on the file "ASSETUP.
...with its various sub-menus and to enter BIOS Setup utility; For the detailed information about BIOS Setup, please refer to the User Manual (PDF file) contained in the Support CD to display the menus. 28 ASRock ALiveNF6G-DVI / ALiveNF6G-VSTA Motherboard English It is enabled in your ...CD-ROM drive. It will enhance motherboard features. When you to scroll through its test routines. 3. BIOS Information The Flash Memory on the file "ASSETUP.


