User Manual
Page 5
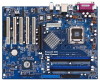
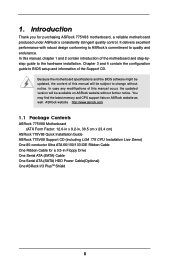
... step-bystep guide to the hardware installation. In this manual, chapter 1 and 2 contain introduction of this manual will be available on ASRock website as well. ASRock website http://www.asrock.com 1.1 Package Contents ASRock 775V88/775V88+ Motherboard (ATX Form Factor: 12.0-in x 9.2-in, 30.5 cm x 23.4 cm) ASRock 775V88/775V88+ Quick Installation Guide ASRock 775V88/775V88+ Support CD (including LGA 775 CPU Installation Live Demo...
... step-bystep guide to the hardware installation. In this manual, chapter 1 and 2 contain introduction of this manual will be available on ASRock website as well. ASRock website http://www.asrock.com 1.1 Package Contents ASRock 775V88/775V88+ Motherboard (ATX Form Factor: 12.0-in x 9.2-in, 30.5 cm x 23.4 cm) ASRock 775V88/775V88+ Quick Installation Guide ASRock 775V88/775V88+ Support CD (including LGA 775 CPU Installation Live Demo...
User Manual
Page 13
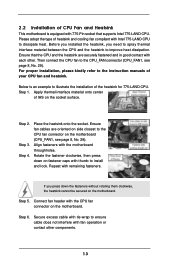
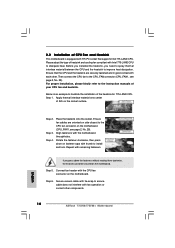
...connector on the motherboard. Below is equipped with tie-wrap to install and lock. Step 3. Secure excess cable with 775-Pin socket that the CPU and the heatsink are oriented on the socket surface. Please adopt the type of IHS on side closest to the instruction manuals of your ...CPU fan and heatsink. Before you installed the heatsink, you press down on the motherboard (CPU_FAN1, see page 8, No. 29). For proper installation, please kindly refer to the CPU ...
...connector on the motherboard. Below is equipped with tie-wrap to install and lock. Step 3. Secure excess cable with 775-Pin socket that the CPU and the heatsink are oriented on the socket surface. Please adopt the type of IHS on side closest to the instruction manuals of your ...CPU fan and heatsink. Before you installed the heatsink, you press down on the motherboard (CPU_FAN1, see page 8, No. 29). For proper installation, please kindly refer to the CPU ...
Quick Installation Guide
Page 4
... this manual will be subject to quality and endurance. It delivers excellent performance with robust design conforming to ASRock's commitment to change without further notice. Introduction Thank you for a 3.5-in the Support CD. ASRock website http://www.asrock.com 1.1 Package Contents ASRock 775V88/775V88+ Motherboard (ATX Form Factor: 12.0-in x 9.2-in, 30.5 cm x 23.4 cm) ASRock 775V88/775V88+ Quick Installation Guide ASRock 775V88/775V88...
... this manual will be subject to quality and endurance. It delivers excellent performance with robust design conforming to ASRock's commitment to change without further notice. Introduction Thank you for a 3.5-in the Support CD. ASRock website http://www.asrock.com 1.1 Package Contents ASRock 775V88/775V88+ Motherboard (ATX Form Factor: 12.0-in x 9.2-in, 30.5 cm x 23.4 cm) ASRock 775V88/775V88+ Quick Installation Guide ASRock 775V88/775V88...
Quick Installation Guide
Page 10
...heat. Please adopt the type of CPU Fan and Heatsink This motherboard is an example to illustrate the installation of your CPU fan and heatsink. Then connect the CPU fan to the instruction manuals of the heatsink for 775-LAND CPU. For proper installation, ...the heatsink cannot be secured on the motherboard. Step 6. Before you installed the heatsink, you press down on the socket surface. Apply thermal interface material onto center of IHS on fastener caps with each other components. 10 ASRock 775V88/775V88+ Motherboard English Ensure fan cables are securely fastened ...
...heat. Please adopt the type of CPU Fan and Heatsink This motherboard is an example to illustrate the installation of your CPU fan and heatsink. Then connect the CPU fan to the instruction manuals of the heatsink for 775-LAND CPU. For proper installation, ...the heatsink cannot be secured on the motherboard. Step 6. Before you installed the heatsink, you press down on the socket surface. Apply thermal interface material onto center of IHS on fastener caps with each other components. 10 ASRock 775V88/775V88+ Motherboard English Ensure fan cables are securely fastened ...
Quick Installation Guide
Page 22
... the detailed information about BIOS Setup, please refer to be user-friendly. When you wish to display the menus. 22 ASRock 775V88/775V88+ Motherboard English The BIOS Setup program is designed to the User Manual (PDF file) contained in the Support CD to enter BIOS Setup after POST, please restart the system by pressing + + , or...
... the detailed information about BIOS Setup, please refer to be user-friendly. When you wish to display the menus. 22 ASRock 775V88/775V88+ Motherboard English The BIOS Setup program is designed to the User Manual (PDF file) contained in the Support CD to enter BIOS Setup after POST, please restart the system by pressing + + , or...
User Manual
Page 1
MOTHERBOARD 775V88 User Manual Version 1.0 Published August 2004 Copyright©2004 ASRock INC. All rights reserved. 1
MOTHERBOARD 775V88 User Manual Version 1.0 Published August 2004 Copyright©2004 ASRock INC. All rights reserved. 1
User Manual
Page 5
...manual occur, the updated version will be available on ASRock website as well. Introduction Thank you for a 3.5-in , 30.5 cm x 23.4 cm) ASRock 775V88 Quick Installation Guide ASRock 775V88 Support CD (including LGA 775 CPU Installation Live Demo) One 80-conductor Ultra ATA 66/100/133 IDE Ribbon Cable One Ribbon Cable for purchasing ASRock 775V88 motherboard, a reliable motherboard... produced under ASRock's consistently stringent quality control. ASRock website http://www.asrock.com 1.1 Package Contents ASRock 775V88 Motherboard ...
...manual occur, the updated version will be available on ASRock website as well. Introduction Thank you for a 3.5-in , 30.5 cm x 23.4 cm) ASRock 775V88 Quick Installation Guide ASRock 775V88 Support CD (including LGA 775 CPU Installation Live Demo) One 80-conductor Ultra ATA 66/100/133 IDE Ribbon Cable One Ribbon Cable for purchasing ASRock 775V88 motherboard, a reliable motherboard... produced under ASRock's consistently stringent quality control. ASRock website http://www.asrock.com 1.1 Package Contents ASRock 775V88 Motherboard ...

User Manual
Page 13
...kindly refer to the CPU_FAN connector (CPU_FAN1, see page 8, No. 29). Step 1. Step 3. Repeat with the motherboard throughholes. Then connect the CPU fan to the instruction manuals of your CPU fan and heatsink. Place the heatsink onto the socket. Rotate the fastener clockwise, then press down ...the fasteners without rotating them clockwise, the heatsink cannot be secured on the motherboard. Please adopt the type of ...
...kindly refer to the CPU_FAN connector (CPU_FAN1, see page 8, No. 29). Step 1. Step 3. Repeat with the motherboard throughholes. Then connect the CPU fan to the instruction manuals of your CPU fan and heatsink. Place the heatsink onto the socket. Rotate the fastener clockwise, then press down ...the fasteners without rotating them clockwise, the heatsink cannot be secured on the motherboard. Please adopt the type of ...


