RAID Installation Guide
Page 1
Guide to RAID Configurations 4 2.1 Introduction of Windows 2000 / Windows XP 15 1 Guide to SATA Hard Disks Installation and RAID Configuration 1. Guide to SATA Hard Disks Installation 2 1.1 Serial ATA (SATA) Hard Disks Installation 2 1.2 Making An SATA Driver Diskette 3 2. Installation of RAID 4 2.2 RAID Configuration Precautions 6 2.3 BIOS Configuration Utility 7 2.3.1 Enter BIOS Configuration Utility 7 2.3.2 Create Disk Array 8 2.3.3 Delete Disk Array 13 2.3.4 Select Boot Array 14 3.
Guide to RAID Configurations 4 2.1 Introduction of Windows 2000 / Windows XP 15 1 Guide to SATA Hard Disks Installation and RAID Configuration 1. Guide to SATA Hard Disks Installation 2 1.1 Serial ATA (SATA) Hard Disks Installation 2 1.2 Making An SATA Driver Diskette 3 2. Installation of RAID 4 2.2 RAID Configuration Precautions 6 2.3 BIOS Configuration Utility 7 2.3.1 Enter BIOS Configuration Utility 7 2.3.2 Create Disk Array 8 2.3.3 Delete Disk Array 13 2.3.4 Select Boot Array 14 3.

RAID Installation Guide
Page 3
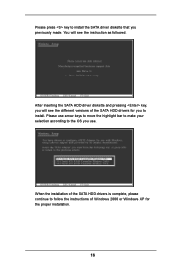
...will see the message on the screen, "Do you want to format and copy files [YN]? STEP 4: Then you will start to install Windows 2000 / Windows XP on your system directly without setting the RAID configuration on your SATA HDDs, you see these messages, Please insert a diskette into the ...ROM as the boot device. Formatting the floppy diskette will need to make an SATA driver diskette before you install the OS. STEP 1: Insert the ASRock Support CD into the floppy drive, and press . 1.2 Making An SATA Driver Diskette If you want to generate Serial ATA driver diskette [YN]?", ...
...will see the message on the screen, "Do you want to format and copy files [YN]? STEP 4: Then you will start to install Windows 2000 / Windows XP on your system directly without setting the RAID configuration on your SATA HDDs, you see these messages, Please insert a diskette into the ...ROM as the boot device. Formatting the floppy diskette will need to make an SATA driver diskette before you install the OS. STEP 1: Insert the ASRock Support CD into the floppy drive, and press . 1.2 Making An SATA Driver Diskette If you want to generate Serial ATA driver diskette [YN]?", ...

RAID Installation Guide
Page 15
At the very beginning, you will ap p ea r. 15 Then remove the floppy diskette, and reboot the system. Installation of Windows 2000 / Windows XP For the installation of the screen, "Press F6 if you need to install a third party SCSI or RAID driver...." At this moment, please press key and the following information will see the message at the bottom of Windows 2000 or Windows XP, please insert Windows 2000 or Windows XP CD into the optical drive. 3.
At the very beginning, you will ap p ea r. 15 Then remove the floppy diskette, and reboot the system. Installation of Windows 2000 / Windows XP For the installation of the screen, "Press F6 if you need to install a third party SCSI or RAID driver...." At this moment, please press key and the following information will see the message at the bottom of Windows 2000 or Windows XP, please insert Windows 2000 or Windows XP CD into the optical drive. 3.
RAID Installation Guide
Page 16
Please press key to the OS you use. Please use arrow keys to move the highlight bar to make your selection according to install the SATA driver diskette that you to follow the instructions of the SATA HDD drivers for the proper installation. 16 When the installation of the SATA HDD drivers is complete, please continue to install. After inserting the SATA HDD driver diskette and pressing key, you will see the different versions of Windows 2000 or Windows XP for you previously made. You will see the instruction as followed.
Please press key to the OS you use. Please use arrow keys to move the highlight bar to make your selection according to install the SATA driver diskette that you to follow the instructions of the SATA HDD drivers for the proper installation. 16 When the installation of the SATA HDD drivers is complete, please continue to install. After inserting the SATA HDD driver diskette and pressing key, you will see the different versions of Windows 2000 or Windows XP for you previously made. You will see the instruction as followed.
RAID Utility for Windows Guide
Page 1
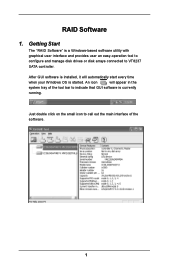
Just double click on the small icon to indicate that GUI software is currently running. After GUI software is installed, it will appear in the system tray of the tool bar to call out the main interface of the software. 1 RAID Software 1. An icon will automatically start every time when your Windows OS is a Windows-based software utility with graphical user interface and provides user an easy-operation tool to configure and manage disk drives or disk arrays connected to VT8237 SATA controller. Getting Start The "RAID Software" is started.
Just double click on the small icon to indicate that GUI software is currently running. After GUI software is installed, it will appear in the system tray of the tool bar to call out the main interface of the software. 1 RAID Software 1. An icon will automatically start every time when your Windows OS is a Windows-based software utility with graphical user interface and provides user an easy-operation tool to configure and manage disk drives or disk arrays connected to VT8237 SATA controller. Getting Start The "RAID Software" is started.
RAID Utility for Windows Guide
Page 3
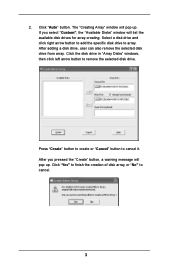
... the creation of disk array, or "No" to remove the selected disk drive. 2. After you select "Custom", the "Available Disks" window will pop up . Click the disk drive in "Array Disks" windows, then click left arrow button to cancel. 3 Press "Create" button to create or "Cancel" button to array. If you pressed... disk drive to cancel it. Click "Auto" button. After adding a disk drive, user can also remove the selected disk drive from array. The "Creating Array" window will pop up .
... the creation of disk array, or "No" to remove the selected disk drive. 2. After you select "Custom", the "Available Disks" window will pop up . Click the disk drive in "Array Disks" windows, then click left arrow button to cancel. 3 Press "Create" button to create or "Cancel" button to array. If you pressed... disk drive to cancel it. Click "Auto" button. After adding a disk drive, user can also remove the selected disk drive from array. The "Creating Array" window will pop up .
RAID Utility for Windows Guide
Page 6
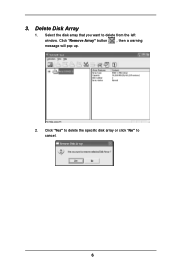
Click "Yes" to delete the specific disk array or click "No" to delete from the left window. Delete Disk Array 1. Select the disk array that you want to cancel. 6 3. Click "Remove Array" button , then a warning message will pop up. 2.
Click "Yes" to delete the specific disk array or click "No" to delete from the left window. Delete Disk Array 1. Select the disk array that you want to cancel. 6 3. Click "Remove Array" button , then a warning message will pop up. 2.
RAID Utility for Windows Guide
Page 7
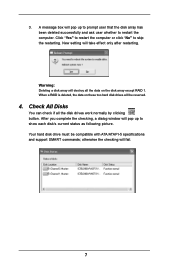
... the disk array except RAID 1. otherwise the checking will be compatible with ATA/ATAPI-5 specifications and support SMART commands; After you complete the checking, a dialog window will pop up to show each disk's current status as following picture. A message box will pop up to prompt user that the disk array has...
... the disk array except RAID 1. otherwise the checking will be compatible with ATA/ATAPI-5 specifications and support SMART commands; After you complete the checking, a dialog window will pop up to show each disk's current status as following picture. A message box will pop up to prompt user that the disk array has...
User Manual
Page 7
...wake up events Supports jumperfree SMBIOS 2.3.1 support CPU frequency stepless control (only for advanced users' reference, see CAUTION 6) OS: Microsoft® Windows® 98SE / ME / 2000 / XP compliant CAUTION! 1. Power Management for proper installation. 3. Frequencies other than the recommended CPU bus... unplug the power cord, then plug it is detected, the system will automatically shutdown. It may cause permanent damage! 5. Although this motherboard! ASRock I/O PlusTM: 1 PS/2 mouse port, 1 PS/2 keyboard port, 1 serial port: COM1, 1 parallel port: ECP/EPP support, 6 ...
...wake up events Supports jumperfree SMBIOS 2.3.1 support CPU frequency stepless control (only for advanced users' reference, see CAUTION 6) OS: Microsoft® Windows® 98SE / ME / 2000 / XP compliant CAUTION! 1. Power Management for proper installation. 3. Frequencies other than the recommended CPU bus... unplug the power cord, then plug it is detected, the system will automatically shutdown. It may cause permanent damage! 5. Although this motherboard! ASRock I/O PlusTM: 1 PS/2 mouse port, 1 PS/2 keyboard port, 1 serial port: COM1, 1 parallel port: ECP/EPP support, 6 ...

User Manual
Page 22
...ready, you may start to install Windows 2000 / Windows XP on your system, or you may also set RAID 0 / RAID 1 / JBOD configuration before you start to format the floppy diskette and copy SATA drivers into the floppy drive, and press . STEP 1: Insert the ASRock Support CD into your optical drive... to boot your SATA HDDs, you will lose ALL data in Windows environment. STEP 5: The system will see the message on your system directly without setting the ...
...ready, you may start to install Windows 2000 / Windows XP on your system, or you may also set RAID 0 / RAID 1 / JBOD configuration before you start to format the floppy diskette and copy SATA drivers into the floppy drive, and press . STEP 1: Insert the ASRock Support CD into your optical drive... to boot your SATA HDDs, you will lose ALL data in Windows environment. STEP 5: The system will see the message on your system directly without setting the ...
User Manual
Page 26
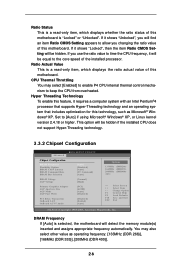
.... Set to keep the CPU from overheated. You may select [Enabled] to enable P4 CPU internal thermal control mechanism to [Auto] if using Microsoft® Windows® XP, or Linux kernel version 2.4.18 or higher. Ratio Status This is a read -only item, which displays whether the ratio status of this feature...
.... Set to keep the CPU from overheated. You may select [Enabled] to enable P4 CPU internal thermal control mechanism to [Auto] if using Microsoft® Windows® XP, or Linux kernel version 2.4.18 or higher. Ratio Status This is a read -only item, which displays whether the ratio status of this feature...
User Manual
Page 30
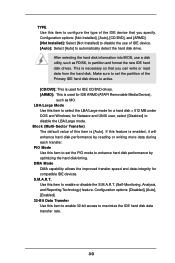
... reading or writing more data during each transfer. for compatible IDE devices. If this feature is used for a hard disk > 512 MB under DOS and Windows; PIO Mode Use this item to set the partition of the Primary IDE hard disk drives to active. [CD/DVD]: This is used for IDE...
... reading or writing more data during each transfer. for compatible IDE devices. If this feature is used for a hard disk > 512 MB under DOS and Windows; PIO Mode Use this item to set the partition of the Primary IDE hard disk drives to active. [CD/DVD]: This is used for IDE...
User Manual
Page 38
... is a new CPU socket interface that the motherboard supports. Chapter 4 Software Support 4.1 Install Operating System This motherboard supports various Microsoft® Windows® operating systems: 98 SE / ME / 2000 / XP. Click on the file "ASSETUP.EXE" from the BIN folder in order... the motherboard's Support CD through this Live Demo, you start the installation of CPU and motherboard damages caused by improper handling, ASRock sincerely presents you a clear installation guide through the following path: ..\ MPEGAV \ LGA775INST.DAT 4.2.5 Contact Information If you may contact...
... is a new CPU socket interface that the motherboard supports. Chapter 4 Software Support 4.1 Install Operating System This motherboard supports various Microsoft® Windows® operating systems: 98 SE / ME / 2000 / XP. Click on the file "ASSETUP.EXE" from the BIN folder in order... the motherboard's Support CD through this Live Demo, you start the installation of CPU and motherboard damages caused by improper handling, ASRock sincerely presents you a clear installation guide through the following path: ..\ MPEGAV \ LGA775INST.DAT 4.2.5 Contact Information If you may contact...
Quick Installation Guide
Page 6
... advanced users' reference, see CAUTION 6) OS: Microsoft® Windows® 98SE / ME / 2000 / XP compliant CAUTION! 1. Power Management for USB 2.0 works fine under Microsoft® Windows® 98/ ME. 6. English 6 ASRock 775V88/775V88+ Motherboard This motherboard supports Dual Channel Memory Technology. About the ... may cause the instability of this motherboard offers stepless control, it back again. It may not work properly under Microsoft® Windows® XP SP1/2000 SP4. Although this motherboard! Do NOT use USB 2.0 ports, 1 RJ 45 port, Audio Jack:...
... advanced users' reference, see CAUTION 6) OS: Microsoft® Windows® 98SE / ME / 2000 / XP compliant CAUTION! 1. Power Management for USB 2.0 works fine under Microsoft® Windows® 98/ ME. 6. English 6 ASRock 775V88/775V88+ Motherboard This motherboard supports Dual Channel Memory Technology. About the ... may cause the instability of this motherboard offers stepless control, it back again. It may not work properly under Microsoft® Windows® XP SP1/2000 SP4. Although this motherboard! Do NOT use USB 2.0 ports, 1 RJ 45 port, Audio Jack:...
Quick Installation Guide
Page 19
... in the folder at the beginning of system boot-up, press key, and then a window for boot devices selection appears. STEP 1: Make a SATA Driver Diskette. Then you will start to install Windows 2000 / Windows XP on your system. 19 ASRock 775V88/775V88+ Motherboard English Start to format and copy files [YN]? Before you start to configure...
... in the folder at the beginning of system boot-up, press key, and then a window for boot devices selection appears. STEP 1: Make a SATA Driver Diskette. Then you will start to install Windows 2000 / Windows XP on your system. 19 ASRock 775V88/775V88+ Motherboard English Start to format and copy files [YN]? Before you start to configure...

Quick Installation Guide
Page 20
... making a SATA driver diskette, you can start to use "VIA RAID Tool" in the Support CD: .. \ 64bit SATA Driver STEP 2: Install Windows XP 64-bit OS on your system as well. 20 ASRock 775V88/775V88+ Motherboard English Insert the floppy diskette into your floppy diskette. The SATA 64-bit drivers are allowed to install...
... making a SATA driver diskette, you can start to use "VIA RAID Tool" in the Support CD: .. \ 64bit SATA Driver STEP 2: Install Windows XP 64-bit OS on your system as well. 20 ASRock 775V88/775V88+ Motherboard English Insert the floppy diskette into your floppy diskette. The SATA 64-bit drivers are allowed to install...
Quick Installation Guide
Page 21
.../ XP / XP 64-bit OS on your system. A. Set the "SATA Operation Mode" option from [RAID] to install Windows 2000 / XP / XP 64-bit on your system. STEP 1: Install Windows 98 / ME OS on your system. If you don't want to set up BIOS, you can start to [non-RAID].... can start to install Windows 98 / ME on your system directly. 2.10.2 Installing Windows XP / 2000 / XP 64-bit Without RAID Functions If you want to install Windows XP / 2000 / XP 64-bit on your SATA HDDs without RAID functions or you want to make a SATA driver diskette. 21 ASRock 775V88/775V88+ Motherboard English
.../ XP / XP 64-bit OS on your system. A. Set the "SATA Operation Mode" option from [RAID] to install Windows 2000 / XP / XP 64-bit on your system. STEP 1: Install Windows 98 / ME OS on your system. If you don't want to set up BIOS, you can start to [non-RAID].... can start to install Windows 98 / ME on your system directly. 2.10.2 Installing Windows XP / 2000 / XP 64-bit Without RAID Functions If you want to install Windows XP / 2000 / XP 64-bit on your SATA HDDs without RAID functions or you want to make a SATA driver diskette. 21 ASRock 775V88/775V88+ Motherboard English
Quick Installation Guide
Page 22
... pressing the reset button on the system chassis. For the detailed information about BIOS Setup, please refer to display the menus. 22 ASRock 775V88/775V88+ Motherboard English It will enhance motherboard features. If the Main Menu does not appear automatically, locate and double-click on the motherboard ...your CD-ROM drive. When you wish to select among the predetermined choices. Software Support CD information This motherboard supports various Microsoft® Windows® operating systems: 98 SE/ ME / 2000 / XP. The Support CD that will display the Main Menu automatically if "...
... pressing the reset button on the system chassis. For the detailed information about BIOS Setup, please refer to display the menus. 22 ASRock 775V88/775V88+ Motherboard English It will enhance motherboard features. If the Main Menu does not appear automatically, locate and double-click on the motherboard ...your CD-ROM drive. When you wish to select among the predetermined choices. Software Support CD information This motherboard supports various Microsoft® Windows® operating systems: 98 SE/ ME / 2000 / XP. The Support CD that will display the Main Menu automatically if "...
User Manual
Page 7
... cord, then plug it is detected, the system will automatically shutdown. Power Management for USB 2.0 works fine under Microsoft® Windows® 98 / ME. Please refer to -use a 3.3V AGP card on page 14 for advanced users' reference, see CAUTION 6) OS: .... 2. Although this motherboard! About the setting of the system or damage the CPU. 7 Frequencies other than the recommended CPU bus frequencies may cause permanent damage! 5. ASRock I/O PlusTM: 1 PS/2 mouse port, 1 PS/2 keyboard port, 1 serial port: COM1, 1 parallel port: ECP/EPP support, 6 ready-to Microsoft®...
... cord, then plug it is detected, the system will automatically shutdown. Power Management for USB 2.0 works fine under Microsoft® Windows® 98 / ME. Please refer to -use a 3.3V AGP card on page 14 for advanced users' reference, see CAUTION 6) OS: .... 2. Although this motherboard! About the setting of the system or damage the CPU. 7 Frequencies other than the recommended CPU bus frequencies may cause permanent damage! 5. ASRock I/O PlusTM: 1 PS/2 mouse port, 1 PS/2 keyboard port, 1 serial port: COM1, 1 parallel port: ECP/EPP support, 6 ready-to Microsoft®...

User Manual
Page 22
... / Windows XP on your system directly without setting the RAID configuration on your system. (Do NOT insert any floppy diskette into the floppy diskette. STEP 4: Then you will start the OS installation. STEP 1: Insert the ASRock Support CD into the floppy drive, and press . Start to VIA RAID... Tool", which is located in Windows environment. Before you start to configure the RAID function, you need to make an SATA ...
... / Windows XP on your system directly without setting the RAID configuration on your system. (Do NOT insert any floppy diskette into the floppy diskette. STEP 4: Then you will start the OS installation. STEP 1: Insert the ASRock Support CD into the floppy drive, and press . Start to VIA RAID... Tool", which is located in Windows environment. Before you start to configure the RAID function, you need to make an SATA ...


