
User Manual
Page 4
Software Support 38 4.1 Install Operating System 38 4.2 Support CD Information 38 4.2.1 Running Support CD 38 4.2.2 Drivers Menu 38 4.2.3 Utilities Menu 38 4.2.4 "LGA 775 CPU Installation Live Demo" Program .. 38 4.2.5 Contact Information 38 4 4.
Software Support 38 4.1 Install Operating System 38 4.2 Support CD Information 38 4.2.1 Running Support CD 38 4.2.2 Drivers Menu 38 4.2.3 Utilities Menu 38 4.2.4 "LGA 775 CPU Installation Live Demo" Program .. 38 4.2.5 Contact Information 38 4 4.
User Manual
Page 5
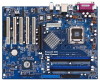
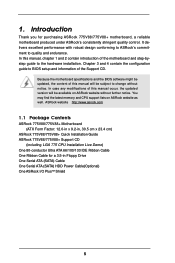
.... 1. In this manual occur, the updated version will be available on ASRock website as well. ASRock website http://www.asrock.com 1.1 Package Contents ASRock 775V88/775V88+ Motherboard (ATX Form Factor: 12.0-in x 9.2-in, 30.5 cm x 23.4 cm) ASRock 775V88/775V88+ Quick Installation Guide ASRock 775V88/775V88+ Support CD (including LGA 775 CPU Installation Live Demo) One 80-conductor Ultra ATA 66/100/133 IDE...
.... 1. In this manual occur, the updated version will be available on ASRock website as well. ASRock website http://www.asrock.com 1.1 Package Contents ASRock 775V88/775V88+ Motherboard (ATX Form Factor: 12.0-in x 9.2-in, 30.5 cm x 23.4 cm) ASRock 775V88/775V88+ Quick Installation Guide ASRock 775V88/775V88+ Support CD (including LGA 775 CPU Installation Live Demo) One 80-conductor Ultra ATA 66/100/133 IDE...

User Manual
Page 6
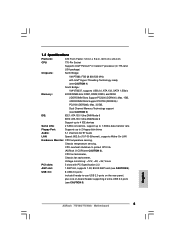
... to 2 floppy disk drives Audio: 5.1 channels AC'97 Audio LAN: Speed: 802.3u (10/100 Ethernet), supports Wake-On-LAN Hardware Monitor: CPU temperature sensing Chassis temperature sensing CPU overheat shutdown to protect CPU life (ASRock U-COP)(see CAUTION 3) CPU fan tachometer Chassis fan tachometer Voltage monitoring: +12V, +5V, +3.3V, Vcore PCI slots: 5 slots with PCI...
... to 2 floppy disk drives Audio: 5.1 channels AC'97 Audio LAN: Speed: 802.3u (10/100 Ethernet), supports Wake-On-LAN Hardware Monitor: CPU temperature sensing Chassis temperature sensing CPU overheat shutdown to protect CPU life (ASRock U-COP)(see CAUTION 3) CPU fan tachometer Chassis fan tachometer Voltage monitoring: +12V, +5V, +3.3V, Vcore PCI slots: 5 slots with PCI...
User Manual
Page 7
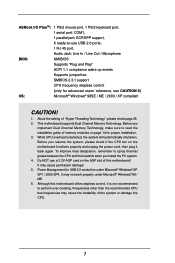
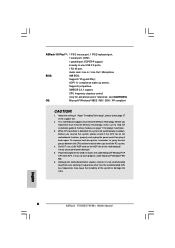
...It may not work properly under Microsoft® Windows® XP SP1 / 2000 SP4. ASRock I/O PlusTM: 1 PS/2 mouse port, 1 PS/2 keyboard port, 1 serial port: COM1, 1 parallel port: ECP/EPP support, 6 ready-to-use a 3.3V AGP card on the AGP slot of this motherboard offers... USB 2.0 ports, 1 RJ 45 port, Audio Jack: Line In / Line Out / Microphone BIOS: AMI BIOS Supports "Plug and Play" ACPI 1.1 compliance wake up events Supports jumperfree SMBIOS 2.3.1 support CPU frequency stepless control (only for USB 2.0 works fine under Microsoft® Windows® 98 / ME. 6. Before you...
...It may not work properly under Microsoft® Windows® XP SP1 / 2000 SP4. ASRock I/O PlusTM: 1 PS/2 mouse port, 1 PS/2 keyboard port, 1 serial port: COM1, 1 parallel port: ECP/EPP support, 6 ready-to-use a 3.3V AGP card on the AGP slot of this motherboard offers... USB 2.0 ports, 1 RJ 45 port, Audio Jack: Line In / Line Out / Microphone BIOS: AMI BIOS Supports "Plug and Play" ACPI 1.1 compliance wake up events Supports jumperfree SMBIOS 2.3.1 support CPU frequency stepless control (only for USB 2.0 works fine under Microsoft® Windows® 98 / ME. 6. Before you...
User Manual
Page 12
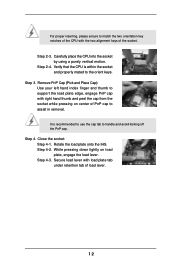
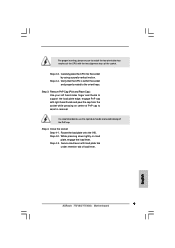
... the socket by using a purely vertical motion. Secure load lever with the two alignment keys of load lever. 12 Step 4. Verify that the CPU is recommended to use the cap tab to the orient keys. Step 4-2. Remove PnP Cap (Pick and Place Cap): Use your left hand index finger ...and thumb to support the load plate edge, engage PnP cap with right hand thumb and peel the cap from the socket while pressing on load plate, engage the...
... the socket by using a purely vertical motion. Secure load lever with the two alignment keys of load lever. 12 Step 4. Verify that the CPU is recommended to use the cap tab to the orient keys. Step 4-2. Remove PnP Cap (Pick and Place Cap): Use your left hand index finger ...and thumb to support the load plate edge, engage PnP cap with right hand thumb and peel the cap from the socket while pressing on load plate, engage the...
User Manual
Page 13
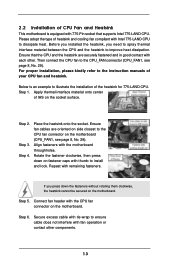
Ensure that supports Intel 775-LAND CPU. Below is equipped with 775-Pin socket that the CPU and the heatsink are oriented on side closest to the CPU fan connector on the motherboard (CPU_FAN1, see page 8, No. 29). Step 1. Apply thermal interface material onto center of IHS on fastener ... fasteners without rotating them clockwise, the heatsink cannot be secured on the motherboard. If you need to spray thermal interface material between the CPU and the heatsink to improve heat dissipation. Repeat with thumb to install and lock. Step 6. Please adopt the type of heatsink and ...
Ensure that supports Intel 775-LAND CPU. Below is equipped with 775-Pin socket that the CPU and the heatsink are oriented on side closest to the CPU fan connector on the motherboard (CPU_FAN1, see page 8, No. 29). Step 1. Apply thermal interface material onto center of IHS on fastener ... fasteners without rotating them clockwise, the heatsink cannot be secured on the motherboard. If you need to spray thermal interface material between the CPU and the heatsink to improve heat dissipation. Repeat with thumb to install and lock. Step 6. Please adopt the type of heatsink and ...
User Manual
Page 26
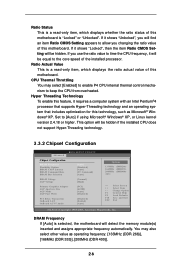
...200MHz (DDR 400)]. 26 If it shows "Locked", then the item Ratio CMOS Setting will be hidden if the installed CPU does not support Hyper-Threading technology. 3.3.2 Chipset Configuration BIOS SETUP UTILITY Advanced Chipset Configuration DRAM Frequency Flexibility Option DRAM CAS# Latency DRAM Command...This is selected, the motherboard will be equal to keep the CPU from overheated. Set to time the CPU frequency, it requires a computer system with an Intel Pentium®4 processor that supports Hyper-Threading technology and an operating system that includes optimization for this...
...200MHz (DDR 400)]. 26 If it shows "Locked", then the item Ratio CMOS Setting will be hidden if the installed CPU does not support Hyper-Threading technology. 3.3.2 Chipset Configuration BIOS SETUP UTILITY Advanced Chipset Configuration DRAM Frequency Flexibility Option DRAM CAS# Latency DRAM Command...This is selected, the motherboard will be equal to keep the CPU from overheated. Set to time the CPU frequency, it requires a computer system with an Intel Pentium®4 processor that supports Hyper-Threading technology and an operating system that includes optimization for this...
User Manual
Page 27
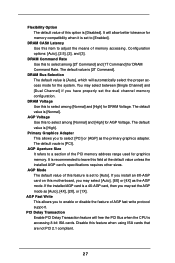
...], [8X] or [4X] as [Auto], [4X], [2X], or [1X]. PCI Delay Transaction Enable PCI Delay Transaction feature will free the PCI Bus when the CPU is [PCI]. Disable this motherboard, you install an 8X-AGP card on this feature when using ISA cards that are not PCI 2.1 compliant. 27 The...select among [Normal] and [High] for DRAM Command Rate. AGP Aperture Size It refers to enable or disable the feature of AGP fast write protocol support. AGP Fast Write This allows you have properly set to select among [2T Command] and [1T Command] for AGP Voltage. Flexibility Option The default ...
...], [8X] or [4X] as [Auto], [4X], [2X], or [1X]. PCI Delay Transaction Enable PCI Delay Transaction feature will free the PCI Bus when the CPU is [PCI]. Disable this motherboard, you install an 8X-AGP card on this feature when using ISA cards that are not PCI 2.1 compliant. 27 The...select among [Normal] and [High] for DRAM Command Rate. AGP Aperture Size It refers to enable or disable the feature of AGP fast write protocol support. AGP Fast Write This allows you have properly set to select among [2T Command] and [1T Command] for AGP Voltage. Flexibility Option The default ...
User Manual
Page 38
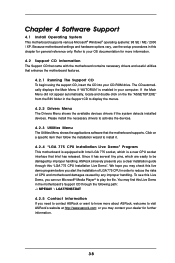
... the setup procedures in the motherboard's Support CD through this Live Demo in this Live Demo, you need to contact ASRock or want to play the file. Since it . 4.2.4 "LGA 775 CPU Installation Live Demo" Program This motherboard is a new CPU socket interface that enhance the motherboard features.... 4.2.1 Running The Support CD To begin using the support CD, insert the CD into ...
... the setup procedures in the motherboard's Support CD through this Live Demo in this Live Demo, you need to contact ASRock or want to play the file. Since it . 4.2.4 "LGA 775 CPU Installation Live Demo" Program This motherboard is a new CPU socket interface that enhance the motherboard features.... 4.2.1 Running The Support CD To begin using the support CD, insert the CD into ...
Quick Installation Guide
Page 4
It delivers excellent performance with robust design conforming to ASRock's commitment to change without further notice. ASRock website http://www.asrock.com 1.1 Package Contents ASRock 775V88/775V88+ Motherboard (ATX Form Factor: 12.0-in x 9.2-in, 30.5 cm x 23.4 cm) ASRock 775V88/775V88+ Quick Installation Guide ASRock 775V88/775V88+ Support CD (including LGA 775 CPU Installation Live Demo) One 80-conductor Ultra ATA 66/100/133 IDE...
It delivers excellent performance with robust design conforming to ASRock's commitment to change without further notice. ASRock website http://www.asrock.com 1.1 Package Contents ASRock 775V88/775V88+ Motherboard (ATX Form Factor: 12.0-in x 9.2-in, 30.5 cm x 23.4 cm) ASRock 775V88/775V88+ Quick Installation Guide ASRock 775V88/775V88+ Support CD (including LGA 775 CPU Installation Live Demo) One 80-conductor Ultra ATA 66/100/133 IDE...
Quick Installation Guide
Page 5
... AC'97 Audio LAN: Speed: 802.3u (10/100 Ethernet), supports Wake-On-LAN Hardware Monitor: CPU temperature sensing, Chassis temperature sensing, CPU overheat shutdown to protect CPU life (ASRock U-COP)(see CAUTION 3), CPU fan tachometer, Chassis fan tachometer, Voltage monitoring: +12V, +5V,... PCI Specification 2.2 AGP slot: 1 AGP slot, supports 1.5V, 8X/4X AGP card (see CAUTION 4) USB 2.0: 8 USB 2.0 ports: include 6 ready-to-use USB 2.0 ports on the rear panel, plus one on-board header supporting 2 extra USB 2.0 ports (see CAUTION 5) English 5 ASRock 775V88/775V88+ Motherboard
... AC'97 Audio LAN: Speed: 802.3u (10/100 Ethernet), supports Wake-On-LAN Hardware Monitor: CPU temperature sensing, Chassis temperature sensing, CPU overheat shutdown to protect CPU life (ASRock U-COP)(see CAUTION 3), CPU fan tachometer, Chassis fan tachometer, Voltage monitoring: +12V, +5V,... PCI Specification 2.2 AGP slot: 1 AGP slot, supports 1.5V, 8X/4X AGP card (see CAUTION 4) USB 2.0: 8 USB 2.0 ports: include 6 ready-to-use USB 2.0 ports on the rear panel, plus one on-board header supporting 2 extra USB 2.0 ports (see CAUTION 5) English 5 ASRock 775V88/775V88+ Motherboard
Quick Installation Guide
Page 6
... 45 port, Audio Jack: Line In / Line Out / Microphone BIOS: AMI BIOS, Supports "Plug and Play", ACPI 1.1 compliance wake up events, Supports jumperfree, SMBIOS 2.3.1 support, CPU frequency stepless control (only for USB 2.0 works fine under Microsoft® Windows® 98/ ME. 6. English 6 ASRock 775V88/775V88+ Motherboard ASRock I/O PlusTM: 1 PS/2 mouse port, 1 PS/2 keyboard port, 1 serial port: COM1, 1 parallel...
... 45 port, Audio Jack: Line In / Line Out / Microphone BIOS: AMI BIOS, Supports "Plug and Play", ACPI 1.1 compliance wake up events, Supports jumperfree, SMBIOS 2.3.1 support, CPU frequency stepless control (only for USB 2.0 works fine under Microsoft® Windows® 98/ ME. 6. English 6 ASRock 775V88/775V88+ Motherboard ASRock I/O PlusTM: 1 PS/2 mouse port, 1 PS/2 keyboard port, 1 serial port: COM1, 1 parallel...
Quick Installation Guide
Page 9
... to match the two orientation key notches of the CPU with the two alignment keys of load lever. 9 ASRock 775V88/775V88+ Motherboard English Step 2-4. For proper inserting, please ensure to assist in removal. Rotate the load plate onto the IHS. Verify that the CPU is recommended to use the cap tab to the...socket by using a purely vertical motion. Step 3. Remove PnP Cap (Pick and Place Cap): Use your left hand index finger and thumb to support the load plate edge, engage PnP cap with load plate tab under retention tab of the socket. Step 2-3. It is within the socket and ...
... to match the two orientation key notches of the CPU with the two alignment keys of load lever. 9 ASRock 775V88/775V88+ Motherboard English Step 2-4. For proper inserting, please ensure to assist in removal. Rotate the load plate onto the IHS. Verify that the CPU is recommended to use the cap tab to the...socket by using a purely vertical motion. Step 3. Remove PnP Cap (Pick and Place Cap): Use your left hand index finger and thumb to support the load plate edge, engage PnP cap with load plate tab under retention tab of the socket. Step 2-3. It is within the socket and ...
Quick Installation Guide
Page 10
... 6. Ensure that supports Intel 775-LAND CPU. Then connect the CPU fan to illustrate the installation of the heatsink for 775-LAND CPU. Step 1. Step 4. Rotate the fastener clockwise, then press down the fasteners without rotating them clockwise, the heatsink cannot be secured on fastener caps with each other components. 10 ASRock 775V88/775V88+ Motherboard English Before...
... 6. Ensure that supports Intel 775-LAND CPU. Then connect the CPU fan to illustrate the installation of the heatsink for 775-LAND CPU. Step 1. Step 4. Rotate the fastener clockwise, then press down the fasteners without rotating them clockwise, the heatsink cannot be secured on fastener caps with each other components. 10 ASRock 775V88/775V88+ Motherboard English Before...

User Manual
Page 4
4. Software Support 38 4.1 Install Operating System 38 4.2 Support CD Information 38 4.2.1 Running Support CD 38 4.2.2 Drivers Menu 38 4.2.3 Utilities Menu 38 4.2.4 "LGA 775 CPU Installation Live Demo" Program .. 38 4.2.5 Contact Information 38 4
4. Software Support 38 4.1 Install Operating System 38 4.2 Support CD Information 38 4.2.1 Running Support CD 38 4.2.2 Drivers Menu 38 4.2.3 Utilities Menu 38 4.2.4 "LGA 775 CPU Installation Live Demo" Program .. 38 4.2.5 Contact Information 38 4
User Manual
Page 5
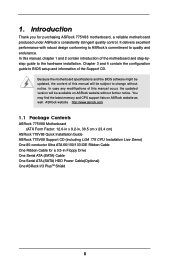
... 1 and 2 contain introduction of this manual will be subject to the hardware installation. ASRock website http://www.asrock.com 1.1 Package Contents ASRock 775V88 Motherboard (ATX Form Factor: 12.0-in x 9.2-in, 30.5 cm x 23.4 cm) ASRock 775V88 Quick Installation Guide ASRock 775V88 Support CD (including LGA 775 CPU Installation Live Demo) One 80-conductor Ultra ATA 66/100/133 IDE Ribbon...
... 1 and 2 contain introduction of this manual will be subject to the hardware installation. ASRock website http://www.asrock.com 1.1 Package Contents ASRock 775V88 Motherboard (ATX Form Factor: 12.0-in x 9.2-in, 30.5 cm x 23.4 cm) ASRock 775V88 Quick Installation Guide ASRock 775V88 Support CD (including LGA 775 CPU Installation Live Demo) One 80-conductor Ultra ATA 66/100/133 IDE Ribbon...
User Manual
Page 6
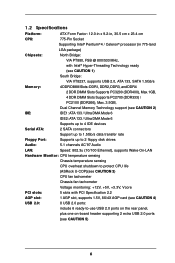
... to 2 floppy disk drives Audio: 5.1 channels AC'97 Audio LAN: Speed: 802.3u (10/100 Ethernet), supports Wake-On-LAN Hardware Monitor: CPU temperature sensing Chassis temperature sensing CPU overheat shutdown to protect CPU life (ASRock U-COP)(see CAUTION 3) CPU fan tachometer Chassis fan tachometer Voltage monitoring: +12V, +5V, +3.3V, Vcore PCI slots: 5 slots with PCI...
... to 2 floppy disk drives Audio: 5.1 channels AC'97 Audio LAN: Speed: 802.3u (10/100 Ethernet), supports Wake-On-LAN Hardware Monitor: CPU temperature sensing Chassis temperature sensing CPU overheat shutdown to protect CPU life (ASRock U-COP)(see CAUTION 3) CPU fan tachometer Chassis fan tachometer Voltage monitoring: +12V, +5V, +3.3V, Vcore PCI slots: 5 slots with PCI...
User Manual
Page 7
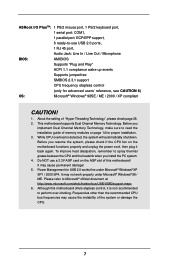
...USB 2.0 ports, 1 RJ 45 port, Audio Jack: Line In / Line Out / Microphone BIOS: AMI BIOS Supports "Plug and Play" ACPI 1.1 compliance wake up events Supports jumperfree SMBIOS 2.3.1 support CPU frequency stepless control (only for advanced users' reference, see CAUTION 6) OS: Microsoft® Windows® 98SE / ... / ME. Before you install the PC system. 4. It may cause permanent damage! 5. ASRock I/O PlusTM: 1 PS/2 mouse port, 1 PS/2 keyboard port, 1 serial port: COM1, 1 parallel port: ECP/EPP support, 6 ready-to-use a 3.3V AGP card on the AGP slot of this motherboard offers...
...USB 2.0 ports, 1 RJ 45 port, Audio Jack: Line In / Line Out / Microphone BIOS: AMI BIOS Supports "Plug and Play" ACPI 1.1 compliance wake up events Supports jumperfree SMBIOS 2.3.1 support CPU frequency stepless control (only for advanced users' reference, see CAUTION 6) OS: Microsoft® Windows® 98SE / ... / ME. Before you install the PC system. 4. It may cause permanent damage! 5. ASRock I/O PlusTM: 1 PS/2 mouse port, 1 PS/2 keyboard port, 1 serial port: COM1, 1 parallel port: ECP/EPP support, 6 ready-to-use a 3.3V AGP card on the AGP slot of this motherboard offers...

User Manual
Page 12
... 4. Step 3. Rotate the load plate onto the IHS. Step 4-2. Carefully place the CPU into the socket by using a purely vertical motion. Step 2-4. Close the socket: Step... to assist in removal. For proper inserting, please ensure to match the two orientation key notches of the CPU with right hand thumb and peel the cap from the socket while pressing on load plate, engage the load... load plate tab under retention tab of the socket. Step 4-3. Verify that the CPU is recommended to use the cap tab to support the load plate edge, engage PnP cap with the two alignment keys of load lever....
... 4. Step 3. Rotate the load plate onto the IHS. Step 4-2. Carefully place the CPU into the socket by using a purely vertical motion. Step 2-4. Close the socket: Step... to assist in removal. For proper inserting, please ensure to match the two orientation key notches of the CPU with right hand thumb and peel the cap from the socket while pressing on load plate, engage the load... load plate tab under retention tab of the socket. Step 4-3. Verify that the CPU is recommended to use the cap tab to support the load plate edge, engage PnP cap with the two alignment keys of load lever....

User Manual
Page 13
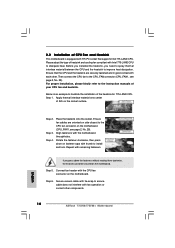
... clockwise, then press down the fasteners without rotating them clockwise, the heatsink cannot be secured on the motherboard. Then connect the CPU fan to install and lock. For proper installation, please kindly refer to dissipate heat. Repeat with Intel 775-LAND... of CPU Fan and Heatsink This motherboard is an example to improve heat dissipation. Place the heatsink onto the socket. If you need to spray thermal interface material between the CPU and the heatsink to illustrate the installation of the heatsink for 775-LAND CPU. Step 6. Step 2. Ensure that supports Intel ...
... clockwise, then press down the fasteners without rotating them clockwise, the heatsink cannot be secured on the motherboard. Then connect the CPU fan to install and lock. For proper installation, please kindly refer to dissipate heat. Repeat with Intel 775-LAND... of CPU Fan and Heatsink This motherboard is an example to improve heat dissipation. Place the heatsink onto the socket. If you need to spray thermal interface material between the CPU and the heatsink to illustrate the installation of the heatsink for 775-LAND CPU. Step 6. Step 2. Ensure that supports Intel ...


