User Guide
Page 3
... 9 1 INTRODUCING THE ROUTER OfficeConnect ADSL Wireless 54 Mbps 11g Firewall Router 11 Router Advantages 13 Package Contents 13 Minimum System and Component Requirements 14 Physical Features 14 2 INSTALLING THE ROUTER Introduction 17 Safety Information 17 Positioning the Router 17 Using the Rubber Feet 18 Wall Mounting 18 Powering Up the Router 19 Connecting the Router 19 3 SETTING UP YOUR COMPUTERS Obtaining an IP Address Automatically 23...
... 9 1 INTRODUCING THE ROUTER OfficeConnect ADSL Wireless 54 Mbps 11g Firewall Router 11 Router Advantages 13 Package Contents 13 Minimum System and Component Requirements 14 Physical Features 14 2 INSTALLING THE ROUTER Introduction 17 Safety Information 17 Positioning the Router 17 Using the Rubber Feet 18 Wall Mounting 18 Powering Up the Router 19 Connecting the Router 19 3 SETTING UP YOUR COMPUTERS Obtaining an IP Address Automatically 23...
User Guide
Page 6
... Mask? 111 DHCP Addressing 111 Static Addressing 111 Auto-IP Addressing 111 B TECHNICAL SPECIFICATIONS OfficeConnect ADSL Wireless 54Mbps 11g Firewall Router 113 Standards 114 C SAFETY INFORMATION D END USER SOFTWARE LICENSE AGREEMENT E OBTAINING SUPPORT FOR YOUR PRODUCT Register Your Product 123 Purchase Value-Added Services 123 Troubleshoot Online 124 Access Software Downloads 124 Telephone Technical Support and Repair 124 Contact Us 125
... Mask? 111 DHCP Addressing 111 Static Addressing 111 Auto-IP Addressing 111 B TECHNICAL SPECIFICATIONS OfficeConnect ADSL Wireless 54Mbps 11g Firewall Router 113 Standards 114 C SAFETY INFORMATION D END USER SOFTWARE LICENSE AGREEMENT E OBTAINING SUPPORT FOR YOUR PRODUCT Register Your Product 123 Purchase Value-Added Services 123 Troubleshoot Online 124 Access Software Downloads 124 Telephone Technical Support and Repair 124 Contact Us 125
User Guide
Page 25
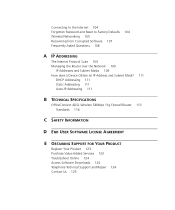
... on Properties. 5 A screen similar to Figure 8 should be configured correctly for this chapter. Obtaining an IP Address Automatically Windows 2000 If you are using DHCP. 3 SETTING UP YOUR COMPUTERS The Router has the ability to dynamically allocate network addresses to the computers on your computers need to be displayed. However, your network, using a Windows...
... on Properties. 5 A screen similar to Figure 8 should be configured correctly for this chapter. Obtaining an IP Address Automatically Windows 2000 If you are using DHCP. 3 SETTING UP YOUR COMPUTERS The Router has the ability to dynamically allocate network addresses to the computers on your computers need to be displayed. However, your network, using a Windows...
User Guide
Page 26
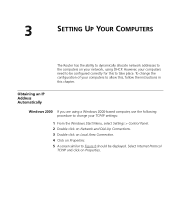
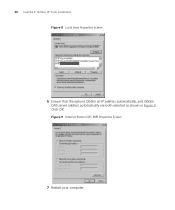
Figure 9 Internet Protocol (TCP/IP) Properties Screen 7 Restart your computer. Click OK. 24 CHAPTER 3: SETTING UP YOUR COMPUTERS Figure 8 Local Area Properties Screen 6 Ensure that the options Obtain an IP address automatically, and Obtain DNS server address automatically are both selected as shown in Figure 9.
Figure 9 Internet Protocol (TCP/IP) Properties Screen 7 Restart your computer. Click OK. 24 CHAPTER 3: SETTING UP YOUR COMPUTERS Figure 8 Local Area Properties Screen 6 Ensure that the options Obtain an IP address automatically, and Obtain DNS server address automatically are both selected as shown in Figure 9.
User Guide
Page 27
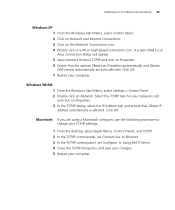
... Windows Start Menu, select Settings > Control Panel. 2 Double click on Properties. 3 In the TCP/IP dialog, select the IP Address tab, and ensure that the options Obtain an IP address automatically, and Obtain DNS servers automatically are using a Macintosh computer, use the following procedure to change your...Control Panels, and TCP/IP. 2 In the TCP/IP control panel, set Connect Via: to Ethernet. 3 In the TCP/IP control panel, set Configure: to Using DHCP Server. 4 Close the TCP/IP dialog box, and save your changes. 5 Restart your computer. Obtaining an IP Address Automatically 25 Windows XP...
... Windows Start Menu, select Settings > Control Panel. 2 Double click on Properties. 3 In the TCP/IP dialog, select the IP Address tab, and ensure that the options Obtain an IP address automatically, and Obtain DNS servers automatically are using a Macintosh computer, use the following procedure to change your...Control Panels, and TCP/IP. 2 In the TCP/IP control panel, set Connect Via: to Ethernet. 3 In the TCP/IP control panel, set Configure: to Using DHCP Server. 4 Close the TCP/IP dialog box, and save your changes. 5 Restart your computer. Obtaining an IP Address Automatically 25 Windows XP...
User Guide
Page 37
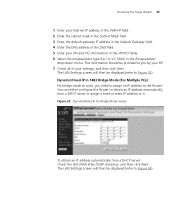
... menu. You can either configure the Router to obtain an IP address automatically from a DHCP server: Check the Get WAN IP By DCHP checkbox, and then click Next. Figure 23 Dynamic/Fixed IP for Bridge Mode Screen To obtain an IP address automatically from a DHCP server or assign a fixed or static IP address to Figure 24). Accessing the Setup...
... menu. You can either configure the Router to obtain an IP address automatically from a DHCP server: Check the Get WAN IP By DCHP checkbox, and then click Next. Figure 23 Dynamic/Fixed IP for Bridge Mode Screen To obtain an IP address automatically from a DHCP server or assign a fixed or static IP address to Figure 24). Accessing the Setup...
User Guide
Page 38
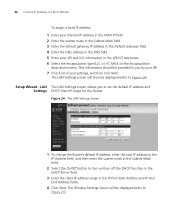
... 24). Setup Wizard - The Wireless Settings screen will then be provided to Figure 25). This information should be displayed (refer to set the default IP address and Settings DHCP client IP range for the Router. Figure 24 The LAN Settings Screen 1 To change the Router's default IP address, enter the new IP address in the IP Address field, and then enter the...
... 24). Setup Wizard - The Wireless Settings screen will then be provided to Figure 25). This information should be displayed (refer to set the default IP address and Settings DHCP client IP range for the Router. Figure 24 The LAN Settings Screen 1 To change the Router's default IP address, enter the new IP address in the IP Address field, and then enter the...
User Guide
Page 41
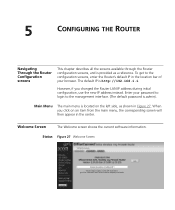
... screens This chapter describes all the screens available through the Router configuration screens, and is http://192.168.1.1. However, if you click on the left side, as a reference. Welcome Screen The Welcome screen shows the current software information. The default IP is provided as shown in the center. Status Figure 27 Welcome... item from the main menu, the corresponding screen will then appear in Figure 27. Main Menu The main menu is admin). When you changed the Router LAN IP address during initial configuration, use the new...
... screens This chapter describes all the screens available through the Router configuration screens, and is http://192.168.1.1. However, if you click on the left side, as a reference. Welcome Screen The Welcome screen shows the current software information. The default IP is provided as shown in the center. Status Figure 27 Welcome... item from the main menu, the corresponding screen will then appear in Figure 27. Main Menu The main menu is admin). When you changed the Router LAN IP address during initial configuration, use the new...

User Guide
Page 42
... ON (Enabled). ■ Specify the Starting and Ending IP Pool address. LAN Settings The LAN Settings screen is NONE. ■ Specify the IP address of the Router. The default IP is Starting: 2 / Ending: 254. ■ Specify the IP address Lease Time. The default is 192.168.1.1 ■ Change... make changes to the settings, you to configure the DHCP server. The Router will automatically assign IP addresses to each computer on your Router, and to : ■ Change the default IP address of 3Com NBX call processor. Figure 28 LAN Settings Screen The factory default settings for...
... ON (Enabled). ■ Specify the Starting and Ending IP Pool address. LAN Settings The LAN Settings screen is NONE. ■ Specify the IP address of the Router. The default IP is Starting: 2 / Ending: 254. ■ Specify the IP address Lease Time. The default is 192.168.1.1 ■ Change... make changes to the settings, you to configure the DHCP server. The Router will automatically assign IP addresses to each computer on your Router, and to : ■ Change the default IP address of 3Com NBX call processor. Figure 28 LAN Settings Screen The factory default settings for...
User Guide
Page 43
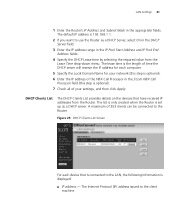
... on the devices that is connected to the Router. The Internet Protocol (IP) address issued to use the Router as a DHCP server. A maximum of your network (this step is optional). 6 Enter the IP address of the NBX Call Processor in the 3Com NBX Call Processor field (this step is optional...and then click Apply. The list is only created when the Router is displayed: ■ IP address - The default IP address is the length of time the DHCP server will reserve the IP address for each device that have received IP addresses from the Lease Time drop-down menu. The lease time is...
... on the devices that is connected to the Router. The Internet Protocol (IP) address issued to use the Router as a DHCP server. A maximum of your network (this step is optional). 6 Enter the IP address of the NBX Call Processor in the 3Com NBX Call Processor field (this step is optional...and then click Apply. The list is only created when the Router is displayed: ■ IP address - The default IP address is the length of time the DHCP server will reserve the IP address for each device that have received IP addresses from the Lease Time drop-down menu. The lease time is...
User Guide
Page 44
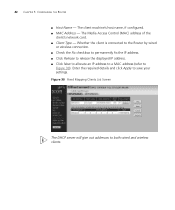
Whether the client is connected to the Router by wired or wireless connection. ■ Check the Fix checkbox to permanently fix the IP address. ■ Click Release to release the displayed IP address. ■ Click New to allocate an IP address to a MAC address (refer to both wired and wireless clients. Figure 30 Fixed Mapping Clients List Screen The DHCP server...
Whether the client is connected to the Router by wired or wireless connection. ■ Check the Fix checkbox to permanently fix the IP address. ■ Click Release to release the displayed IP address. ■ Click New to allocate an IP address to a MAC address (refer to both wired and wireless clients. Figure 30 Fixed Mapping Clients List Screen The DHCP server...
User Guide
Page 51
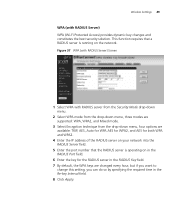
Wireless Settings 49 WPA (with RADIUS server from the Security Mode drop-down menu. 2 Select WPA mode from the drop-down menu, three modes are supported: ... the drop-down menu, four options are available: TKIP, AES, Auto for WPA AES for WPA2, and AES for both WPA and WPA2. 4 Enter the IP address of the RADIUS server on your network into the RADIUS Server field. 5 Enter the port number that a RADIUS server is operating on the network. Figure...
Wireless Settings 49 WPA (with RADIUS server from the Security Mode drop-down menu. 2 Select WPA mode from the drop-down menu, three modes are supported: ... the drop-down menu, four options are available: TKIP, AES, Auto for WPA AES for WPA2, and AES for both WPA and WPA2. 4 Enter the IP address of the RADIUS server on your network into the RADIUS Server field. 5 Enter the port number that a RADIUS server is operating on the network. Figure...
User Guide
Page 57
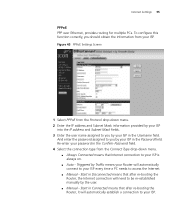
...enter the password assigned to you should obtain the information from the Connect Type drop-down menu. 2 Enter the IP address and Subnet Mask information provided by your ISP into the IP address and Subnet Mask fields. 3 Enter the user name assigned to your ISP in the Username field. Re-enter ...your password in the Confirm Password field. 4 Select the connection type from your ISP in the Password field. Start in Connected means that after re-booting the Router, it...
...enter the password assigned to you should obtain the information from the Connect Type drop-down menu. 2 Enter the IP address and Subnet Mask information provided by your ISP into the IP address and Subnet Mask fields. 3 Enter the user name assigned to your ISP in the Username field. Re-enter ...your password in the Confirm Password field. 4 Select the connection type from your ISP in the Password field. Start in Connected means that after re-booting the Router, it...

User Guide
Page 59
... Subnet Mask information provided by your password in the Username field. And enter the password assigned to you a fixed or static IP address, select No in the IP assigned by your ISP in the Confirm Password field. Internet Settings 57 13 Click Apply. PPPoA PPP over ATM, this function correctly, you by ...your ISP. Re-enter your ISP into the IP address and Subnet Mask fields. 3 Enter the user name assigned to you should obtain the information from the Protocol drop-down menu...
... Subnet Mask information provided by your password in the Username field. And enter the password assigned to you a fixed or static IP address, select No in the IP assigned by your ISP in the Confirm Password field. Internet Settings 57 13 Click Apply. PPPoA PPP over ATM, this function correctly, you by ...your ISP. Re-enter your ISP into the IP address and Subnet Mask fields. 3 Enter the user name assigned to you should obtain the information from the Protocol drop-down menu...
User Guide
Page 63
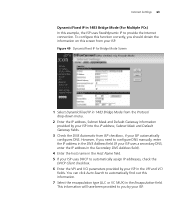
In this mode the WAN ADSL port will be provided to you should be configured with either dynamic or static IP addressing. This information should obtain the information on this information. 7 Select the encapsulation type (LLC or VC MUX) in the VPI and VCI fields. You ...3 Check the DNS Automatic from your ISP. However, if you need to configure DNS manually, enter the IP address in the DNS Address field. (If your ISP uses a secondary DNS, enter the IP address in the Secondary DNS Address field). 4 Enter the host name in the Host Name filed. 5 If your ISP in the Encapsulation ...
In this mode the WAN ADSL port will be provided to you should be configured with either dynamic or static IP addressing. This information should obtain the information on this information. 7 Select the encapsulation type (LLC or VC MUX) in the VPI and VCI fields. You ...3 Check the DNS Automatic from your ISP. However, if you need to configure DNS manually, enter the IP address in the DNS Address field. (If your ISP uses a secondary DNS, enter the IP address in the Secondary DNS Address field). 4 Enter the host name in the Host Name filed. 5 If your ISP in the Encapsulation ...
User Guide
Page 65
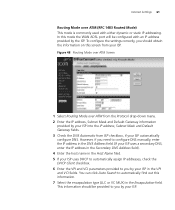
... provide the Internet connection. However, if you need to configure DNS manually, enter the IP address in the DNS Address field. (If your ISP uses a secondary DNS, enter the IP address in the Secondary DNS Address field). 4 Enter the host name in the Host Name field. 5 If your ISP uses DHCP ...should obtain the information on this function correctly, you by your ISP into the IP address, Subnet Mask and Default Gateway fields. 3 Check the DNS Automatic from the Protocol drop-down menu. 2 Enter the IP address, Subnet Mask and Default Gateway information provided by your ISP in 1483 Bridge ...
... provide the Internet connection. However, if you need to configure DNS manually, enter the IP address in the DNS Address field. (If your ISP uses a secondary DNS, enter the IP address in the Secondary DNS Address field). 4 Enter the host name in the Host Name field. 5 If your ISP uses DHCP ...should obtain the information on this function correctly, you by your ISP into the IP address, Subnet Mask and Default Gateway fields. 3 Check the DNS Automatic from the Protocol drop-down menu. 2 Enter the IP address, Subnet Mask and Default Gateway information provided by your ISP in 1483 Bridge ...
User Guide
Page 67
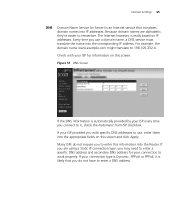
... Router. For example, the domain name www.example.com might translate to enter a DNS address. Figure 51 DNS Screen If the DNS information is an Internet service that you do not require you to enter this screen and click Apply. The Internet however, is likely that translates domain names into the corresponding IP address...
... Router. For example, the domain name www.example.com might translate to enter a DNS address. Figure 51 DNS Screen If the DNS information is an Internet service that you do not require you to enter this screen and click Apply. The Internet however, is likely that translates domain names into the corresponding IP address...
User Guide
Page 74
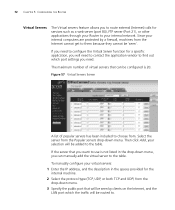
...Server function for a specific application, you will need . If the server that you want to use is 20. 72 CHAPTER 5: CONFIGURING THE ROUTER Virtual Servers The Virtual servers feature allows you to route external (Internet) calls for the internal machine. 2 Select the protocol type (TCP, ...servers that will be seen by a firewall, machines from . To manually configure your selection will be added to the table. Select the server from the drop-down menu, you can be 'seen'. Then click Add, your virtual servers: 1 Enter the IP address, and the description in the drop-down...
...Server function for a specific application, you will need . If the server that you want to use is 20. 72 CHAPTER 5: CONFIGURING THE ROUTER Virtual Servers The Virtual servers feature allows you to route external (Internet) calls for the internal machine. 2 Select the protocol type (TCP, ...servers that will be seen by a firewall, machines from . To manually configure your selection will be added to the table. Select the server from the drop-down menu, you can be 'seen'. Then click Add, your virtual servers: 1 Enter the IP address, and the description in the drop-down...

User Guide
Page 75
The computer in the Client PC IP Address field. Firewall 73 4 You can open the client up to unrestricted two-way Internet access. Enter the IP address (if known) that will need to access the DMZ PC, then set the Public IP Address to 0.0.0.0. 3 Click Apply. To put a computer in the ... video conferencing application. Figure 58 DMZ Screen Use this feature on the Internet at this address can access the DMZ PC without firewall protection. If the IP address is not protected from behind the firewall, you have a client PC that only the computer on a temporary basis. This may...
The computer in the Client PC IP Address field. Firewall 73 4 You can open the client up to unrestricted two-way Internet access. Enter the IP address (if known) that will need to access the DMZ PC, then set the Public IP Address to 0.0.0.0. 3 Click Apply. To put a computer in the ... video conferencing application. Figure 58 DMZ Screen Use this feature on the Internet at this address can access the DMZ PC without firewall protection. If the IP address is not protected from behind the firewall, you have a client PC that only the computer on a temporary basis. This may...
User Guide
Page 78
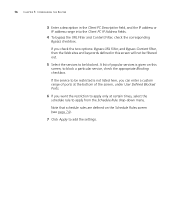
... keywords defined in the Client PC Description field, and the IP address or IP address range into the Client PC IP Address fields. 4 To bypass the URL Filter and Content Filter, check the corresponding Bypass checkbox. If the service to be blocked. 76 CHAPTER 5: CONFIGURING THE ROUTER 3 Enter a description in this screen, to block a particular service, check...
... keywords defined in the Client PC Description field, and the IP address or IP address range into the Client PC IP Address fields. 4 To bypass the URL Filter and Content Filter, check the corresponding Bypass checkbox. If the service to be blocked. 76 CHAPTER 5: CONFIGURING THE ROUTER 3 Enter a description in this screen, to block a particular service, check...


