
User Guide
Page 4
...Type 31 Setup Wizard - Configuration Summary 38 5 CONFIGURING THE ROUTER Navigating Through the Router Configuration screens 39 Main Menu 39 Welcome Screen 39 Status 39 LAN Settings 40 LAN Settings 40 DHCP Clients List 41 Wireless Settings 43 Configuration 44 Encryption 45 Connection Control 50 Client List... 51 Advance 52 Profile 53 Internet Settings 54 ATM PVC 54 DNS 65 Hostname & Clone MAC address 66 Firewall 67 SPI 67 Special Applications 71 Virtual Servers 72 DMZ 73 Wireless Settings 37 Setup Wizard - LAN Settings 36 Setup Wizard - Change Password 30 Setup Wizard - 4 RUNNING THE ...
...Type 31 Setup Wizard - Configuration Summary 38 5 CONFIGURING THE ROUTER Navigating Through the Router Configuration screens 39 Main Menu 39 Welcome Screen 39 Status 39 LAN Settings 40 LAN Settings 40 DHCP Clients List 41 Wireless Settings 43 Configuration 44 Encryption 45 Connection Control 50 Client List... 51 Advance 52 Profile 53 Internet Settings 54 ATM PVC 54 DNS 65 Hostname & Clone MAC address 66 Firewall 67 SPI 67 Special Applications 71 Virtual Servers 72 DMZ 73 Wireless Settings 37 Setup Wizard - LAN Settings 36 Setup Wizard - Change Password 30 Setup Wizard - 4 RUNNING THE ...
User Guide
Page 6
Connecting to the Internet 104 Forgotten Password and Reset to Factory Defaults 104 Wireless Networking 105 Recovering from Corrupted Software 107 Frequently Asked Questions 108 A IP ADDRESSING The Internet Protocol Suite 109 Managing the Router over the Network 109 IP Addresses ... an IP Address and Subnet Mask? 111 DHCP Addressing 111 Static Addressing 111 Auto-IP Addressing 111 B TECHNICAL SPECIFICATIONS OfficeConnect ADSL Wireless 54Mbps 11g Firewall Router 113 Standards 114 C SAFETY INFORMATION D END USER SOFTWARE LICENSE AGREEMENT E OBTAINING SUPPORT FOR YOUR PRODUCT Register Your Product...
Connecting to the Internet 104 Forgotten Password and Reset to Factory Defaults 104 Wireless Networking 105 Recovering from Corrupted Software 107 Frequently Asked Questions 108 A IP ADDRESSING The Internet Protocol Suite 109 Managing the Router over the Network 109 IP Addresses ... an IP Address and Subnet Mask? 111 DHCP Addressing 111 Static Addressing 111 Auto-IP Addressing 111 B TECHNICAL SPECIFICATIONS OfficeConnect ADSL Wireless 54Mbps 11g Firewall Router 113 Standards 114 C SAFETY INFORMATION D END USER SOFTWARE LICENSE AGREEMENT E OBTAINING SUPPORT FOR YOUR PRODUCT Register Your Product...
User Guide
Page 17
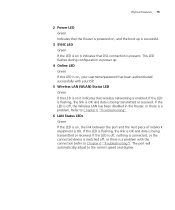
... is enabled. If the LED is off, nothing is connected, or the connected device is switched off , the Wireless LAN has been disabled in the Router, or there is being transmitted or received. If the LED is off , or there is OK. If the LED is flashing, the link is OK ... LED is on it indicates that DSL connection is present. Physical Features 15 2 Power LED Green Indicates that the Router is powered on, and the boot up . 4 Online LED Green If this LED is on, your username/password has been authenticated successfully with the connection (refer to the correct speed and duplex.
... is enabled. If the LED is off, nothing is connected, or the connected device is switched off , the Wireless LAN has been disabled in the Router, or there is being transmitted or received. If the LED is off , or there is OK. If the LED is flashing, the link is OK ... LED is on it indicates that DSL connection is present. Physical Features 15 2 Power LED Green Indicates that the Router is powered on, and the boot up . 4 Online LED Green If this LED is on, your username/password has been authenticated successfully with the connection (refer to the correct speed and duplex.
User Guide
Page 18
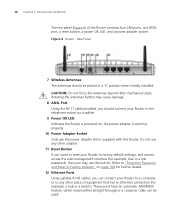
... LED, and a power adapter socket. Refer to "Forgotten Password and Reset to a lost password), then you may cause damage. 8 ADSL Port Using the RJ-11 cable provided, you can be placed in a 'V' position when initially installed. Rear Panel 7 Wireless Antennae The antennae should connect your Router to factory default settings, and cannot access the web...
... LED, and a power adapter socket. Refer to "Forgotten Password and Reset to a lost password), then you may cause damage. 8 ADSL Port Using the RJ-11 cable provided, you can be placed in a 'V' position when initially installed. Rear Panel 7 Wireless Antennae The antennae should connect your Router to factory default settings, and cannot access the web...
User Guide
Page 30
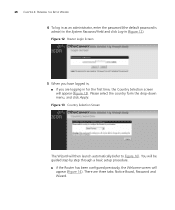
...will then launch automatically (refer to Figure 16). There are logging in (Figure 12). Figure 12 Router Login Screen 5 When you have logged in, ■ if you are three tabs: Notice Board, Password and Wizard. Figure 13 Country Selection Screen The Wizard will appear (Figure 14). 28 CHAPTER 4: ...RUNNING THE SETUP WIZARD 4 To log in as an administrator, enter the password (the default password is admin) in the System Password field and click Log in for the first time, the Country Selection screen will appear (Figure 13).
...will then launch automatically (refer to Figure 16). There are logging in (Figure 12). Figure 12 Router Login Screen 5 When you have logged in, ■ if you are three tabs: Notice Board, Password and Wizard. Figure 13 Country Selection Screen The Wizard will appear (Figure 14). 28 CHAPTER 4: ...RUNNING THE SETUP WIZARD 4 To log in as an administrator, enter the password (the default password is admin) in the System Password field and click Log in for the first time, the Country Selection screen will appear (Figure 13).
User Guide
Page 31
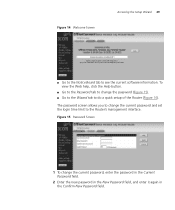
... the Notice Board tab to do a quick setup of the Router (Figure 16). Figure 15 Password Screen 1 To change the current password and set the login time limit to change the current password, enter the password in the Current Password field. 2 Enter the new password in the New Password field, and enter it again in the Confirm New...
... the Notice Board tab to do a quick setup of the Router (Figure 16). Figure 15 Password Screen 1 To change the current password and set the login time limit to change the current password, enter the password in the Current Password field. 2 Enter the new password in the New Password field, and enter it again in the Confirm New...
User Guide
Page 32
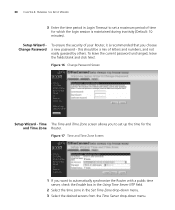
...10 minutes). To leave the current password unchanged, leave the fields blank and click Next. Time The Time and Time Zone screen allows you to set a maximum period of time for which the login session is recommended that you want to automatically synchronize the Router with a public time server, ... Select the time zone in Login Timeout to set up the time for the and Time Zone Router. Figure 17 Time and Time Zone Screen 1 If you choose a new password - Setup Wizard Change Password To ensure the security of letters and numbers, and not easily guessed by others. Figure 16 Change...
...10 minutes). To leave the current password unchanged, leave the fields blank and click Next. Time The Time and Time Zone screen allows you to set a maximum period of time for which the login session is recommended that you want to automatically synchronize the Router with a public time server, ... Select the time zone in Login Timeout to set up the time for the and Time Zone Router. Figure 17 Time and Time Zone Screen 1 If you choose a new password - Setup Wizard Change Password To ensure the security of letters and numbers, and not easily guessed by others. Figure 16 Change...
User Guide
Page 34
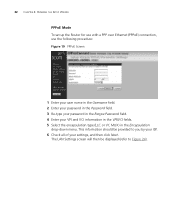
... the encapsulation type (LLC or VC MUX) in the Encapsulation drop-down menu. 32 CHAPTER 4: RUNNING THE SETUP WIZARD PPPoE Mode To set up the Router for use with a PPP over Ethernet (PPPoE) connection, use the following procedure: Figure 19 PPPoE Screen 1 Enter your user name in the Username field. 2 Enter...
... the encapsulation type (LLC or VC MUX) in the Encapsulation drop-down menu. 32 CHAPTER 4: RUNNING THE SETUP WIZARD PPPoE Mode To set up the Router for use with a PPP over Ethernet (PPPoE) connection, use the following procedure: Figure 19 PPPoE Screen 1 Enter your user name in the Username field. 2 Enter...
User Guide
Page 35
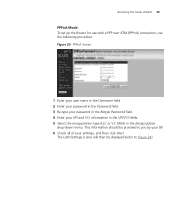
...the VPI/VCI fields. 5 Select the encapsulation type (LLC or VC MUX) in the Retype Password field. 4 Enter your settings, and then click Next. Accessing the Setup Wizard 33 PPPoA Mode To set up the Router for use with a PPP over ATM (PPPoA) connection, use the following procedure: Figure 20... PPPoA Screen 1 Enter your user name in the Username field. 2 Enter your password in the Password field. 3 Re-type your password in the Encapsulation drop-down menu.
...the VPI/VCI fields. 5 Select the encapsulation type (LLC or VC MUX) in the Retype Password field. 4 Enter your settings, and then click Next. Accessing the Setup Wizard 33 PPPoA Mode To set up the Router for use with a PPP over ATM (PPPoA) connection, use the following procedure: Figure 20... PPPoA Screen 1 Enter your user name in the Username field. 2 Enter your password in the Password field. 3 Re-type your password in the Encapsulation drop-down menu.
User Guide
Page 41
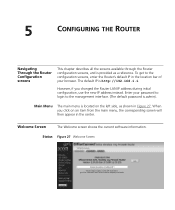
Enter your password to login to the configuration screens, enter the Router's default IP in the location bar of your browser. When you changed the Router LAN IP address during initial configuration, use the new IP address instead. Status Figure 27 Welcome Screen However, if you ... in Figure 27. Main Menu The main menu is http://192.168.1.1. To get to the management interface. (The default password is provided as shown in the center. 5 CONFIGURING THE ROUTER Navigating Through the Router Configuration screens This chapter describes all the screens available through the...
Enter your password to login to the configuration screens, enter the Router's default IP in the location bar of your browser. When you changed the Router LAN IP address during initial configuration, use the new IP address instead. Status Figure 27 Welcome Screen However, if you ... in Figure 27. Main Menu The main menu is http://192.168.1.1. To get to the management interface. (The default password is provided as shown in the center. 5 CONFIGURING THE ROUTER Navigating Through the Router Configuration screens This chapter describes all the screens available through the...
User Guide
Page 50
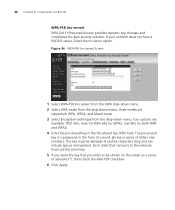
... security solution. Each client that connects to the network must be shown on the screen as a series of letters and numbers. 48 CHAPTER 5: CONFIGURING THE ROUTER WPA-PSK (no server option. Figure 36 WPA-PSK (no server) Screen 1 Select WPA-PSK (no server) from the WPA drop-down menu. 2 Select WPA...-shared key in the form of a word, phrase or series of asterisks (*), then check the Hide PSK checkbox. 6 Click Apply. The pre-shared key is a password, in the Pre-shared Key (PSK) field. If your network does not have a RADIUS server. The key must use the same key. 5 If you want...
... security solution. Each client that connects to the network must be shown on the screen as a series of letters and numbers. 48 CHAPTER 5: CONFIGURING THE ROUTER WPA-PSK (no server option. Figure 36 WPA-PSK (no server) Screen 1 Select WPA-PSK (no server) from the WPA drop-down menu. 2 Select WPA...-shared key in the form of a word, phrase or series of asterisks (*), then check the Hide PSK checkbox. 6 Click Apply. The pre-shared key is a password, in the Pre-shared Key (PSK) field. If your network does not have a RADIUS server. The key must use the same key. 5 If you want...
User Guide
Page 57
... drop-down menu. ■ Always Connected means that after re-booting the Router, it will automatically connect to your ISP. Re-enter your password in Connected means that after re-booting the Router, the Internet connection will need to be re-established manually by Traffic means... your Router will automatically establish a connection to your ISP in the Username field. Triggered by the user. ■ Manual - Start in the Confirm Password field. 4 Select the connection type from your ISP. Internet Settings...
... drop-down menu. ■ Always Connected means that after re-booting the Router, it will automatically connect to your ISP. Re-enter your password in Connected means that after re-booting the Router, the Internet connection will need to be re-established manually by Traffic means... your Router will automatically establish a connection to your ISP in the Username field. Triggered by the user. ■ Manual - Start in the Confirm Password field. 4 Select the connection type from your ISP. Internet Settings...

User Guide
Page 59
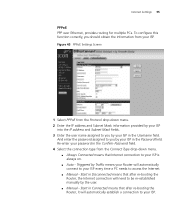
... you a fixed or static IP address, select No in the Username field. Figure 46 PPPoA Settings Screen 1 Select PPPoA from your ISP in the Confirm Password field. Then enter the IP address and Subnet Mask information provided by your ISP into the IP address and Subnet Mask fields. 3 Enter the user... name assigned to next step. ■ If your password in the Password field. PPPoA PPP over ATM, this function correctly, you by ISP field. Internet Settings 57 13 Click Apply.
... you a fixed or static IP address, select No in the Username field. Figure 46 PPPoA Settings Screen 1 Select PPPoA from your ISP in the Confirm Password field. Then enter the IP address and Subnet Mask information provided by your ISP into the IP address and Subnet Mask fields. 3 Enter the user... name assigned to next step. ■ If your password in the Password field. PPPoA PPP over ATM, this function correctly, you by ISP field. Internet Settings 57 13 Click Apply.
User Guide
Page 70
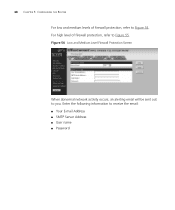
68 CHAPTER 5: CONFIGURING THE ROUTER For low and medium levels of firewall protection, refer to Figure 55. Enter the following information to you. For high level of firewall protection, refer to Figure 54. Figure 54 Low and Medium Level Firewall Protection Screen When abnormal network activity occurs, an alerting email will be sent out to receive the email: ■ Your E-mail Address ■ SMTP Server Address ■ User name ■ Password
68 CHAPTER 5: CONFIGURING THE ROUTER For low and medium levels of firewall protection, refer to Figure 55. Enter the following information to you. For high level of firewall protection, refer to Figure 54. Figure 54 Low and Medium Level Firewall Protection Screen When abnormal network activity occurs, an alerting email will be sent out to receive the email: ■ Your E-mail Address ■ SMTP Server Address ■ User name ■ Password
User Guide
Page 85
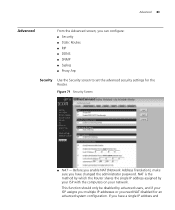
... method by which the Router shares the single IP address assigned by advanced users, and if your network. This function should only be disabled by your ISP with the computers on your ISP assigns you multiple IP addresses or you have changed the administrator password. If you need NAT... disabled for the Router. Figure 71 Security Screen ■ NAT - Before you enable NAT (Network Address Translation), make sure you can configure: ...
... method by which the Router shares the single IP address assigned by advanced users, and if your network. This function should only be disabled by your ISP with the computers on your ISP assigns you multiple IP addresses or you have changed the administrator password. If you need NAT... disabled for the Router. Figure 71 Security Screen ■ NAT - Before you enable NAT (Network Address Translation), make sure you can configure: ...
User Guide
Page 87
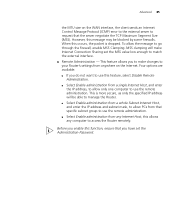
... an Internet Control Message Protocol (ICMP) error to the external server to go through the firewall, enable MSS Clamping. However, this allows any Internet Host, this message may be able to manage the Router. ■ Select Enable administration from a whole Subnet Internet Host, and enter the IP ...this feature, select Disable Remote Administration. ■ Select Enable administration from any computer to make Internet Connection Sharing set the Administration Password. MSS clamping will be blocked by some firewalls. This is dropped. Advanced 85 the MTU size on the Internet.
... an Internet Control Message Protocol (ICMP) error to the external server to go through the firewall, enable MSS Clamping. However, this allows any Internet Host, this message may be able to manage the Router. ■ Select Enable administration from a whole Subnet Internet Host, and enter the IP ...this feature, select Disable Remote Administration. ■ Select Enable administration from any computer to make Internet Connection Sharing set the Administration Password. MSS clamping will be blocked by some firewalls. This is dropped. Advanced 85 the MTU size on the Internet.

User Guide
Page 90
...9632; No-IP.com ■ Zoneedit.com Switches off authentication on the Router. Dynamic Domain Name Server (DDNS) enables you to a dynamic IP address. An unencrypted text password that is required if the Password option has been selected. 8 Click Apply. RIP information is not shared between... devices whose passwords do not match. 7 In the Authentication Code field, enter the password that needs to be set on all RIP-enabled devices connected to this Router. DDNS The Router provides a list of authentication: ■ None - 88 CHAPTER 5: CONFIGURING THE ROUTER 5 Use the Poison...
...9632; No-IP.com ■ Zoneedit.com Switches off authentication on the Router. Dynamic Domain Name Server (DDNS) enables you to a dynamic IP address. An unencrypted text password that is required if the Password option has been selected. 8 Click Apply. RIP information is not shared between... devices whose passwords do not match. 7 In the Authentication Code field, enter the password that needs to be set on all RIP-enabled devices connected to this Router. DDNS The Router provides a list of authentication: ■ None - 88 CHAPTER 5: CONFIGURING THE ROUTER 5 Use the Poison...
User Guide
Page 91
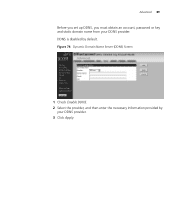
DDNS is disabled by your DDNS provider. Advanced 89 Before you set up DDNS, you must obtain an account, password or key and static domain name from your DDNS provider. 3 Click Apply. Figure 74 Dynamic Domain Name Server (DDNS) Screen 1 Check Enable DDNS. 2 Select the provider, and then enter the necessary information provided by default.
DDNS is disabled by your DDNS provider. Advanced 89 Before you set up DDNS, you must obtain an account, password or key and static domain name from your DDNS provider. 3 Click Apply. Figure 74 Dynamic Domain Name Server (DDNS) Screen 1 Check Enable DDNS. 2 Select the provider, and then enter the necessary information provided by default.

User Guide
Page 106
...computers, this would be convenient. 1 Power off the Router. 2 Disconnect all your computers and the telephone line from the Router. Use the Internet Settings screen to verify this. ■ Check that the PPPoE or PPPoA user name and password are correct. ■ Ensure that your computer has received... the correct address information from the Router. Forgotten Password and Reset to Factory Defaults If you can be lost, and you can re-establish...
...computers, this would be convenient. 1 Power off the Router. 2 Disconnect all your computers and the telephone line from the Router. Use the Internet Settings screen to verify this. ■ Check that the PPPoE or PPPoA user name and password are correct. ■ Ensure that your computer has received... the correct address information from the Router. Forgotten Password and Reset to Factory Defaults If you can be lost, and you can re-establish...
User Guide
Page 110
See "Forgotten Password and Reset to set up VPN hosts on the Router. A maximum of 128 wireless clients are only 4 LAN ports on your supplier for the Router? contact your LAN that clients elsewhere on the Internet can connect to, but this is also possible to Factory ... many computers on your LAN by visiting: http://www.3com.com There are supported. Where can expand the number of expanding your network; The Router supports VPN passthrough, which allows VPN clients on the LAN to the Router. 3Com wireless access points and hubs and switches provide a simple, reliable...
See "Forgotten Password and Reset to set up VPN hosts on the Router. A maximum of 128 wireless clients are only 4 LAN ports on your supplier for the Router? contact your LAN that clients elsewhere on the Internet can connect to, but this is also possible to Factory ... many computers on your LAN by visiting: http://www.3com.com There are supported. Where can expand the number of expanding your network; The Router supports VPN passthrough, which allows VPN clients on the LAN to the Router. 3Com wireless access points and hubs and switches provide a simple, reliable...


