Getting Started Guide
Page 4
...the Console Port 35 Automatic Setup 38 Using 3Com Network Supervisor 38 Connecting to the Console Port 38 Methods of Managing a Switch 41 Command Line Interface Management 41 Web Interface Management 42 SNMP Management 42 Setting Up Command Line Interface Management 43 CLI Management via the Console Port 43 CLI Management over the Network 43 Setting Up Web Interface Management 44 Pre-requisites 44 Web Management Over the Network 44 Setting Up SNMP Management 45 Pre-requisites 45 Default Users and Passwords 46 Changing Default Passwords 46 4 PROBLEM SOLVING Solving Problems Indicated by LEDs 48...
...the Console Port 35 Automatic Setup 38 Using 3Com Network Supervisor 38 Connecting to the Console Port 38 Methods of Managing a Switch 41 Command Line Interface Management 41 Web Interface Management 42 SNMP Management 42 Setting Up Command Line Interface Management 43 CLI Management via the Console Port 43 CLI Management over the Network 43 Setting Up Web Interface Management 44 Pre-requisites 44 Web Management Over the Network 44 Setting Up SNMP Management 45 Pre-requisites 45 Default Users and Passwords 46 Changing Default Passwords 46 4 PROBLEM SOLVING Solving Problems Indicated by LEDs 48...
Getting Started Guide
Page 12
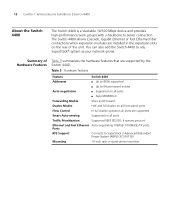
... Table 3 summarizes the hardware features that are installed in the expansion slots on all ports Traffic Prioritization Supported (IEEE 802.ID): 4 queues per port Ethernet and Fast Ethernet Auto-negotiating 10BASE-T/100BASE-TX ports Ports RPS Support Connects to any SuperStack® system as your network grows. You can also add the Switch 4400 to SuperStack 3 Advanced Redundant Power System (ARPS) (3C16071B) Mounting 19-inch rack or stand-alone mounting The Switch 4400 allows Cascade, Gigabit Ethernet or Fast Ethernet Fiber connections when expansion modules...
... Table 3 summarizes the hardware features that are installed in the expansion slots on all ports Traffic Prioritization Supported (IEEE 802.ID): 4 queues per port Ethernet and Fast Ethernet Auto-negotiating 10BASE-T/100BASE-TX ports Ports RPS Support Connects to any SuperStack® system as your network grows. You can also add the Switch 4400 to SuperStack 3 Advanced Redundant Power System (ARPS) (3C16071B) Mounting 19-inch rack or stand-alone mounting The Switch 4400 allows Cascade, Gigabit Ethernet or Fast Ethernet Fiber connections when expansion modules...
Getting Started Guide
Page 13
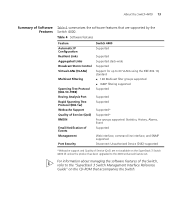
...Table 4 Software features Feature Automatic IP Configuration Resilient Links Aggregated Links Broadcast Storm Control Virtual LANs (VLANs) Multicast Filtering Spanning Tree Protocol (802.1D-1998) Roving Analysis Port Rapid Spanning Tree Protocol (802.1w) Webcache Support Quality of Service (QoS) RMON Email Notification of Events Management Port Security Switch 4400 Supported Supported Supported stack-wide Supported Support for up to 60 VLANs using the IEEE 802.1Q standard ■ 128 Multicast filter groups supported ■ IGMP filtering supported Supported Supported Supported Supported...
...Table 4 Software features Feature Automatic IP Configuration Resilient Links Aggregated Links Broadcast Storm Control Virtual LANs (VLANs) Multicast Filtering Spanning Tree Protocol (802.1D-1998) Roving Analysis Port Rapid Spanning Tree Protocol (802.1w) Webcache Support Quality of Service (QoS) RMON Email Notification of Events Management Port Security Switch 4400 Supported Supported Supported stack-wide Supported Support for up to 60 VLANs using the IEEE 802.1Q standard ■ 128 Multicast filter groups supported ■ IGMP filtering supported Supported Supported Supported Supported...

Getting Started Guide
Page 19
... Mask ■ Default Router Default Settings 19 Default Settings Table 6 shows the default settings for all other traffic. Webcache support and Quality of Service (QoS) are retained to allow you to connect to "best effort" for the Switch 4400: Table 6 Default Settings Feature Switch 4400 Automatic IP Configuration Enabled Port Status Enabled Port Speed 10/100 Mbps ports are auto-negotiated Duplex Mode All fixed 10BASE-T and 100BASE-TX ports are auto-negotiated Flow Control ■ Enabled in half duplex ■ Auto-negotiated in the Command Line Interface, the following...
... Mask ■ Default Router Default Settings 19 Default Settings Table 6 shows the default settings for all other traffic. Webcache support and Quality of Service (QoS) are retained to allow you to connect to "best effort" for the Switch 4400: Table 6 Default Settings Feature Switch 4400 Automatic IP Configuration Enabled Port Status Enabled Port Speed 10/100 Mbps ports are auto-negotiated Duplex Mode All fixed 10BASE-T and 100BASE-TX ports are auto-negotiated Flow Control ■ Enabled in half duplex ■ Auto-negotiated in the Command Line Interface, the following...

Getting Started Guide
Page 25
... If the Switch units are free-standing, up with one IP address. Apply the pads to eight units can stack Switch units together in the marked area at each other , you are mixing a variety of SuperStack® 3 Switch and Hub units, the smaller units must use the self-adhesive rubber pads supplied. The following combinations are running the 4400 enhanced feature set.
... If the Switch units are free-standing, up with one IP address. Apply the pads to eight units can stack Switch units together in the marked area at each other , you are mixing a variety of SuperStack® 3 Switch and Hub units, the smaller units must use the self-adhesive rubber pads supplied. The following combinations are running the 4400 enhanced feature set.
Getting Started Guide
Page 26
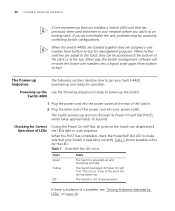
... LEDs" on the Switch are assigned a unit number from bottom to the stack, they are disabled and the LEDs light in your network before you add it to -top for Correct Operation of LEDs During the Power On Self Test, all ports on page 48. When further switches are added to top). The Switch powers-up and operating normally. When the POST has completed, check the Power...
... LEDs" on the Switch are assigned a unit number from bottom to the stack, they are disabled and the LEDs light in your network before you add it to -top for Correct Operation of LEDs During the Power On Self Test, all ports on page 48. When further switches are added to top). The Switch powers-up and operating normally. When the POST has completed, check the Power...
Getting Started Guide
Page 29
... of Managing a Switch ■ Setting Up Command Line Interface Management ■ Setting Up Web Interface Management ■ Setting Up SNMP Management ■ Default Users and Passwords It covers the following topics: ■ Setting Up Overview ■ Initial Switch Setup ■ Manual Setup ■ Automatic Setup ■ Methods of accessing the management software to manage a Switch. 3 SETTING UP FOR MANAGEMENT Your Switch can install it and it works, you have to improve the efficiency of the Switch and therefore the overall performance of your network. This...
... of Managing a Switch ■ Setting Up Command Line Interface Management ■ Setting Up Web Interface Management ■ Setting Up SNMP Management ■ Default Users and Passwords It covers the following topics: ■ Setting Up Overview ■ Initial Switch Setup ■ Manual Setup ■ Automatic Setup ■ Methods of accessing the management software to manage a Switch. 3 SETTING UP FOR MANAGEMENT Your Switch can install it and it works, you have to improve the efficiency of the Switch and therefore the overall performance of your network. This...
Getting Started Guide
Page 30
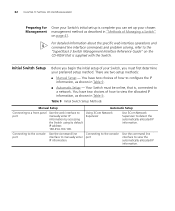
... intend to actively manage your Switch, work through the "Manual Setup" section on a DHCP or BootP server, and eliminates the risk of the IP address changing. This makes management simpler and more information on default users and changing default passwords, see "Default Users and Passwords" on your Switch from unauthorized access, you must change it is not dependent on page 33 and connect to a front panel port or the console port to manually configure the IP information...
... intend to actively manage your Switch, work through the "Manual Setup" section on a DHCP or BootP server, and eliminates the risk of the IP address changing. This makes management simpler and more information on default users and changing default passwords, see "Default Users and Passwords" on your Switch from unauthorized access, you must change it is not dependent on page 33 and connect to a front panel port or the console port to manually configure the IP information...
Getting Started Guide
Page 31
... and use the automatic IP configuration method, you need to view the automatically allocated IP information before you can begin management. This is known as Auto-IP and is the same mechanism used by that server. Work through the "Automatic Setup" section on the network. Most DHCP and BootP servers allow static IP addresses to be configured so that you use 3Com Network Supervisor or connect to the console port to...
... and use the automatic IP configuration method, you need to view the automatically allocated IP information before you can begin management. This is known as Auto-IP and is the same mechanism used by that server. Work through the "Automatic Setup" section on the network. Most DHCP and BootP servers allow static IP addresses to be configured so that you use 3Com Network Supervisor or connect to the console port to...
Getting Started Guide
Page 32
... preferred setup method. Using 3Com Network Supervisor Use 3Com Network Supervisor to the "SuperStack 3 Switch Management Interface Reference Guide" on page 41. For detailed information about the specific web interface operations and command line interface commands and problem solving, refer to detect the automatically allocated IP information. Your Switch must first determine your chosen Management management method as described in "Methods of your Switch, you can set up is complete you must be online, that is , connected to manually...
... preferred setup method. Using 3Com Network Supervisor Use 3Com Network Supervisor to the "SuperStack 3 Switch Management Interface Reference Guide" on page 41. For detailed information about the specific web interface operations and command line interface commands and problem solving, refer to detect the automatically allocated IP information. Your Switch must first determine your chosen Management management method as described in "Methods of your Switch, you can set up is complete you must be online, that is , connected to manually...
Getting Started Guide
Page 33
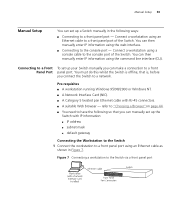
... ■ default gateway Connecting the Workstation to the Switch 1 Connect the workstation to a front panel port using an Ethernet cable as shown in the following so that is offline, that you can manually set up your Switch manually you connect the Switch to the console port - Connect a workstation using a console cable to a front panel port of the Switch. Manual Setup 33 Manual Setup You can set up the Switch with RJ-45 connectors. ■ A suitable Web browser - Connect a workstation using the command line interface (CLI). refer to...
... ■ default gateway Connecting the Workstation to the Switch 1 Connect the workstation to a front panel port using an Ethernet cable as shown in the following so that is offline, that you can manually set up your Switch manually you connect the Switch to the console port - Connect a workstation using a console cable to a front panel port of the Switch. Manual Setup 33 Manual Setup You can set up the Switch with RJ-45 connectors. ■ A suitable Web browser - Connect a workstation using the command line interface (CLI). refer to...
Getting Started Guide
Page 35
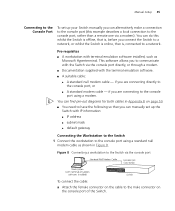
...; default gateway Connecting the Workstation to the Switch 1 Connect the workstation to the console port using a modem. Manual Setup 35 Connecting to the Console Port To set up your Switch manually you to communicate with the Switch via the console port directly, or through a modem. ■ Documentation supplied with the terminal emulation software. ■ A suitable cable: ■ A standard null modem cable - Figure 8 Connecting a workstation to the Switch via a modem). This software allows you can do this example describes a local connection...
...; default gateway Connecting the Workstation to the Switch 1 Connect the workstation to the console port using a modem. Manual Setup 35 Connecting to the Console Port To set up your Switch manually you to communicate with the Switch via the console port directly, or through a modem. ■ Documentation supplied with the terminal emulation software. ■ A suitable cable: ■ A standard null modem cable - Figure 8 Connecting a workstation to the Switch via a modem). This software allows you can do this example describes a local connection...

Getting Started Guide
Page 36
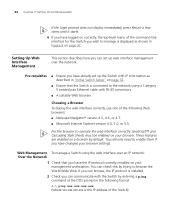
...; no hardware flow control Refer to its console port. If the login prompt does not begin immediately, press Return a few times until it from being loosened. If you have logged on correctly, the top-level menu of the serial ports (also known as a COM port) on the cable to one of the command line interface is displayed as the Switch detects a connection to the documentation that accompanies the terminal emulation software for...
...; no hardware flow control Refer to its console port. If the login prompt does not begin immediately, press Return a few times until it from being loosened. If you have logged on correctly, the top-level menu of the serial ports (also known as a COM port) on the cable to one of the command line interface is displayed as the Switch detects a connection to the documentation that accompanies the terminal emulation software for...
Getting Started Guide
Page 38
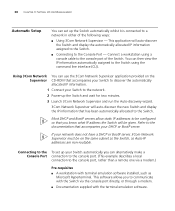
... to the Switch. ■ Connecting to the Console Port - If your network does not have a DHCP or BootP server, 3Com Network Supervisor must be configured so that accompanies your DHCP or BootP server. Using 3Com Network Supervisor You can alternatively make a connection to the console port. (This example describes a local connection to the console port, rather than a remote one via the console port directly, or through a modem. ■ Documentation supplied with terminal emulation software installed, such as Auto-IP addresses are non...
... to the Switch. ■ Connecting to the Console Port - If your network does not have a DHCP or BootP server, 3Com Network Supervisor must be configured so that accompanies your DHCP or BootP server. Using 3Com Network Supervisor You can alternatively make a connection to the console port. (This example describes a local connection to the console port, rather than a remote one via the console port directly, or through a modem. ■ Documentation supplied with terminal emulation software installed, such as Auto-IP addresses are non...

Getting Started Guide
Page 42
... remotely over the network Refer to "Setting Up SNMP Management" on page 45. Figure 15 SNMP management over the network Refer to "Setting Up Web Interface Management" on the CD-ROM that allow you to manage Management the Switch using any network management workstation running the Simple Network Management Protocol (SNMP) as shown in Figure 15. 42 CHAPTER 3: SETTING UP FOR MANAGEMENT Web Interface Each Switch has an internal set of web pages that accompanies your Switch. SNMP Management You can use the 3Com Network Supervisor software...
... remotely over the network Refer to "Setting Up SNMP Management" on page 45. Figure 15 SNMP management over the network Refer to "Setting Up Web Interface Management" on the CD-ROM that allow you to manage Management the Switch using any network management workstation running the Simple Network Management Protocol (SNMP) as shown in Figure 15. 42 CHAPTER 3: SETTING UP FOR MANAGEMENT Web Interface Each Switch has an internal set of web pages that accompanies your Switch. SNMP Management You can use the 3Com Network Supervisor software...
Getting Started Guide
Page 44
... have changed your browser. Setting Up Web Interface Management This section describes how you can set up web interface management over an IP network: Over the Network 1 Check that the Switch is displayed as described in the following Web browsers: ■ Netscape Navigator® version 4.5, 4.6, or 4.7. ■ Microsoft Internet Explorer version 4.0, 5.0, or 5.5. 44 CHAPTER 3: SETTING UP FOR MANAGEMENT If the login prompt does not display immediately, press Return a few times...
... have changed your browser. Setting Up Web Interface Management This section describes how you can set up web interface management over an IP network: Over the Network 1 Check that the Switch is displayed as described in the following Web browsers: ■ Netscape Navigator® version 4.5, 4.6, or 4.7. ■ Microsoft Internet Explorer version 4.0, 5.0, or 5.5. 44 CHAPTER 3: SETTING UP FOR MANAGEMENT If the login prompt does not display immediately, press Return a few times...
Getting Started Guide
Page 45
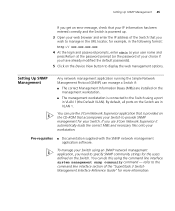
... are installed on the management workstation. ■ The management workstation is provided on the Device View button to the Switch using a port in VLAN 1. To manage your Switch. You can use 3Com Network Supervisor it automatically loads the correct MIBs and necessary files onto your Switch to specify SNMP community strings for your Switch using the command line interface system management snmp community command - By default, all ports on the Switch. Pre-requisites ■ Documentation supplied with the SNMP network management application software. Setting Up SNMP Management...
... are installed on the management workstation. ■ The management workstation is provided on the Device View button to the Switch using a port in VLAN 1. To manage your Switch. You can use 3Com Network Supervisor it automatically loads the correct MIBs and necessary files onto your Switch to specify SNMP community strings for your Switch using the command line interface system management snmp community command - By default, all ports on the Switch. Pre-requisites ■ Documentation supplied with the SNMP network management application software. Setting Up SNMP Management...
Getting Started Guide
Page 46
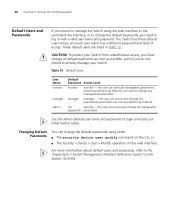
... Switch Table 10 Default Users User Name monitor manager admin Default Password Access Level monitor monitor - manager manager - 46 CHAPTER 3: SETTING UP FOR MANAGEMENT Default Users and Passwords If you intend to manage the Switch using either: ■ The security device user modify command on the CLI, or ■ The Security > Device > User > Modify operation on the Switch CD-ROM. the user can view all default passwords as soon as possible, even if you do not intend to the "Superstack 3 Switch Management Interface Reference Guide" on the web interface. These default users...
... Switch Table 10 Default Users User Name monitor manager admin Default Password Access Level monitor monitor - manager manager - 46 CHAPTER 3: SETTING UP FOR MANAGEMENT Default Users and Passwords If you intend to manage the Switch using either: ■ The security device user modify command on the CLI, or ■ The Security > Device > User > Modify operation on the Switch CD-ROM. the user can view all default passwords as soon as possible, even if you do not intend to the "Superstack 3 Switch Management Interface Reference Guide" on the web interface. These default users...
Getting Started Guide
Page 73
... E Ethernet address of the Switch 24 INDEX 73 F factory defaults 19 H hardware features 12 I initial switch setup 32 installing the Switch 21 prerequisites 22 IP addressing registered 51 IP configuration 30 L LEDs 15 logging in as a default user 46 M MAC address of the Switch 24 management methods 41 preparing for 32 setting up 29, 30 manual setup 33 console port 35 front panel port 33 MDI configuration 27 MDIX configuration 27 MIBs 68 N network supplier support 68 O online technical services 67 P passwords...
... E Ethernet address of the Switch 24 INDEX 73 F factory defaults 19 H hardware features 12 I initial switch setup 32 installing the Switch 21 prerequisites 22 IP addressing registered 51 IP configuration 30 L LEDs 15 logging in as a default user 46 M MAC address of the Switch 24 management methods 41 preparing for 32 setting up 29, 30 manual setup 33 console port 35 front panel port 33 MDI configuration 27 MDIX configuration 27 MIBs 68 N network supplier support 68 O online technical services 67 P passwords...

Getting Started Guide
Page 74
...-through configuration 27 Switch 4400 3C number 24 automatic setup 38 console port 18 dimensions 63 Ethernet address 24 features 12, 13 initial setup 32 installation 21, 22 MAC address 24 manual setup 33 power socket 18 powering-up 26 product name 24 rack mounting 23 RPS socket 18 serial number 24 size 63 stacking 25 unit information label 24 weight 63 system specifications 63 T technical support 3Com Knowledgebase Web Services 67 3Com URL 67 network suppliers 68 product repair 70 troubleshooting...
...-through configuration 27 Switch 4400 3C number 24 automatic setup 38 console port 18 dimensions 63 Ethernet address 24 features 12, 13 initial setup 32 installation 21, 22 MAC address 24 manual setup 33 power socket 18 powering-up 26 product name 24 rack mounting 23 RPS socket 18 serial number 24 size 63 stacking 25 unit information label 24 weight 63 system specifications 63 T technical support 3Com Knowledgebase Web Services 67 3Com URL 67 network suppliers 68 product repair 70 troubleshooting...


