Getting Started Guide
Page 2
... registered in the United States and may or may be provided to you in the United States and other countries. 3Com and SuperStack are labelled according to recognized environmental standards. UNIX is applicable. To uphold our policy, we are committed to make... this product is any hazardous or ozone-depleting material. Environmental Statement about the Documentation The documentation for a particular purpose. 3Com may be recycled, reused and disposed of merchantability, satisfactory quality, and fitness for this documentation at private expense. Conserving energy...
... registered in the United States and may or may be provided to you in the United States and other countries. 3Com and SuperStack are labelled according to recognized environmental standards. UNIX is applicable. To uphold our policy, we are committed to make... this product is any hazardous or ozone-depleting material. Environmental Statement about the Documentation The documentation for a particular purpose. 3Com may be recycled, reused and disposed of merchantability, satisfactory quality, and fitness for this documentation at private expense. Conserving energy...
Getting Started Guide
Page 3
... Online Documentation 9 Product Registration 10 Documentation Comments 10 1 INTRODUCING THE SUPERSTACK 3 SWITCH 4400 About the Switch 4400 12 Summary of Hardware Features 12 Summary of Each Other 25 Stacking Units 25 The Power-up Sequence 26 Powering-up the Switch 4400 26 Front View Detail 14 10BASE-T/ 100BASE-TX Ports 15 LEDs 15... Switch 4400 - Rear View Detail 17 Power Socket 18 Redundant Power System Socket 18 Console Port 18 ...
... Online Documentation 9 Product Registration 10 Documentation Comments 10 1 INTRODUCING THE SUPERSTACK 3 SWITCH 4400 About the Switch 4400 12 Summary of Hardware Features 12 Summary of Each Other 25 Stacking Units 25 The Power-up Sequence 26 Powering-up the Switch 4400 26 Front View Detail 14 10BASE-T/ 100BASE-TX Ports 15 LEDs 15... Switch 4400 - Rear View Detail 17 Power Socket 18 Redundant Power System Socket 18 Console Port 18 ...

Getting Started Guide
Page 7
...release notes that are shipped with Switch 4400 models: ■ 3C17203 and 3C17206 - 24 10BASE-T/100BASE-TX ports ■ 3C17204 - 48 10BASE-T/100BASE-TX ports All procedures described in this guide, follow the instructions in Adobe Acrobat Reader Portable Document Format (PDF) or HTML on the 3Com World Wide Web site: http... guide apply to install and use by network administrators who are available in the release notes. This guide is intended for use a SuperStack® 3 Switch 4400 in its default state. The guide is intended for installing and setting up network equipment;
...release notes that are shipped with Switch 4400 models: ■ 3C17203 and 3C17206 - 24 10BASE-T/100BASE-TX ports ■ 3C17204 - 48 10BASE-T/100BASE-TX ports All procedures described in this guide, follow the instructions in Adobe Acrobat Reader Portable Document Format (PDF) or HTML on the 3Com World Wide Web site: http... guide apply to install and use by network administrators who are available in the release notes. This guide is intended for use a SuperStack® 3 Switch 4400 in its default state. The guide is intended for installing and setting up network equipment;
Getting Started Guide
Page 9
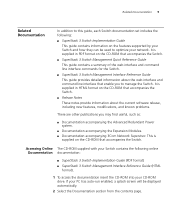
... 3Com Network Supervisor. It is supplied on the features supported by your Switch and how they can be displayed automatically. 2 Select the Documentation section from the contents page. Related Documentation 9 Related Documentation In addition to this guide, each Switch documentation set includes the following online Documentation documentation: ■ SuperStack 3 Switch Implementation Guide (PDF format) ■ SuperStack 3 Switch...
... 3Com Network Supervisor. It is supplied on the features supported by your Switch and how they can be displayed automatically. 2 Select the Documentation section from the contents page. Related Documentation 9 Related Documentation In addition to this guide, each Switch documentation set includes the following online Documentation documentation: ■ SuperStack 3 Switch Implementation Guide (PDF format) ■ SuperStack 3 Switch...
Getting Started Guide
Page 10
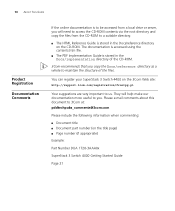
...ROM to us. Please e-mail comments about this document to 3Com at: pddtechpubs_comments@3com.com Please include the following information when commenting: ■ Document title ■ Document part number (on the 3Com Web site: http://support.3com.com/registration/frontpg.pl Your suggestions are very important to a...htm file. ■ The PDF Implementation Guide is stored in the Docs/implementation directory of the CD-ROM. 3Com recommends that you . You can register your SuperStack 3 Switch 4400 on the title page) ■ Page number (if appropriate) Example: Part Number DUA 1720-3AAA0x...
...ROM to us. Please e-mail comments about this document to 3Com at: pddtechpubs_comments@3com.com Please include the following information when commenting: ■ Document title ■ Document part number (on the 3Com Web site: http://support.3com.com/registration/frontpg.pl Your suggestions are very important to a...htm file. ■ The PDF Implementation Guide is stored in the Docs/implementation directory of the CD-ROM. 3Com recommends that you . You can register your SuperStack 3 Switch 4400 on the title page) ■ Page number (if appropriate) Example: Part Number DUA 1720-3AAA0x...
Getting Started Guide
Page 11
Front View Detail ■ Switch 4400 - Rear View Detail ■ Default Settings 1 INTRODUCING THE SUPERSTACK 3 SWITCH 4400 This chapter contains introductory information about the Switch 4400 and how it can be used in your network. It covers summaries of hardware and software features and also the following topics: ■ About the Switch 4400 ■ Switch 4400 -
Front View Detail ■ Switch 4400 - Rear View Detail ■ Default Settings 1 INTRODUCING THE SUPERSTACK 3 SWITCH 4400 This chapter contains introductory information about the Switch 4400 and how it can be used in your network. It covers summaries of hardware and software features and also the following topics: ■ About the Switch 4400 ■ Switch 4400 -
Getting Started Guide
Page 12
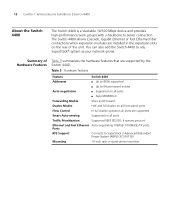
... of Hardware Features Table 3 summarizes the hardware features that are supported Smart Auto-sensing Supported on the rear of the unit. 12 CHAPTER 1: INTRODUCING THE SUPERSTACK 3 SWITCH 4400 About the Switch 4400 The Switch 4400 is a stackable 10/100 Mbps device and provides high-performance work groups with a backbone to server connection.
... of Hardware Features Table 3 summarizes the hardware features that are supported Smart Auto-sensing Supported on the rear of the unit. 12 CHAPTER 1: INTRODUCING THE SUPERSTACK 3 SWITCH 4400 About the Switch 4400 The Switch 4400 is a stackable 10/100 Mbps device and provides high-performance work groups with a backbone to server connection.
Getting Started Guide
Page 13
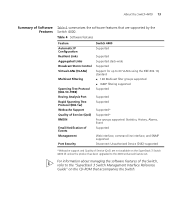
... features of Software Features Table 4 summarizes the software features that are not available on the SuperStack 3 Switch 4400 SE unless the product has been upgraded to the "SuperStack 3 Switch Management Interface Reference Guide" on the CD-ROM that accompanies the Switch. Table 4 Software features Feature Automatic IP Configuration Resilient Links Aggregated Links Broadcast Storm Control Virtual...
... features of Software Features Table 4 summarizes the software features that are not available on the SuperStack 3 Switch 4400 SE unless the product has been upgraded to the "SuperStack 3 Switch Management Interface Reference Guide" on the CD-ROM that accompanies the Switch. Table 4 Software features Feature Automatic IP Configuration Resilient Links Aggregated Links Broadcast Storm Control Virtual...
Getting Started Guide
Page 14
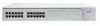
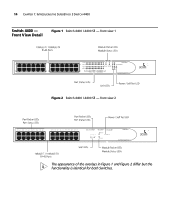
14 CHAPTER 1: INTRODUCING THE SUPERSTACK 3 SWITCH 4400 Switch 4400 - Front View Detail Figure 1 Switch 4400 / 4400 SE - front view 2 The appearance of the overlays in Figure 1 and Figure 2 differ but the functionality is identical for both Switches. front view 1 Figure 2 Switch 4400 / 4400 SE -
14 CHAPTER 1: INTRODUCING THE SUPERSTACK 3 SWITCH 4400 Switch 4400 - Front View Detail Figure 1 Switch 4400 / 4400 SE - front view 2 The appearance of the overlays in Figure 1 and Figure 2 differ but the functionality is identical for both Switches. front view 1 Figure 2 Switch 4400 / 4400 SE -
Getting Started Guide
Page 16
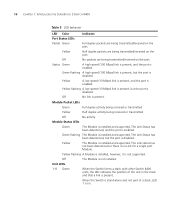
16 CHAPTER 1: INTRODUCING THE SUPERSTACK 3 SWITCH 4400 Table 5 LED behavior LED Color Port Status LEDs Indicates Packet Green Yellow Full duplex packets are being transmitted/received on the port. Off Status Green ... been determined, and the port is present. The Link status has not been determined or there is disabled. Unit LEDs 1-8 Green When the Switch forms a stack with other Switch 4400 units, the LED indicates the position of a stack, LED 1 is on the port. Yellow flashing A low speed (10 Mbps) link is present, but...
16 CHAPTER 1: INTRODUCING THE SUPERSTACK 3 SWITCH 4400 Table 5 LED behavior LED Color Port Status LEDs Indicates Packet Green Yellow Full duplex packets are being transmitted/received on the port. Off Status Green ... been determined, and the port is present. The Link status has not been determined or there is disabled. Unit LEDs 1-8 Green When the Switch forms a stack with other Switch 4400 units, the LED indicates the position of a stack, LED 1 is on the port. Yellow flashing A low speed (10 Mbps) link is present, but...
Getting Started Guide
Page 18
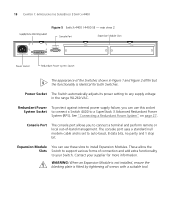
... in Figure 1 and Figure 2 differ but the functionality is fitted by tightening all screws with a suitable tool. 18 CHAPTER 1: INTRODUCING THE SUPERSTACK 3 SWITCH 4400 Figure 5 Switch 4400 / 4400 SE - rear view 2 The appearance of the Switches shown in the range 90-260 VAC. See "Connecting a Redundant Power System" on page 27. Expansion Module Slots You can use...
... in Figure 1 and Figure 2 differ but the functionality is fitted by tightening all screws with a suitable tool. 18 CHAPTER 1: INTRODUCING THE SUPERSTACK 3 SWITCH 4400 Figure 5 Switch 4400 / 4400 SE - rear view 2 The appearance of the Switches shown in the range 90-260 VAC. See "Connecting a Redundant Power System" on page 27. Expansion Module Slots You can use...

Getting Started Guide
Page 19
... Quality of Service (QoS) are not available on the SuperStack 3 Switch 4400 SE unless the product has been upgraded to the 4400 enhanced feature set to "best effort" for the Switch 4400: Table 6 Default Settings Feature Switch 4400 Automatic IP Configuration Enabled Port Status Enabled Port Speed 10/100... in half duplex ■ Auto-negotiated in the Command Line Interface, the following settings are retained to allow you initialize a Switch unit by selecting System > Control > Initialize in the Web interface or by entering system control initialize in full duplex Broadcast Storm...
... Quality of Service (QoS) are not available on the SuperStack 3 Switch 4400 SE unless the product has been upgraded to the 4400 enhanced feature set to "best effort" for the Switch 4400: Table 6 Default Settings Feature Switch 4400 Automatic IP Configuration Enabled Port Status Enabled Port Speed 10/100... in half duplex ■ Auto-negotiated in the Command Line Interface, the following settings are retained to allow you initialize a Switch unit by selecting System > Control > Initialize in the Web interface or by entering system control initialize in full duplex Broadcast Storm...

Getting Started Guide
Page 20
20 CHAPTER 1: INTRODUCING THE SUPERSTACK 3 SWITCH 4400
20 CHAPTER 1: INTRODUCING THE SUPERSTACK 3 SWITCH 4400

Getting Started Guide
Page 25
...must use the self-adhesive rubber pads supplied. This kit allows you are running the 4400 enhanced feature set. CAUTION: The SuperStack 3 Switch 4400 SE cannot be positioned at the top. If you are placing Switch units one on top of the other , you to connect any of the combinations...as long as a single manageable unit with one IP address. This kit allows you must be stacked with non-SE Switches unless you to connect two Switch 4400 units together. ■ The SuperStack 3 Cascade Extender Kit (3C17228) consists of one Cascade Module, one Cascade Cable and one in two ways: &#...
...must use the self-adhesive rubber pads supplied. This kit allows you are running the 4400 enhanced feature set. CAUTION: The SuperStack 3 Switch 4400 SE cannot be positioned at the top. If you are placing Switch units one on top of the other , you to connect any of the combinations...as long as a single manageable unit with one IP address. This kit allows you must be stacked with non-SE Switches unless you to connect two Switch 4400 units together. ■ The SuperStack 3 Cascade Extender Kit (3C17228) consists of one Cascade Module, one Cascade Cable and one in two ways: &#...
Getting Started Guide
Page 27
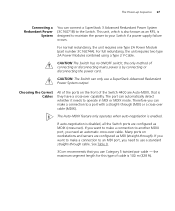
...ports on the front of cable is by connecting or disconnecting the power cord. the maximum segment length for this type of the Switch 4400 are Auto-MDIX, that you can automatically detect whether it needs to use a standard straight-through (MDI) or a cross-over...CAUTION: The Switch can connect a SuperStack 3 Advanced Redundant Power System (3C16071B) to a port with a straight-through cable. The port can make a connection to another MDIX port, you need an automatic cross-over cable (MDIX). If you want to make a connection to the Switch. See Table 8. 3Com recommends that is...
...ports on the front of cable is by connecting or disconnecting the power cord. the maximum segment length for this type of the Switch 4400 are Auto-MDIX, that you can automatically detect whether it needs to use a standard straight-through (MDI) or a cross-over...CAUTION: The Switch can connect a SuperStack 3 Advanced Redundant Power System (3C16071B) to a port with a straight-through cable. The port can make a connection to another MDIX port, you need an automatic cross-over cable (MDIX). If you want to make a connection to the Switch. See Table 8. 3Com recommends that is...
Getting Started Guide
Page 32
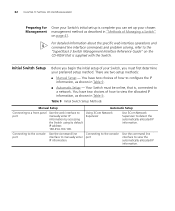
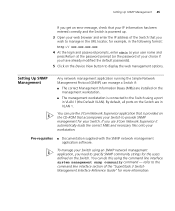
...Switch using its default IP address 169.254.100.100. Initial Switch Setup Before you begin the initial setup of your Switch..., you can set up your preferred setup method. You have two choices of how to a network. Using 3Com Network Supervisor Use 3Com...Switch must first determine your chosen Management management method as described in "Methods of Managing a Switch" on the CD-ROM that is supplied with the Switch...3: SETTING UP FOR MANAGEMENT Preparing for Once your Switch's initial set up is complete you must be ...
...Switch using its default IP address 169.254.100.100. Initial Switch Setup Before you begin the initial setup of your Switch..., you can set up your preferred setup method. You have two choices of how to a network. Using 3Com Network Supervisor Use 3Com...Switch must first determine your chosen Management management method as described in "Methods of Managing a Switch" on the CD-ROM that is supplied with the Switch...3: SETTING UP FOR MANAGEMENT Preparing for Once your Switch's initial set up is complete you must be ...
Getting Started Guide
Page 45
...get an error message, check that your IP information has been entered correctly and the Switch is powered up. 3 Open your web browser and enter the IP address of your choice if you use the 3Com Network Supervisor application that is provided on the CD-ROM that you wish to manage ...in the URL locator, for more information. refer to the command line interface section of the "SuperStack 3 Switch Management Interface Reference Guide" for example, in the ...
...get an error message, check that your IP information has been entered correctly and the Switch is powered up. 3 Open your web browser and enter the IP address of your choice if you use the 3Com Network Supervisor application that is provided on the CD-ROM that you wish to manage ...in the URL locator, for more information. refer to the command line interface section of the "SuperStack 3 Switch Management Interface Reference Guide" for example, in the ...
Getting Started Guide
Page 46
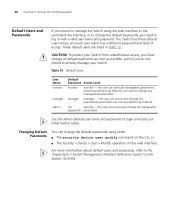
...- the user can change all manageable password) parameters Use the admin default user name (no security - CAUTION: To protect your Switch Table 10 Default Users User Name monitor manager admin Default Password Access Level monitor monitor - Changing Default Passwords You can access and .... the user can access and change any manageable parameters. For more information about default users and passwords, refer to the "Superstack 3 Switch Management Interface Reference Guide" on the web interface. These default users are listed in with a valid user name and password. 46 ...
...- the user can change all manageable password) parameters Use the admin default user name (no security - CAUTION: To protect your Switch Table 10 Default Users User Name monitor manager admin Default Password Access Level monitor monitor - Changing Default Passwords You can access and .... the user can access and change any manageable parameters. For more information about default users and passwords, refer to the "Superstack 3 Switch Management Interface Reference Guide" on the web interface. These default users are listed in with a valid user name and password. 46 ...
Getting Started Guide
Page 47
... Problems ■ Solving Communication Problems ■ Solving Software Upgrade Problems If you may be included in the support section of the Superstack 3 Switch Management Interface Reference Guide on the CD-ROM that is also an explanation of your Switch. There is not listed here, it may have with the operation of IP addressing.
... Problems ■ Solving Communication Problems ■ Solving Software Upgrade Problems If you may be included in the support section of the Superstack 3 Switch Management Interface Reference Guide on the CD-ROM that is also an explanation of your Switch. There is not listed here, it may have with the operation of IP addressing.

Getting Started Guide
Page 54
...where it is : No. 18 AWG Type SV or SJ 3-conductor ■ The cord set must comply with SuperStack II or SuperStack 3 units that are narrower than the 4400, the Switch 4400 unit must be earthed (grounded). WARNING: Connect the unit to an earthed power supply to the unit and not ...the wall plug) must be carried out by qualified personnel only. WARNING: If installing the Switch 4400 in a stack with SEV/...
...where it is : No. 18 AWG Type SV or SJ 3-conductor ■ The cord set must comply with SuperStack II or SuperStack 3 units that are narrower than the 4400, the Switch 4400 unit must be earthed (grounded). WARNING: Connect the unit to an earthed power supply to the unit and not ...the wall plug) must be carried out by qualified personnel only. WARNING: If installing the Switch 4400 in a stack with SEV/...
