
Owner Guide 1st Printing
Page 10
... remove the coolant recovery cap while the engine is on when the transmission control switch is OFF. This light also illuminates briefly when the ignition key is high. Instrumentation Engine coolant temperature Illuminates when the engine coolant temperature is turned to ON.
... remove the coolant recovery cap while the engine is on when the transmission control switch is OFF. This light also illuminates briefly when the ignition key is high. Instrumentation Engine coolant temperature Illuminates when the engine coolant temperature is turned to ON.
Owner Guide 1st Printing
Page 11
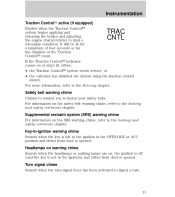
... chime, refer to the Seating and safety restraints chapter. If the Traction Control indicator comes on , the ignition is off (and the key is not in the OFF/LOCK or ACC position and either front door is opened . For information on the SRS warning chime, refer to the...minimum of four seconds or for the duration of the Traction Control event. For more information, refer to limit a wheelspin condition. Key-in-ignition warning chime Sounds when the key is left in the ignition in the ignition) and either : • the Traction Control system needs service, or • ...
... chime, refer to the Seating and safety restraints chapter. If the Traction Control indicator comes on , the ignition is off (and the key is not in the OFF/LOCK or ACC position and either front door is opened . For information on the SRS warning chime, refer to the...minimum of four seconds or for the duration of the Traction Control event. For more information, refer to limit a wheelspin condition. Key-in-ignition warning chime Sounds when the key is left in the ignition in the ignition) and either : • the Traction Control system needs service, or • ...

Owner Guide 1st Printing
Page 12
... INST ECON AVG SPEED C LTR GAL TO EMPTY TRIP A E PRN D 21 Fuel gauge Displays approximately how much fuel is in the fuel tank (when the key is in motion. The fuel gauge may vary slightly when the vehicle is in the ON position). When the gauge first indicates empty, there is...
... INST ECON AVG SPEED C LTR GAL TO EMPTY TRIP A E PRN D 21 Fuel gauge Displays approximately how much fuel is in the fuel tank (when the key is in motion. The fuel gauge may vary slightly when the vehicle is in the ON position). When the gauge first indicates empty, there is...
Owner Guide 1st Printing
Page 35
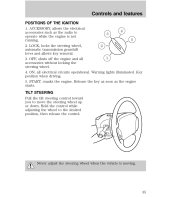
..., all accessories without locking the steering wheel. 4. LOCK, locks the steering wheel, 2 automatic transmission gearshift lever and allows key removal. 1 3. Never adjust the steering wheel when the vehicle is not 5 running. 2. Release the key as soon as the radio to 3 operate while the engine is moving. 35 ACCESSORY, allows the electrical 4 accessories...
..., all accessories without locking the steering wheel. 4. LOCK, locks the steering wheel, 2 automatic transmission gearshift lever and allows key removal. 1 3. Never adjust the steering wheel when the vehicle is not 5 running. 2. Release the key as soon as the radio to 3 operate while the engine is moving. 35 ACCESSORY, allows the electrical 4 accessories...

Owner Guide 1st Printing
Page 49
... the keyless entry keypad through the following procedure: 1. REMOTE ENTRY SYSTEM (IF EQUIPPED) The remote entry system allows you to unlock all vehicle doors without a key. Press the control a second time within five seconds to lock or unlock all doors. Unlocking the doors Press this control to confirm the control was...
... the keyless entry keypad through the following procedure: 1. REMOTE ENTRY SYSTEM (IF EQUIPPED) The remote entry system allows you to unlock all vehicle doors without a key. Press the control a second time within five seconds to lock or unlock all doors. Unlocking the doors Press this control to confirm the control was...

Owner Guide 1st Printing
Page 50
... 7/8), press and release control 1/2. 4. Press the unlock control, then press the lock control. Turn the ignition key to OFF. 4. You must wait 30 seconds. 1. Press the power door unlock control three times. 3. Turn the ignition key from ON to ON. 2. Once disabled, the feature can be repeated. Press the power door unlock...
... 7/8), press and release control 1/2. 4. Press the unlock control, then press the lock control. Turn the ignition key to OFF. 4. You must wait 30 seconds. 1. Press the power door unlock control three times. 3. Turn the ignition key from ON to ON. 2. Once disabled, the feature can be repeated. Press the power door unlock...

Owner Guide 1st Printing
Page 52
...: • they have been turned on with the dimmer control or • any door is open. Place the positive ( +) side of the transmitter near the key ring. Controls and features The inside the transmitter unit. 3. The battery saver will allow you to 10 meters (33 feet) away from your vehicle. Replacing...
...: • they have been turned on with the dimmer control or • any door is open. Place the positive ( +) side of the transmitter near the key ring. Controls and features The inside the transmitter unit. 3. The battery saver will allow you to 10 meters (33 feet) away from your vehicle. Replacing...
Owner Guide 1st Printing
Page 53
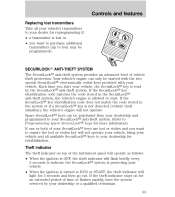
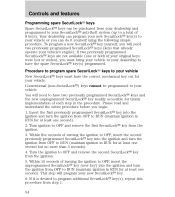
...or flashes rapidly, have the system serviced by the SecuriLock anti-theft system. Each time you start . Spare SecuriLock keys can only be purchased from your dealership and programmed to your SecuriLock anti-theft system. Your vehicle's engine can be started ...with the two special SecuriLock electronically coded keys provided with your vehicle. If one or both of vehicle theft protection. SECURILOCKி ANTI-THEFT SYSTEM The SecuriLock anti-...
...or flashes rapidly, have the system serviced by the SecuriLock anti-theft system. Each time you start . Spare SecuriLock keys can only be purchased from your dealership and programmed to your SecuriLock anti-theft system. Your vehicle's engine can be started ...with the two special SecuriLock electronically coded keys provided with your vehicle. If one or both of vehicle theft protection. SECURILOCKி ANTI-THEFT SYSTEM The SecuriLock anti-...
Owner Guide 1st Printing
Page 54
...one or both of each step in the procedure. If it yourself using the following simple procedure. If two previously programmed SecuriLock keys are not available (one second but no more than 5 seconds). 4. Turn the ignition to OFF and remove the second SecuriLock...; key from step 1. 54 Procedure to program spare SecuriLockி keys to your vehicle New SecuriLock keys must bring your vehicle to your original keys were lost or stolen), you can be programmed to your vehicle or you must...
...one or both of each step in the procedure. If it yourself using the following simple procedure. If two previously programmed SecuriLock keys are not available (one second but no more than 5 seconds). 4. Turn the ignition to OFF and remove the second SecuriLock...; key from step 1. 54 Procedure to program spare SecuriLockி keys to your vehicle New SecuriLock keys must bring your vehicle to your original keys were lost or stolen), you can be programmed to your vehicle or you must...
Owner Guide 1st Printing
Page 55
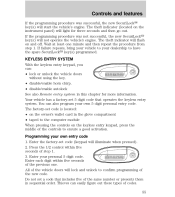
...them in sequential order. Enter your own entry code 1. Controls and features If the programming procedure was not successful, the new SecuriLock key(s) will not operate the vehicle's engine. The theft indicator (located on the instrument panel) will start the vehicle's engine. If the ...programming procedure was successful, the new SecuriLock key(s) will light for more information. KEYLESS ENTRY SYSTEM With the keyless entry keypad, you can: • lock or unlock the vehicle doors ...
...them in sequential order. Enter your own entry code 1. Controls and features If the programming procedure was not successful, the new SecuriLock key(s) will not operate the vehicle's engine. The theft indicator (located on the instrument panel) will start the vehicle's engine. If the ...programming procedure was successful, the new SecuriLock key(s) will light for more information. KEYLESS ENTRY SYSTEM With the keyless entry keypad, you can: • lock or unlock the vehicle doors ...
Owner Guide 1st Printing
Page 78
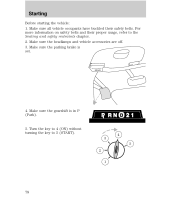
For more information on safety belts and their safety belts. Turn the key to 4 (ON) without turning the key to the Seating and safety restraints chapter. 2. Make sure all vehicle occupants have buckled their proper usage, refer to 5 (START). 4 3 5 2 1 78 Make sure the headlamps and vehicle accessories are off. 3. Make sure the gearshift is set. Make sure the parking brake is in P (Park). 5. HOOD BRAKE 4. Starting Before starting the vehicle: 1.
For more information on safety belts and their safety belts. Turn the key to 4 (ON) without turning the key to the Seating and safety restraints chapter. 2. Make sure all vehicle occupants have buckled their proper usage, refer to 5 (START). 4 3 5 2 1 78 Make sure the headlamps and vehicle accessories are off. 3. Make sure the gearshift is set. Make sure the parking brake is in P (Park). 5. HOOD BRAKE 4. Starting Before starting the vehicle: 1.

Owner Guide 1st Printing
Page 80
... engine coolant, which improves starting the vehicle. Using the heater for a few seconds, apply the brake and release the parking brake. The key will not harm the engine, so the heater can be plugged in the night before starting the vehicle. Release the accelerator when the engine...below -12°C (10°F), depress the accelerator and start within five seconds, wait ten seconds and try again. 3. Starting STARTING THE ENGINE 1. Turn the key to 4 (ON). 4 3 5 2 1 2. If the engine does not start in two attempts or if the temperature is strongly recommended if you live ...
... engine coolant, which improves starting the vehicle. Using the heater for a few seconds, apply the brake and release the parking brake. The key will not harm the engine, so the heater can be plugged in the night before starting the vehicle. Release the accelerator when the engine...below -12°C (10°F), depress the accelerator and start within five seconds, wait ten seconds and try again. 3. Starting STARTING THE ENGINE 1. Turn the key to 4 (ON). 4 3 5 2 1 2. If the engine does not start in two attempts or if the temperature is strongly recommended if you live ...
Owner Guide 1st Printing
Page 85
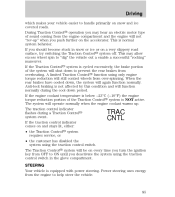
... motor type of sound coming from the engine compartment and the engine will still control wheels from OFF to ON until you turn the ignition key from over-spinning. When the rear brakes have cooled down period. If you push further on and stays lit, either: • the Traction Control...
... motor type of sound coming from the engine compartment and the engine will still control wheels from OFF to ON until you turn the ignition key from over-spinning. When the rear brakes have cooled down period. If you push further on and stays lit, either: • the Traction Control...
Owner Guide 1st Printing
Page 87
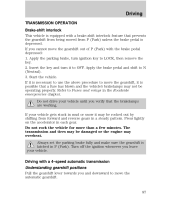
If it is depressed. Refer to LOCK, then remove the key. 2. Do not drive your vehicle. Apply the parking brake, turn it may be damaged or the engine may not be operating properly. Driving with a 4-speed ... is equipped with a brake-shift interlock feature that prevents the gearshift from being moved from forward and reverse gears in a steady pattern. Insert the key and turn ignition key to Fuses and relays in the Roadside emergencies chapter. The transmission and tires may be rocked out by shifting from P (Park) unless the...
If it is depressed. Refer to LOCK, then remove the key. 2. Do not drive your vehicle. Apply the parking brake, turn it may be damaged or the engine may not be operating properly. Driving with a 4-speed ... is equipped with a brake-shift interlock feature that prevents the gearshift from being moved from forward and reverse gears in a steady pattern. Insert the key and turn ignition key to Fuses and relays in the Roadside emergencies chapter. The transmission and tires may be rocked out by shifting from P (Park) unless the...
Owner Guide 1st Printing
Page 94
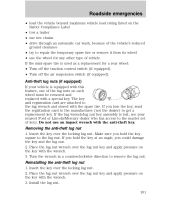
... fuel system for leaks in the fuel system. 94 If no fuel leak is located on the switch. 4. Pause for a few seconds and return the key to the ON position. Turn the ignition to the OFF position. 5. Roadside emergencies HAZARD LIGHTS CONTROL Use only in an emergency to warn traffic of...
... fuel system for leaks in the fuel system. 94 If no fuel leak is located on the switch. 4. Pause for a few seconds and return the key to the ON position. Turn the ignition to the OFF position. 5. Roadside emergencies HAZARD LIGHTS CONTROL Use only in an emergency to warn traffic of...
Owner Guide 1st Printing
Page 101
.... 2. Place the lug nut wrench over the locking lug nut. 2. The key and registration card are attached to the lug wrench and stored with the spare tire. Anti-theft lug nuts (if equipped) If your nearest Ford or Lincoln/Mercury dealer who has access to the lug nut. Place the lug nut... wrench over the locking lug nut. Insert the key over the lug nut key and apply pressure on the key with the wrench. 3. Removing the anti-theft lug nut 1. Install...
.... 2. Place the lug nut wrench over the locking lug nut. 2. The key and registration card are attached to the lug wrench and stored with the spare tire. Anti-theft lug nuts (if equipped) If your nearest Ford or Lincoln/Mercury dealer who has access to the lug nut. Place the lug nut... wrench over the locking lug nut. Insert the key over the lug nut key and apply pressure on the key with the wrench. 3. Removing the anti-theft lug nut 1. Install...

Owner Guide 1st Printing
Page 107
... are designed and built to find out which makes tracking routine service easy. Turn off 1. Working with the engine off the engine and remove the key. 3. Maintenance and care SERVICE RECOMMENDATIONS To help you service your vehicle: • We highlight do-it-yourself items in the engine compartment for easy location...
... are designed and built to find out which makes tracking routine service easy. Turn off 1. Working with the engine off the engine and remove the key. 3. Maintenance and care SERVICE RECOMMENDATIONS To help you service your vehicle: • We highlight do-it-yourself items in the engine compartment for easy location...
Owner Guide 1st Printing
Page 150
... the ignition ...35 Instrument panel cleaning ...140 lighting up panel and interior .23 Keyless entry system autolock ...50 keypad ...55 programming entry code ...55,56 Keys key in ignition chime ...11 Lamps headlamps ...133 high-mount brakelamp ...135 interior lamps ...136 parking lamps ...134 tail lamps ...135 License plate lamps ...135 Lights...
... the ignition ...35 Instrument panel cleaning ...140 lighting up panel and interior .23 Keyless entry system autolock ...50 keypad ...55 programming entry code ...55,56 Keys key in ignition chime ...11 Lamps headlamps ...133 high-mount brakelamp ...135 interior lamps ...136 parking lamps ...134 tail lamps ...135 License plate lamps ...135 Lights...
Scheduled Maintenance Guide 2nd Printing
Page 29
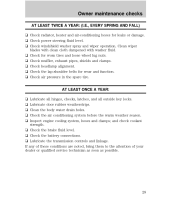
... the battery connections. u Check air pressure in the spare tire. u Check headlamp alignment. AT LEAST ONCE A YEAR: u u u u u Lubricate all hinges, checks, latches, and all outside key locks. Inspect engine cooling system, hoses and clamps; Owner maintenance checks AT LEAST TWICE A YEAR: (I.E., EVERY SPRING AND FALL) u Check radiator, heater and air-conditioning...
... the battery connections. u Check air pressure in the spare tire. u Check headlamp alignment. AT LEAST ONCE A YEAR: u u u u u Lubricate all hinges, checks, latches, and all outside key locks. Inspect engine cooling system, hoses and clamps; Owner maintenance checks AT LEAST TWICE A YEAR: (I.E., EVERY SPRING AND FALL) u Check radiator, heater and air-conditioning...


