
Optoma EP739 Support Question
Optoma EP739 Support Question
Find answers below for this question about Optoma EP739.Need a Optoma EP739 manual? We have 1 online manual for this item!
Question posted by 10bbma on August 15th, 2014
Optoma Ep739 Projector How To Take Apart
The person who posted this question about this Optoma product did not include a detailed explanation. Please use the "Request More Information" button to the right if more details would help you to answer this question.
Current Answers
Related Optoma EP739 Manual Pages
User Manual - Page 1

... ...6 Control Panel ...7 Connection Ports ...8 Remote Control ...9
Installation 10 Connecting the Projector 10 Powering On/Off the Projector 11
Powering On the Projector 11 Powering Off the projector 12 Warning Indicator ...12 Adjusting the Projected Image 13 Adjusting the Projector Image Height 13 Adjusting the Projector Zoom / Focus 14 Adjusting Projected Image Size 14
User Controls 15...
User Manual - Page 2
... when it will burn out and may hurt your unit.
Warning-
If this happens, the projector will detect the life of its cooling cycle before disconnecting power. To reduce the risk of ...the procedures listed under "Replacing the Lamp".
Warning- Do not use lens cap when projector is on the projector first and then the signal sources. To replace the lamp, follow all warnings, ...
User Manual - Page 4
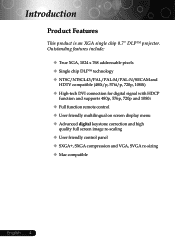
... panel ‹ SXGA+, SXGA compression and VGA, SVGA re-sizing ‹ Mac compatible
English ... 4 Introduction
Product Features
This product is an XGA single chip 0.7" DLPTM projector.
User Manual - Page 10
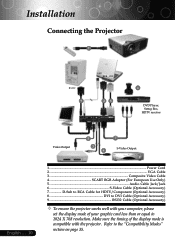
...graphic card less than or equal to the "Compatibility Modes" section on page 35. Refer to 1024 X 768 resolution. Installation
Connecting the Projector
1
RS232
9
USB RGB DVI
28
4 DVD Player, Settop Box, HDTV receiver
Video Output
5
3 6
7 S-Video Output
English ......DVI to DVI Cable (Optional Accessory) 9 RS232 Cable (Optional Accessory)
™ To ensure the projector works well with the...
User Manual - Page 11
..., use the "Source" button on the control panel to Set
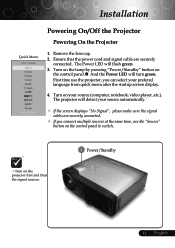
Powering On/Off the Projector
Powering On the Projector
1. Remove the lens cap. 2. Turn on the lamp by pressing "Power/Standby" ... flash green. 3. Installation
Quick Menu
Select language
Press Enter to switch.
™Turn on the projector first and then the signal sources.
1 Power/Standby
11 ... Ensure that the power cord and signal...
User Manual - Page 12
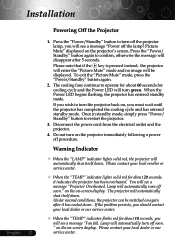
...standby mode, simply press "Power/ Standby" button to turn off the projector lamp, you must wait until the projector has completed the cooling cycle and has entered standby mode. Do not... a message "Fan fail. You will disappear after it indicates the projector has been overheated. The projector will turn the projector back on -screen display. Please contact your local dealer or our ...
User Manual - Page 13

... the elevator button. 2. Lower the image, then release the button to lock the elevator foot into position.
3. Installation
Adjusting the Projected Image
Adjusting the Projector Image Height
The projector is equipped with an elevator foot for adjusting the image height.
Press the elevator button n. 2. To lower the image: 1. Raise the image to...
User Manual - Page 14

Installation
Adjusting the Projector Zoom / Focus
You may turn the zoom ring to 10.0 meters).
Screen Size
Max.(WxH) Min.(WxH)
Distance
29.5"(75.0cm)
24.6"(62.5cm)
23....) 32.81'(10.0m)
Screen
Max.
(Diagonal) Min.
To focus the image, rotate the focus ring until the image is for user's reference only. The projector will focus at distances from 3.9 to 32.8feet (1.2 to zoom in or out.
User Manual - Page 15

...
on screen To exit OSD, press "Menu" again.
display
(OSD)
menu.
English distortion
caused
by
tilting
the
projector
(±16
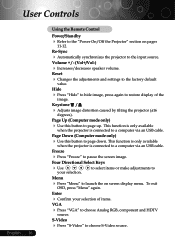
Four Directional Select Keys
4
Use your selection of items. Auto Image
4 Automatically synchronizes the projector to
Enter
4 Confirm your
selection. Keystone /Keystone
4
Adjusts image degrees). to select items or make adjustments to...
User Manual - Page 16
...
display
of items. VGA
4
Press "VGA" source.
This function is only available when the projector is connected to a computer via an USB cable. Enter
4 Confirm your
selection. User Controls
...Hide" image. the
adjustments
and
settings
to 11-12. This function is when the projector is connected to a computer
only available via an USB
cable.
to select items or ...
User Manual - Page 18

...described above.
5. When OSD is displayed, use
keys to be adjusted in the
main menu. The projector will automatically detect the source. How to Set
Sub Menu
Setting
English ... 18
Use
keys to make...change a variety of settings. User Controls
On Screen Display Menus
The Projector has multilingual On Screen Display menus that allow you to select the desired item and adjust the
settings...
User Manual - Page 27

...
so you can project from behind a translucent screen.
4
Front-Ceiling
When you select this function, the projector turns the image
upside down for ceiling-mounted projection.
4
Rear-Ceiling
When you select this function, the projector reverses and turns the image upside down at same time. Signal Type
Select signal type RGB or...
User Manual - Page 28

... On Yes
Video Off Off No
Management
High Altitude
Choose "ON" to turn on all menus to allow for proper high altitude cooling of the projector.
Reset
Choose "Yes" to return the display parameters on High Altitude mode operates the fans at full speed continuously to the factory default settings. English...
User Manual - Page 29
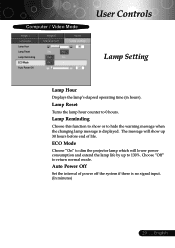
... lamp message is no signal input. (In minutes)
29 ... Auto Power Off
Set the interval of life. English ECO Mode
Choose "On" to dim the projector lamp which will show or to 130%. The message will lower power consumption and extend the lamp life by up 30 hours before end of...
User Manual - Page 30
...than or equal
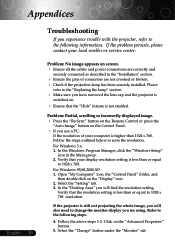
to 1024 x 768. In the "Desktop Area" you experience trouble with the projector, refer to the following steps. 4. Refer to the following information. Appendices
English ... 30
Troubleshooting... feature is still not projecting the whole image, you will find the resolution setting. If the projector is not enabled. For Windows 95,98,2000,XP: 1.
Click on screen. 4 Ensure all ...
User Manual - Page 31

...an adjustment. Refer to page 30. Refer to page 22. 4 Change the monitor color setting from the projector.
31 ... Then select "Standard monitor types" under the "Models" box.
7. You are using a ...display mode of focus
4 Adjusts the Focus Ring on "Show all the equipment and the projector. Verify that the resolution setting of the monitor display is out of your computer's documentation...
User Manual - Page 32
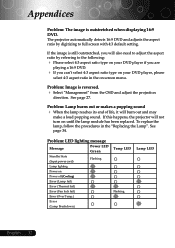
...DVD player, please
select 4:3 aspect ratio in the "Replacing the Lamp". If this happens, the projector will burn out and may
make a loud popping sound. See page 34. If the image is...4 If you can't select 4:3 aspect ratio type on until the lamp module has been replaced. The projector automatically detects 16:9 DVD and adjusts the aspect ratio by referring to full screen with 4:3 default setting....
User Manual - Page 33

... full power
operation. Lamp will automatically turn off soon." Lamp will automatically turn off soon." will
be shown
when the fan is going to deplete.
4 "Projector Overheated. will be shown when the system temperature is approaching the end of order.
33 ... Replacement Suggested!" Appendices
Problem: Message Reminders 4 "Lamp is over heat...
User Manual - Page 34

... minutes before changing lamp!
1
3
2
4
Warning: To
reduce the risk of its useful life in full power operation. Lamp Changing Procedure: 1. Appendices
Replacing the lamp
The projector will show you see this message, changing the lamp as soon as possible. When you a warning message "Lamp is hot! The bulb may shatter and...
User Manual - Page 36

If you wish to the projector met the following specifications:
™Please note that damage resulting from
incorrect installation will invalidate the ... / 402.50
Max. / Min.
49.83
English ... 36 Appendices
Ceiling Mount Installation
1. To prevent damaging your projector, please use a third party ceiling mount kit, please ensure the screws used to attached a mount to use the ceiling mount ...
Similar Questions

White Vertical Line Issue With My Optoma Ds305 Projector. Help?
I have recently been given this projector and to my dismay when i turn it on plugged into the my PC ...
I have recently been given this projector and to my dismay when i turn it on plugged into the my PC ...
(Posted by creepingdeathslayer 8 years ago)


Ceiling Mounted Projector
We have a ceiling mounted projector. It had to be raised in the back to get it on the screen. The pr...
We have a ceiling mounted projector. It had to be raised in the back to get it on the screen. The pr...
(Posted by coreymoz 11 years ago)

Optoma Ep739 Displyas A White Vertical Bar
As soon as the projector starts starts up, a white vertical bar is displayed on the right side of th...
As soon as the projector starts starts up, a white vertical bar is displayed on the right side of th...
(Posted by pnelson 12 years ago)