
Lexmark T652 Support Question
Lexmark T652 Support Question
Find answers below for this question about Lexmark T652.Need a Lexmark T652 manual? We have 9 online manuals for this item!
Question posted by aidachry on September 1st, 2014
How To Stop Paper Jams In Printer Of Lexmark T652
The person who posted this question about this Lexmark product did not include a detailed explanation. Please use the "Request More Information" button to the right if more details would help you to answer this question.
Current Answers
Related Lexmark T652 Manual Pages
Clearing Jams Guide - Page 1

...too much paper. Have bent corners - Lexmark™ T65x Clearing Jams Guide
Clearing jams
Avoiding jams
The following hints can stain garments and skin. Load them prior to access jam locations. ... 283
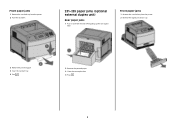
Area Printer Optional external duplex unit Paper trays Multipurpose feeder Envelope feeder Optional output bins StapleSmartTM II Finisher Staple cartridge
1
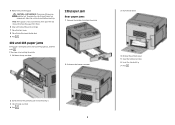
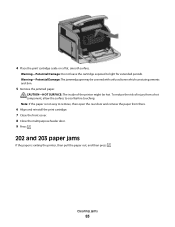
200 and 201 paper jams
1 Push the...
Clearing Jams Guide - Page 2
... and reinstall the print cartridge. 7 Close the front cover. 8 Close the multipurpose feeder door. 9 Press .
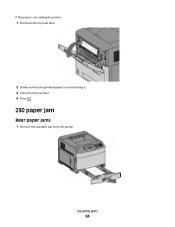
202 and 203 paper jams
If the paper is not exiting the printer: 1 Pull down the top rear door.
230 paper jam
Rear paper jams
1 Remove the standard tray from a hot component, allow the surface to avoid tearing it. 3 Close the top rear...
Clearing Jams Guide - Page 3
...
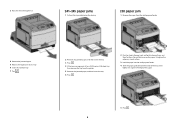
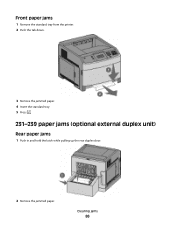
1 Remove the standard tray from the printer. 2 Remove the duplex jam access tray.
3 Remove the jammed paper. 4 Insert the standard tray. 5 Press .
2 Remove the jammed paper. 3 Close the rear duplex door. 4 Press .
3
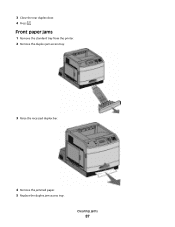
Front paper jams
1 Remove the standard tray from the printer. 2 Push the tab down.
231-239 paper jams (optional external duplex unit)
Rear paper jams
1 Push in and hold the...
Clearing Jams Guide - Page 4
... the display.
250 paper jam
1 Remove the paper from the multipurpose feeder.
4 Remove the jammed paper. 5 Replace the duplex jam access tray. 6 Insert the standard tray. 7 Press .
2 Remove any jammed paper, and then insert the tray. 3 Press . 4 If the jam message persists for a 250-sheet or 550-sheet tray,
then remove the tray from the printer. 5 Remove the jammed paper, and then...
Clearing Jams Guide - Page 5
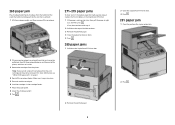
... the output bin door or doors. 5 Press .
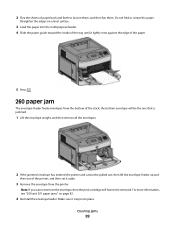
280 paper jams
1 Pull down the StapleSmart II Finisher door.
2 If the jammed envelope has entered the printer and cannot be the one that is jammed. 1 Lift the envelope weight, and then remove all the envelopes.
271-279 paper jams
To clear a jam in the output expander, high-capacity output stacker...
Clearing Jams Guide - Page 6

...paper jam
To prevent paper jams, the stapler motor does not run when the stapler door is open. 1 Close the stapler door until it clicks into place.
2 Pull the latch of the staple cartridge holder down, and then pull the holder out of the printer....
4 Press down on the staple guard until it snaps into place.
2 Press .
283 staple jam
1 Press the latch to open ...
Troubleshooting Guide - Page 3
...PAPER IS LOADED CORRECTLY
1 Open the paper tray. 2 Check for paper jams or misfeeds.
3 Make sure paper guides are using : 1 From the printer control panel, check the settings for the length of the following :
RESET THE PRINTER
Turn the printer... that came with the paper tray, or go to www.lexmark.com/publications to the 2000-sheet tray.
• Make sure the printer is listed on . ...
Troubleshooting Guide - Page 4
...or StapleSmartTM II Finisher is listed on the menu settings page, but paper jams when it exits the printer and enters the mailbox, then it may not be properly installed.
Hard...you clear the jam
Jam Recovery is securely connected. Reinstall the option.
For more information, see the hardware setup documentation that came with the 5-bin mailbox, or go to www.lexmark.com/publications ...
User's Guide - Page 4
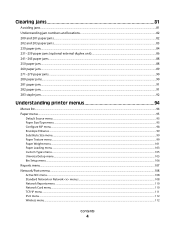
... and locations...82 200 and 201 paper jams...82 202 and 203 paper jams...83 230 paper jam...84 231-239 paper jams (optional external duplex unit 86 241-245 paper jams...88 250 paper jam...88 260 paper jam...89 271-279 paper jams...90 280 paper jams...90 281 paper jam...91 282 paper jam...91 283 staple jam...92
Understanding printer menus 94
Menus list...94 Paper menu...95
Default Source menu...
User's Guide - Page 82
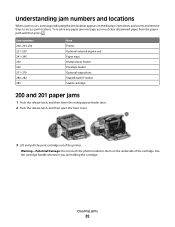
... cartridge handle whenever you must clear all jammed paper from the paper path and then press . To resolve any paper jam message, you are holding the cartridge. Jam numbers 200-203, 230 231-239 241-245 250 260 271-279 280-282 283
Area Printer Optional external duplex unit Paper trays Multipurpose feeder Envelope feeder Optional output bins...
User's Guide - Page 83
... the front cover. 8 Close the multipurpose feeder door. 9 Press .
202 and 203 paper jams
If the paper is exiting the printer, then pull the paper out, and then press . Note: If the paper is not easy to cool before touching. Warning-Potential Damage: The jammed paper may be hot.
Warning-Potential Damage: Do not leave the cartridge exposed...
User's Guide - Page 84
If the paper is not exiting the printer:
1 Pull down the top rear door.
2 Slowly remove the jammed paper to avoid tearing it. 3 Close the top rear door. 4 Press .
230 paper jam
Rear paper jams
1 Remove the standard tray from the printer. Clearing jams
84
User's Guide - Page 86
Clearing jams
86 Front paper jams
1 Remove the standard tray from the printer. 2 Push the tab down.
3 Remove the jammed paper. 4 Insert the standard tray. 5 Press .
231-239 paper jams (optional external duplex unit)
Rear paper jams
1 Push in and hold the latch while pulling up the rear duplex door.
2 Remove the jammed paper.
User's Guide - Page 87
Front paper jams
1 Remove the standard tray from the printer. 2 Remove the duplex jam access tray.
3 Raise the recessed duplex bar.
4 Remove the jammed paper. 5 Replace the duplex jam access tray.
3 Close the rear duplex door. 4 Press . Clearing jams
87
User's Guide - Page 88
.... 7 Press .
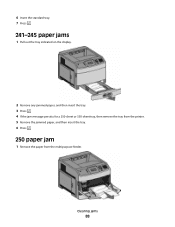
241-245 paper jams
1 Pull out the tray indicated on the display.
2 Remove any jammed paper, and then insert the tray. 3 Press . 4 If the jam message persists for a 250-sheet or 550-sheet tray, then remove the tray from the printer. 5 Remove the jammed paper, and then insert the tray. 6 Press .
250 paper jam
1 Remove the paper from the multipurpose...
User's Guide - Page 89
... sure it lightly rests against the edge of the paper.
5 Press .
260 paper jam
The envelope feeder feeds envelopes from the printer. Do not fold or crease the paper.
For more information, see "200 and 201 paper jams" on a level surface.
3 Load the paper into the multipurpose feeder. 4 Slide the paper guide toward the inside of the tray until...
User's Guide - Page 180
... of the following :
RESET THE PRINTER
Turn the printer off , wait about 10 seconds, and then turn the printer on the menu settings page, but paper jams when it enters or exits the ...'s Guide available on .
Paper trays
These are possible solutions. RESET THE PRINTER
Turn the printer off , wait about 10 seconds, and then turn the printer on our Web site at www.lexmark.com/publications.
User's Guide - Page 181
... hardware setup documentation that came with the option, or go to www.lexmark.com/publications to view the option instruction sheet. Duplex unit
If the duplex unit is listed on the menu settings page, but paper jams when it exits the printer or enters the output option, then it may not be properly installed...
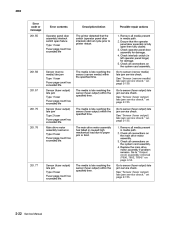
Service Manual - Page 54

... 4. Go to "Output cover assembly removal (T650, T652, T654)" on the printhead assembly 2. See "Sensor (narrow media) late jam service check." Go to paper jam or bind.
1. Check all connections on the main ... specified time.
201.28
Image data did not cycle prior to printer restart.
201.31
Sensor (narrow media) late jam Type 2 fuser
The expected wide media is late reaching the sensor...
Service Manual - Page 56
...cycle prior to printer restart.
1. Go to paper jam or bind.
201.77
Sensor (fuser output) late jam Type 2 fuser Fuser page count has exceeded life. See "Sensor (fuser output) late jam service check." Check...for damage. 5. Go to "Output cover assembly removal (T650, T652, T654)" on page 2-135.
201.56
Sensor (narrow media) late jam Type 1 fuser Fuser page count has exceeded life. The media...
Similar Questions

The Paper Jam Indicator Remains On, Even Though There Is Not A Paper Jam. Print
Therefore, the paper goes half way through and then it says "paper jam".
Therefore, the paper goes half way through and then it says "paper jam".
(Posted by drooger 7 years ago)


How To Remove Paper Rollers From Lexmark Printer T652?
(Posted by wacksdougr 10 years ago)


Paper Jam In The Input Sensor
Recently after replacing the photo conductor kit on my E238 Lexmark printer I have had problems with...
Recently after replacing the photo conductor kit on my E238 Lexmark printer I have had problems with...
(Posted by jsiringagency 11 years ago)