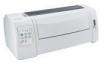
Lexmark 2580n Support Question
Lexmark 2580n Support Question
Find answers below for this question about Lexmark 2580n - Forms Printer B/W Dot-matrix.Need a Lexmark 2580n manual? We have 1 online manual for this item!
Question posted by phyllismcgovern on August 31st, 2020
Why Is Our 2 Part Form Is Advancing Past The Tear-off Each Time We Print A Form?
No settings were changed as to my knowledge, I'm not sure why it keeps advancing half way down the next form and doesn't stop at the tear-off point
Current Answers
Answer #1: Posted by abacusdevaraj on August 31st, 2020 5:51 PM
abacusdevaraj

Member since:
August 31st, 2020 Points: 1,430
Member since:
August 31st, 2020 Points: 1,430
If you use the front or rear push tractor, you can use the tear-off feature to advance your continuous paper to the printer's tear-off edge when you finish printing. You can then easily tear off the printed document. When you resume printing, the printer automatically feeds the paper back to the top-of-form position so that you can save the paper normally lost between documents.
As described below, you can use the tear-off feature in two ways: manually by pressing the printer's Tear Off/Card button, or automatically by turning on the auto tear-off mode.
If the perforation between pages is not aligned with the tear-off edge, you can adjust the position of the perforation using the Micro Adjust feature. See Adjusting the tear-off position for instructions.
Devaraj
Answer #2: Posted by nareshmahawar2001 on September 1st, 2020 12:03 AM
nareshmahawar2001

Member since:
August 31st, 2020 Points: 980
Member since:
August 31st, 2020 Points: 980
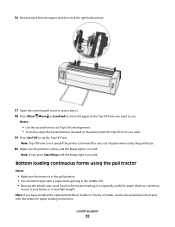
Follow these steps to load continuous paper using the push tractor: Make sure the printer is turned off. Remove the printer cover and the paper guide and place the paper release lever in the continuous paper position. Release the sprocket units by pulling the sprocket locks forward.
Naresh Mahawar
Related Lexmark 2580n Manual Pages
User's Guide - Page 2
... Printing a demonstration page...12 Printing a network setup page...14 Printing from Windows or DOS...14 Using IBM emulation mode...15 Using Epson emulation mode...15 Using Okidata MICROLINE emulation mode...16
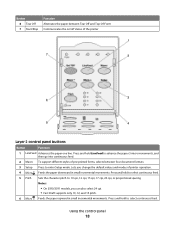
Using the control panel 17
Understanding the control panel buttons...17 Understanding the control panel lights...19 Setting the printer online or offline...20 Advancing...
User's Guide - Page 4
.../Stop, FormFeed, Tear Off and Load/Unload 68 Printer power switch is on, but the power light is too dark ...74 Incorrect number of lines on a page...74 Graphics do not start at the left margin 68 Printer speed slows ...68 Incorrect characters print, left margin changes, or printing stops 69 Printing continues beyond the edges of the continuous forms...
User's Guide - Page 18
... feed.
5 Pitch
Sets the character pitch to enter Setup mode. Using the control panel
18 Press and hold LineFeed to advance the paper 5 micro movements, and then go into continuous feed.
2 Macro To support different styles of pre-printed forms, selects between Tear Off and Top-Of-Form Communicates the on/off status of printer operation.
4 Micro...
User's Guide - Page 19
...
7 Set TOF Sets the Top-Of-Form, which is the position of paper.
Blinking The printer is loaded in the Setup menu. Off
A downloaded font is offline. Pitch Lock is selected.
Paper Out Off
Paper is out of the first print line on the page
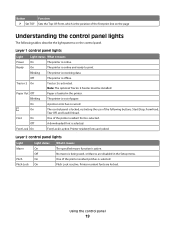
Understanding the control panel lights
The following buttons: Start/Stop, FormFeed,
Tear...
User's Guide - Page 20

... set the printer online, press Start/Stop. The Ready light turns off . 2 Press and hold Load/Unload and Tractor while turning the printer on the next page or to eject the cut form or an envelope. To change one type of printer functions to the Start/Stop, FormFeed, Tear Off, and Load/Unload buttons, lock the control panel. Advancing paper...
User's Guide - Page 26

... have been sent to the printer after advancing to the printer. Note: If you have already set to On, it moves the top perforation of a continuous form to the Tear Off position when all of the following are true:
• The printer has finished printing. • The paper has advanced to the Top-Of-Form on the next page. •...
User's Guide - Page 32
... paper
32 Note: If not, press Start/Stop until the Ready light is very light weight. Bottom loading continuous forms using the pull tractor.
20 Make sure the printer is online, and the Ready light is on solid. Notes:
• Use the second form to set the Top-Of-Form. Note: If you have installed the optional...
User's Guide - Page 36
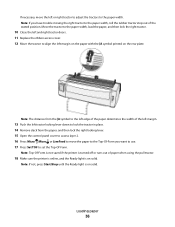
... use. 17 Press Set TOF to set the Top-Of-Form. Note: Top-Of-Form is not saved if the printer is turned off or runs out of paper when using the pull tractor.
18 Make sure the printer is online, and the Ready light is on solid.
Note: If not, press Start/Stop until the Ready light...
User's Guide - Page 39
... in your program. Note: If not, press Start/Stop until the Ready light is on page 37
Loading paper
39
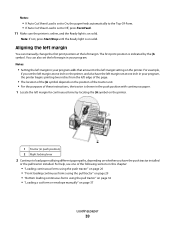
Aligning the left margin
You can also set the left margin in your program, the printer begins printing two inches from the left margin. The first print position is indicated by locating the [A symbol on...
User's Guide - Page 40
... your Top-of print. If a cut form is off, tear off .
5 Open the control panel cover to access layer 2.
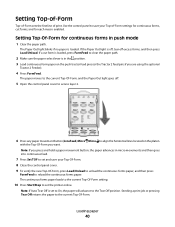
6 Press any paper movement button (LineFeed, Micro , Micro ) to set to On, the paper will advance to the current Top-Of-Form. The continuous forms paper loads to the current Top-Of-Form setting.
10 Press Start/Stop to align the...
User's Guide - Page 49

... paper while you make all your selections, the printer will print a page with your changes reflected.
6 Press Set TOF until the printer returns to the Main menu, or press Pitch from any option from the Main menu by pressing the corresponding button. Changing menu settings (an example)
Note: Make sure continuous forms are loaded in Setup mode, press Micro...
User's Guide - Page 52
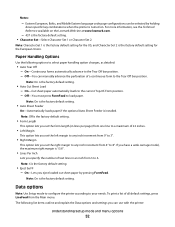
... from 3 to any inch increment from the Main menu. On-Continuous forms automatically advance to your needs. Data options
Note: Use Setup mode to configure the printer according to the Tear Off bar position. - Notes:
-
Note: 6 is the factory default setting. On-Lets you set the form length (in an inch from 4" to 3".
• Right Margin
This...
User's Guide - Page 53
... buffer size to the European characters • Disabled-No code page substitution
Note: Disabled is the factory default setting.
Zero Slash
• On-The zero (0) prints with a slash down the middle. • Off-The zero (0) prints without a slash down the middle.
Understanding Setup mode and menu options
53 Note: Off is the factory...
User's Guide - Page 54

...; Enabled-Verifies the Top-Of-Form before printing begins on continuous forms • Disabled-Does not verify the Top-Of-Form before printing on continuous forms
Note: Enabled is the factory default setting.
Note: On is selected, the printer still prints unidirectionally.
when this pitch is the factory default setting. Note: Off is the factory default setting.
Note: Enabled is the...
User's Guide - Page 62

... interrupt a printer test page:
1 Press Start/Stop. Once you stop a printer test page, turn the printer off by any switch or breaker. • The printer is not plugged into any problem the printer may be experiencing. Note: You can run a printer test page with or without a computer connected to continue printing a printer test page. Running a printer test page
1 Make sure the paper...
User's Guide - Page 67
... access cover. • Close the front cover.
Printer goes to the Tear Off position before the print job finishes
Set Auto Tear Off to the new Top-Of-Form position.
6 Press Start/Stop. The printer beeps twice and the paper rolls backward and then advances to On:
1 Press Start/Stop. 2 Press and hold Tear Off until another job is present, these...
User's Guide - Page 70

Paper fed in the Auto Sheet Feeder jams at the printer entrance
These are possible solutions. Make sure you tear off . 2 Set the forms thickness lever to position 7. 3 Push the paper select lever down to the position. 4 Gently pull the sheet of paper from the Auto Sheet Feeder:
1 Remove ...
User's Guide - Page 80
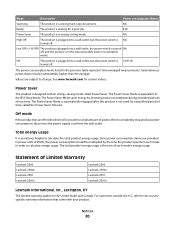
NA
High Off
The product is plugged into a wall outlet, but the power switch is in energy-saving mode. Low Off ( NA
Ready
The product is waiting for a print job.
8 W
Power Saver
The product is NA turned off.
Mode
Description
Power consumption (Watts)
Scanning
The product is scanning hard-copy documents.
User's Guide - Page 82

...anyone other rights that caused the damages. Lexmark's and its duty cycle -Use of printing media outside of Lexmark specifications -Refurbishment, repair, refilling or remanufacture by Lexmark TO THE ...damages up to the limit set forth in the following paragraph. Notices
82 ALL INFORMATION, SPECIFICATIONS, PRICES, AND SERVICES ARE SUBJECT TO CHANGE AT ANY TIME WITHOUT NOTICE. IN NO ...
User's Guide - Page 83

... using 20
loading continuous forms 26 cut form or envelope 37
locking control panel 20
M
Main menu options 50 menu settings
changing 49
N
network setup page 14 noise emission levels 79 notices 77, 78, 79, 80
O
offline setting printer 20
Okidata MICROLINE emulation mode
using 16 online
setting printer 20 ordering supplies 57
P
paper advancing 20
paper feed troubleshooting...
Similar Questions

Disable Power Saving?
How to disable the power saving settings on a Lexmark Forms Printer 2580?
How to disable the power saving settings on a Lexmark Forms Printer 2580?
(Posted by nostyler 11 years ago)

Lexmark 2381 Plus Forms Printer How To Get Rid Of Line Down Middle Of Page?
I use an "old wood burning", Lexmark 2381 PLus Forms Printrer,. My issue is that's it's notprinting ...
I use an "old wood burning", Lexmark 2381 PLus Forms Printrer,. My issue is that's it's notprinting ...
(Posted by lapiper 12 years ago)

Ink Spots On Bol Forms
One of our sites is using a lexmark 2581 to print part BOL's. They are fed in through the bottom. If...
One of our sites is using a lexmark 2581 to print part BOL's. They are fed in through the bottom. If...
(Posted by almunyon 12 years ago)
How Do I Set My Forms 2590 Printer To Align The Prints?
I have a Lexmark Forms 2590. I used a continuous A4 paper and used it for Sage application. Everytim...
I have a Lexmark Forms 2590. I used a continuous A4 paper and used it for Sage application. Everytim...
(Posted by xcalipto 12 years ago)

Lexmark - Label Form Feed Incorrect Serial Vs Parallel
We have a Lexmark 4227 loaded with continuous fan fold labels. When it is connected directly to a P...
We have a Lexmark 4227 loaded with continuous fan fold labels. When it is connected directly to a P...
(Posted by stephecr 12 years ago)