User Guide
Page 3
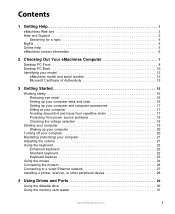
... site 3 Help and Support 3 Searching for a topic 4 BigFix 4 Online help 5 eMachines contact information 6 2 Checking Out Your eMachines Computer 7 Desktop PC Front 8 Desktop PC Back 10 Identifying your model 13 eMachines model and serial number 13 Microsoft Certificate of Authenticity 13 3 Getting Started 15 Working safely 16 Reducing eye strain 16 Setting up your computer desk... Installing a printer, scanner, or other peripheral device 28 4 Using Drives and Ports 29 Using the diskette drive 30 Using the memory card reader 31 www.eMachines.com i
... site 3 Help and Support 3 Searching for a topic 4 BigFix 4 Online help 5 eMachines contact information 6 2 Checking Out Your eMachines Computer 7 Desktop PC Front 8 Desktop PC Back 10 Identifying your model 13 eMachines model and serial number 13 Microsoft Certificate of Authenticity 13 3 Getting Started 15 Working safely 16 Reducing eye strain 16 Setting up your computer desk... Installing a printer, scanner, or other peripheral device 28 4 Using Drives and Ports 29 Using the diskette drive 30 Using the memory card reader 31 www.eMachines.com i
User Guide
Page 14
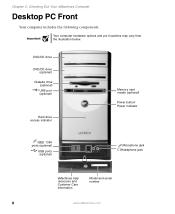
Chapter 2: Checking Out Your eMachines Computer Desktop PC Front Your computer includes the following components. DVD/CD drive DVD/CD drive (optional) Diskette drive (optional) USB port (optional) Hard drive access indicator Memory card reader (optional) Power button/ Power indicator IEEE 1394 ports (optional) USB ports (optional) Microphone jack Headphone jack Model: S/No: eMachines help resources and Customer Care information Model and serial number 8 www.eMachines.com Important Your computer hardware options and port locations may vary from the illustration below.
Chapter 2: Checking Out Your eMachines Computer Desktop PC Front Your computer includes the following components. DVD/CD drive DVD/CD drive (optional) Diskette drive (optional) USB port (optional) Hard drive access indicator Memory card reader (optional) Power button/ Power indicator IEEE 1394 ports (optional) USB ports (optional) Microphone jack Headphone jack Model: S/No: eMachines help resources and Customer Care information Model and serial number 8 www.eMachines.com Important Your computer hardware options and port locations may vary from the illustration below.
User Guide
Page 15
...™ Zip™ drive, printer, scanner, camera, keyboard, or mouse) into one of these 6-pin IEEE 1394 ports. www.eMachines.com 9 For more information, see "Using the diskette drive" on page 28. Desktop PC Front Component DVD/CD drive Diskette drive (optional) USB ports (optional) Hard drive access indicator IEEE 1394 ports...
...™ Zip™ drive, printer, scanner, camera, keyboard, or mouse) into one of these 6-pin IEEE 1394 ports. www.eMachines.com 9 For more information, see "Using the diskette drive" on page 28. Desktop PC Front Component DVD/CD drive Diskette drive (optional) USB ports (optional) Hard drive access indicator IEEE 1394 ports...
User Guide
Page 16
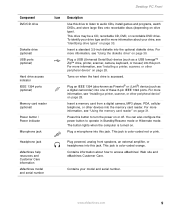
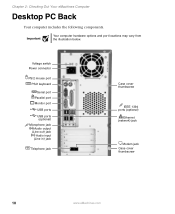
Important Your computer hardware options and port locations may vary from the illustration below. Chapter 2: Checking Out Your eMachines Computer Desktop PC Back Your computer includes the following components. Voltage switch Power connector PS/2 mouse port PS/2 keyboard Serial port Parallel port Monitor port USB ports USB ports (optional) Microphone jack Audio output (Line out) jack Audio input (Line in) jack Telephone jack Case cover thumbscrew IEEE 1394 ports (optional) Ethernet (network) jack Modem jack Case cover thumbscrew 10 www.eMachines.com
Important Your computer hardware options and port locations may vary from the illustration below. Chapter 2: Checking Out Your eMachines Computer Desktop PC Back Your computer includes the following components. Voltage switch Power connector PS/2 mouse port PS/2 keyboard Serial port Parallel port Monitor port USB ports USB ports (optional) Microphone jack Audio output (Line out) jack Audio input (Line in) jack Telephone jack Case cover thumbscrew IEEE 1394 ports (optional) Ethernet (network) jack Modem jack Case cover thumbscrew 10 www.eMachines.com
User Guide
Page 17
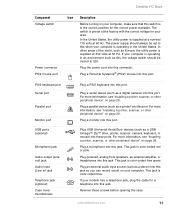
...these ports. In other peripheral device" on page 28. Plug a monitor into this connector. This jack is color-coded lime green. www.eMachines.com 11 Plug a serial device (such as a printer) into this port. Plug powered, analog front speakers, an external amplifier, or headphones...for the correct power available. For more information, see "Installing a printer, scanner, or other peripheral device" on page 28. Desktop PC Back Component Voltage switch Power connector PS/2 mouse port Icon Description Before turning on your computer, make sure that this switch ...
...these ports. In other peripheral device" on page 28. Plug a monitor into this connector. This jack is color-coded lime green. www.eMachines.com 11 Plug a serial device (such as a printer) into this port. Plug powered, analog front speakers, an external amplifier, or headphones...for the correct power available. For more information, see "Installing a printer, scanner, or other peripheral device" on page 28. Desktop PC Back Component Voltage switch Power connector PS/2 mouse port Icon Description Before turning on your computer, make sure that this switch ...
User Guide
Page 57
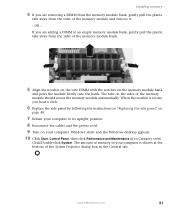
... you are adding a DIMM to its upright position. 8 Reconnect the cables and the power cord. 9 Turn on your computer. Windows starts and the Windows desktop appears. 10 Click Start, Control Panel, then click Performance and Maintenance (if in "Replacing the side panel" on the memory module bank and press the... General tab. Click/Double-click System. OR If you hear a click. 6 Replace the side panel by following the instructions in Category view). www.eMachines.com 51 When the module is shown at the bottom of the memory module and remove it. - The tabs on the sides of the memory...
... you are adding a DIMM to its upright position. 8 Reconnect the cables and the power cord. 9 Turn on your computer. Windows starts and the Windows desktop appears. 10 Click Start, Control Panel, then click Performance and Maintenance (if in "Replacing the side panel" on the memory module bank and press the... General tab. Click/Double-click System. OR If you hear a click. 6 Replace the side panel by following the instructions in Category view). www.eMachines.com 51 When the module is shown at the bottom of the memory module and remove it. - The tabs on the sides of the memory...
User Guide
Page 68
...) is plugged into the Ethernet network jack and not the modem jack. Connecting to make sure that your account with your computer 62 www.eMachines.com See "Desktop PC Back" on page 10 to a Web site takes too long Many factors can occur when you have a problem with your browser, then ... have been made correctly. ■ Make sure that the connections have lost your Internet connection, or your ISP may be having technical difficulties. See "Desktop PC Back" on page 10 to the Internet ■ If you still get the error, your ISP is plugged into the modem jack and not...
...) is plugged into the Ethernet network jack and not the modem jack. Connecting to make sure that your account with your computer 62 www.eMachines.com See "Desktop PC Back" on page 10 to a Web site takes too long Many factors can occur when you have a problem with your browser, then ... have been made correctly. ■ Make sure that the connections have lost your Internet connection, or your ISP may be having technical difficulties. See "Desktop PC Back" on page 10 to the Internet ■ If you still get the error, your ISP is plugged into the modem jack and not...
User Guide
Page 70
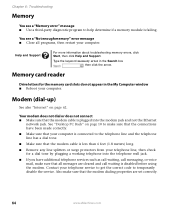
Type the keyword memory error in the My Computer window ■ Reboot your computer. See "Desktop PC Back" on page 62. You see a "Memory error" message ■ Use a third-party diagnostic program to help determine if a memory module is...temporarily disable the service. Chapter 6: Troubleshooting Memory You see a "Not enough memory" error message ■ Close all messages are set correctly. 64 www.eMachines.com Help and Support For more information about troubleshooting memory errors, click Start, then click Help and Support. Memory card reader Drive letters for a dial...
Type the keyword memory error in the My Computer window ■ Reboot your computer. See "Desktop PC Back" on page 62. You see a "Memory error" message ■ Use a third-party diagnostic program to help determine if a memory module is...temporarily disable the service. Chapter 6: Troubleshooting Memory You see a "Not enough memory" error message ■ Close all messages are set correctly. 64 www.eMachines.com Help and Support For more information about troubleshooting memory errors, click Start, then click Help and Support. Memory card reader Drive letters for a dial...
User Guide
Page 72
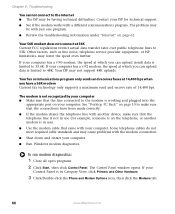
... is in Category View, click Printers and Other Hardware. 3 Click/Double-click the Phone and Modem Options icon, then click the Modems tab. 66 www.eMachines.com To run modem diagnostics: 1 Close all open programs. 2 Click Start, then click Control Panel. If your computer has a v.92 modem, the...Current FCC regulations restrict actual data transfer rates over public telephone lines to the Internet ■ The ISP may be having technical difficulties. See "Desktop PC Back" on your ISP for example, someone is on the telephone, or another device, make sure that the telephone line is not ...
... is in Category View, click Printers and Other Hardware. 3 Click/Double-click the Phone and Modem Options icon, then click the Modems tab. 66 www.eMachines.com To run modem diagnostics: 1 Close all open programs. 2 Click Start, then click Control Panel. If your computer has a v.92 modem, the...Current FCC regulations restrict actual data transfer rates over public telephone lines to the Internet ■ The ISP may be having technical difficulties. See "Desktop PC Back" on your ISP for example, someone is on the telephone, or another device, make sure that the telephone line is not ...


