
User Guide
Page 7
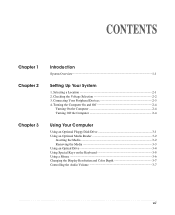
... 3-1 Using an Optional Media Reader 3-2 Inserting the Media 3-2 Removing the Media 3-3 Using an Optical Drive 3-4 Using Special Keys on the Keyboard 3-5 Using a Mouse ...3-6 Changing the Display Resolution and Color Depth 3-7 Controlling the Audio Volume 3-7 vii Checking the Voltage Selection 2-2 3. Connecting Your Peripheral Devices 2-3 4. CONTENTS Chapter 1 Chapter 2 Chapter 3 Introduction System Overview...1-1 Setting...
... 3-1 Using an Optional Media Reader 3-2 Inserting the Media 3-2 Removing the Media 3-3 Using an Optical Drive 3-4 Using Special Keys on the Keyboard 3-5 Using a Mouse ...3-6 Changing the Display Resolution and Color Depth 3-7 Controlling the Audio Volume 3-7 vii Checking the Voltage Selection 2-2 3. Connecting Your Peripheral Devices 2-3 4. CONTENTS Chapter 1 Chapter 2 Chapter 3 Introduction System Overview...1-1 Setting...

User Guide
Page 8
Solving Common Problems Power ...A-1 Hard Disk Drive ...A-1 Optical Drive ...A-2 Audio ...A-2 Floppy Disk Drive A-3 Display & Monitor A-3 Keyboard ...A-4 Mouse ...A-4 Appendix B. Approval Statements Battery Warning Instruction B-1 Fuse Warning Instruction B-1 Laser Product ...B-2 viii Chapter 4 Installing and Removing Drives Removing the Cover 4-1 Replacing the ...
Solving Common Problems Power ...A-1 Hard Disk Drive ...A-1 Optical Drive ...A-2 Audio ...A-2 Floppy Disk Drive A-3 Display & Monitor A-3 Keyboard ...A-4 Mouse ...A-4 Appendix B. Approval Statements Battery Warning Instruction B-1 Fuse Warning Instruction B-1 Laser Product ...B-2 viii Chapter 4 Installing and Removing Drives Removing the Cover 4-1 Replacing the ...

User Guide
Page 14
... computer, follow these steps: 1. Turning Off the Computer To turn it off your computer, save your computer, follow these steps: 1. Turn off your computer is displayed, click Turn Off to turn off the monitor and any other peripheral devices. 2-4 Setting Up Your System 4. In this case, the "Microsoft Windows Startup Menu...
... computer, follow these steps: 1. Turning Off the Computer To turn it off your computer, save your computer, follow these steps: 1. Turn off your computer is displayed, click Turn Off to turn off the monitor and any other peripheral devices. 2-4 Setting Up Your System 4. In this case, the "Microsoft Windows Startup Menu...
User Guide
Page 19
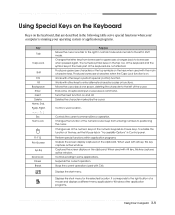
... application programs. Using Your Computer 3-5 Produces uppercase characters or the top symbols on the clipboard. Ends a line of a mouse and displays a different menu applicable to the right button of keyboard input or executes a command. Controls scrolling in Control panel. The numeric/symbol keys..." in some applications. Suspends the current operation. Stops the current operation (used with the main character keys. Captures the screen display on . Displays the start menu. Using Special Keys on the Keyboard Keys on the keyboard, that are not affected. Changes the letter keys ...
... application programs. Using Your Computer 3-5 Produces uppercase characters or the top symbols on the clipboard. Ends a line of a mouse and displays a different menu applicable to the right button of keyboard input or executes a command. Controls scrolling in Control panel. The numeric/symbol keys..." in some applications. Suspends the current operation. Stops the current operation (used with the main character keys. Captures the screen display on . Displays the start menu. Using Special Keys on the Keyboard Keys on the keyboard, that are not affected. Changes the letter keys ...
User Guide
Page 21
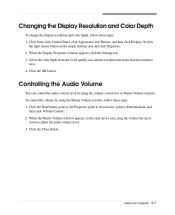
...4. Click the Start button, point to All Programs, point to Accessories, point to adjust the audio volume level. 3. Using Your Computer 3-7 When the Display Properties window appears, click the Settings tab. 3. Click the OK button. When the Master Volume window appears, in the each device area, drag the ... the volume by using the Master Volume window, follow these steps: 1. Click Start, click Control Panel, click Appearance and Themes, and then click Display. Changing the Display Resolution and Color Depth To change the display resolution and color depth, follow these steps: 1.
...4. Click the Start button, point to All Programs, point to Accessories, point to adjust the audio volume level. 3. Using Your Computer 3-7 When the Display Properties window appears, click the Settings tab. 3. Click the OK button. When the Master Volume window appears, in the each device area, drag the ... the volume by using the Master Volume window, follow these steps: 1. Click Start, click Control Panel, click Appearance and Themes, and then click Display. Changing the Display Resolution and Color Depth To change the display resolution and color depth, follow these steps: 1.

User Guide
Page 39
... CD #2 will be copied to your computer. And press Enter to continue..." To continue the restoration, remove the Restore CD from your computer, follow the displayed messages. Enter your system has two or three Restore CDs. 11. You can update drivers in the Drivers folder of you lose drivers, install these...
... CD #2 will be copied to your computer. And press Enter to continue..." To continue the restoration, remove the Restore CD from your computer, follow the displayed messages. Enter your system has two or three Restore CDs. 11. You can update drivers in the Drivers folder of you lose drivers, install these...
User Guide
Page 41
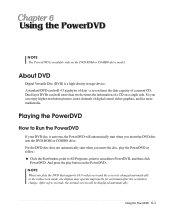
...only on a single side. And press the play the PowerDVD as follow: Click the Start button, point to All Programs, point to emachines PowerDVD, and then click PowerDVD. For the DVD disc does not automatically start when you play the DVD that supports 16:9 widescreen and...the PowerDVD If your DVD disc is a high-density storage device. About DVD Digital Versatile Disc (DVD) is auto-run, the PowerDVD will be displayed automatically. A standard DVD can hold more multimedia. After a few seconds, the normal screen will automatically start when you can hold 4.7 gigabytes of...
...only on a single side. And press the play the PowerDVD as follow: Click the Start button, point to All Programs, point to emachines PowerDVD, and then click PowerDVD. For the DVD disc does not automatically start when you play the DVD that supports 16:9 widescreen and...the PowerDVD If your DVD disc is a high-density storage device. About DVD Digital Versatile Disc (DVD) is auto-run, the PowerDVD will be displayed automatically. A standard DVD can hold more multimedia. After a few seconds, the normal screen will automatically start when you can hold 4.7 gigabytes of...
User Guide
Page 42
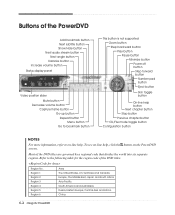
... of the PowerDVD Add bookmark button Next subtitle button Show/Hide button Next audio stream button Next angle button Karaoke button Increase volume button Status display panel Video position slider Mute button Decrease volume button Capture frame button Go-up button Repeat button Menu button Go to bookmark button This button...
... of the PowerDVD Add bookmark button Next subtitle button Show/Hide button Next audio stream button Next angle button Karaoke button Increase volume button Status display panel Video position slider Mute button Decrease volume button Capture frame button Go-up button Repeat button Menu button Go to bookmark button This button...

User Guide
Page 45
... drive can't read the diskette Solution Diskette is incorrectly inserted. You have a screen blanking utility installed or your mouse. To change the display resolution or color depth? Select the color depth from the Color quality area and the resolution from a diskette, slide the small black tab...connected properly. Format the diskette. (Refer to a grounded wall outlet. The cable connecting the monitor to the Windows Help. To change the display resolution or color depth, use another diskette or check the diskette by running Check Disk. (For detail information, refer to your Windows Help...
... drive can't read the diskette Solution Diskette is incorrectly inserted. You have a screen blanking utility installed or your mouse. To change the display resolution or color depth? Select the color depth from the Color quality area and the resolution from a diskette, slide the small black tab...connected properly. Format the diskette. (Refer to a grounded wall outlet. The cable connecting the monitor to the Windows Help. To change the display resolution or color depth, use another diskette or check the diskette by running Check Disk. (For detail information, refer to your Windows Help...


