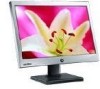
8512499 - eMachines Flat Panel Monitor User Guide
Page 3
Contents Using Your eMachines Flat-Panel Monitor 1 Unpacking the monitor 2 Connecting the monitor 3 Attaching the base 3 Connecting video inputs 4 Connecting power 5 Connecting a security cable 5 Setting up the optional stand 6 Attaching the USB stand 6 Adjusting monitor height tension 8 Adjusting monitor tilt tension ... bar 11 Starting the monitor 12 Adjusting monitor settings 13 Monitor buttons 13 On-screen display options 14 Changing Windows screen settings 17 Video modes 18 Power management 19 ENERGY STAR 19 Energy declaration 19 Maintaining 20 Troubleshooting 20 ...
8512499 - eMachines Flat Panel Monitor User Guide
Page 5
Using Your eMachines Flat-Panel Monitor • Connecting the monitor • Setting up the optional stand • Setting up the optional speaker bar • Starting the monitor • Adjusting monitor settings • Power management • Maintaining • Troubleshooting • Specifications 1
8512499 - eMachines Flat Panel Monitor User Guide
Page 6
Using Your eMachines Flat-Panel Monitor Unpacking the monitor Your monitor box should contain the following items: • Monitor (with neck attached) • Base • This User Guide • VGA cable • Power cord If you are missing any items, call Customer Care. For telephone numbers, see the label on the back of your monitor. 2
8512499 - eMachines Flat Panel Monitor User Guide
Page 7
You may need to press the two buttons on the base to let the monitor slide on a table top, then slide the monitor neck down onto the base until it clicks into place. Base buttons 3 Attaching the base To attach the base: • Place the monitor base on smoothly. www.emachines.com Connecting the monitor Important To attach the optional USB stand instead of the base, complete the instructions in "Setting up the monitor, first attach the base, then make your cable connections. To set up the optional stand" on page 6.
8512499 - eMachines Flat Panel Monitor User Guide
Page 8
... using the optional speaker bar (described in "Setting up the optional speaker bar" on page 11), we recommend that your computer and the monitor so you use the included right-angle VGA cable for the video connection so the speaker bar does not obstruct the cable. OR Connect the...cable to the blue VGA video connector under the back of each. Using Your eMachines Flat-Panel Monitor Connecting video inputs To connect video sources to your monitor: 1 Position your computer is only available on the 19-inch model. Tip (19-inch model) When using a DVI connection, you can reach the back of ...
8512499 - eMachines Flat Panel Monitor User Guide
Page 9
... connect the power cord to the power connector under the back of the monitor. (The appearance of your monitor (cable lock not included). Cable lock slot 5 www.emachines.com Connecting power To connect power: 1 Position your monitor so you can secure your monitor to your computer desk (or to another heavy object) with a cable lock...
8512499 - eMachines Flat Panel Monitor User Guide
Page 10
...In the United States, you can adjust the stand for height, tilt, and screen rotation. Let the monitor base hang down on the stand. Screw 4 Remove the four small screws from the LCD panel. When the stand is connected to the USB 2.0 ports on a stable, soft (non-marring) ...surface. To attach the adjustable stand: 1 Make sure that the monitor is ideal. Using Your eMachines Flat-Panel Monitor Setting up to four USB devices to your ...
8512499 - eMachines Flat Panel Monitor User Guide
Page 12
... stay in place when you let go, you need to adjust the stand if the amounts of force required to maintain the height for your monitor's height tension: 1 Press the screwdriver access hole cap from the base. You also need to the right and hold it, then lower the neck ...into place and release the lever. To adjust your monitor. Using Your eMachines Flat-Panel Monitor 9 Slide the neck's bracket slot onto the bracket's mounting tab. 10 Press the bracket lever to change the stand's height tension. Screwdriver ...
8512499 - eMachines Flat Panel Monitor User Guide
Page 13
... the tension is correct for your size of the monitor is about 1 inch (2.5 cm) below eye level. If the monitor lowers by itself when you let go. After the forces are equalized, turn the screw counter-clockwise several complete turns. www.emachines.com 2 Insert a Phillips screwdriver through the access ...hole in the base and onto the height tension screw (on the top of the stand) so the monitor stays in place when you let go, turn the screw several...
8512499 - eMachines Flat Panel Monitor User Guide
Page 14
... USB ports, you need to adjust lighting to accommodate each user's height and preference. Screen distance from the top of your computer. Using Your eMachines Flat-Panel Monitor Ergonomic guidelines The recommended screen positioning is tilted upward. This guideline places the center of the screen at or slightly below (about 1 inch or...
8512499 - eMachines Flat Panel Monitor User Guide
Page 16
... of your computer is not blue or you see "Troubleshooting" on page 13. Important When adjusting the monitor settings, always press the Auto button before entering the OSD. Using Your eMachines Flat-Panel Monitor 6 Turn on the monitor's power button should be blue. If the power LED is running, the power LED on the...
8512499 - eMachines Flat Panel Monitor User Guide
Page 17
...adjust the display image. OSD inactive: Press to automatically optimize the monitor's image position, clock, and phase. • / (brightness) OSD active: Press to open a menu or setting. www.emachines.com Adjusting monitor settings Use the monitor controls (located on page 17. OSD inactive: Press to adjust the...Press to select the video source. • Auto OSD active: Press to move down through menus and adjust OSD options. Monitor buttons This monitor features an on-screen display (OSD) that shown.) Input button Auto button Brightness button Contrast button Menu button • Input ...
8512499 - eMachines Flat Panel Monitor User Guide
Page 18
... level or change the option. 5 Press the Input button to return to a previous menu. 6 When you identify them. 1 Press the Auto button. Using Your eMachines Flat-Panel Monitor On-screen display options Adjusting OSD settings To adjust the OSD settings: Tip While the OSD is automatically adjusted to the ideal settings for...
8512499 - eMachines Flat Panel Monitor User Guide
Page 19
... can adjust image size and minimize distortions. Gamma-Customizes the gamma level. www.emachines.com OSD menus OSD Menu Main menu Main Menu Auto Picture Geometry Advanced Reset Description Auto-Automatically adjusts your monitor to maximize the life of the monitor backlights. Picture-Opens the Picture menu, where you are comfortable with to...
8512499 - eMachines Flat Panel Monitor User Guide
Page 20
...and clears or sharpens the displayed characters. LED Brightness-Changes the brightness of the OSD. Information-Displays the current screen resolution. 16 Using Your eMachines Flat-Panel Monitor OSD Menu Geometry menu Geometry H-Position V-Position Clock Phase Description H-Position-Moves the display image left and right. You can also press the ... the color levels. Language-Changes the language of the Standby and Power LED to configure the horizontal position automatically. For information on changing your monitor at a resolution less than that you should change .
8512499 - eMachines Flat Panel Monitor User Guide
Page 21
...colors 3 To change to save your Windows desktop, then click Properties. 2 Click Display. www.emachines.com Changing Windows screen settings Color depth and screen resolution are two of the most basic monitor settings you want . To change the color depth and screen resolution in your images seems "...false" or "jumpy," especially after several seconds. 5 Click OK, then click Yes to suit your monitor. Type adjusting monitor settings in Category View, click Appearance and Themes. Help For more information and screen components (such as icons and menu bars) ...
8512499 - eMachines Flat Panel Monitor User Guide
Page 22
Mode Mode name and resolution Horizontal Vertical Available in DVI mode frequency (kHz) frequency (Hz) (19-inch model) 1 VGA 640 × 350 31.469 70.087 No 2 VGA 640 × 480 31.469 59.941 Yes 3 VESA 640 × 480 37.....935 59.887 Yes 16 VESA 1440 × 900 70.635 74.984 No 18 If you do not use the best mode for the monitor, the display image may look slightly "fuzzy." Using Your eMachines Flat-Panel Monitor Video modes Your monitor supports several video modes.
8512499 - eMachines Flat Panel Monitor User Guide
Page 23
...: VESA state LED indicator 17-inch power consumption 19-inch power consumption On Active Off Blue Orange < 25 W www.emachines.com Power management ENERGY STAR As an ENERGY STAR® Partner, eMachines has determined that supports the VESA Display Power Management Signaling (DPMS) Protocol, the monitor can be reduced to build circuitry into the...
8512499 - eMachines Flat Panel Monitor User Guide
Page 24
...See your notebook's display, an externally attached display, and both your primary monitor and not use near water. • Keep the monitor away from radiators or heat vents. • Keep the monitor out of the monitor and the wall outlet. You will permanently scratch the screen. •...monitor" on page 3. For more information about the picture quality. No power • Make sure that the video cable is connected correctly to both the back of direct sunlight. Caution Do not use both at the same time. Using Your eMachines Flat-Panel Monitor Maintaining To keep the monitor...
8512499 - eMachines Flat Panel Monitor User Guide
Page 25
...Display colors are wrong • Press Menu, then Auto to automatically adjust the display image to the ideal settings. • Restart your computer with your monitor. www.emachines.com • If the power LED is orange: • Make sure that your computer is turned on. • Move the mouse or press any... key on the keyboard to bring the monitor out of sleep mode. • Restart your computer with the monitor turned on. • Make sure that the video...