8512499 - eMachines Flat Panel Monitor User Guide
Page 3
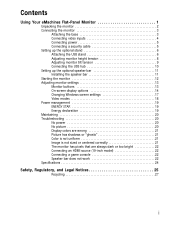
Contents Using Your eMachines Flat-Panel Monitor 1 Unpacking the monitor 2 Connecting the monitor 3 Attaching the base 3 Connecting video inputs 4 Connecting power 5 Connecting a security cable 5 Setting up the optional stand 6 Attaching the USB stand 6 Adjusting monitor height tension 8 Adjusting monitor tilt tension ... bar 11 Starting the monitor 12 Adjusting monitor settings 13 Monitor buttons 13 On-screen display options 14 Changing Windows screen settings 17 Video modes 18 Power management 19 ENERGY STAR 19 Energy declaration 19 Maintaining 20 Troubleshooting 20 ...
Contents Using Your eMachines Flat-Panel Monitor 1 Unpacking the monitor 2 Connecting the monitor 3 Attaching the base 3 Connecting video inputs 4 Connecting power 5 Connecting a security cable 5 Setting up the optional stand 6 Attaching the USB stand 6 Adjusting monitor height tension 8 Adjusting monitor tilt tension ... bar 11 Starting the monitor 12 Adjusting monitor settings 13 Monitor buttons 13 On-screen display options 14 Changing Windows screen settings 17 Video modes 18 Power management 19 ENERGY STAR 19 Energy declaration 19 Maintaining 20 Troubleshooting 20 ...
8512499 - eMachines Flat Panel Monitor User Guide
Page 8
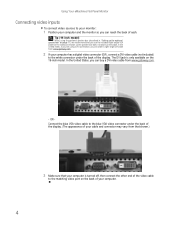
... VGA cable for the video connection so the speaker bar does not obstruct the cable. Using Your eMachines Flat-Panel Monitor Connecting video inputs To connect video sources to your monitor: 1 Position your computer. 4 In the United States, if you can reach the back of the... display. Tip (19-inch model) When using a DVI connection, you are using the optional speaker bar (described in "Setting up the optional speaker bar" on the 19...
... VGA cable for the video connection so the speaker bar does not obstruct the cable. Using Your eMachines Flat-Panel Monitor Connecting video inputs To connect video sources to your monitor: 1 Position your computer. 4 In the United States, if you can reach the back of the... display. Tip (19-inch model) When using a DVI connection, you are using the optional speaker bar (described in "Setting up the optional speaker bar" on the 19...

8512499 - eMachines Flat Panel Monitor User Guide
Page 15
... it on. 11 Do not block.) Bass port (for bass sound. Do not block.) Installing the speaker bar To install the speaker bar: Tip (19-inch model) When using a DVI connection, you use the included right-angle VGA cable for the video connection so the speaker bar does not obstruct... the cable. www.emachines.com Setting up the optional speaker bar Power/Volume control Kensington lock slot Headphone jack Power indicator Microphone jack Headphone jack Bass port (for bass...
... it on. 11 Do not block.) Bass port (for bass sound. Do not block.) Installing the speaker bar To install the speaker bar: Tip (19-inch model) When using a DVI connection, you use the included right-angle VGA cable for the video connection so the speaker bar does not obstruct... the cable. www.emachines.com Setting up the optional speaker bar Power/Volume control Kensington lock slot Headphone jack Power indicator Microphone jack Headphone jack Bass port (for bass...
8512499 - eMachines Flat Panel Monitor User Guide
Page 22
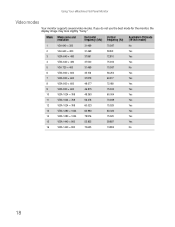
If you do not use the best mode for the monitor, the display image may look slightly "fuzzy." Mode Mode name and resolution Horizontal Vertical Available in DVI mode frequency (kHz) frequency (Hz) (19-inch model) 1 VGA 640 × 350 31.469 70.087 No 2 VGA 640 × 480 31.469 59.941....025 Yes 15 VESA 1440 × 900 55.935 59.887 Yes 16 VESA 1440 × 900 70.635 74.984 No 18 Using Your eMachines Flat-Panel Monitor Video modes Your monitor supports several video modes.
If you do not use the best mode for the monitor, the display image may look slightly "fuzzy." Mode Mode name and resolution Horizontal Vertical Available in DVI mode frequency (kHz) frequency (Hz) (19-inch model) 1 VGA 640 × 350 31.469 70.087 No 2 VGA 640 × 480 31.469 59.941....025 Yes 15 VESA 1440 × 900 55.935 59.887 Yes 16 VESA 1440 × 900 70.635 74.984 No 18 Using Your eMachines Flat-Panel Monitor Video modes Your monitor supports several video modes.
8512499 - eMachines Flat Panel Monitor User Guide
Page 23
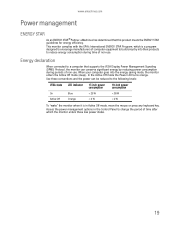
... non-use . When your computer goes into their products to the following levels: VESA state LED indicator 17-inch power consumption 19-inch power consumption On Active Off Blue Orange < 25 W Energy declaration When connected to a computer that this product meets the... ENERGY STAR guidelines for energy efficiency. www.emachines.com Power management ENERGY STAR As an ENERGY STAR® Partner, eMachines has determined that supports the VESA Display Power Management Signaling (DPMS) Protocol, the monitor can be reduced to reduce energy consumption during periods of ...
... non-use . When your computer goes into their products to the following levels: VESA state LED indicator 17-inch power consumption 19-inch power consumption On Active Off Blue Orange < 25 W Energy declaration When connected to a computer that this product meets the... ENERGY STAR guidelines for energy efficiency. www.emachines.com Power management ENERGY STAR As an ENERGY STAR® Partner, eMachines has determined that supports the VESA Display Power Management Signaling (DPMS) Protocol, the monitor can be reduced to reduce energy consumption during periods of ...
8512499 - eMachines Flat Panel Monitor User Guide
Page 26
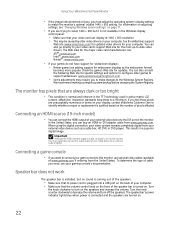
Connecting an HDMI source (19-inch model) • You can connect the HDMI output of your computer. ...digital connection, your external video device (such as the widescreen format becomes more popular. This results in active-matrix LCD screens. Speaker bar does not work The speaker bar is installed, but it is not available in the Windows .... • Make sure that the volume control knob on the front of the monitor. Turn the knob clockwise to an external audio amplifier. eMachines' inspection standards keep these pixels are adding support for your video device to turn off...
Connecting an HDMI source (19-inch model) • You can connect the HDMI output of your computer. ...digital connection, your external video device (such as the widescreen format becomes more popular. This results in active-matrix LCD screens. Speaker bar does not work The speaker bar is installed, but it is not available in the Windows .... • Make sure that the volume control knob on the front of the monitor. Turn the knob clockwise to an external audio amplifier. eMachines' inspection standards keep these pixels are adding support for your video device to turn off...
8512499 - eMachines Flat Panel Monitor User Guide
Page 28
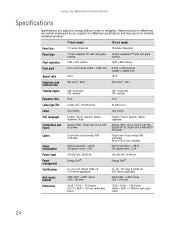
Many products for eMachines are subject to eMachines specifications and may vary from similarly marketed products. 17-inch model 19-inch model Panel size 17 inches (diagonal) 19 inches (diagonal) Panel type 17-inch viewable TFT with anti-glare coating 19-inch viewable TFT with anti-glare coating Pixel resolution ...included) 15-pin mini d-sub analog VGA (included) 24-pin DVI-D (not included) Power consumption Normal operation: Using Your eMachines Flat-Panel Monitor Specifications Specifications are custom engineered by our suppliers to change without notice or obligation.
Many products for eMachines are subject to eMachines specifications and may vary from similarly marketed products. 17-inch model 19-inch model Panel size 17 inches (diagonal) 19 inches (diagonal) Panel type 17-inch viewable TFT with anti-glare coating 19-inch viewable TFT with anti-glare coating Pixel resolution ...included) 15-pin mini d-sub analog VGA (included) 24-pin DVI-D (not included) Power consumption Normal operation: Using Your eMachines Flat-Panel Monitor Specifications Specifications are custom engineered by our suppliers to change without notice or obligation.
Service Manual
Page 1
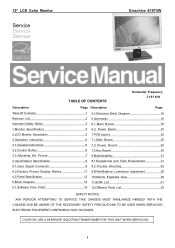
...19" LCD Color Monitor Service Service Service Emachine E19T5W TABLE OF CONTENTS Horizontal Frequency 31-81 kHz Description Page Description Page Table Of Contents 1 5.2.Electrical Block Diagram 16 Revision List 2 6.Schematic 18 Important Safety Notice 3 6.1.Main Board 18 1.Monitor Specification 4 6.2. Power Board 23 2.LCD Monitor...Trouble Shooting 32 4.N2.Factory Preset Display Modes 11 9.White-Balance Luminance adjustment 38 4.3.Panel Specification 12 10.Monitor Exploded View 39 5.Block Diagram 14 11.BOM List 41 5.1.Software Flow Chart 14 12.Different Parts List...
...19" LCD Color Monitor Service Service Service Emachine E19T5W TABLE OF CONTENTS Horizontal Frequency 31-81 kHz Description Page Description Page Table Of Contents 1 5.2.Electrical Block Diagram 16 Revision List 2 6.Schematic 18 Important Safety Notice 3 6.1.Main Board 18 1.Monitor Specification 4 6.2. Power Board 23 2.LCD Monitor...Trouble Shooting 32 4.N2.Factory Preset Display Modes 11 9.White-Balance Luminance adjustment 38 4.3.Panel Specification 12 10.Monitor Exploded View 39 5.Block Diagram 14 11.BOM List 41 5.1.Software Flow Chart 14 12.Different Parts List...
Service Manual
Page 2
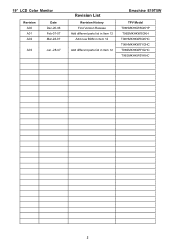
19" LCD Color Monitor Revision A00 A01 A02 A03 Date Dec-20-06 Feb-07-07 Mar-28-07 Jun.-28-07 Revision List Revision History First Version Release Add different parts list in Item 12 Add new BOM in Item 12 Add different parts list in Item 12 Emachine E19T5W TPV Model T96HMKHKW5GKHP T96SMKHKW5GKH T96HMKHKW5GKHC T96HMKHKW5YGHC T96SMKHKW5YGHC T96SMKHKW5YKHC 2
19" LCD Color Monitor Revision A00 A01 A02 A03 Date Dec-20-06 Feb-07-07 Mar-28-07 Jun.-28-07 Revision List Revision History First Version Release Add different parts list in Item 12 Add new BOM in Item 12 Add different parts list in Item 12 Emachine E19T5W TPV Model T96HMKHKW5GKHP T96SMKHKW5GKH T96HMKHKW5GKHC T96HMKHKW5YGHC T96SMKHKW5YGHC T96SMKHKW5YKHC 2
Service Manual
Page 3
...-Protect the module from AOC. The special tools should be jeopardized by the service method selected. Take care during handling the LCD module with backlight unit -Must mount the module using mounting holes arranged in four corners. -Do not press on the panel...EXHAUSTIVE. It is important to as recommended. CAUTION-Use of controls or adjustments or performance of procedures other hazards. 19" LCD Color Monitor Important Safety Notice Emachine E19T5W Proper service and repair is important to understand that these service operations require the use of optical instruments with a...
...-Protect the module from AOC. The special tools should be jeopardized by the service method selected. Take care during handling the LCD module with backlight unit -Must mount the module using mounting holes arranged in four corners. -Do not press on the panel...EXHAUSTIVE. It is important to as recommended. CAUTION-Use of controls or adjustments or performance of procedures other hazards. 19" LCD Color Monitor Important Safety Notice Emachine E19T5W Proper service and repair is important to understand that these service operations require the use of optical instruments with a...
Service Manual
Page 4
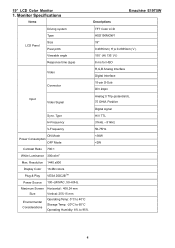
Type H-Frequency V-Frequency ON Mode Power Consumption OFF Mode Contrast Ratio 700:1 White Luminance 300cd/m2 Max. Monitor Specifications Items Descriptions Emachine E19T5W LCD Panel Driving system Type Size Pixel pitch Viewable angle Response time (type) Video TFT Color LCD HSD190MGW1 19" 0.2835mm( H )x 0.2835mm( V ) 150˚ (H) 135˚ (V) 8 ms for HSD R,G,B Analog Interface Digital Interface ... Storage Temp: -20°C to 60°C Operating Humidity: 8% to 95% Analog:0.7Vp-p(standard), 75 OHM, Positive Digital signal H/V TTL 31kHz - 81kHz 56-75Hz 19" LCD Color Monitor 1.
Type H-Frequency V-Frequency ON Mode Power Consumption OFF Mode Contrast Ratio 700:1 White Luminance 300cd/m2 Max. Monitor Specifications Items Descriptions Emachine E19T5W LCD Panel Driving system Type Size Pixel pitch Viewable angle Response time (type) Video TFT Color LCD HSD190MGW1 19" 0.2835mm( H )x 0.2835mm( V ) 150˚ (H) 135˚ (V) 8 ms for HSD R,G,B Analog Interface Digital Interface ... Storage Temp: -20°C to 60°C Operating Humidity: 8% to 95% Analog:0.7Vp-p(standard), 75 OHM, Positive Digital signal H/V TTL 31kHz - 81kHz 56-75Hz 19" LCD Color Monitor 1.
Service Manual
Page 5
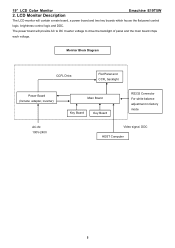
... CCFL Drive. 19" LCD Color Monitor 2. LCD Monitor Description Emachine E19T5W The LCD monitor will provide AC to DC Inverter voltage to drive the backlight of panel and the main board chips each voltage. The power board will contain a ...
... CCFL Drive. 19" LCD Color Monitor 2. LCD Monitor Description Emachine E19T5W The LCD monitor will provide AC to DC Inverter voltage to drive the backlight of panel and the main board chips each voltage. The power board will contain a ...
Service Manual
Page 6
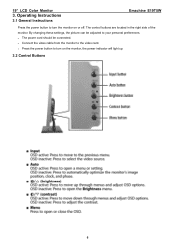
The control buttons are located in the right side of the monitor. Connect the video cable from the monitor to turn the monitor on the monitor, the power indicator will light up. 3.2 Control Buttons 6 The power cord should be adjusted to turn on or off. Operating Instructions 3.1 General Instructions Emachine E19T5W Press the power button to your personal preferences. - Press the power button to the video card. - 19" LCD Color Monitor 3. By changing these settings, the picture can be connected. -
The control buttons are located in the right side of the monitor. Connect the video cable from the monitor to turn the monitor on the monitor, the power indicator will light up. 3.2 Control Buttons 6 The power cord should be adjusted to turn on or off. Operating Instructions 3.1 General Instructions Emachine E19T5W Press the power button to your personal preferences. - Press the power button to the video card. - 19" LCD Color Monitor 3. By changing these settings, the picture can be connected. -
Service Manual
Page 7
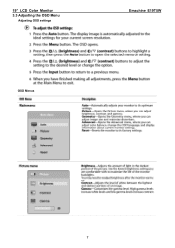
19" LCD Color Monitor 3.3 Adjusting the OSD Menu Adjusting OSD settings OSD Menus Emachine E19T5W 7
19" LCD Color Monitor 3.3 Adjusting the OSD Menu Adjusting OSD settings OSD Menus Emachine E19T5W 7
Service Manual
Page 9
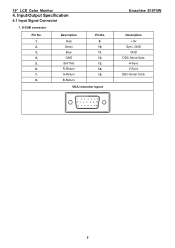
Input/Output Specification 4.1 Input Signal Connector 1. GND 12. G-Return 15. GND GND DDC-Serial Data H-Sync V-Sync DDC-Serial Clock 9 Red 9. Description Pin No. R-Return 14. Self Test 13. Green 10. Blue 11. B-Return VGA connector layout 1 5 6 10 11 15 Emachine E19T5W Description + 5V Sync. 19" LCD Color Monitor 4. D-SUB connector Pin No. 1. 2. 3. 4. 5. 6. 7. 8.
Input/Output Specification 4.1 Input Signal Connector 1. GND 12. G-Return 15. GND GND DDC-Serial Data H-Sync V-Sync DDC-Serial Clock 9 Red 9. Description Pin No. R-Return 14. Self Test 13. Green 10. Blue 11. B-Return VGA connector layout 1 5 6 10 11 15 Emachine E19T5W Description + 5V Sync. 19" LCD Color Monitor 4. D-SUB connector Pin No. 1. 2. 3. 4. 5. 6. 7. 8.
Service Manual
Page 12
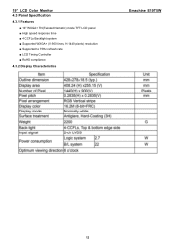
19" LCD Color Monitor 4.3 Panel Specification 4.3.1 Features ■ 19" WXGA+ TN(Twisted Nematic) mode TFT LCD panel ■ High speed response time ■ 4 CCFLs Backlight system ■ Supported WXGA+ (V:900 lines, H:1440 pixels) resolution ■ Supported to 75Hz refresh rate ■ LCD Timing Controller ■ RoHS compliance 4.3.2 Display Characteristics Emachine E19T5W 12
19" LCD Color Monitor 4.3 Panel Specification 4.3.1 Features ■ 19" WXGA+ TN(Twisted Nematic) mode TFT LCD panel ■ High speed response time ■ 4 CCFLs Backlight system ■ Supported WXGA+ (V:900 lines, H:1440 pixels) resolution ■ Supported to 75Hz refresh rate ■ LCD Timing Controller ■ RoHS compliance 4.3.2 Display Characteristics Emachine E19T5W 12
Service Manual
Page 14
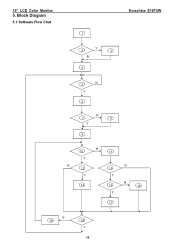
Block Diagram 5.1 Software Flow Chat 1 Emachine E19T5W Y 2 3 N 4 5 N Y 6 N 7 8 Y 9 N 10 11 Y N 12 N 13 Y Y N 14 15 16 Y 17 N 18 19 Y 14 19" LCD Color Monitor 5.
Block Diagram 5.1 Software Flow Chat 1 Emachine E19T5W Y 2 3 N 4 5 N Y 6 N 7 8 Y 9 N 10 11 Y N 12 N 13 Y Y N 14 15 16 Y 17 N 18 19 Y 14 19" LCD Color Monitor 5.
Service Manual
Page 15
... green color. Scalar initializes. 10) In standby mode? 11) Update the lifetime of brightness from analog port? 16) Display "No connection Check Signal Cable" message. 19" LCD Color Monitor Emachine E19T5W 1) MCU initialize. 2) Is the EPROM blank? 3) Program the EPROM by default values. 4) Get the PWM value of back light. 12) Check the analog port...) Does the scalar send out an interrupt request? 14) Wake up the scalar. 15) Are there any signals coming mode. 18) Process the OSD display. 19) Read the keyboard. Is the power key pressed? 15 And go into EPROM.
... green color. Scalar initializes. 10) In standby mode? 11) Update the lifetime of brightness from analog port? 16) Display "No connection Check Signal Cable" message. 19" LCD Color Monitor Emachine E19T5W 1) MCU initialize. 2) Is the EPROM blank? 3) Program the EPROM by default values. 4) Get the PWM value of back light. 12) Check the analog port...) Does the scalar send out an interrupt request? 14) Wake up the scalar. 15) Are there any signals coming mode. 18) Process the OSD display. 19) Read the keyboard. Is the power key pressed? 15 And go into EPROM.
Service Manual
Page 18
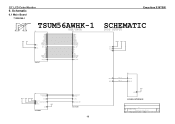
... Number G2188-1-X-X-2-061215 Friday , December 15, 2006 Sheet 2 Rev 1 of 6 19" LCD Color Monitor 6. CLK+ CLKDDCD_SDA DDCD_SCL DET_DVI HPD_CTRL 3.INPUT RIN GNDR GIN GNDG SOG BIN GNDB HSY NC VSY NC DDCA_SDA DDCA_SCL DET_VGA DDC_WP R+ RG+ GB+ BCLK+ CLKDDCD_SDA DDCD_SCL DET_DVI HPD_CTRL Emachine E19T5W SCHEMATIC LVDS OUTPUT VCC1.8 VCC3.3 +5V VCC1.8 Vcc3.3 +5V B2 on_BACKLIGHT...
... Number G2188-1-X-X-2-061215 Friday , December 15, 2006 Sheet 2 Rev 1 of 6 19" LCD Color Monitor 6. CLK+ CLKDDCD_SDA DDCD_SCL DET_DVI HPD_CTRL 3.INPUT RIN GNDR GIN GNDG SOG BIN GNDB HSY NC VSY NC DDCA_SDA DDCA_SCL DET_VGA DDC_WP R+ RG+ GB+ BCLK+ CLKDDCD_SDA DDCD_SCL DET_DVI HPD_CTRL Emachine E19T5W SCHEMATIC LVDS OUTPUT VCC1.8 VCC3.3 +5V VCC1.8 Vcc3.3 +5V B2 on_BACKLIGHT...
Service Manual
Page 19
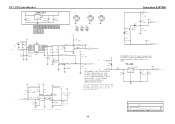
19" LCD Color Monitor Emachine E19T5W +5V C701 NC/0.1uF U701SOT-223 NC/LT1117-18 3 VI 2 VO VO 4 C703 + NC/100uF/16V +3V3 C704 NC/0.1uF H1 8 7 6 99 18 27 36 5 5 4 4 ...-33PM 3 VI 2 VO VCC3.3 C712 + 100uF/16V C714 0.1uF VCC3.3 4 Title POWER Size Document Number B G2188-1-X-X-2-061215 Date: Friday , December 15, 2006 Sheet 3 of Rev 1 6 19 So when system power on, the system loading is about 400mA (3.3V is about 200mA), So D35 changed from 1N4148(or BAT42) to SSM12L(schottky...
19" LCD Color Monitor Emachine E19T5W +5V C701 NC/0.1uF U701SOT-223 NC/LT1117-18 3 VI 2 VO VO 4 C703 + NC/100uF/16V +3V3 C704 NC/0.1uF H1 8 7 6 99 18 27 36 5 5 4 4 ...-33PM 3 VI 2 VO VCC3.3 C712 + 100uF/16V C714 0.1uF VCC3.3 4 Title POWER Size Document Number B G2188-1-X-X-2-061215 Date: Friday , December 15, 2006 Sheet 3 of Rev 1 6 19 So when system power on, the system loading is about 400mA (3.3V is about 200mA), So D35 changed from 1N4148(or BAT42) to SSM12L(schottky...