8512499 - eMachines Flat Panel Monitor User Guide
Page 6
Using Your eMachines Flat-Panel Monitor Unpacking the monitor Your monitor box should contain the following items: • Monitor (with neck attached) • Base • This User Guide • VGA cable • Power cord If you are missing any items, call Customer Care. For telephone numbers, see the label on the back of your monitor. 2
Using Your eMachines Flat-Panel Monitor Unpacking the monitor Your monitor box should contain the following items: • Monitor (with neck attached) • Base • This User Guide • VGA cable • Power cord If you are missing any items, call Customer Care. For telephone numbers, see the label on the back of your monitor. 2
8512499 - eMachines Flat Panel Monitor User Guide
Page 9
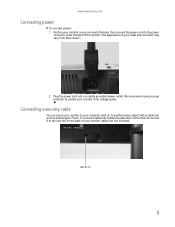
... cable and connector may vary from voltage spikes. Cable lock slot 5 www.emachines.com Connecting power To connect power: 1 Position your monitor so you can secure your monitor to your computer desk (or to protect your monitor from that shown.) 2 Plug the power cord into a correctly grounded power outlet. To connect a cable lock, follow the cable lock's instructions to...
... cable and connector may vary from voltage spikes. Cable lock slot 5 www.emachines.com Connecting power To connect power: 1 Position your monitor so you can secure your monitor to your computer desk (or to protect your monitor from that shown.) 2 Plug the power cord into a correctly grounded power outlet. To connect a cable lock, follow the cable lock's instructions to...

8512499 - eMachines Flat Panel Monitor User Guide
Page 15
Do not block.) Bass port (for bass sound. Do not block.) Installing the speaker bar To install the speaker bar: Tip (19-inch model) When using a DVI connection, you use the included right-angle VGA cable for the video connection so the speaker bar does not ...bar. 3 Connect the speaker bar's USB power cord to any available USB port on your computer. 4 Connect the speaker bar's headphone (green) and microphone (pink) cables to your computer's headphone and microphone jacks. 5 If your computer is not already on, turn it on. 11 www.emachines.com Setting up the optional speaker bar...
Do not block.) Bass port (for bass sound. Do not block.) Installing the speaker bar To install the speaker bar: Tip (19-inch model) When using a DVI connection, you use the included right-angle VGA cable for the video connection so the speaker bar does not ...bar. 3 Connect the speaker bar's USB power cord to any available USB port on your computer. 4 Connect the speaker bar's headphone (green) and microphone (pink) cables to your computer's headphone and microphone jacks. 5 If your computer is not already on, turn it on. 11 www.emachines.com Setting up the optional speaker bar...
8512499 - eMachines Flat Panel Monitor User Guide
Page 24
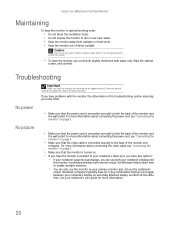
Using Your eMachines Flat-Panel Monitor Maintaining To keep the monitor in extended desktop multi-monitor mode. If you have an FN key combination that lets you toggle between your primary monitor and not use any judgments about connecting the power cord, see "Connecting the monitor" on page 3. • Make sure that the power cord is turned on page 3. • Make...
Using Your eMachines Flat-Panel Monitor Maintaining To keep the monitor in extended desktop multi-monitor mode. If you have an FN key combination that lets you toggle between your primary monitor and not use any judgments about connecting the power cord, see "Connecting the monitor" on page 3. • Make sure that the power cord is turned on page 3. • Make...
8512499 - eMachines Flat Panel Monitor User Guide
Page 26
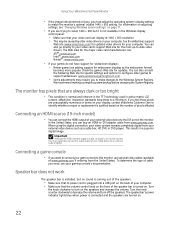
...(19-inch model) •...LCD screens. To determine the type of cable you need, see "Changing Windows screen settings" on page 17. • If you are adding support for updates. Important Although the HDMI interface supports audio, no sound is coming out of the speakers. • Make sure that its power cord...power indicator lights blue when power is normal and inherent in the TFT technology used in a superior digital image. You can also go directly to your video card's support Web site for the most up-to the DVI port of the monitor. Using Your eMachines Flat-Panel Monitor...
...(19-inch model) •...LCD screens. To determine the type of cable you need, see "Changing Windows screen settings" on page 17. • If you are adding support for updates. Important Although the HDMI interface supports audio, no sound is coming out of the speakers. • Make sure that its power cord...power indicator lights blue when power is normal and inherent in the TFT technology used in a superior digital image. You can also go directly to your video card's support Web site for the most up-to the DVI port of the monitor. Using Your eMachines Flat-Panel Monitor...
8512499 - eMachines Flat Panel Monitor User Guide
Page 30
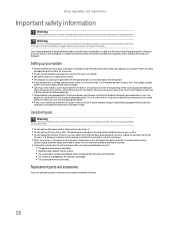
...voltage. ■ Openings in use an extension cord with a three-wire power cord to dry for your area. Retain all instructions marked on the power cord or allow it is important that the product is properly grounded when in the monitor case are provided for ventilation when you operate your... work surface. ■ The product should only be operated from the type of power source indicated on . &#...
...voltage. ■ Openings in use an extension cord with a three-wire power cord to dry for your area. Retain all instructions marked on the power cord or allow it is important that the product is properly grounded when in the monitor case are provided for ventilation when you operate your... work surface. ■ The product should only be operated from the type of power source indicated on . &#...
Service Manual
Page 6
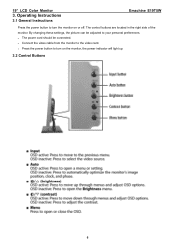
Operating Instructions 3.1 General Instructions Emachine E19T5W Press the power button to the video card. - Connect the video cable from the monitor to turn on or off. By changing these settings, the picture can be connected. - Press the power button to your personal preferences. - The control buttons are located in the right side of the monitor. 19" LCD Color Monitor 3. The power cord should be adjusted to turn the monitor on the monitor, the power indicator will light up. 3.2 Control Buttons 6
Operating Instructions 3.1 General Instructions Emachine E19T5W Press the power button to the video card. - Connect the video cable from the monitor to turn on or off. By changing these settings, the picture can be connected. - Press the power button to your personal preferences. - The control buttons are located in the right side of the monitor. 19" LCD Color Monitor 3. The power cord should be adjusted to turn the monitor on the monitor, the power indicator will light up. 3.2 Control Buttons 6

Service Manual
Page 38
... the value G=100 6. Turn the Power-button off to "-F-" and press MENU key A. parameter is x = 313±20, y = 329 ±20, Y =180 cd/m2. 3. Channel to RGB-Mode (with press "MODE" button) 2. The LCD-indicator on factory window until chroma 7120 indicator reached the value B=100 7. 19" LCD Color Monitor Emachine E19T5W 9. Bias adjustment: Set the Contrast...
... the value G=100 6. Turn the Power-button off to "-F-" and press MENU key A. parameter is x = 313±20, y = 329 ±20, Y =180 cd/m2. 3. Channel to RGB-Mode (with press "MODE" button) 2. The LCD-indicator on factory window until chroma 7120 indicator reached the value B=100 7. 19" LCD Color Monitor Emachine E19T5W 9. Bias adjustment: Set the Contrast...
Service Manual
Page 41
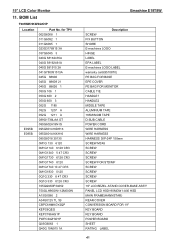
... Q40G 19N915 1A Emachine E19T5W Description SCREW FIX BUTTON SHORE E-machines LOGO HINGE LABEL EPA LABEL E-machines LOGO LABEL warranty card(8510870) PE BAG FOR BASE EPE COVER PE BAG FOR MONITOR CABLE TIE HANDLE1 HANDLE2 MIDDLE TAPE ALUMINIUM TAPE 165MINIUM TAPE D-SUB CABLE POWER CORD WIRE HARNESS WIRE ...HARNESS HARNESS 30P-24P 150mm SCREW M3X6 SCREW SCREW SCREW SCREW FOR STD/MF SCREW SCREW SCREW SCREW 19" LCD BEZEL-STAND COVER-BASE ASS'Y PANEL LCD HSD190MGW1-A00 HSD MAIN FRAME(HANNSTAR) REAR COVER CONVERSION BOARD FOR 19" KEY BOARD KEY BOARD POWER BOARD ...
... Q40G 19N915 1A Emachine E19T5W Description SCREW FIX BUTTON SHORE E-machines LOGO HINGE LABEL EPA LABEL E-machines LOGO LABEL warranty card(8510870) PE BAG FOR BASE EPE COVER PE BAG FOR MONITOR CABLE TIE HANDLE1 HANDLE2 MIDDLE TAPE ALUMINIUM TAPE 165MINIUM TAPE D-SUB CABLE POWER CORD WIRE HARNESS WIRE ...HARNESS HARNESS 30P-24P 150mm SCREW M3X6 SCREW SCREW SCREW SCREW FOR STD/MF SCREW SCREW SCREW SCREW 19" LCD BEZEL-STAND COVER-BASE ASS'Y PANEL LCD HSD190MGW1-A00 HSD MAIN FRAME(HANNSTAR) REAR COVER CONVERSION BOARD FOR 19" KEY BOARD KEY BOARD POWER BOARD ...


