8512499 - eMachines Flat Panel Monitor User Guide
Page 3
... Your eMachines Flat-Panel Monitor 1 Unpacking the monitor 2 Connecting the monitor 3 Attaching the base 3 Connecting video inputs 4 Connecting power 5 Connecting a security cable 5 Setting up the optional stand 6 Attaching the USB stand 6 Adjusting monitor height tension 8 Adjusting monitor tilt tension 9 Connecting the USB hub 10 Setting up the optional speaker bar 11 Installing the speaker bar 11 Starting the monitor 12 Adjusting monitor settings 13 Monitor buttons 13 On-screen display options 14 Changing Windows screen settings 17 Video modes 18 Power management 19...
... Your eMachines Flat-Panel Monitor 1 Unpacking the monitor 2 Connecting the monitor 3 Attaching the base 3 Connecting video inputs 4 Connecting power 5 Connecting a security cable 5 Setting up the optional stand 6 Attaching the USB stand 6 Adjusting monitor height tension 8 Adjusting monitor tilt tension 9 Connecting the USB hub 10 Setting up the optional speaker bar 11 Installing the speaker bar 11 Starting the monitor 12 Adjusting monitor settings 13 Monitor buttons 13 On-screen display options 14 Changing Windows screen settings 17 Video modes 18 Power management 19...

8512499 - eMachines Flat Panel Monitor User Guide
Page 5
Using Your eMachines Flat-Panel Monitor • Connecting the monitor • Setting up the optional stand • Setting up the optional speaker bar • Starting the monitor • Adjusting monitor settings • Power management • Maintaining • Troubleshooting • Specifications 1
Using Your eMachines Flat-Panel Monitor • Connecting the monitor • Setting up the optional stand • Setting up the optional speaker bar • Starting the monitor • Adjusting monitor settings • Power management • Maintaining • Troubleshooting • Specifications 1
8512499 - eMachines Flat Panel Monitor User Guide
Page 8
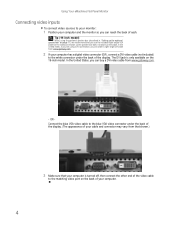
... end of the video cable to the matching video port on the 19-inch model. Tip (19-inch model) When using a DVI connection, you can buy a DVI video cable from www.gateway.com. 2 If your computer. 4 Using Your eMachines Flat-Panel Monitor Connecting video inputs To connect video sources to your monitor: 1 Position your computer and the monitor so you can reach the back of the display. In the United States, you are using the optional speaker bar (described in "Setting up the optional...
... end of the video cable to the matching video port on the 19-inch model. Tip (19-inch model) When using a DVI connection, you can buy a DVI video cable from www.gateway.com. 2 If your computer. 4 Using Your eMachines Flat-Panel Monitor Connecting video inputs To connect video sources to your monitor: 1 Position your computer and the monitor so you can reach the back of the display. In the United States, you are using the optional speaker bar (described in "Setting up the optional...
8512499 - eMachines Flat Panel Monitor User Guide
Page 10
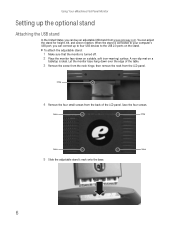
..., you can adjust the stand for height, tilt, and screen rotation. To attach the adjustable stand: 1 Make sure that the monitor is ideal. Let the monitor base hang down on the stand. Screw 4 Remove the four small screws from the back of the table. 3 Remove the screw from the neck hinge, then remove the neck from www.gateway.com. Using Your eMachines Flat-Panel Monitor Setting up to four USB devices to the USB 2.0 ports on a stable...
..., you can adjust the stand for height, tilt, and screen rotation. To attach the adjustable stand: 1 Make sure that the monitor is ideal. Let the monitor base hang down on the stand. Screw 4 Remove the four small screws from the back of the table. 3 Remove the screw from the neck hinge, then remove the neck from www.gateway.com. Using Your eMachines Flat-Panel Monitor Setting up to four USB devices to the USB 2.0 ports on a stable...
8512499 - eMachines Flat Panel Monitor User Guide
Page 14
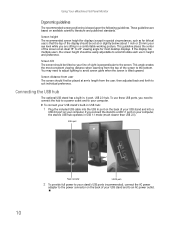
... USB stand has a built-in USB hub: 1 Plug the included USB cable into the USB In port on the back of the screen to accommodate each user's height and preference. If the display has multiple users, the screen height should first be easily adjustable to the bottom. If you connect the stand to suit individual preference. Using Your eMachines Flat-Panel Monitor Ergonomic guidelines The recommended screen positioning is perpendicular to your USB stand's built-in , 4-port, USB 2.0 hub. Screen...
... USB stand has a built-in USB hub: 1 Plug the included USB cable into the USB In port on the back of the screen to accommodate each user's height and preference. If the display has multiple users, the screen height should first be easily adjustable to the bottom. If you connect the stand to suit individual preference. Using Your eMachines Flat-Panel Monitor Ergonomic guidelines The recommended screen positioning is perpendicular to your USB stand's built-in , 4-port, USB 2.0 hub. Screen...

8512499 - eMachines Flat Panel Monitor User Guide
Page 15
... on. 11 Do not block.) Bass port (for bass sound. www.emachines.com Setting up the optional speaker bar Power/Volume control Kensington lock slot Headphone jack Power indicator Microphone jack Headphone jack Bass port (for bass sound. Do not block.) Installing the speaker bar To install the speaker bar: Tip (19-inch model) When using a DVI connection, you use the included right-angle VGA cable for the video connection so the speaker bar does not obstruct the...
... on. 11 Do not block.) Bass port (for bass sound. www.emachines.com Setting up the optional speaker bar Power/Volume control Kensington lock slot Headphone jack Power indicator Microphone jack Headphone jack Bass port (for bass sound. Do not block.) Installing the speaker bar To install the speaker bar: Tip (19-inch model) When using a DVI connection, you use the included right-angle VGA cable for the video connection so the speaker bar does not obstruct the...
8512499 - eMachines Flat Panel Monitor User Guide
Page 16
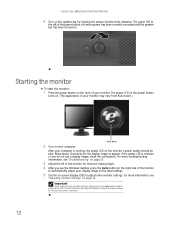
... the monitor's power button should be blue. Important When adjusting the monitor settings, always press the Auto button before entering the OSD. This will automatically adjust the display image to appear. Using Your eMachines Flat-Panel Monitor 6 Turn on page 13. Allow about 10 seconds for the display image to the ideal settings for the best viewing angle. 4 After you do not see "Adjusting monitor settings" on the speaker bar by rotating the power/volume knob clockwise. The power LED on the power button turns...
... the monitor's power button should be blue. Important When adjusting the monitor settings, always press the Auto button before entering the OSD. This will automatically adjust the display image to appear. Using Your eMachines Flat-Panel Monitor 6 Turn on page 13. Allow about 10 seconds for the display image to the ideal settings for the best viewing angle. 4 After you do not see "Adjusting monitor settings" on the speaker bar by rotating the power/volume knob clockwise. The power LED on the power button turns...
8512499 - eMachines Flat Panel Monitor User Guide
Page 17
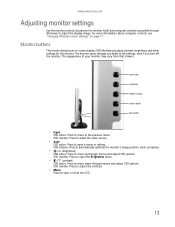
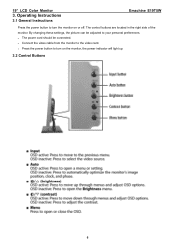
... settings, even if you adjust contrast, brightness, and other settings for the monitor. www.emachines.com Adjusting monitor settings Use the monitor controls (located on -screen display (OSD) that lets you turn off the monitor. (The appearance of your monitor may vary from that shown.) Input button Auto button Brightness button Contrast button Menu button • Input OSD active: Press to move to the previous menu. For more information about computer controls, see "Changing Windows screen settings" on page 17. OSD inactive: Press to automatically optimize the monitor's image position...
... settings, even if you adjust contrast, brightness, and other settings for the monitor. www.emachines.com Adjusting monitor settings Use the monitor controls (located on -screen display (OSD) that lets you turn off the monitor. (The appearance of your monitor may vary from that shown.) Input button Auto button Brightness button Contrast button Menu button • Input OSD active: Press to move to the previous menu. For more information about computer controls, see "Changing Windows screen settings" on page 17. OSD inactive: Press to automatically optimize the monitor's image position...
8512499 - eMachines Flat Panel Monitor User Guide
Page 20
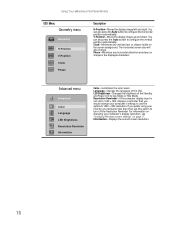
... the display image up and down. You can also press the Auto button to turn off the Resolution Reminder. Phase-Minimizes any vertical bars or stripes visible on page 17. Advanced menu Advanced Color Language LED Brightness Resolution Reminder Information Color-Customizes the color levels. LED Brightness-Changes the brightness of the OSD. For information on changing your computer's display resolution, see "Changing Windows screen settings" on the screen background. Language-Changes the language of the Standby and Power LED to configure the vertical position...
... the display image up and down. You can also press the Auto button to turn off the Resolution Reminder. Phase-Minimizes any vertical bars or stripes visible on page 17. Advanced menu Advanced Color Language LED Brightness Resolution Reminder Information Color-Customizes the color levels. LED Brightness-Changes the brightness of the OSD. For information on changing your computer's display resolution, see "Changing Windows screen settings" on the screen background. Language-Changes the language of the Standby and Power LED to configure the vertical position...
8512499 - eMachines Flat Panel Monitor User Guide
Page 21
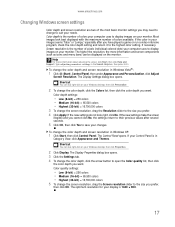
... about adjusting the screen, click Start, then click Help and Support. Most images look right, click No. Help For more information and screen components (such as icons and menu bars) can also right-click on your display is the number of colors available. www.emachines.com Changing Windows screen settings Color depth and screen resolution are two of the most basic monitor settings you prefer, then click OK. To change the screen resolution, drag the Resolution...
... about adjusting the screen, click Start, then click Help and Support. Most images look right, click No. Help For more information and screen components (such as icons and menu bars) can also right-click on your display is the number of colors available. www.emachines.com Changing Windows screen settings Color depth and screen resolution are two of the most basic monitor settings you prefer, then click OK. To change the screen resolution, drag the Resolution...
8512499 - eMachines Flat Panel Monitor User Guide
Page 24
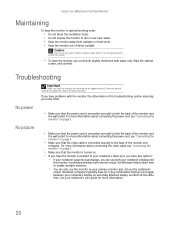
... notebook supports dual displays, you toggle between your notebook's display, an externally attached display, and both your notebook's display and this monitor as your notebook's user guide for approximately 30 minutes before making any type of abrasive pad or glass cleaner. See Windows Help to learn how to both the back of the monitor and the wall outlet. Using Your eMachines Flat-Panel Monitor Maintaining To keep the monitor in optimal working...
... notebook supports dual displays, you toggle between your notebook's display, an externally attached display, and both your notebook's display and this monitor as your notebook's user guide for approximately 30 minutes before making any type of abrasive pad or glass cleaner. See Windows Help to learn how to both the back of the monitor and the wall outlet. Using Your eMachines Flat-Panel Monitor Maintaining To keep the monitor in optimal working...
8512499 - eMachines Flat Panel Monitor User Guide
Page 25
...; Press Menu, then Auto to automatically adjust the display image to the ideal settings. • Make sure that the monitor warms up for at least 30 minutes before making a final judgment about connecting the video cable, see "Adjusting monitor settings" on page 13. 21 For more information about color uniformity or brightness. www.emachines.com • If the power LED is orange: • Make sure that your computer is turned on. •...
...; Press Menu, then Auto to automatically adjust the display image to the ideal settings. • Make sure that the monitor warms up for at least 30 minutes before making a final judgment about connecting the video cable, see "Adjusting monitor settings" on page 13. 21 For more information about color uniformity or brightness. www.emachines.com • If the power LED is orange: • Make sure that your computer is turned on. •...
8512499 - eMachines Flat Panel Monitor User Guide
Page 26
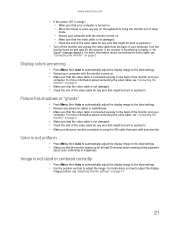
... monitor has pixels that its power cord is turned on page 17. • If you need, see your display, contact eMachines Customer Care to the Windows System Registry. When using the digital connection, your video content remains completely digital from your computer. Using Your eMachines Flat-Panel Monitor • If the image looks stretched or fuzzy, you can buy an HDMI-to-DVI adapter cable from www.gateway.com. For information on adjusting settings, see "Changing Windows screen settings" on . Check...
... monitor has pixels that its power cord is turned on page 17. • If you need, see your display, contact eMachines Customer Care to the Windows System Registry. When using the digital connection, your video content remains completely digital from your computer. Using Your eMachines Flat-Panel Monitor • If the image looks stretched or fuzzy, you can buy an HDMI-to-DVI adapter cable from www.gateway.com. For information on adjusting settings, see "Changing Windows screen settings" on . Check...

8512499 - eMachines Flat Panel Monitor User Guide
Page 27
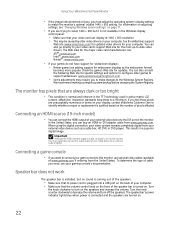
... speaker icon in the Windows taskbar. 23 For optimum volume control using the speaker bar, we recommend that you set too high, the speaker bar's sound may always be distorted. To adjust the audio device's output volume, see the device's user guide. To check your headphone/speaker mute settings, click the speaker icon in the Windows taskbar, or click (Start), Control Panel, Sounds and Audio Devices, the Volume tab, then click Advanced. www.emachines.com All connections...
... speaker icon in the Windows taskbar. 23 For optimum volume control using the speaker bar, we recommend that you set too high, the speaker bar's sound may always be distorted. To adjust the audio device's output volume, see the device's user guide. To check your headphone/speaker mute settings, click the speaker icon in the Windows taskbar, or click (Start), Control Panel, Sounds and Audio Devices, the Volume tab, then click Advanced. www.emachines.com All connections...
8512499 - eMachines Flat Panel Monitor User Guide
Page 30
... selector switch is set up your Gateway product. Do not block or cover these instructions to help guard against personal injury and damage to your work surface. ■ The product should only be operated from the wall outlet and refer servicing to qualified personnel if: ■ The power cord or plug is damaged. ■ Liquid has been spilled into the monitor ventilation openings...
... selector switch is set up your Gateway product. Do not block or cover these instructions to help guard against personal injury and damage to your work surface. ■ The product should only be operated from the wall outlet and refer servicing to qualified personnel if: ■ The power cord or plug is damaged. ■ Liquid has been spilled into the monitor ventilation openings...
Service Manual
Page 1
... UNIT WHEN SERVICING 1 Power Board 23 2.LCD Monitor Description 5 7.PCB Layout 25 3.Operation Instruction 6 7.1.Main Board 25 3.1.General Instructions 6 7.2.Power Board 28 3.2.Control Button 6 7.3.Key Board 30 3.3.Adjusting the Picture 7 8.Maintainability 31 4.Input/Output Specification 9 8.1.Equipments and Tools Requirement 31 4.1.Input Signal Connector 9 8.2.Trouble Shooting 32 4.N2.Factory Preset Display Modes 11 9.White-Balance Luminance adjustment 38 4.3.Panel Specification 12 10.Monitor Exploded View 39 5.Block Diagram 14 11.BOM List 41 5.1.Software Flow...
... UNIT WHEN SERVICING 1 Power Board 23 2.LCD Monitor Description 5 7.PCB Layout 25 3.Operation Instruction 6 7.1.Main Board 25 3.1.General Instructions 6 7.2.Power Board 28 3.2.Control Button 6 7.3.Key Board 30 3.3.Adjusting the Picture 7 8.Maintainability 31 4.Input/Output Specification 9 8.1.Equipments and Tools Requirement 31 4.1.Input Signal Connector 9 8.2.Trouble Shooting 32 4.N2.Factory Preset Display Modes 11 9.White-Balance Luminance adjustment 38 4.3.Panel Specification 12 10.Monitor Exploded View 39 5.Block Diagram 14 11.BOM List 41 5.1.Software Flow...
Service Manual
Page 4
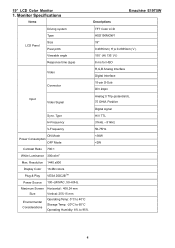
Monitor Specifications Items Descriptions Emachine E19T5W LCD Panel Driving system Type Size Pixel pitch Viewable angle Response time (type) Video TFT Color LCD HSD190MGW1 19" 0.2835mm( H )x 0.2835mm( V ) 150˚ (H) 135˚ (V) 8 ms for HSD R,G,B Analog Interface Digital Interface Connector 15-pin D-Sub DVI 24pin Input Video Signal Sync. Resolution 1440 x900 Display Color Plug & Play 16.2M colors VESA DDC2BTM Power Source 100~240VAC, 50~60Hz Maximum Screen Horizontal : 408.24 mm Size Vertical: 255.15 mm Environmental Considerations Operating Temp: 0°C to 40...
Monitor Specifications Items Descriptions Emachine E19T5W LCD Panel Driving system Type Size Pixel pitch Viewable angle Response time (type) Video TFT Color LCD HSD190MGW1 19" 0.2835mm( H )x 0.2835mm( V ) 150˚ (H) 135˚ (V) 8 ms for HSD R,G,B Analog Interface Digital Interface Connector 15-pin D-Sub DVI 24pin Input Video Signal Sync. Resolution 1440 x900 Display Color Plug & Play 16.2M colors VESA DDC2BTM Power Source 100~240VAC, 50~60Hz Maximum Screen Horizontal : 408.24 mm Size Vertical: 255.15 mm Environmental Considerations Operating Temp: 0°C to 40...
Service Manual
Page 5
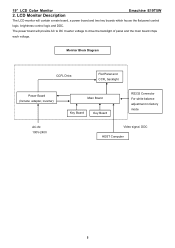
... power board will contain a main board, a power board and two key boards which house the flat panel control logic, brightness control logic and DDC. Flat Panel and CCFL backlight Power Board (Include: adapter, inverter) Main Board Key Board Key Board RS232 Connector For white balance adjustment in factory mode AC-IN 100V-240V Video signal, DDC HOST Computer 5 LCD Monitor Description Emachine E19T5W The LCD monitor will provide AC to DC Inverter voltage to drive the backlight of panel and the main board chips each voltage. 19" LCD Color Monitor...
... power board will contain a main board, a power board and two key boards which house the flat panel control logic, brightness control logic and DDC. Flat Panel and CCFL backlight Power Board (Include: adapter, inverter) Main Board Key Board Key Board RS232 Connector For white balance adjustment in factory mode AC-IN 100V-240V Video signal, DDC HOST Computer 5 LCD Monitor Description Emachine E19T5W The LCD monitor will provide AC to DC Inverter voltage to drive the backlight of panel and the main board chips each voltage. 19" LCD Color Monitor...
Service Manual
Page 6
19" LCD Color Monitor 3. The control buttons are located in the right side of the monitor. The power cord should be adjusted to the video card. - Operating Instructions 3.1 General Instructions Emachine E19T5W Press the power button to turn the monitor on the monitor, the power indicator will light up. 3.2 Control Buttons 6 Connect the video cable from the monitor to your personal preferences. - By changing these settings, the picture can be connected. - Press the power button to turn on or off.
19" LCD Color Monitor 3. The control buttons are located in the right side of the monitor. The power cord should be adjusted to the video card. - Operating Instructions 3.1 General Instructions Emachine E19T5W Press the power button to turn the monitor on the monitor, the power indicator will light up. 3.2 Control Buttons 6 Connect the video cable from the monitor to your personal preferences. - By changing these settings, the picture can be connected. - Press the power button to turn on or off.
Service Manual
Page 15
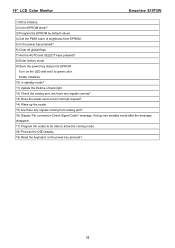
... LED and set it to show the coming from EPROM. 5) Is the power key pressed? 6) Clear all global flags. 7) Are the AUTO and SELECT keys pressed? 8) Enter factory mode. 9) Save the power key status into EPROM. 19" LCD Color Monitor Emachine E19T5W 1) MCU initialize. 2) Is the EPROM blank? 3) Program the EPROM by default values. 4) Get the PWM value of back light. 12) Check the analog port, are there any signals...
... LED and set it to show the coming from EPROM. 5) Is the power key pressed? 6) Clear all global flags. 7) Are the AUTO and SELECT keys pressed? 8) Enter factory mode. 9) Save the power key status into EPROM. 19" LCD Color Monitor Emachine E19T5W 1) MCU initialize. 2) Is the EPROM blank? 3) Program the EPROM by default values. 4) Get the PWM value of back light. 12) Check the analog port, are there any signals...


