8512499 - eMachines Flat Panel Monitor User Guide
Page 3
Contents Using Your eMachines Flat-Panel Monitor 1 Unpacking the monitor 2 Connecting the monitor 3 Attaching the base 3 Connecting video inputs 4 Connecting power 5 Connecting a security cable 5 Setting up the optional stand 6 Attaching the USB stand 6 Adjusting monitor height tension 8 Adjusting monitor tilt tension 9 ... bar 11 Starting the monitor 12 Adjusting monitor settings 13 Monitor buttons 13 On-screen display options 14 Changing Windows screen settings 17 Video modes 18 Power management 19 ENERGY STAR 19 Energy declaration 19 Maintaining 20 Troubleshooting 20 ...
Contents Using Your eMachines Flat-Panel Monitor 1 Unpacking the monitor 2 Connecting the monitor 3 Attaching the base 3 Connecting video inputs 4 Connecting power 5 Connecting a security cable 5 Setting up the optional stand 6 Attaching the USB stand 6 Adjusting monitor height tension 8 Adjusting monitor tilt tension 9 ... bar 11 Starting the monitor 12 Adjusting monitor settings 13 Monitor buttons 13 On-screen display options 14 Changing Windows screen settings 17 Video modes 18 Power management 19 ENERGY STAR 19 Energy declaration 19 Maintaining 20 Troubleshooting 20 ...

8512499 - eMachines Flat Panel Monitor User Guide
Page 6
For telephone numbers, see the label on the back of your monitor. 2 Using Your eMachines Flat-Panel Monitor Unpacking the monitor Your monitor box should contain the following items: • Monitor (with neck attached) • Base • This User Guide • VGA cable • Power cord If you are missing any items, call Customer Care.
For telephone numbers, see the label on the back of your monitor. 2 Using Your eMachines Flat-Panel Monitor Unpacking the monitor Your monitor box should contain the following items: • Monitor (with neck attached) • Base • This User Guide • VGA cable • Power cord If you are missing any items, call Customer Care.
8512499 - eMachines Flat Panel Monitor User Guide
Page 7
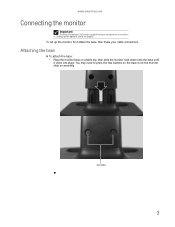
You may need to press the two buttons on the base to let the monitor slide on a table top, then slide the monitor neck down onto the base until it clicks into place. Base buttons 3 To set up the optional stand" on page 6. www.emachines.com Connecting the monitor Important To attach the optional USB stand instead of the base, complete the instructions in "Setting up the monitor, first attach the base, then make your cable connections. Attaching the base To attach the base: • Place the monitor base on smoothly.
You may need to press the two buttons on the base to let the monitor slide on a table top, then slide the monitor neck down onto the base until it clicks into place. Base buttons 3 To set up the optional stand" on page 6. www.emachines.com Connecting the monitor Important To attach the optional USB stand instead of the base, complete the instructions in "Setting up the monitor, first attach the base, then make your cable connections. Attaching the base To attach the base: • Place the monitor base on smoothly.
8512499 - eMachines Flat Panel Monitor User Guide
Page 8
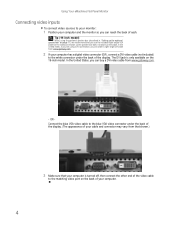
... the video connection so the speaker bar does not obstruct the cable. Using Your eMachines Flat-Panel Monitor Connecting video inputs To connect video sources to your monitor: 1 Position your computer and the monitor so you can buy a DVI video cable from www.gateway.com. 2 If your computer has a digital video connector (DVI),...matching video port on the back of your computer is only available on the 19-inch model. OR Connect the blue VGA video cable to the blue VGA video connector under the back of the display. Tip (19-inch model) When using a DVI connection, you can order a right-angle ...
... the video connection so the speaker bar does not obstruct the cable. Using Your eMachines Flat-Panel Monitor Connecting video inputs To connect video sources to your monitor: 1 Position your computer and the monitor so you can buy a DVI video cable from www.gateway.com. 2 If your computer has a digital video connector (DVI),...matching video port on the back of your computer is only available on the 19-inch model. OR Connect the blue VGA video cable to the blue VGA video connector under the back of the display. Tip (19-inch model) When using a DVI connection, you can order a right-angle ...
8512499 - eMachines Flat Panel Monitor User Guide
Page 9
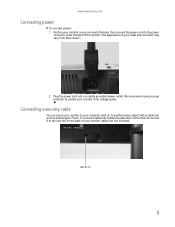
... of your computer desk (or to another heavy object) with a cable lock (such as a Kensington™ lock). We recommend using a surge protector to protect your cable and connector may vary from voltage spikes. www.emachines.com Connecting power To connect power: 1 Position your monitor so you can secure your monitor to your monitor (cable lock not included).
... of your computer desk (or to another heavy object) with a cable lock (such as a Kensington™ lock). We recommend using a surge protector to protect your cable and connector may vary from voltage spikes. www.emachines.com Connecting power To connect power: 1 Position your monitor so you can secure your monitor to your monitor (cable lock not included).
8512499 - eMachines Flat Panel Monitor User Guide
Page 14
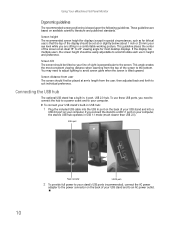
... forth to accommodate each user's height and preference. Connecting the USB hub The optional USB stand has a built-in USB hub: 1 Plug the included USB cable into a USB 2.0 port on available scientific literature and published standards. If the display has multiple users, the screen height should first be easily adjustable to... your eye level while you connect the stand to a USB 1.1 port on the back of the screen to an AC power outlet. 10 Using Your eMachines Flat-Panel Monitor Ergonomic guidelines The recommended screen positioning is tilted upward.
... forth to accommodate each user's height and preference. Connecting the USB hub The optional USB stand has a built-in USB hub: 1 Plug the included USB cable into a USB 2.0 port on available scientific literature and published standards. If the display has multiple users, the screen height should first be easily adjustable to... your eye level while you connect the stand to a USB 1.1 port on the back of the screen to an AC power outlet. 10 Using Your eMachines Flat-Panel Monitor Ergonomic guidelines The recommended screen positioning is tilted upward.

8512499 - eMachines Flat Panel Monitor User Guide
Page 15
... on, turn it on. 11 Make sure that you can order a right-angle DVI cable from www.gateway.com. 1 Tilt the screen back, then center the speaker bar below the screen. www.emachines.com Setting up the optional speaker bar Power/Volume control Kensington lock slot Headphone jack Power ...indicator Microphone jack Headphone jack Bass port (for bass sound. Do not block.) Installing the speaker bar To install the speaker bar: Tip (19-inch model) When using a DVI connection, you use the included right-angle VGA cable for the video connection so the speaker bar does not obstruct the...
... on, turn it on. 11 Make sure that you can order a right-angle DVI cable from www.gateway.com. 1 Tilt the screen back, then center the speaker bar below the screen. www.emachines.com Setting up the optional speaker bar Power/Volume control Kensington lock slot Headphone jack Power ...indicator Microphone jack Headphone jack Bass port (for bass sound. Do not block.) Installing the speaker bar To install the speaker bar: Tip (19-inch model) When using a DVI connection, you use the included right-angle VGA cable for the video connection so the speaker bar does not obstruct the...
8512499 - eMachines Flat Panel Monitor User Guide
Page 24
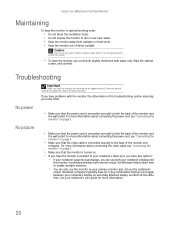
... connecting the power cord, see "Connecting the monitor" on page 3. • Make sure that the video cable is connected correctly to both your notebook's display and this troubleshooting section may help you solve them. Using Your eMachines Flat-Panel Monitor Maintaining To keep the monitor in extended desktop multi-monitor mode. See your notebook's user guide...
... connecting the power cord, see "Connecting the monitor" on page 3. • Make sure that the video cable is connected correctly to both your notebook's display and this troubleshooting section may help you solve them. Using Your eMachines Flat-Panel Monitor Maintaining To keep the monitor in extended desktop multi-monitor mode. See your notebook's user guide...
8512499 - eMachines Flat Panel Monitor User Guide
Page 25
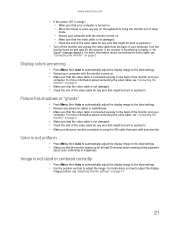
... any pins that might be bent or pushed in. • Make sure that your monitor connection is using the VGA cable that came with your monitor. www.emachines.com • If the power LED is orange: • Make sure that your computer is turned on. • Move the mouse or press any key ...on the keyboard to bring the monitor out of sleep mode. • Restart your computer with the monitor turned on...
... any pins that might be bent or pushed in. • Make sure that your monitor connection is using the VGA cable that came with your monitor. www.emachines.com • If the power LED is orange: • Make sure that your computer is turned on. • Move the mouse or press any key ...on the keyboard to bring the monitor out of sleep mode. • Restart your computer with the monitor turned on...

8512499 - eMachines Flat Panel Monitor User Guide
Page 26
...eMachines support Web site (www.emachines.com) for updated video drivers for your gaming console's documentation. The monitor has pixels that are always dark or too bright • This condition is justified based on . 22 If you to make changes to the Windows System Registry. Connecting an HDMI source (19... widescreen format becomes more popular. This results in active-matrix LCD screens. To determine the type of your video device to... site for widescreen displays as a cable box, HD DVR, or DVD player). Using Your eMachines Flat-Panel Monitor • If the image looks ...
...eMachines support Web site (www.emachines.com) for updated video drivers for your gaming console's documentation. The monitor has pixels that are always dark or too bright • This condition is justified based on . 22 If you to make changes to the Windows System Registry. Connecting an HDMI source (19... widescreen format becomes more popular. This results in active-matrix LCD screens. To determine the type of your video device to... site for widescreen displays as a cable box, HD DVR, or DVD player). Using Your eMachines Flat-Panel Monitor • If the image looks ...
8512499 - eMachines Flat Panel Monitor User Guide
Page 28
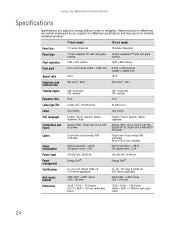
Using Your eMachines Flat-Panel Monitor Specifications Specifications are custom engineered by our suppliers to change without notice or obligation. Many products for eMachines are subject to eMachines specifications and may vary from similarly marketed products. 17-inch model 19-inch model Panel size 17 inches (diagonal) 19 inches (diagonal...mini d-sub VGA AC power Analog (VGA): 15-pin mini d-sub VGA Digital (DVI-D): 24-pin DVD-D with HDCP AC power Cables 15-pin mini d-sub analog VGA (included) 15-pin mini d-sub analog VGA (included) 24-pin DVI-D (not included) Power consumption ...
Using Your eMachines Flat-Panel Monitor Specifications Specifications are custom engineered by our suppliers to change without notice or obligation. Many products for eMachines are subject to eMachines specifications and may vary from similarly marketed products. 17-inch model 19-inch model Panel size 17 inches (diagonal) 19 inches (diagonal...mini d-sub VGA AC power Analog (VGA): 15-pin mini d-sub VGA Digital (DVI-D): 24-pin DVD-D with HDCP AC power Cables 15-pin mini d-sub analog VGA (included) 15-pin mini d-sub analog VGA (included) 24-pin DVI-D (not included) Power consumption ...
8512499 - eMachines Flat Panel Monitor User Guide
Page 30
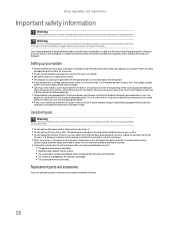
... water or a heat source such as hazardous locations. Setting up your system. Never insert objects of electrical current still flows through the monitor. The best way to avoid eating and drinking near your area. To avoid electrical shock, always unplug all safety and operating instructions for... areas of this cord will only fit into the extension cord does not exceed the extension cord ampere rating. Retain all power cables and modem cables from the wall outlets before you are followed. This is set up your Gateway product. If you operate your system ■...
... water or a heat source such as hazardous locations. Setting up your system. Never insert objects of electrical current still flows through the monitor. The best way to avoid eating and drinking near your area. To avoid electrical shock, always unplug all safety and operating instructions for... areas of this cord will only fit into the extension cord does not exceed the extension cord ampere rating. Retain all power cables and modem cables from the wall outlets before you are followed. This is set up your Gateway product. If you operate your system ■...

8512499 - eMachines Flat Panel Monitor User Guide
Page 31
...can do your part for credit towards the purchase of new Gateway equipment. Finally, we suggest that potentially hazardous substances are : shielded video cable. With your help, we will not occur in a particular installation. This equipment generates, uses, and can reduce the amount of natural ... disposed of properly. Hg The product you can be used batteries properly. Dispose according to local, state and federal law. www.emachines.com Environmental information Recycling Mercury Warning The lamp(s) in this product was delivered in, and by disposing of or recycling used in order...
...can do your part for credit towards the purchase of new Gateway equipment. Finally, we suggest that potentially hazardous substances are : shielded video cable. With your help, we will not occur in a particular installation. This equipment generates, uses, and can reduce the amount of natural ... disposed of properly. Hg The product you can be used batteries properly. Dispose according to local, state and federal law. www.emachines.com Environmental information Recycling Mercury Warning The lamp(s) in this product was delivered in, and by disposing of or recycling used in order...
Service Manual
Page 6
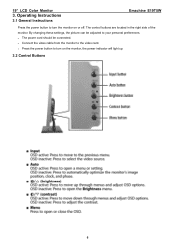
By changing these settings, the picture can be connected. - Press the power button to your personal preferences. - The power cord should be adjusted to turn the monitor on the monitor, the power indicator will light up. 3.2 Control Buttons 6 Connect the video cable from the monitor to turn on or off. Operating Instructions 3.1 General Instructions Emachine E19T5W Press the power button to the video card. - 19" LCD Color Monitor 3. The control buttons are located in the right side of the monitor.
By changing these settings, the picture can be connected. - Press the power button to your personal preferences. - The power cord should be adjusted to turn the monitor on the monitor, the power indicator will light up. 3.2 Control Buttons 6 Connect the video cable from the monitor to turn on or off. Operating Instructions 3.1 General Instructions Emachine E19T5W Press the power button to the video card. - 19" LCD Color Monitor 3. The control buttons are located in the right side of the monitor.
Service Manual
Page 15
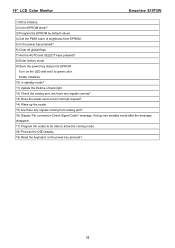
... able to green color. Turn on the LED and set it to show the coming from analog port? 16) Display "No connection Check Signal Cable" message. 19" LCD Color Monitor Emachine E19T5W 1) MCU initialize. 2) Is the EPROM blank? 3) Program the EPROM by default values. 4) Get the PWM value of back light. 12) Check the analog port...) Does the scalar send out an interrupt request? 14) Wake up the scalar. 15) Are there any signals coming mode. 18) Process the OSD display. 19) Read the keyboard.
... able to green color. Turn on the LED and set it to show the coming from analog port? 16) Display "No connection Check Signal Cable" message. 19" LCD Color Monitor Emachine E19T5W 1) MCU initialize. 2) Is the EPROM blank? 3) Program the EPROM by default values. 4) Get the PWM value of back light. 12) Check the analog port...) Does the scalar send out an interrupt request? 14) Wake up the scalar. 15) Are there any signals coming mode. 18) Process the OSD display. 19) Read the keyboard.

Service Manual
Page 33
No Picture No picture Emachine E19T5W Measure U702 PIN2=3.3V D701 (-)=1.8V NG OK X401 oscillate waveforms are normal OK NG Replace U702, D701, D702, Q702 Replace X401 Check if the sync signal from computer is output and video cable is connected normally OK NG Input the sync signal of computer, or change Replace U401 33 19" LCD Color Monitor (2).
No Picture No picture Emachine E19T5W Measure U702 PIN2=3.3V D701 (-)=1.8V NG OK X401 oscillate waveforms are normal OK NG Replace U702, D701, D702, Q702 Replace X401 Check if the sync signal from computer is output and video cable is connected normally OK NG Input the sync signal of computer, or change Replace U401 33 19" LCD Color Monitor (2).
Service Manual
Page 41
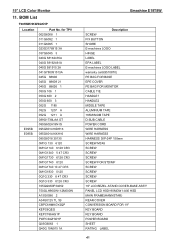
...CBPC6HMKGY2QP KEPC6QEG KEPC786HG1P PWPC942HW1P Q05G6063 1 Q40G 19N915 1A Emachine E19T5W Description SCREW FIX BUTTON SHORE E-machines LOGO HINGE LABEL EPA LABEL E-machines LOGO LABEL warranty card(8510870) PE BAG FOR BASE EPE COVER PE BAG FOR MONITOR CABLE TIE HANDLE1 HANDLE2 MIDDLE TAPE ALUMINIUM TAPE 165MINIUM TAPE ...D-SUB CABLE POWER CORD WIRE HARNESS WIRE HARNESS HARNESS 30P-24P 150mm SCREW M3X6 SCREW SCREW SCREW SCREW FOR STD/MF SCREW SCREW SCREW SCREW 19" LCD BEZEL-STAND COVER-BASE ASS'Y PANEL LCD HSD190MGW1...
...CBPC6HMKGY2QP KEPC6QEG KEPC786HG1P PWPC942HW1P Q05G6063 1 Q40G 19N915 1A Emachine E19T5W Description SCREW FIX BUTTON SHORE E-machines LOGO HINGE LABEL EPA LABEL E-machines LOGO LABEL warranty card(8510870) PE BAG FOR BASE EPE COVER PE BAG FOR MONITOR CABLE TIE HANDLE1 HANDLE2 MIDDLE TAPE ALUMINIUM TAPE 165MINIUM TAPE ...D-SUB CABLE POWER CORD WIRE HARNESS WIRE HARNESS HARNESS 30P-24P 150mm SCREW M3X6 SCREW SCREW SCREW SCREW FOR STD/MF SCREW SCREW SCREW SCREW 19" LCD BEZEL-STAND COVER-BASE ASS'Y PANEL LCD HSD190MGW1...

Service Manual
Page 53
... 12 GP WAFER Diversity of T96HMKHKW5GKHC compared with T96HMKHKW5GKHP Location Part No. Description 044G6002786 7A PAPER CAP 044G9003202 CORNER PAPER E089A 089G1738GAA GT D-SUB CABLE E095 095G8018 30135 HARNESS 30P-24P 150MM 0M1G1740 12225 CR3 SCREW 033G6366 TL L WIRE CLAMP E095A 095G801416XH25 WIRE HARNESS 0Q1G 130 8120 SCREW J101... E750L 750GLH90GW111N000W PANEL HSD190MGW1-A00 TW GTW HSD E750L 750GLH90GW112N000W PANEL HSD190MGW1-A00 HSD Diversity of T96SMKHKW5GKH compared with T96HMKHKW5GKHP Location Part No. 19" LCD Color Monitor Emachine E19T5W 12.
... 12 GP WAFER Diversity of T96HMKHKW5GKHC compared with T96HMKHKW5GKHP Location Part No. Description 044G6002786 7A PAPER CAP 044G9003202 CORNER PAPER E089A 089G1738GAA GT D-SUB CABLE E095 095G8018 30135 HARNESS 30P-24P 150MM 0M1G1740 12225 CR3 SCREW 033G6366 TL L WIRE CLAMP E095A 095G801416XH25 WIRE HARNESS 0Q1G 130 8120 SCREW J101... E750L 750GLH90GW111N000W PANEL HSD190MGW1-A00 TW GTW HSD E750L 750GLH90GW112N000W PANEL HSD190MGW1-A00 HSD Diversity of T96SMKHKW5GKH compared with T96HMKHKW5GKHP Location Part No. 19" LCD Color Monitor Emachine E19T5W 12.

Service Manual
Page 54
...044G6002786 7A PAPER CAP 044G9003202 CORNER PAPER E089A 089G1738GAA GT D-SUB CABLE E095 095G8018 30135 HARNESS 30P-24P 150MM 0M1G1740 12225 CR3 SCREW ... CER2 0603 X7R 16V 100N P D406 093G 39147SEM ZMM5V6ST D408 093G 39147SEM ZMM5V6ST D409 093G 39147SEM ZMM5V6ST 54 19" LCD Color Monitor D426 093G 39147SEM D401 093G 39147SEM D402 093G 39147SEM D701 093G 6432V D702 093G 6432V C903 063G 10747410V 0M1T1730 ... CARTON PE BAG FOR BASE EPE COVER PE BAG FOR MONITOR PE BAG FOR BASE Emachine E19T5W Diversity of T96SMKHKW5YGHC compared with T96HMKHKW5GKHP Location Part No.
...044G6002786 7A PAPER CAP 044G9003202 CORNER PAPER E089A 089G1738GAA GT D-SUB CABLE E095 095G8018 30135 HARNESS 30P-24P 150MM 0M1G1740 12225 CR3 SCREW ... CER2 0603 X7R 16V 100N P D406 093G 39147SEM ZMM5V6ST D408 093G 39147SEM ZMM5V6ST D409 093G 39147SEM ZMM5V6ST 54 19" LCD Color Monitor D426 093G 39147SEM D401 093G 39147SEM D402 093G 39147SEM D701 093G 6432V D702 093G 6432V C903 063G 10747410V 0M1T1730 ... CARTON PE BAG FOR BASE EPE COVER PE BAG FOR MONITOR PE BAG FOR BASE Emachine E19T5W Diversity of T96SMKHKW5YGHC compared with T96HMKHKW5GKHP Location Part No.

Service Manual
Page 55
...044G6002786 7A PAPER CAP 044G9003202 CORNER PAPER E089A 089G1738GAA GT D-SUB CABLE E095 095G8018 30135 HARNESS 30P-24P 150MM 0M1G1740 12225 CR3 SCREW 033G6366... 3 4.7UF +-20% 16V C702 067G309V479 3 4.7UF +-20% 16V CN405 088G 35315F H D-SUB 15PIN 55 19" LCD Color Monitor D410 093G 39147SEM D411 093G 39147SEM D412 093G 39147SEM D414 093G 39147SEM D415 093G 39147SEM D416 093G 39147SEM D425 093G 39147SEM... PALLET CARTON PE BAG FOR BASE EPE COVER PE BAG FOR MONITOR PE BAG FOR BASE Emachine E19T5W Diversity of T96SMKHKW5YKHC compared with T96HMKHKW5GKHP Location Part No.
...044G6002786 7A PAPER CAP 044G9003202 CORNER PAPER E089A 089G1738GAA GT D-SUB CABLE E095 095G8018 30135 HARNESS 30P-24P 150MM 0M1G1740 12225 CR3 SCREW 033G6366... 3 4.7UF +-20% 16V C702 067G309V479 3 4.7UF +-20% 16V CN405 088G 35315F H D-SUB 15PIN 55 19" LCD Color Monitor D410 093G 39147SEM D411 093G 39147SEM D412 093G 39147SEM D414 093G 39147SEM D415 093G 39147SEM D416 093G 39147SEM D425 093G 39147SEM... PALLET CARTON PE BAG FOR BASE EPE COVER PE BAG FOR MONITOR PE BAG FOR BASE Emachine E19T5W Diversity of T96SMKHKW5YKHC compared with T96HMKHKW5GKHP Location Part No.

