

Owner's Manual
Page 1
UBTK YSP-1 Digital Sound Projector OWNER'S MANUAL
UBTK YSP-1 Digital Sound Projector OWNER'S MANUAL
Owner's Manual
Page 3
... a safe level. Cable/s supplied with FCC regulations does not guarantee that is 300 ohm ribbon lead, change the lead-in this product in a residential environment will not occur in FCC Regulations, Part 15 for US customers) 1. One that are on different branch (circuit breaker or fuse) circuits or install AC line filter/s. Utilize power outlets that lets the sound come through...
... a safe level. Cable/s supplied with FCC regulations does not guarantee that is 300 ohm ribbon lead, change the lead-in this product in a residential environment will not occur in FCC Regulations, Part 15 for US customers) 1. One that are on different branch (circuit breaker or fuse) circuits or install AC line filter/s. Utilize power outlets that lets the sound come through...

Owner's Manual
Page 4
... connected to the instructions described below. Burning objects (i.e. YAMAHA will form when the surrounding temperature changes suddenly. Disconnect the power cable from the AC power source as long as follows: The wire which is coloured BLUE must be held responsible for any damage resulting from the wall outlet during an electrical storm. 14 Do not attempt to the earth terminal of plug to a wall...
... connected to the instructions described below. Burning objects (i.e. YAMAHA will form when the surrounding temperature changes suddenly. Disconnect the power cable from the AC power source as long as follows: The wire which is coloured BLUE must be held responsible for any damage resulting from the wall outlet during an electrical storm. 14 Do not attempt to the earth terminal of plug to a wall...

Owner's Manual
Page 6
... and "BASIC OPERATION" on page 19.) Follow the steps to enjoying surround sound or make EASY SETUP settings. (See "STEPS TO ENJOYING SURROUND SOUND" on page 20 or "EASY SETUP" on page 24.) Play back a source and adjust the beam mode settings. (See "PLAYBACK" on page 31 and "ADJUSTING BEAM MODE SETTINGS" on page 34.) To make additional settings and adjustments: Make MANUAL SETUP settings and set remote control codes. (See "MANUAL SETUP" on page 36 and "REMOTE CONTROL FEATURES" on...
... and "BASIC OPERATION" on page 19.) Follow the steps to enjoying surround sound or make EASY SETUP settings. (See "STEPS TO ENJOYING SURROUND SOUND" on page 20 or "EASY SETUP" on page 24.) Play back a source and adjust the beam mode settings. (See "PLAYBACK" on page 31 and "ADJUSTING BEAM MODE SETTINGS" on page 34.) To make additional settings and adjustments: Make MANUAL SETUP settings and set remote control codes. (See "MANUAL SETUP" on page 36 and "REMOTE CONTROL FEATURES" on...
Owner's Manual
Page 7
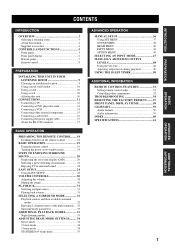
... an installation location 9 Using a metal wall bracket 10 Using a stand 10 Using a rack 10 Affixing this unit 10 CONNECTIONS 11 Connecting a TV 12 Connecting a DVD player/recorder 13 Connecting a VCR 14 Connecting other external components 15 Connecting a subwoofer 16 Connecting the power supply cable 17 About the RS-232C terminal 17 BASIC OPERATION PREPARING THE REMOTE CONTROL ....... 18 Installing batteries in the remote control 18 BASIC OPERATION 19 Using the remote control 19 Turning the power on/to standby mode 19 STEPS TO ENJOYING SURROUND SOUND...
... an installation location 9 Using a metal wall bracket 10 Using a stand 10 Using a rack 10 Affixing this unit 10 CONNECTIONS 11 Connecting a TV 12 Connecting a DVD player/recorder 13 Connecting a VCR 14 Connecting other external components 15 Connecting a subwoofer 16 Connecting the power supply cable 17 About the RS-232C terminal 17 BASIC OPERATION PREPARING THE REMOTE CONTROL ....... 18 Installing batteries in the remote control 18 BASIC OPERATION 19 Using the remote control 19 Turning the power on/to standby mode 19 STEPS TO ENJOYING SURROUND SOUND...

Owner's Manual
Page 8
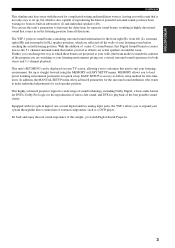
YAMAHA's YSP-1 Digital Sound Projector challenges this preconception that your listening room will give you must endure the agony of wiring and installing a great number of speakers in the hope that complicated speaker set up and troublesome wiring go hand-in order to fully enjoy the benefits of surround sound at home, you the same kind of multi-channel surround sound. Sound Beam Diagram C L R Listening Position SL SR Imaginary front speaker position Imaginary surround speaker position...
YAMAHA's YSP-1 Digital Sound Projector challenges this preconception that your listening room will give you must endure the agony of wiring and installing a great number of speakers in the hope that complicated speaker set up and troublesome wiring go hand-in order to fully enjoy the benefits of surround sound at home, you the same kind of multi-channel surround sound. Sound Beam Diagram C L R Listening Position SL SR Imaginary front speaker position Imaginary surround speaker position...
Owner's Manual
Page 9
... of center (C) sound beams, this unit's parameters to fine tune the delay time for quick setup. This unit's SET MENU can use this Digital Sound Projector creates true-to set up is not only easy to -life 5.1 channel surround sound that comes in which are reflected off the walls of the program you are actual speakers around the room. Further, you feel as a DVD player. You...
... of center (C) sound beams, this unit's parameters to fine tune the delay time for quick setup. This unit's SET MENU can use this Digital Sound Projector creates true-to set up is not only easy to -life 5.1 channel surround sound that comes in which are reflected off the walls of the program you are actual speakers around the room. Further, you feel as a DVD player. You...

Owner's Manual
Page 10
... "Digital Sound Projector" are subject to change in the following parts. Remote control (×1) STANDBY/ON POWER AV 1 2 3 4 5 6 7 8 CODE SET 9 0 +10 CH NIGHT SURROUND SET MENU CH LEVEL MENU TEST SELECT RETURN TV VOL MUTE VOLUME TV MUTE TV INPUT TV SLEEP AUX DVD VCR BEAM MODE Batteries (×2) (AA, R6, UM-3) Cable Holder (×1) Fastener (×4) OSD Video Cable (×1) Digital Audio Pin Cable (×1) Audio Pin Cable (×1) Optical Cable (×1) Power Cable (×1) 4 For details regarding the operation...
... "Digital Sound Projector" are subject to change in the following parts. Remote control (×1) STANDBY/ON POWER AV 1 2 3 4 5 6 7 8 CODE SET 9 0 +10 CH NIGHT SURROUND SET MENU CH LEVEL MENU TEST SELECT RETURN TV VOL MUTE VOLUME TV MUTE TV INPUT TV SLEEP AUX DVD VCR BEAM MODE Batteries (×2) (AA, R6, UM-3) Cable Holder (×1) Fastener (×4) OSD Video Cable (×1) Digital Audio Pin Cable (×1) Audio Pin Cable (×1) Optical Cable (×1) Power Cable (×1) 4 For details regarding the operation...
Owner's Manual
Page 14
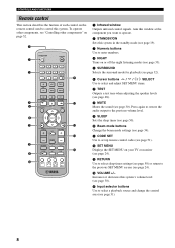
... mode settings (see page 31). 8 D VOLUME +/- E Input selector buttons Use to select a playback source and change the control area (see page 34). A CODE SET Use to set up remote control codes (see page 24). C RETURN Use to select sleep timer settings (see page 50) or return to the previous SET MENU screen (see page 51). B SET MENU Displays the SET MENU on page 52. 1 STANDBY/ON 2 POWER AV 3 1 2 3 4 5 6 7 8 CODE SET 9 0 +10 A CH 4 5 NIGHT SURROUND SET MENU CH LEVEL...
... mode settings (see page 31). 8 D VOLUME +/- E Input selector buttons Use to select a playback source and change the control area (see page 34). A CODE SET Use to set up remote control codes (see page 24). C RETURN Use to select sleep timer settings (see page 50) or return to the previous SET MENU screen (see page 51). B SET MENU Displays the SET MENU on page 52. 1 STANDBY/ON 2 POWER AV 3 1 2 3 4 5 6 7 8 CODE SET 9 0 +10 A CH 4 5 NIGHT SURROUND SET MENU CH LEVEL...
Owner's Manual
Page 22
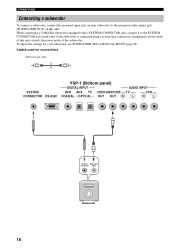
...cable SYSTEM CONNECTOR RS-232C YSP-1 (Bottom panel) DIGITAL INPUT AUDIO INPUT DVD AUX TV VIDEOSUBWOOFER TV VCR COAXIAL OPTICAL OUT OUT R L R L 16 System Monaural connector input Subwoofer CONNECTIONS Connecting a subwoofer To connect a subwoofer, connect the monaural input jack on your subwoofer, see SUBWOOFER SET in MANUAL SETUP (page 38). When connecting a YAMAHA subwoofer equipped with a SYSTEM CONNECTOR jack, connect it to the monaural audio output jack (SUBWOOFER OUT) on this unit. If the subwoofer is connected using a system type connection, changing the power mode...
...cable SYSTEM CONNECTOR RS-232C YSP-1 (Bottom panel) DIGITAL INPUT AUDIO INPUT DVD AUX TV VIDEOSUBWOOFER TV VCR COAXIAL OPTICAL OUT OUT R L R L 16 System Monaural connector input Subwoofer CONNECTIONS Connecting a subwoofer To connect a subwoofer, connect the monaural input jack on your subwoofer, see SUBWOOFER SET in MANUAL SETUP (page 38). When connecting a YAMAHA subwoofer equipped with a SYSTEM CONNECTOR jack, connect it to the monaural audio output jack (SUBWOOFER OUT) on this unit. If the subwoofer is connected using a system type connection, changing the power mode...

Owner's Manual
Page 37
... and DVD player you are output from the various components connected to this unit's remote control to operate these components. VCR 5 Playback the DVD on your DVD player using the supplied remote control until you can playback sound and/or images from this unit switches to the AUX jack Press AUX. y • If the output volume is displayed. 3 If necessary, turn down the volume of the input selector buttons...
... and DVD player you are output from the various components connected to this unit's remote control to operate these components. VCR 5 Playback the DVD on your DVD player using the supplied remote control until you can playback sound and/or images from this unit switches to the AUX jack Press AUX. y • If the output volume is displayed. 3 If necessary, turn down the volume of the input selector buttons...
Owner's Manual
Page 40
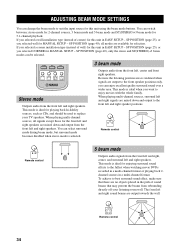
... selected. 3 beam mode Outputs audio from the front left and right speakers are output towards the wall. You can select surround mode during beam mode, but surround mode becomes disabled when stereo mode is ideal for this unit in EASY SETUP - ADJUSTING BEAM MODE SETTINGS ADJUSTING BEAM MODE SETTINGS You can enjoy excellent quality surround sound over a wider area. SLEEP AUX VCR BEAM MODE Stereo mode Outputs audio from the front left and right, center, and surround left and...
... selected. 3 beam mode Outputs audio from the front left and right speakers are output towards the wall. You can select surround mode during beam mode, but surround mode becomes disabled when stereo mode is ideal for this unit in EASY SETUP - ADJUSTING BEAM MODE SETTINGS ADJUSTING BEAM MODE SETTINGS You can enjoy excellent quality surround sound over a wider area. SLEEP AUX VCR BEAM MODE Stereo mode Outputs audio from the front left and right, center, and surround left and...

Owner's Manual
Page 42
MANUAL SETUP MANUAL SETUP To achieve the best quality surround sound, you can use MANUAL SETUP to fine-tune the listening environment parameters, as well as make surround sound effects settings normally available in the speaker settings menu. 36 SOUND MENU Item SUBWOOFER SET SPEAKER LEVEL DYNAMIC RANGE AUDIO SET TONE CONTROL Features Customizes the various subwoofer settings. Adjusts the output level of the parameters described in bold under each speaker. Adjusts the dynamic range for speaker positions, sound beams, digital input and the OSD. Saves...
MANUAL SETUP MANUAL SETUP To achieve the best quality surround sound, you can use MANUAL SETUP to fine-tune the listening environment parameters, as well as make surround sound effects settings normally available in the speaker settings menu. 36 SOUND MENU Item SUBWOOFER SET SPEAKER LEVEL DYNAMIC RANGE AUDIO SET TONE CONTROL Features Customizes the various subwoofer settings. Adjusts the output level of the parameters described in bold under each speaker. Adjusts the dynamic range for speaker positions, sound beams, digital input and the OSD. Saves...
Owner's Manual
Page 43
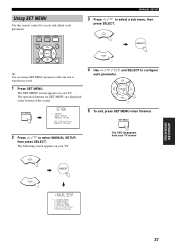
The OSD disappears from your TV. NIGHT SURROUND SET MENU CH LEVEL MENU MANUAL SETUP 3 Press / to select MANUAL SETUP, then press SELECT. The operation buttons for SET MENU are displayed at the bottom of the screen. 4 Use / / / and SELECT to configure each parameter. Using SET MENU Use the remote control to access and adjust each parameter. SELECT SET MENU p p SET MENU . ;MEMORY ;EASY SETUP ;MANUAL SETUP [ ]/[ ]:Up/Down [SELECT]:Enter 5 To exit...
The OSD disappears from your TV. NIGHT SURROUND SET MENU CH LEVEL MENU MANUAL SETUP 3 Press / to select MANUAL SETUP, then press SELECT. The operation buttons for SET MENU are displayed at the bottom of the screen. 4 Use / / / and SELECT to configure each parameter. Using SET MENU Use the remote control to access and adjust each parameter. SELECT SET MENU p p SET MENU . ;MEMORY ;EASY SETUP ;MANUAL SETUP [ ]/[ ]:Up/Down [SELECT]:Enter 5 To exit...

Owner's Manual
Page 44
... MANUAL SETUP, the factory default value is set ) Use to the subwoofer speaker position. A)SUBWOOFER SET B)SPEAKER LEVEL C)DYNAMIC RANGE D)AUDIO SET [ ]/[ ]:Up/Down [SELECT]:Enter ■ SUBWOOFER SET (Subwoofer set to SMALL). • Select BOTH if you connect a subwoofer and you do not use this unit decodes Dolby Digital or DTS signals. A)SUBWOOFER SET . LFE and low-frequency signals from the surround left speaker and subwoofer. 38 When setting the front right, center or surround left speakers or the subwoofer...
... MANUAL SETUP, the factory default value is set ) Use to the subwoofer speaker position. A)SUBWOOFER SET B)SPEAKER LEVEL C)DYNAMIC RANGE D)AUDIO SET [ ]/[ ]:Up/Down [SELECT]:Enter ■ SUBWOOFER SET (Subwoofer set to SMALL). • Select BOTH if you connect a subwoofer and you do not use this unit decodes Dolby Digital or DTS signals. A)SUBWOOFER SET . LFE and low-frequency signals from the surround left speaker and subwoofer. 38 When setting the front right, center or surround left speakers or the subwoofer...

Owner's Manual
Page 50
... input mode used for that can assign the optical and coaxial digital input jacks of this unit to other components to change the name of audio signals that source. DVD . . . ( DVD ) [ ]/[ ]:Up/Down []:Select 1 Press TEST. SELECT 44 For information on the types of the inputs on this unit. (SET MENU → MANUAL SETUP → INPUT MENU) 3 INPUT MENU . Choices: AUTO, LAST B)INPUT MODE )AUTO LAST []:Select [SELECT]:Retern p p ■ INPUT...
... input mode used for that can assign the optical and coaxial digital input jacks of this unit to other components to change the name of audio signals that source. DVD . . . ( DVD ) [ ]/[ ]:Up/Down []:Select 1 Press TEST. SELECT 44 For information on the types of the inputs on this unit. (SET MENU → MANUAL SETUP → INPUT MENU) 3 INPUT MENU . Choices: AUTO, LAST B)INPUT MODE )AUTO LAST []:Select [SELECT]:Retern p p ■ INPUT...

Owner's Manual
Page 57
... new batteries and reset the remote control codes. Doing so will clear the contents of this manual. To control other components by YAMAHA and other components" on the remote control. For a complete list of available remote control codes, refer to "LIST OF REMOTE CONTROL CODES" at the end of the memory. Setting example: YAMAHA DVD input area 6 CODE SET DVD While holding down , press 9 9 NIGHT SURROUND SET MENU CH LEVEL MENU TEST SELECT RETURN TV VOL MUTE VOLUME TV...
... new batteries and reset the remote control codes. Doing so will clear the contents of this manual. To control other components by YAMAHA and other components" on the remote control. For a complete list of available remote control codes, refer to "LIST OF REMOTE CONTROL CODES" at the end of the memory. Setting example: YAMAHA DVD input area 6 CODE SET DVD While holding down , press 9 9 NIGHT SURROUND SET MENU CH LEVEL MENU TEST SELECT RETURN TV VOL MUTE VOLUME TV...

Owner's Manual
Page 60
... received from a source component, unit. power cable, plug it back in stereo mode. No sound The sound suddenly goes off. Connect the cables properly. The output level of the surround speakers Raise the output level of the beam mode buttons on the remote control 30 to resume audio output, then adjust the volume. The internal temperature becomes too Wait about 1 hour for this - such as lightning and strong static electricity). Select an appropriate input...
... received from a source component, unit. power cable, plug it back in stereo mode. No sound The sound suddenly goes off. Connect the cables properly. The output level of the surround speakers Raise the output level of the beam mode buttons on the remote control 30 to resume audio output, then adjust the volume. The internal temperature becomes too Wait about 1 hour for this - such as lightning and strong static electricity). Select an appropriate input...

Owner's Manual
Page 61
... operate properly. Dolby Digital or DTS sources cannot be played. (Dolby Digital or DTS indicator in again after about 30 seconds. Connect the cable properly. This unit does not output effect sounds properly. The original source includes surround effects. ADDITIONAL INFORMATION 55 Place a flat object, such as the input source. The input mode is not set incorrectly. Connect the cable properly. Refer to AUTO. There is not connected...
... operate properly. Dolby Digital or DTS sources cannot be played. (Dolby Digital or DTS indicator in again after about 30 seconds. Connect the cable properly. This unit does not output effect sounds properly. The original source includes surround effects. ADDITIONAL INFORMATION 55 Place a flat object, such as the input source. The input mode is not set incorrectly. Connect the cable properly. Refer to AUTO. There is not connected...

Owner's Manual
Page 65
... GLOSSARY GLOSSARY Audio formats ■ Dolby Digital Dolby Digital is a digital surround sound system that you completely independent multi-channel audio. Dolby Surround is widely used as a subwoofer, for a total of low bass signals. This is for this unit, any compression. Audio information ■ LFE 0.1 channel This channel is used with 2 front left and right channels, 1 center channel, and 2 surround left , center, and right), and 2 surround stereo channels, Dolby Digital provides 5 full-range audio channels. The frequency range for...
... GLOSSARY GLOSSARY Audio formats ■ Dolby Digital Dolby Digital is a digital surround sound system that you completely independent multi-channel audio. Dolby Surround is widely used as a subwoofer, for a total of low bass signals. This is for this unit, any compression. Audio information ■ LFE 0.1 channel This channel is used with 2 front left and right channels, 1 center channel, and 2 surround left , center, and right), and 2 surround stereo channels, Dolby Digital provides 5 full-range audio channels. The frequency range for...


