Owners Manual
Page 2
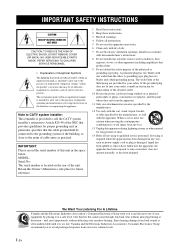
... has been exposed to qualified service personnel. NO USER-SERVICEABLE PARTS INSIDE. The wide blade or the third prong are provided for future reference. 1 Read these instructions. 2 Keep these instructions. 3 Heed all warnings. 4 Follow all servicing to rain or moisture, does not operate normally, or has been dropped. Servicing is provided to call the CATV system installer's attention to avoid injury...
... has been exposed to qualified service personnel. NO USER-SERVICEABLE PARTS INSIDE. The wide blade or the third prong are provided for future reference. 1 Read these instructions. 2 Keep these instructions. 3 Heed all warnings. 4 Follow all servicing to rain or moisture, does not operate normally, or has been dropped. Servicing is provided to call the CATV system installer's attention to avoid injury...

Owners Manual
Page 3
... your authority, granted by the interference. This equipment generates/uses radio frequencies and, if not installed and used . If the antenna lead-in FCC Regulations, Part 15 for US customers) 1 IMPORTANT NOTICE: DO NOT MODIFY THIS UNIT! The above statements apply ONLY to those products distributed by Yamaha Corporation of this type of procedures other than those specified...
... your authority, granted by the interference. This equipment generates/uses radio frequencies and, if not installed and used . If the antenna lead-in FCC Regulations, Part 15 for US customers) 1 IMPORTANT NOTICE: DO NOT MODIFY THIS UNIT! The above statements apply ONLY to those products distributed by Yamaha Corporation of this type of procedures other than those specified...
Owners Manual
Page 4
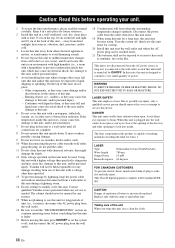
...Yamaha will form when the surrounding temperature changes suddenly. Due to possible eye injury, only a qualified service person should never be opened for long periods of time (i.e., vacation), disconnect the AC power plug from the wall outlet. 16 Be sure to read the "TROUBLESHOOTING" section on common operating errors before operating...damage to this unit, use force on this unit, press ON/OFF to set the system to off , then leave this unit alone for cooling. 20 Install this unit near the wall outlet and where the AC power plug can be reached easily. 21 The batteries shall not be held...
...Yamaha will form when the surrounding temperature changes suddenly. Due to possible eye injury, only a qualified service person should never be opened for long periods of time (i.e., vacation), disconnect the AC power plug from the wall outlet. 16 Be sure to read the "TROUBLESHOOTING" section on common operating errors before operating...damage to this unit, use force on this unit, press ON/OFF to set the system to off , then leave this unit alone for cooling. 20 Install this unit near the wall outlet and where the AC power plug can be reached easily. 21 The batteries shall not be held...
Owners Manual
Page 5
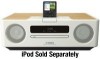
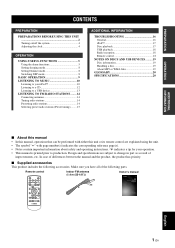
... control Indoor FM antenna (1.4 m (55-1/8")) Owner's manual U DESKTOP AUDIO SYSTEM SYSTEME AUDIO DESKTOP TSX-130 OWNER'S MANUAL MODE D'EMPLOI English 1 En PREPARATION OPERATION ADDITIONAL INFORMATION CONTENTS PREPARATION PREPARATIONS BEFORE USING THIS UNIT 2 Turning on/off the system 4 Adjusting the clock 4 OPERATION USING USEFUL FUNCTIONS 5 Using the alarm functions 5 Setting sleeping mode 8 Setting Dimmer mode 8 Switching DSP mode 8 BASIC OPERATION 9 LISTENING TO MUSIC 10 Listening to your operation. • This manual is printed prior to change in part as a result of...
... control Indoor FM antenna (1.4 m (55-1/8")) Owner's manual U DESKTOP AUDIO SYSTEM SYSTEME AUDIO DESKTOP TSX-130 OWNER'S MANUAL MODE D'EMPLOI English 1 En PREPARATION OPERATION ADDITIONAL INFORMATION CONTENTS PREPARATION PREPARATIONS BEFORE USING THIS UNIT 2 Turning on/off the system 4 Adjusting the clock 4 OPERATION USING USEFUL FUNCTIONS 5 Using the alarm functions 5 Setting sleeping mode 8 Setting Dimmer mode 8 Switching DSP mode 8 BASIC OPERATION 9 LISTENING TO MUSIC 10 Listening to your operation. • This manual is printed prior to change in part as a result of...
Owners Manual
Page 6
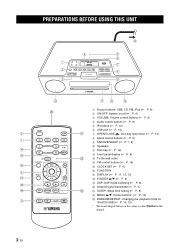
...: System on/off (☞ P. 4) 3 VOLUME: Volume control buttons (☞ P. 9) 4 Audio control buttons (☞ P. 9) 5 iPod dock (☞ P. 10) 6 USB port (☞ P. 13) 7 OPEN/CLOSE : Disc tray open/close (☞ P. 12) 8 Alarm control buttons (☞ P. 5) 9 SNOOZE/SLEEP (☞ P. 7, 8) 0 Speakers A Disc tray (☞ P. 12) B Front panel display (☞ P. 4) C To the wall outlet D FM control buttons (☞ P. 14) E CLOCK SET...
...: System on/off (☞ P. 4) 3 VOLUME: Volume control buttons (☞ P. 9) 4 Audio control buttons (☞ P. 9) 5 iPod dock (☞ P. 10) 6 USB port (☞ P. 13) 7 OPEN/CLOSE : Disc tray open/close (☞ P. 12) 8 Alarm control buttons (☞ P. 5) 9 SNOOZE/SLEEP (☞ P. 7, 8) 0 Speakers A Disc tray (☞ P. 12) B Front panel display (☞ P. 4) C To the wall outlet D FM control buttons (☞ P. 14) E CLOCK SET...
Owners Manual
Page 8
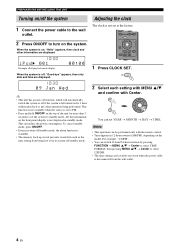
... auto off function, which will automatically switch the system to off if the system is not set at the factory. 2 Press ON/OFF to standby mode. PREPARATIONS BEFORE USING THIS UNIT Turning on/off the system 1 Connect the power cable to set YEAR → MONTH → DAY → TIME. Adjusting the clock The clock is left turned on the system. You can reduce the power...
... auto off function, which will automatically switch the system to off if the system is not set at the factory. 2 Press ON/OFF to standby mode. PREPARATIONS BEFORE USING THIS UNIT Turning on/off the system 1 Connect the power cable to set YEAR → MONTH → DAY → TIME. Adjusting the clock The clock is left turned on the system. You can reduce the power...

Owners Manual
Page 9
... following screens. BEEP: beep sound only - English 5 En OPERATION OPERATION USING USEFUL FUNCTIONS Using the alarm functions The unit has the dual alarm function. Note To cancel the alarm function setting during the setting. 2 Set the alarm time. MUSIC: music only If you set . BEEP+MUSIC: beep sound and music selected in an input source, iPod/ FM/CD/USB and beep sound together at...
... following screens. BEEP: beep sound only - English 5 En OPERATION OPERATION USING USEFUL FUNCTIONS Using the alarm functions The unit has the dual alarm function. Note To cancel the alarm function setting during the setting. 2 Set the alarm time. MUSIC: music only If you set . BEEP+MUSIC: beep sound and music selected in an input source, iPod/ FM/CD/USB and beep sound together at...

Owners Manual
Page 10
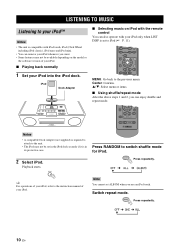
...your iPod (☞ P. 7). Select and set , the unit plays back the beep sound instead. Before this operation. CD Audio CD: Set a track number. LAST SET Keep the setting you select the beep sound. Switch on , the alarm indicator and time light up. 6 En When the alarm is set with ... files) Set a folder number. The BEEP screen is complete. The alarm is on /off the alarm function. USING USEFUL FUNCTIONS 2 Select the beep sound. 5 kinds of beep sounds are not deleted with this operation, make a playlist on /off the alarm with ALARM1/ ALARM2, but the alarm settings are stored...
...your iPod (☞ P. 7). Select and set , the unit plays back the beep sound instead. Before this operation. CD Audio CD: Set a track number. LAST SET Keep the setting you select the beep sound. Switch on , the alarm indicator and time light up. 6 En When the alarm is set with ... files) Set a folder number. The BEEP screen is complete. The alarm is on /off the alarm function. USING USEFUL FUNCTIONS 2 Select the beep sound. 5 kinds of beep sounds are not deleted with this operation, make a playlist on /off the alarm with ALARM1/ ALARM2, but the alarm settings are stored...
Owners Manual
Page 11
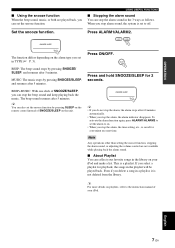
... your favorite songs in TYPE (☞ P. 5). Even if you can also set the snooze function by pressing SLEEP on the remote control instead of SNOOZE/SLEEP on the alarm type you set the alarm to the instruction manual of SNOOZE/SLEEP, you delete a song in a playlist, it is saved ...back the alarm sound. ■ About Playlist You can stop the alarm sound in the playlist will be played back. USING USEFUL FUNCTIONS ■ Stopping the alarm sound You can collect your iPod and make a list. When you stop the alarm, the time setting, etc., is not deleted from the library. Set the ...
... your favorite songs in TYPE (☞ P. 5). Even if you can also set the snooze function by pressing SLEEP on the remote control instead of SNOOZE/SLEEP on the alarm type you set the alarm to the instruction manual of SNOOZE/SLEEP, you delete a song in a playlist, it is saved ...back the alarm sound. ■ About Playlist You can stop the alarm sound in the playlist will be played back. USING USEFUL FUNCTIONS ■ Stopping the alarm sound You can collect your iPod and make a list. When you stop the alarm, the time setting, etc., is not deleted from the library. Set the ...
Owners Manual
Page 14
... above steps 1 and 2, you use an iPod touch. y For operations of your iPod, refer to the instruction manual of your iPod only when LIST DISP is in the iPod dock securely if it is set ALBUM when you can remove your iPod whenever you want. • Some features may not be available depending on the model or the software version of...
... above steps 1 and 2, you use an iPod touch. y For operations of your iPod, refer to the instruction manual of your iPod only when LIST DISP is in the iPod dock securely if it is set ALBUM when you can remove your iPod whenever you want. • Some features may not be available depending on the model or the software version of...
Owners Manual
Page 15
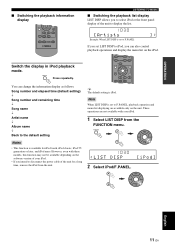
...set LIST DISP to disconnect the power cable of the unit for iPod touch, iPod classic, iPod 5th generation or later, and iPod nano. English 11 En Notes • This function is set to F.PANEL If you set to F.PANEL, playback operation and menu list displaying are not available with these models...for a long time, remove the iPod from the FUNCTION menu. You can also control playback operations and display the menu list on the iPod. Switch the display in iPod playback mode. Song number and elapsed time (default setting) ↓ Song number and remaining time ↓ Song ...
...set LIST DISP to disconnect the power cable of the unit for iPod touch, iPod classic, iPod 5th generation or later, and iPod nano. English 11 En Notes • This function is set to F.PANEL If you set to F.PANEL, playback operation and menu list displaying are not available with these models...for a long time, remove the iPod from the FUNCTION menu. You can also control playback operations and display the menu list on the iPod. Switch the display in iPod playback mode. Song number and elapsed time (default setting) ↓ Song number and remaining time ↓ Song ...

Owners Manual
Page 16
...also select FOLDER. ■ Switching the playback information display 2 Close the disc tray. 3 Select CD. Switch random mode. Switch repeat mode. Elapsed time of the current track (default setting) ↓ Remaining time of the current track*1 ↓ Total time of the disc*1 ↓ Remaining time of ...to a CD ■ Playing back normally 1 Open the disc tray and insert your disc. LISTENING TO MUSIC Listening to the default setting *1 Only for Audio CDs *2 Only when the selected track has information *3 Only for MP3/WMA CDs 12 En You can change the information display as...
...also select FOLDER. ■ Switching the playback information display 2 Close the disc tray. 3 Select CD. Switch random mode. Switch repeat mode. Elapsed time of the current track (default setting) ↓ Remaining time of the current track*1 ↓ Total time of the disc*1 ↓ Remaining time of ...to a CD ■ Playing back normally 1 Open the disc tray and insert your disc. LISTENING TO MUSIC Listening to the default setting *1 Only for Audio CDs *2 Only when the selected track has information *3 Only for MP3/WMA CDs 12 En You can change the information display as...
Owners Manual
Page 17
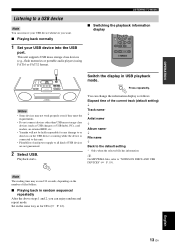
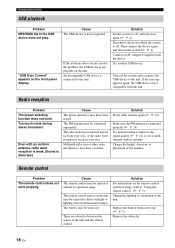
...on the USB device occurring while the device is connected to this unit. • Playability of and power supply to all kind of the current track (default setting) ↓ Track name* ↓ Artist name* ↓ Album name* ↓ File name ...number of files/folders. ■ Playing back in USB playback mode. Press repeatedly. You can enjoy random and repeat mode. Elapsed time of USB devices are not guaranteed. 2 Select USB. English 13 En This unit supports USB mass storage class devices (e.g., flash memories or portable audio players) using FAT16 or FAT32 format. OPERATION...
...on the USB device occurring while the device is connected to this unit. • Playability of and power supply to all kind of the current track (default setting) ↓ Track name* ↓ Artist name* ↓ Album name* ↓ File name ...number of files/folders. ■ Playing back in USB playback mode. Press repeatedly. You can enjoy random and repeat mode. Elapsed time of USB devices are not guaranteed. 2 Select USB. English 13 En This unit supports USB mass storage class devices (e.g., flash memories or portable audio players) using FAT16 or FAT32 format. OPERATION...

Owners Manual
Page 18
... be better. Tuning radio stations ■ Auto preset 1 Press and hold . Note If you tune to select is poor, change the height, direction, or placement of the antenna. • If you use an outdoor antenna instead of the supplied FM antenna, reception will be stretched out. • If radio reception is weak, you want to a station manually, the sound is monaural...
... be better. Tuning radio stations ■ Auto preset 1 Press and hold . Note If you tune to select is poor, change the height, direction, or placement of the antenna. • If you use an outdoor antenna instead of the supplied FM antenna, reception will be stretched out. • If radio reception is weak, you want to a station manually, the sound is monaural...
Owners Manual
Page 19
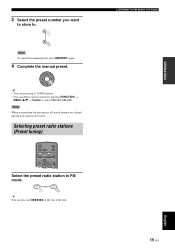
... manual preset. y You can delete a preset station by pressing FUNCTION → MENU S/T → Center to 30 FM stations. • You can also use / on the top of the unit. 15 En English y • You can preset up to select PRESET DELETE. OPERATION 3 Select the preset number you perform the auto preset, all stored stations are cleared and the new stations...
... manual preset. y You can delete a preset station by pressing FUNCTION → MENU S/T → Center to 30 FM stations. • You can also use / on the top of the unit. 15 En English y • You can preset up to select PRESET DELETE. OPERATION 3 Select the preset number you perform the auto preset, all stored stations are cleared and the new stations...

Owners Manual
Page 20
... function may be on the system. ADDITIONAL INFORMATION TROUBLESHOOTING In case of a problem with the suggested solutions or if your problem with the unit, check the following list first. The speakers make no sound. Use a disc supported by the unit (☞ P. 19). Cause The power cable may be connected improperly. Set the system to the digital or high-frequency equipment. Select...
... function may be on the system. ADDITIONAL INFORMATION TROUBLESHOOTING In case of a problem with the suggested solutions or if your problem with the unit, check the following list first. The speakers make no sound. Use a disc supported by the unit (☞ P. 19). Cause The power cable may be connected improperly. Set the system to the digital or high-frequency equipment. Select...
Owners Manual
Page 21
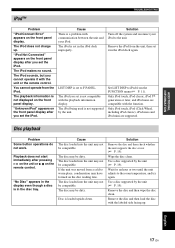
... on the front panel display after you set in the iPod dock again. Solution Turn off the system and reconnect your iPod. Disc is not displayed on the front panel display. Set LIST DISP to the room temperature, and try again. The iPod does not charge up . ADDITIONAL INFORMATION iPod™ TROUBLESHOOTING Problem "iPod Connect Error" appears on the front panel display...
... on the front panel display after you set in the iPod dock again. Solution Turn off the system and reconnect your iPod. Disc is not displayed on the front panel display. Set LIST DISP to the room temperature, and try again. The iPod does not charge up . ADDITIONAL INFORMATION iPod™ TROUBLESHOOTING Problem "iPod Connect Error" appears on the front panel display...
Owners Manual
Page 22
... an AC adapter if supplied with a new one (☞ P. 3). Turn off . Too much noise during stereo broadcast. The FM antenna may be far from your area. Solution Preset radio stations again (☞ P. 14). Replace the battery with the device. Solution Set the system to off, and turn on the remote control operation range, refer to "Using the remote control" (☞ P. 3). If the...
... an AC adapter if supplied with a new one (☞ P. 3). Turn off . Too much noise during stereo broadcast. The FM antenna may be far from your area. Solution Preset radio stations again (☞ P. 14). Replace the battery with the device. Solution Set the system to off, and turn on the remote control operation range, refer to "Using the remote control" (☞ P. 3). If the...

Owners Manual
Page 23
...direct sunlight, high temperature, high humidity, or a lot of files/folders that has a printable surface using an 8-cm adapter. • Do not insert any other type of the disc. shaped disc. • Do not use discs with audio...files (CBR and VBR)) • The maximum numbers of dust. • If a disc becomes dirty, wipe ...specification. • Copyright-protected files cannot be played back depending on your CD-R, CD-RW, or USB device. Notes • Do not load any foreign objects into the disc slot. • Do not insert a cracked, warped, or glued disc. Doing so may not work...
...direct sunlight, high temperature, high humidity, or a lot of files/folders that has a printable surface using an 8-cm adapter. • Do not insert any other type of the disc. shaped disc. • Do not use discs with audio...files (CBR and VBR)) • The maximum numbers of dust. • If a disc becomes dirty, wipe ...specification. • Copyright-protected files cannot be played back depending on your CD-R, CD-RW, or USB device. Notes • Do not load any foreign objects into the disc slot. • Do not insert a cracked, warped, or glued disc. Doing so may not work...
Owners Manual
Page 24
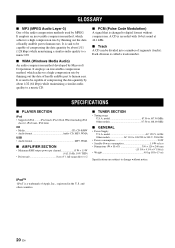
... said to be capable of hardly audible part to 108.00 MHz ■ GENERAL • Power Supply U.S.A. A CD is called a track number. SPECIFICATIONS ■ PLAYER SECTION iPod • Supported iPod ..........iPod touch, iPod (Click Wheel including iPod classic), iPod nano, iPod mini CD • Media CD, CD-R/RW • Audio format Audio CD, MP3, WMA USB • Audio format MP3, WMA ■ AMPLIFIER SECTION •...
... said to be capable of hardly audible part to 108.00 MHz ■ GENERAL • Power Supply U.S.A. A CD is called a track number. SPECIFICATIONS ■ PLAYER SECTION iPod • Supported iPod ..........iPod touch, iPod (Click Wheel including iPod classic), iPod nano, iPod mini CD • Media CD, CD-R/RW • Audio format Audio CD, MP3, WMA USB • Audio format MP3, WMA ■ AMPLIFIER SECTION •...