Owners Manual
Page 3
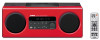
...favorite radio stations. - English Français Deutsch Svenska CONTENTS NAMES OF PARTS AND THEIR FUNCTIONS 2 CONNECTING AN iPod 6 ADJUSTING THE CLOCK 6 LISTENING TO iPod 7 LISTENING TO CD AND USB DEVICE .....7 SWITCHING THE DISPLAY 8 LISTENING TO RADIO STATIONS ...........8 USING ALARM FUNCTION... manual and the product, the product has priority. X Supplied accessories Remote control FM antenna Dock cover SNOOZE / SLEEP ALARM CLOCK CD iPod AUX RADIO USB FOLDER MENU ENTER OPTION VOLUME DISPLAY MUTE TUNING MEMORY PRESET (With CR2032 battery) Italiano Español...
...favorite radio stations. - English Français Deutsch Svenska CONTENTS NAMES OF PARTS AND THEIR FUNCTIONS 2 CONNECTING AN iPod 6 ADJUSTING THE CLOCK 6 LISTENING TO iPod 7 LISTENING TO CD AND USB DEVICE .....7 SWITCHING THE DISPLAY 8 LISTENING TO RADIO STATIONS ...........8 USING ALARM FUNCTION... manual and the product, the product has priority. X Supplied accessories Remote control FM antenna Dock cover SNOOZE / SLEEP ALARM CLOCK CD iPod AUX RADIO USB FOLDER MENU ENTER OPTION VOLUME DISPLAY MUTE TUNING MEMORY PRESET (With CR2032 battery) Italiano Español...

Owners Manual
Page 6
... antenna) 1 2 34 SET ON OFF 5 1 FM antenna (supplied) 2 FM antenna terminal: Connect the supplied FM antenna. 3 AUX: Connect an external device. (☞ P. 12) 4 CLOCK SET: Adjusts the clock. (☞ P. 6) ON: Displays the current time when system is not threaded. 4 En OFF: Switches the system to a wall outlet. All the information on the...
... antenna) 1 2 34 SET ON OFF 5 1 FM antenna (supplied) 2 FM antenna terminal: Connect the supplied FM antenna. 3 AUX: Connect an external device. (☞ P. 12) 4 CLOCK SET: Adjusts the clock. (☞ P. 6) ON: Displays the current time when system is not threaded. 4 En OFF: Switches the system to a wall outlet. All the information on the...
Owners Manual
Page 7
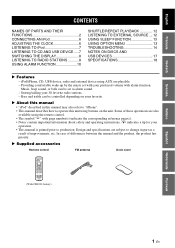
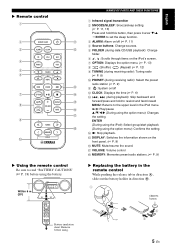
...): Skip backward and forward/press and hold this button, then press Cursor T/S J ENTER to set the sleep function. 3 ALARM: Alarm on/off B CLOCK: Displays the time (☞ P. 6) C , (during receiving radio): Select the preset radio station (☞ P. 9) A : System on the front... panel. (☞ P. 8) F MUTE: Mute/resume the sound. X Remote control 1 2 SNOOZE / SLEEP A 3 ALARM CLOCK B CD iPod AUX 4 RADIO USB 5 FOLDER 6 MENU ENTER C 7 OPTION D DISPLAY E 8 VOLUME MUTE F G 9 TUNING H MEMORY PRESET 0 X Using the remote...
...): Skip backward and forward/press and hold this button, then press Cursor T/S J ENTER to set the sleep function. 3 ALARM: Alarm on/off B CLOCK: Displays the time (☞ P. 6) C , (during receiving radio): Select the preset radio station (☞ P. 9) A : System on the front... panel. (☞ P. 8) F MUTE: Mute/resume the sound. X Remote control 1 2 SNOOZE / SLEEP A 3 ALARM CLOCK B CD iPod AUX 4 RADIO USB 5 FOLDER 6 MENU ENTER C 7 OPTION D DISPLAY E 8 VOLUME MUTE F G 9 TUNING H MEMORY PRESET 0 X Using the remote...

Owners Manual
Page 8
... way. CONNECTING AN iPod Dock Adaptor IPod / iPhone LABEL SIDE Set your iPod. • If you press CLOCK on the remote control. • You can switch the system to power save mode, the iPod is not ..., it . For details on the front panel to switch between the 12 and 24 hour clock display. 3 Set CLOCK to ON to complete. Remove the protective case before connection. • Attach the dock cover ...whenever you are lost about 5 minutes after unplugging the unit. y • While setting the clock, press RETURN to return to the previous setting. • Press SNOOZE/SLEEP on dock adaptor ...
... way. CONNECTING AN iPod Dock Adaptor IPod / iPhone LABEL SIDE Set your iPod. • If you press CLOCK on the remote control. • You can switch the system to power save mode, the iPod is not ..., it . For details on the front panel to switch between the 12 and 24 hour clock display. 3 Set CLOCK to ON to complete. Remove the protective case before connection. • Attach the dock cover ...whenever you are lost about 5 minutes after unplugging the unit. y • While setting the clock, press RETURN to return to the previous setting. • Press SNOOZE/SLEEP on dock adaptor ...
Owners Manual
Page 16
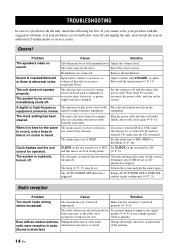
.... Select the correct source. Sound is cracked/distorted or there is heard. A digital or high-frequency The unit may be operated. equipment. Clock flashes and the unit cannot be connected improperly. The automatic system off function turned This unit automatically turns off the system the unit off. 60.... Set the system to sound, only a beep is time for the alarm to off and unplug the unit, and consult the nearest authorized Yamaha dealer or service center. Plug the power cable into the wall outlet firmly, and set to BEEP. If you have selected is connected properly ...
.... Select the correct source. Sound is cracked/distorted or there is heard. A digital or high-frequency The unit may be operated. equipment. Clock flashes and the unit cannot be connected improperly. The automatic system off function turned This unit automatically turns off the system the unit off. 60.... Set the system to sound, only a beep is time for the alarm to off and unplug the unit, and consult the nearest authorized Yamaha dealer or service center. Plug the power cable into the wall outlet firmly, and set to BEEP. If you have selected is connected properly ...
Owners Manual
Page 17
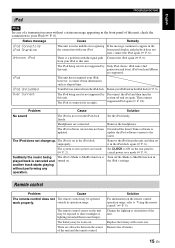
... as elapsed time. Station your iPod (☞ P. 6). Over Current The iPod being used is connected at an angle. The iPod does not charge up. Set CLOCK to ON on the rear panel to the latest. There are obstacles between the sensor of the unit. Remove the obstacles. 15 En
... as elapsed time. Station your iPod (☞ P. 6). Over Current The iPod being used is connected at an angle. The iPod does not charge up. Set CLOCK to ON on the rear panel to the latest. There are obstacles between the sensor of the unit. Remove the obstacles. 15 En
Owners Manual
Page 18
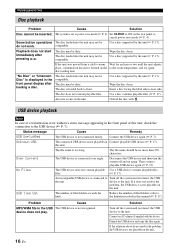
.... Unknown USB The connected USB device is set to cancel power save mode (☞ P. 2). The system is not playable on the unit. 16 En Set CLOCK to ON on the to the room temperature, and try again. Use a disc contains playable files (☞ P. 17). The disc may not be do not...
.... Unknown USB The connected USB device is set to cancel power save mode (☞ P. 2). The system is not playable on the unit. 16 En Set CLOCK to ON on the to the room temperature, and try again. Use a disc contains playable files (☞ P. 17). The disc may not be do not...

