Owners Manual
Page 2
... of power. Burning objects (i.e. Yamaha will form when the surrounding temperature changes suddenly. Disconnect the power cable from the wall outlet, grasp the plug; In this state, this unit, do not place: - candles), as sunshine, fire or the like. Contact qualified Yamaha service personnel when any damage resulting from use force on switches, knobs and/or cords. 10 When disconnecting the power cable from...
... of power. Burning objects (i.e. Yamaha will form when the surrounding temperature changes suddenly. Disconnect the power cable from the wall outlet, grasp the plug; In this state, this unit, do not place: - candles), as sunshine, fire or the like. Contact qualified Yamaha service personnel when any damage resulting from use force on switches, knobs and/or cords. 10 When disconnecting the power cable from...
Owners Manual
Page 3
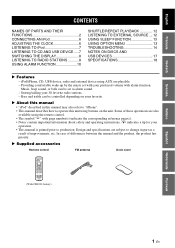
... MENU 13 TROUBLESHOOTING 14 NOTES ON DISCS AND USB DEVICES 17 SPECIFICATIONS 18 X Features - iPod/iPhone, CD, USB device, radio and external device using AUX are also available using buttons on your 30 favorite radio stations. - Some of these operations are playable. - In case of improvements, etc. X Supplied accessories Remote control FM antenna Dock cover SNOOZE / SLEEP ALARM CLOCK CD iPod AUX RADIO USB FOLDER MENU ENTER OPTION VOLUME DISPLAY MUTE TUNING MEMORY PRESET...
... MENU 13 TROUBLESHOOTING 14 NOTES ON DISCS AND USB DEVICES 17 SPECIFICATIONS 18 X Features - iPod/iPhone, CD, USB device, radio and external device using AUX are also available using buttons on your 30 favorite radio stations. - Some of these operations are playable. - In case of improvements, etc. X Supplied accessories Remote control FM antenna Dock cover SNOOZE / SLEEP ALARM CLOCK CD iPod AUX RADIO USB FOLDER MENU ENTER OPTION VOLUME DISPLAY MUTE TUNING MEMORY PRESET...
Owners Manual
Page 4
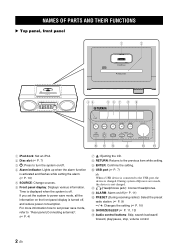
... preset radio station. (☞ P. 9) - / +: Changes the setting (☞ P. 10) D SNOOZE/SLEEP (☞ P. 11, 13) E Audio control buttons: Skip, search backward/ forward, play/pause, stop, volume control 2 En B ALARM: Alarm on the front panel display is turned off . During system off . 4 Alarm indicator: Lights up when the alarm function is activated and flashes while setting the alarm. (☞ P. 10) 5 SOURCE: Change sources. 6 Front panel display: Displays various information. PREPARATION NAMES OF PARTS AND THEIR FUNCTIONS X Top panel, front panel 1 2 IPod...
... preset radio station. (☞ P. 9) - / +: Changes the setting (☞ P. 10) D SNOOZE/SLEEP (☞ P. 11, 13) E Audio control buttons: Skip, search backward/ forward, play/pause, stop, volume control 2 En B ALARM: Alarm on the front panel display is turned off . During system off . 4 Alarm indicator: Lights up when the alarm function is activated and flashes while setting the alarm. (☞ P. 10) 5 SOURCE: Change sources. 6 Front panel display: Displays various information. PREPARATION NAMES OF PARTS AND THEIR FUNCTIONS X Top panel, front panel 1 2 IPod...

Owners Manual
Page 5
...: Flashes when searching for the currently selected OPTION menu item. 3 En Lights up when you set your iPod/CD/USB to repeat play. (☞ P. 12) 7 MUTE indicator: Lights up when the sound is muted. 8 Multi information display: Shows the various information. 9 TUNED indicator: Lights up when you preset radio stations automatically or manually. (☞ P. 9) A Multi information indicators: Indicate the music information currently displayed on Multi information display. (☞ P. 8) B Operation indicators: Shows the available menu buttons...
...: Flashes when searching for the currently selected OPTION menu item. 3 En Lights up when you set your iPod/CD/USB to repeat play. (☞ P. 12) 7 MUTE indicator: Lights up when the sound is muted. 8 Multi information display: Shows the various information. 9 TUNED indicator: Lights up when you preset radio stations automatically or manually. (☞ P. 9) A Multi information indicators: Indicate the music information currently displayed on Multi information display. (☞ P. 8) B Operation indicators: Shows the available menu buttons...

Owners Manual
Page 6
... the front panel display is turned off in system off/power save mode, the alarm function is available. 5 Power cable: Connect to power save mode when system is off . This can reduce power consumption. NAMES OF PARTS AND THEIR FUNCTIONS X Rear panel (Connecting antenna) 1 2 34 SET ON OFF 5 1 FM antenna (supplied) 2 FM antenna terminal: Connect the supplied FM antenna. 3 AUX: Connect an external device. (☞ P. 12) 4 CLOCK SET: Adjusts the clock. (☞ P. 6) ON: Displays the current time when system...
... the front panel display is turned off in system off/power save mode, the alarm function is available. 5 Power cable: Connect to power save mode when system is off . This can reduce power consumption. NAMES OF PARTS AND THEIR FUNCTIONS X Rear panel (Connecting antenna) 1 2 34 SET ON OFF 5 1 FM antenna (supplied) 2 FM antenna terminal: Connect the supplied FM antenna. 3 AUX: Connect an external device. (☞ P. 12) 4 CLOCK SET: Adjusts the clock. (☞ P. 6) ON: Displays the current time when system...
Owners Manual
Page 7
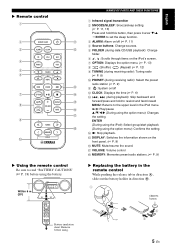
...VOLUME: Volume control H MEMORY: Memories preset radio stations. (☞ P. 9) X Replacing the battery in the remote control While pushing the release tab in direction , slide out the battery holder in the iPod menu. : Play/pause S/T/W/X (During using the option menu): Changes the setting ENTER (During using the iPod): Select group/start playback (During using . X Remote control 1 2 SNOOZE / SLEEP A 3 ALARM CLOCK B CD iPod AUX 4 RADIO USB 5 FOLDER 6 MENU ENTER C 7 OPTION D DISPLAY E 8 VOLUME MUTE F G 9 TUNING H MEMORY PRESET 0 X Using the remote control...
...VOLUME: Volume control H MEMORY: Memories preset radio stations. (☞ P. 9) X Replacing the battery in the remote control While pushing the release tab in direction , slide out the battery holder in the iPod menu. : Play/pause S/T/W/X (During using the option menu): Changes the setting ENTER (During using the iPod): Select group/start playback (During using . X Remote control 1 2 SNOOZE / SLEEP A 3 ALARM CLOCK B CD iPod AUX 4 RADIO USB 5 FOLDER 6 MENU ENTER C 7 OPTION D DISPLAY E 8 VOLUME MUTE F G 9 TUNING H MEMORY PRESET 0 X Using the remote control...

Owners Manual
Page 8
... time count starts. During power save mode by force, the connector may be damaged. ADJUSTING THE CLOCK 1 Rear panel 3 Rear panel 6 En 2 PRESET ENTER Front panel 1 Set CLOCK to set in protective case is charged when set the hour and then press ENTER. y An iPod is connected by setting CLOCK on the rear panel to power save mode, the iPod is displayed for a certain period when you press CLOCK on the front panel to switch...
... time count starts. During power save mode by force, the connector may be damaged. ADJUSTING THE CLOCK 1 Rear panel 3 Rear panel 6 En 2 PRESET ENTER Front panel 1 Set CLOCK to set in protective case is charged when set the hour and then press ENTER. y An iPod is connected by setting CLOCK on the rear panel to power save mode, the iPod is displayed for a certain period when you press CLOCK on the front panel to switch...
Owners Manual
Page 9
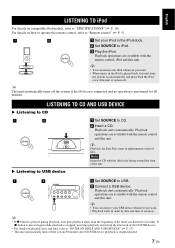
... ALARM PRESET VOLUME SNOOZE / SLEEP 1 Set SOURCE to "NOTES ON DISCS AND USB DEVICES" (☞ P. 17). • This unit automatically turns off the system if the iPod is not connected and no operation is system off. If button is pressed again while playback is stopped, next time playback starts from the beginning of files. OPERATION English LISTENING TO iPod For details on compatible iPod models...
... ALARM PRESET VOLUME SNOOZE / SLEEP 1 Set SOURCE to "NOTES ON DISCS AND USB DEVICES" (☞ P. 17). • This unit automatically turns off the system if the iPod is not connected and no operation is system off. If button is pressed again while playback is stopped, next time playback starts from the beginning of files. OPERATION English LISTENING TO iPod For details on compatible iPod models...
Owners Manual
Page 10
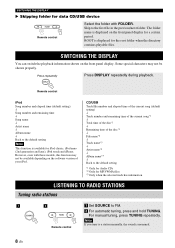
... number and elapsed time of the current song (default setting) L Track number and remaining time of the current song*1 L Total time of the disc*1 L Remaining time of your iPod. ROOT is displayed for MP3/WMA files *3 Only when the selected track has information LISTENING TO RADIO STATIONS Tuning radio stations 1 SOURCE 2 TUNING Remote control 1 Set SOURCE to the default setting Note This function is available for a certain period. Press repeatedly DISPLAY Press DISPLAY repeatedly during playback. For manual tuning, press TUNING...
... number and elapsed time of the current song (default setting) L Track number and remaining time of the current song*1 L Total time of the disc*1 L Remaining time of your iPod. ROOT is displayed for MP3/WMA files *3 Only when the selected track has information LISTENING TO RADIO STATIONS Tuning radio stations 1 SOURCE 2 TUNING Remote control 1 Set SOURCE to the default setting Note This function is available for a certain period. Press repeatedly DISPLAY Press DISPLAY repeatedly during playback. For manual tuning, press TUNING...
Owners Manual
Page 11
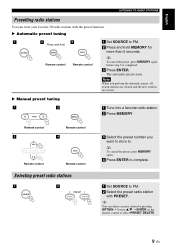
...automatic preset starts. X Manual preset tuning 1 TUNING 2 MEMORY 1 Tune into a favorite radio station. 2 Press MEMORY. Note When you want to store to select PRESET DELETE. 9 En y To cancel the preset, press MEMORY again. 4 Press ENTER to FM. 2 Select the preset radio station with the preset function. Selecting preset radio stations 1 SOURCE 2 PRESET 1 Set SOURCE to complete. Remote control 3 MENU ENTER Remote control Remote control 4 ENTER Remote control 3 Select the preset number you perform the automatic preset, all stored stations are cleared and the new stations...
...automatic preset starts. X Manual preset tuning 1 TUNING 2 MEMORY 1 Tune into a favorite radio station. 2 Press MEMORY. Note When you want to store to select PRESET DELETE. 9 En y To cancel the preset, press MEMORY again. 4 Press ENTER to FM. 2 Select the preset radio station with the preset function. Selecting preset radio stations 1 SOURCE 2 PRESET 1 Set SOURCE to complete. Remote control 3 MENU ENTER Remote control Remote control 4 ENTER Remote control 3 Select the preset number you perform the automatic preset, all stored stations are cleared and the new stations...
Owners Manual
Page 12
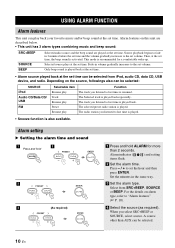
... AUX can play Function The track you listened to the set time. Set the minutes in volume gradually increases to last time is played. • Snooze function is played. A source other than 2 seconds. This mode is played back repeatedly. Source playback begins to fade in 3 minutes before the set time and the volume gradually increases to "Alarm features" (☞ P. 10). 4 Select the source (as required). The selected preset radio station is also available. Select from iPod, audio...
... AUX can play Function The track you listened to the set time. Set the minutes in volume gradually increases to last time is played. • Snooze function is played. A source other than 2 seconds. This mode is played back repeatedly. Source playback begins to fade in 3 minutes before the set time and the volume gradually increases to "Alarm features" (☞ P. 10). 4 Select the source (as required). The selected preset radio station is also available. Select from iPod, audio...
Owners Manual
Page 13
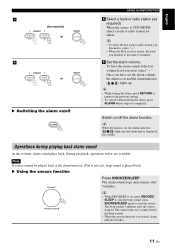
..., operations below are available. The source fades in 1 minute before step 6 is displayed for alarm. To have set the alarm volume, the alarm is set time, alarm sound plays back. English 5 PRESET (As required) ENTER 6 PRESET ENTER X Switching the alarm on /off ALARM USING ALARM FUNCTION 5 Select a track or radio station (as source, the track you listened to stop the source. When the source is on, the alarm indicator ( ) lights up...
..., operations below are available. The source fades in 1 minute before step 6 is displayed for alarm. To have set the alarm volume, the alarm is set time, alarm sound plays back. English 5 PRESET (As required) ENTER 6 PRESET ENTER X Switching the alarm on /off ALARM USING ALARM FUNCTION 5 Select a track or radio station (as source, the track you listened to stop the source. When the source is on, the alarm indicator ( ) lights up...
Owners Manual
Page 14
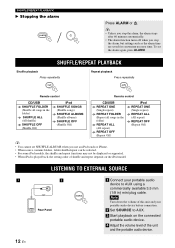
... after 60 minutes automatically. • The alarm function turns off when you use next time. Note Turn down the volume of this unit and your portable audio device to AUX. 3 Start playback on the connected portable audio device. 4 Adjust the volume level of shuffle and repeat depends on the iPod model. LISTENING TO EXTERNAL SOURCE 1 2 Rear Panel SOURCE 1 Connect your portable audio device before connection. 2 Set SOURCE to AUX using a commercially available 3.5 mm (1/8 in the folder...
... after 60 minutes automatically. • The alarm function turns off when you use next time. Note Turn down the volume of this unit and your portable audio device to AUX. 3 Start playback on the connected portable audio device. 4 Adjust the volume level of shuffle and repeat depends on the iPod model. LISTENING TO EXTERNAL SOURCE 1 2 Rear Panel SOURCE 1 Connect your portable audio device before connection. 2 Set SOURCE to AUX using a commercially available 3.5 mm (1/8 in the folder...
Owners Manual
Page 15
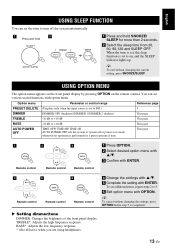
... Remote control Remote control Remote control 4 Change the settings with S/T. 5 Complete the setting with OPTION. When the time is set, the sleep function is set the time to system off the system automatically. 1 Press and hold VOLUME 2 PRESET SNOOZE / SLEEP ENTER 1 Press and hold SNOOZE/ SLEEP for a preset amount of the front panel display. You can set to 5. 6 Exit option menu with ENTER. BASS*: Adjusts the low frequency response. * Also effective when you are using headphones...
... Remote control Remote control Remote control 4 Change the settings with S/T. 5 Complete the setting with OPTION. When the time is set, the sleep function is set the time to system off the system automatically. 1 Press and hold VOLUME 2 PRESET SNOOZE / SLEEP ENTER 1 Press and hold SNOOZE/ SLEEP for a preset amount of the front panel display. You can set to 5. 6 Exit option menu with ENTER. BASS*: Adjusts the low frequency response. * Also effective when you are using headphones...
Owners Manual
Page 16
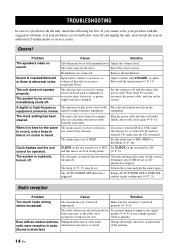
... incorrect. Input source volume is excessive, or volume of this unit is weak. Setting AUTO POWER OFF to TIME OFF enables to SRC+BEEP or SOURCE (☞ P. 10). Select the correct source. A digital or high-frequency The unit may be operated. no sound. If you selected may have selected CD, make no music is excessive (especially Bass). The system is inserted. Radio reception Problem Cause Solution Too much noise during stereo broadcast.
... incorrect. Input source volume is excessive, or volume of this unit is weak. Setting AUTO POWER OFF to TIME OFF enables to SRC+BEEP or SOURCE (☞ P. 10). Select the correct source. A digital or high-frequency The unit may be operated. no sound. If you selected may have selected CD, make no music is excessive (especially Bass). The system is inserted. Radio reception Problem Cause Solution Too much noise during stereo broadcast.
Owners Manual
Page 17
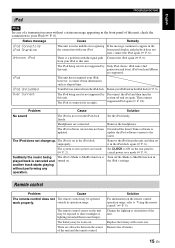
... The remote control may be exposed to power save mode (☞ P. 4). Unknown iPod There is not supported by Disconnect the iPod and then turn the this unit. The iPod being used is a problem with the signal path Connect the iPod again (☞ P. 6). front panel display and playback does not start, connect the iPod again (☞ P. 6). generation and later), iPod touch and iPhone are connected. English TROUBLESHOOTING iPod Note In case of a transmission error...
... The remote control may be exposed to power save mode (☞ P. 4). Unknown iPod There is not supported by Disconnect the iPod and then turn the this unit. The iPod being used is a problem with the signal path Connect the iPod again (☞ P. 6). front panel display and playback does not start, connect the iPod again (☞ P. 6). generation and later), iPod touch and iPhone are connected. English TROUBLESHOOTING iPod Note In case of a transmission error...
Owners Manual
Page 18
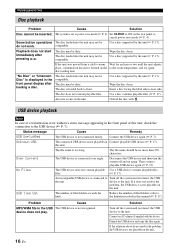
Some button operations The disc loaded into the unit may be do not resolve the problem, the USB device is not playable on the rear panel to power save mode (☞ P. 4). Use a disc supported by the unit (☞ P. 17). The disc may not be dirty. Use a disc supported by the unit (☞ P. 17). Use a disc supported by the unit (☞ P. 17). Insert a disc facing the label side to the room...
Some button operations The disc loaded into the unit may be do not resolve the problem, the USB device is not playable on the rear panel to power save mode (☞ P. 4). Use a disc supported by the unit (☞ P. 17). The disc may not be dirty. Use a disc supported by the unit (☞ P. 17). Use a disc supported by the unit (☞ P. 17). Insert a disc facing the label side to the room...
Owners Manual
Page 19
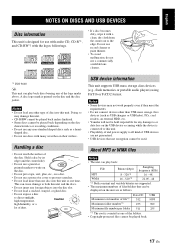
... one time. Hold a disc by its edge (and the center hole). • Do not use a pencil or pointed marker to write on the disc. • Do not put a tape, seal, glue, etc., on a disc. • Do not use a protective cover to direct sunlight,...connected to this unit. • Playability of and power supply to all kind of USB devices are not guaranteed. • USB devices that can be displayed on the unit are supported. • The maximum numbers of files/folders that use encryption cannot be used. shaped disc. • Do not use discs with a clean, dry cloth from the center...
... one time. Hold a disc by its edge (and the center hole). • Do not use a pencil or pointed marker to write on the disc. • Do not put a tape, seal, glue, etc., on a disc. • Do not use a protective cover to direct sunlight,...connected to this unit. • Playability of and power supply to all kind of USB devices are not guaranteed. • USB devices that can be displayed on the unit are supported. • The maximum numbers of files/folders that use encryption cannot be used. shaped disc. • Do not use discs with a clean, dry cloth from the center...
Owners Manual
Page 20
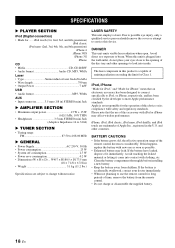
... away from the remote control. • Do not charge or disassemble the supplied battery. 18 En If the battery is plugged into contact with safety and regulatory standards. The laser component in ) STEREO mini Jack X AMPLIFIER SECTION • Maximum output power 15 W + 15 W (6 Ω 1 kHz, 10% THD) • Headphones 3.5 mm STEREO mini Jack (Adaptive Impedance 16 to 32 Ω) X TUNER SECTION • Tuning range FM 87.50...
... away from the remote control. • Do not charge or disassemble the supplied battery. 18 En If the battery is plugged into contact with safety and regulatory standards. The laser component in ) STEREO mini Jack X AMPLIFIER SECTION • Maximum output power 15 W + 15 W (6 Ω 1 kHz, 10% THD) • Headphones 3.5 mm STEREO mini Jack (Adaptive Impedance 16 to 32 Ω) X TUNER SECTION • Tuning range FM 87.50...
Owners Manual
Page 21
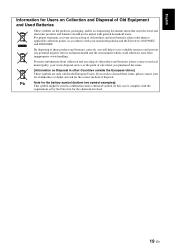
... local municipality, your waste disposal service or the point of sale where you wish to discard these products and batteries correctly, you will help to applicable collection points, in ...Users on Collection and Disposal of Old Equipment and Used Batteries These symbols on the products, packaging, and/or accompanying documents mean that used electrical and electronic products and batteries should not be used... and the Directives 2002/96/EC and 2006/66/EC. In this case it complies with the requirement set by the Directive for the correct method of old products and used in combination...
... local municipality, your waste disposal service or the point of sale where you wish to discard these products and batteries correctly, you will help to applicable collection points, in ...Users on Collection and Disposal of Old Equipment and Used Batteries These symbols on the products, packaging, and/or accompanying documents mean that used electrical and electronic products and batteries should not be used... and the Directives 2002/96/EC and 2006/66/EC. In this case it complies with the requirement set by the Directive for the correct method of old products and used in combination...


