
Owner's Manual
Page 3
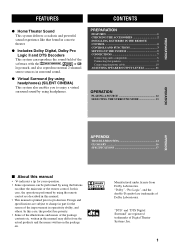
... 1 CHECKING THE ACCESSORIES 2 INSTALLING BATTERIES IN THE REMOTE CONTROL 2 CONTROLS AND FUNCTIONS 3 SETTING UP THE SYSTEM 5 CONNECTIONS 7 Connecting audio components 8 Connecting the speakers 9 Connecting the power cable 10 ADJUSTING SPEAKER OUTPUT LEVELS 11 OPERATION PLAYING A SOURCE 12 SELECTING THE SURROUND MODE 13 OPERATION APPENDIX APPENDIX TROUBLESHOOTING 14 GLOSSARY 16 SPECIFICATIONS 17 I About this...
... 1 CHECKING THE ACCESSORIES 2 INSTALLING BATTERIES IN THE REMOTE CONTROL 2 CONTROLS AND FUNCTIONS 3 SETTING UP THE SYSTEM 5 CONNECTIONS 7 Connecting audio components 8 Connecting the speakers 9 Connecting the power cable 10 ADJUSTING SPEAKER OUTPUT LEVELS 11 OPERATION PLAYING A SOURCE 12 SELECTING THE SURROUND MODE 13 OPERATION APPENDIX APPENDIX TROUBLESHOOTING 14 GLOSSARY 16 SPECIFICATIONS 17 I About this...

Owner's Manual
Page 4
... battery compartment cover. 2 Insert the two batteries (AAA, R03, UM-4 type) with clothing, etc. The batteries can be set ) Non-skid pads (for the center speaker) (3 sets: 24 pieces) AC adaptor (LSE9802B1540) 3.5 mm stereo mini/ RCA stereo pin cable Stand (for the amplifier unit) Screws (2 pieces) Optical cable Audio pin cable...
... battery compartment cover. 2 Insert the two batteries (AAA, R03, UM-4 type) with clothing, etc. The batteries can be set ) Non-skid pads (for the center speaker) (3 sets: 24 pieces) AC adaptor (LSE9802B1540) 3.5 mm stereo mini/ RCA stereo pin cable Stand (for the amplifier unit) Screws (2 pieces) Optical cable Audio pin cable...
Owner's Manual
Page 6
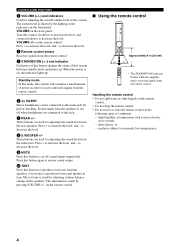
...Handling the remote control • Do not spill water or other liquids on the front panel: Turn this button to reproduce a test tone from each speaker in places subject to this jack. 7 REAR +/- in turn. The current level is shown by pressing VOLUME +/- Press + to increase the level,... and - to decrease the level. 9 MUTE Press this button to this mini-jack for adjusting volume balance among all the speakers. The test tone is cut off when headphones are connected to cut off sound output temporarily. high humidity or temperature such as near a heater,...
...Handling the remote control • Do not spill water or other liquids on the front panel: Turn this button to reproduce a test tone from each speaker in places subject to this jack. 7 REAR +/- in turn. The current level is shown by pressing VOLUME +/- Press + to increase the level,... and - to decrease the level. 9 MUTE Press this button to this mini-jack for adjusting volume balance among all the speakers. The test tone is cut off when headphones are connected to cut off sound output temporarily. high humidity or temperature such as near a heater,...
Owner's Manual
Page 7
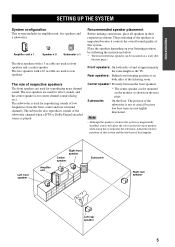
... is for reproducing sounds of the listening room. On the floor. The rear speakers are used for center channel sound (dialog etc.). Amplifier unit x 1 Speaker x 5 Subwoofer x 1 The three speakers with a 10 m cable are used for effect sounds, and the center speaker is magnetically shielded, it controls the overall sound quality of this system and the...
... is for reproducing sounds of the listening room. On the floor. The rear speakers are used for center channel sound (dialog etc.). Amplifier unit x 1 Speaker x 5 Subwoofer x 1 The three speakers with a 10 m cable are used for effect sounds, and the center speaker is magnetically shielded, it controls the overall sound quality of this system and the...
Owner's Manual
Page 8
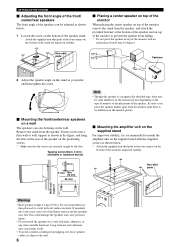
...on top of the monitor to the wall. 6 Do not mount them to prevent the speaker from falling. * Do not place the speaker on top of the monitor with an inclination of more than 10 degrees. Long-term use and vibrations may cause them to mount the amplifier unit on ... a wall with nails, adhesives, or any other unstable hardware. This could damage the speakers and cause personal injury. • Do not install the speakers on the wall. Non-skid 10؇ pads 10؇ Fastener 2 Adjust the speaker angle on the stand as shown in hardware stores) Ⅵ Mounting the amplifier unit ...
...on top of the monitor to the wall. 6 Do not mount them to prevent the speaker from falling. * Do not place the speaker on top of the monitor with an inclination of more than 10 degrees. Long-term use and vibrations may cause them to mount the amplifier unit on ... a wall with nails, adhesives, or any other unstable hardware. This could damage the speakers and cause personal injury. • Do not install the speakers on the wall. Non-skid 10؇ pads 10؇ Fastener 2 Adjust the speaker angle on the stand as shown in hardware stores) Ⅵ Mounting the amplifier unit ...
Owner's Manual
Page 9
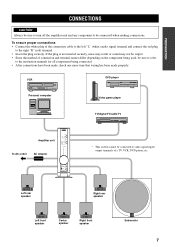
...connection and terminal names differ depending on the component being used, be connected when making connections. Left rear speaker Right rear speaker English Left front speaker Center speaker Right front speaker Subwoofer 7 If the plug is not inserted securely, noise may result or sound may not be output...DIGITAL 2 ANALOG MODE DTS DIGITAL PL MOVIE PL MUSIC VOLUME TRIM 7 +6 6 +4 5 +2 4 0 3 -2 2 -4 1 -6 SILENT Active Servo Technology STANDBY/ON TSS-10 HOME THEATER SOUND SYSTEM * This system cannot be connected to the right "R" (red) terminal. • Insert the plug securely.
...connection and terminal names differ depending on the component being used, be connected when making connections. Left rear speaker Right rear speaker English Left front speaker Center speaker Right front speaker Subwoofer 7 If the plug is not inserted securely, noise may result or sound may not be output...DIGITAL 2 ANALOG MODE DTS DIGITAL PL MOVIE PL MUSIC VOLUME TRIM 7 +6 6 +4 5 +2 4 0 3 -2 2 -4 1 -6 SILENT Active Servo Technology STANDBY/ON TSS-10 HOME THEATER SOUND SYSTEM * This system cannot be connected to the right "R" (red) terminal. • Insert the plug securely.
Owner's Manual
Page 10
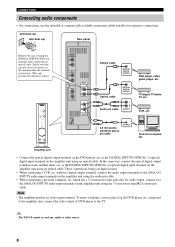
... the video output of dust.) INPUT DIGITAL 1 DIGITAL 2 ANALOG MODE DTS DIGITAL PL MOVIE PL MUSIC VOLUME TRIM 7 +6 6 +4 5 +2 4 0 3 -2 2 -4 1 -6 SILENT STANDBY/ON SPEAKER OUTPUTS FRONT L R REAR (SURROUND) L R CENTER S. y • The TSS-10 cannot record any audio or video source. 8 which has a 3.5 mm-stereo mini jack only for respective connections. CONNECTIONS Connecting audio components •...
... the video output of dust.) INPUT DIGITAL 1 DIGITAL 2 ANALOG MODE DTS DIGITAL PL MOVIE PL MUSIC VOLUME TRIM 7 +6 6 +4 5 +2 4 0 3 -2 2 -4 1 -6 SILENT STANDBY/ON SPEAKER OUTPUTS FRONT L R REAR (SURROUND) L R CENTER S. y • The TSS-10 cannot record any audio or video source. 8 which has a 3.5 mm-stereo mini jack only for respective connections. CONNECTIONS Connecting audio components •...
Owner's Manual
Page 11
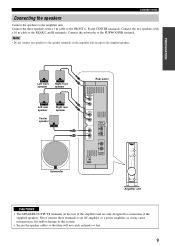
... 5 +2 4 0 3 -2 2 -4 1 -6 SILENT STANDBY/ON Amplifier unit CAUTIONS • The SPEAKER OUTPUTS terminals on the amplifier unit except for connection of the supplied speakers. Note • Do not connect any speakers to the REAR L and R terminals. Connect the subwoofer to the FRONT L, R and CENTER terminals.... Connect the three speakers with a 10 m cable to the speaker terminals on the rear of...
... 5 +2 4 0 3 -2 2 -4 1 -6 SILENT STANDBY/ON Amplifier unit CAUTIONS • The SPEAKER OUTPUTS terminals on the amplifier unit except for connection of the supplied speakers. Note • Do not connect any speakers to the REAR L and R terminals. Connect the subwoofer to the FRONT L, R and CENTER terminals.... Connect the three speakers with a 10 m cable to the speaker terminals on the rear of...
Owner's Manual
Page 13
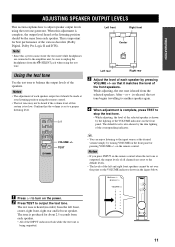
...; Since this system cannot enter the test mode while headphones are reset to the default levels. • The levels of the left rear speaker. After - on the front panel or pressing VOLUME +/- TEST Left front Right front Center Left rear Right rear 3 Adjust the level of...press TEST to stop the test tone. • While adjusting, the level of the selected speaker is heard from each speaker. PREPARATION ADJUSTING SPEAKER OUTPUT LEVELS This section explains how to adjust speaker output levels using the test tone. This is being outputted. Using the test tone Use the ...
...; Since this system cannot enter the test mode while headphones are reset to the default levels. • The levels of the left rear speaker. After - on the front panel or pressing VOLUME +/- TEST Left front Right front Center Left rear Right rear 3 Adjust the level of...press TEST to stop the test tone. • While adjusting, the level of the selected speaker is heard from each speaker. PREPARATION ADJUSTING SPEAKER OUTPUT LEVELS This section explains how to adjust speaker output levels using the test tone. This is being outputted. Using the test tone Use the ...
Owner's Manual
Page 14
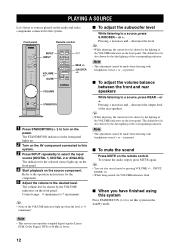
...system. 3 Press INPUT repeatedly to select the input source (DIGITAL 1, DIGITAL 2 or ANALOG). I To adjust the volume balance between the front and rear speakers While listening to a source, press REAR - Pressing + increases and - The volume level is shown by pressing VOLUME +/-, INPUT, MODE, etc. &#...lighting of 48 kHz or lower. 12 is pressed. or +. The default level is shown by the dim lighting of the rear speakers. decreases the output level of the corresponding indicator. PLAYING A SOURCE Let's listen to sources played on the front panel. Refer ...
...system. 3 Press INPUT repeatedly to select the input source (DIGITAL 1, DIGITAL 2 or ANALOG). I To adjust the volume balance between the front and rear speakers While listening to a source, press REAR - Pressing + increases and - The volume level is shown by pressing VOLUME +/-, INPUT, MODE, etc. &#...lighting of 48 kHz or lower. 12 is pressed. or +. The default level is shown by the dim lighting of the rear speakers. decreases the output level of the corresponding indicator. PLAYING A SOURCE Let's listen to sources played on the front panel. Refer ...
Owner's Manual
Page 15
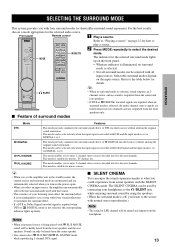
... simulates the surround sound effects of DTS encoded sources without altering the original sound orientation. This mode can be mixed and output from actual speakers with the SILENT CINEMA mode. I Feature of surround modes • When no surround mode is selected, sound output is set to what... When no indicator is illuminated, no surround mode is set the amplifier unit in 2channel stereo, and no sound is outputted from the front speakers only. This mode is not selected, the corresponding indicator lights up on the power again. • When you select an input source, the...
... simulates the surround sound effects of DTS encoded sources without altering the original sound orientation. This mode can be mixed and output from actual speakers with the SILENT CINEMA mode. I Feature of surround modes • When no surround mode is selected, sound output is set to what... When no indicator is illuminated, no surround mode is set the amplifier unit in 2channel stereo, and no sound is outputted from the front speakers only. This mode is not selected, the corresponding indicator lights up on the power again. • When you select an input source, the...
Owner's Manual
Page 16
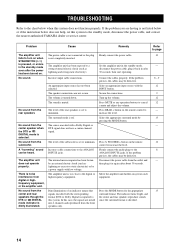
... pressing the MODE button. Move the amplifier unit further away from the center and rear speakers though the DTS or DIGITAL mode indicator is too close to the ANALOG INPUTS jacks. The indicator...appropriate surround mode by a power supply with the INPUT button. The power cable is not connected or the plug is decoded. 10 - 8 - 9 12 9 12 12 - 13 - 12 8 - 13 14 No sound from such equipment. Secure...the standby mode, disconnect the power cable, and contact the nearest authorized YAMAHA dealer or service center. If the problem you are having is off. Firmly connect the audio plugs...
... pressing the MODE button. Move the amplifier unit further away from the center and rear speakers though the DTS or DIGITAL mode indicator is too close to the ANALOG INPUTS jacks. The indicator...appropriate surround mode by a power supply with the INPUT button. The power cable is not connected or the plug is decoded. 10 - 8 - 9 12 9 12 12 - 13 - 12 8 - 13 14 No sound from such equipment. Secure...the standby mode, disconnect the power cable, and contact the nearest authorized YAMAHA dealer or service center. If the problem you are having is off. Firmly connect the audio plugs...
Owner's Manual
Page 17
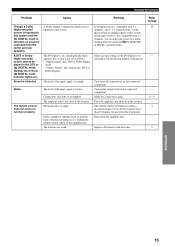
... system. (If the input source is not compatible with new ones. The DVD player, etc. Place the amplifier unit away from the center and rear speakers. Refer to page 13 - - - 8 - 9 - 4 - 2 APPENDIX English 15
... system. (If the input source is not compatible with new ones. The DVD player, etc. Place the amplifier unit away from the center and rear speakers. Refer to page 13 - - - 8 - 9 - 4 - 2 APPENDIX English 15
Owner's Manual
Page 18
... rear) into the human ear, but instead reflects off of walls, ceilings and other 5 channels in theaters with the 5.1 speaker configurations that accurate representations of all the surround modes can be used to the full-range reproduced by many theaters around the world... all 5.1 channels, Dolby Digital can be enjoyed using a matrix circuit. Dolby Surround is now installed in the home. I SILENT CINEMA YAMAHA has developed a natural, realistic sound effect DSP algorithm for low frequency effect. This new technology enables a discrete 5channel playback with six discrete...
... rear) into the human ear, but instead reflects off of walls, ceilings and other 5 channels in theaters with the 5.1 speaker configurations that accurate representations of all the surround modes can be used to the full-range reproduced by many theaters around the world... all 5.1 channels, Dolby Digital can be enjoyed using a matrix circuit. Dolby Surround is now installed in the home. I SILENT CINEMA YAMAHA has developed a natural, realistic sound effect DSP algorithm for low frequency effect. This new technology enables a discrete 5channel playback with six discrete...
Owner's Manual
Page 19
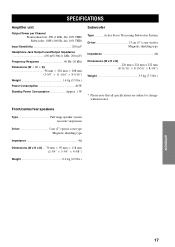
SPECIFICATIONS Amplifier unit Output Power per Channel Front/center/rear: 6W (1 kHz, 4Ω, 10% THD) Subwoofer: 18W (100 Hz, 4Ω, 10% THD) Input Sensitivity 200 mV Headphone Jack Output Level/Output Impedance 450 mV/30Ω (1 kHz, 200 ...13/16" ן8-3/4") Weight 3.3 kg (7.3 lbs.) * Please note that all specifications are subject to change without notice. Front/center/rear speakers Type Full range speaker system Acoustic suspension Driver 5 cm (2") spruce cone type Magnetic shielding type Impedance 4Ω Dimensions (W x H x D) ... 70 mm ן&#...
SPECIFICATIONS Amplifier unit Output Power per Channel Front/center/rear: 6W (1 kHz, 4Ω, 10% THD) Subwoofer: 18W (100 Hz, 4Ω, 10% THD) Input Sensitivity 200 mV Headphone Jack Output Level/Output Impedance 450 mV/30Ω (1 kHz, 200 ...13/16" ן8-3/4") Weight 3.3 kg (7.3 lbs.) * Please note that all specifications are subject to change without notice. Front/center/rear speakers Type Full range speaker system Acoustic suspension Driver 5 cm (2") spruce cone type Magnetic shielding type Impedance 4Ω Dimensions (W x H x D) ... 70 mm ן&#...


