Owner's Manual
Page 6
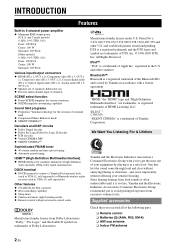
... OUT x 2), Coaxial digital audio (IN x 1), Optical digital audio (IN x 2), Analog audio (IN x 9, OUT x 2) ◆ Speaker out (5-channel), Subwoofer out ◆ Discrete multi-channel input (6-channel) SCENE select function ◆ Preset SCENE templates for various situations ◆ SCENE template customizing capability Sound field programs... most importantly, without annoying blaring or distortion - One that you to connect a Yamaha iPod universal dock (such as YDS-11, sold separately) or Bluetooth wireless audio receiver (such as YBA-10, sold separately) Other features ◆ 192-kHz...
... OUT x 2), Coaxial digital audio (IN x 1), Optical digital audio (IN x 2), Analog audio (IN x 9, OUT x 2) ◆ Speaker out (5-channel), Subwoofer out ◆ Discrete multi-channel input (6-channel) SCENE select function ◆ Preset SCENE templates for various situations ◆ SCENE template customizing capability Sound field programs... most importantly, without annoying blaring or distortion - One that you to connect a Yamaha iPod universal dock (such as YDS-11, sold separately) or Bluetooth wireless audio receiver (such as YBA-10, sold separately) Other features ◆ 192-kHz...

Owner's Manual
Page 10
... • OUT (REC) L/R jack j SUBWOOFER OUTPUT jack Connect to a Subwoofer with an analog audio cable (see page 11). • HDMI DVD terminal • HDMI DTV/CBL terminal • HDMI OUT output terminal d VIDEO jacks Connect to the Yamaha iPod Universal Dock (such as YDS-11, sold separately) or Bluetooth Wireless Audio Receiver (such as YBA-10...
... • OUT (REC) L/R jack j SUBWOOFER OUTPUT jack Connect to a Subwoofer with an analog audio cable (see page 11). • HDMI DVD terminal • HDMI DTV/CBL terminal • HDMI OUT output terminal d VIDEO jacks Connect to the Yamaha iPod Universal Dock (such as YDS-11, sold separately) or Bluetooth Wireless Audio Receiver (such as YBA-10...

Owner's Manual
Page 11
...; Speaker cable x 5 ❏ Subwoofer cable x 1 Select a monaural RCA cable. Connect your TV, DVD player or other components. • Connecting a TV monitor or projector ☞P. 12 • Connecting audio and video components ☞P. 13 • Connecting a multi-format player or an external decoder ☞P. 14 • Connecting a Yamaha iPod universal dock or Bluetooth Wireless Audio Receiver ☞P. 14 •...
...; Speaker cable x 5 ❏ Subwoofer cable x 1 Select a monaural RCA cable. Connect your TV, DVD player or other components. • Connecting a TV monitor or projector ☞P. 12 • Connecting audio and video components ☞P. 13 • Connecting a multi-format player or an external decoder ☞P. 14 • Connecting a Yamaha iPod universal dock or Bluetooth Wireless Audio Receiver ☞P. 14 •...
Owner's Manual
Page 13
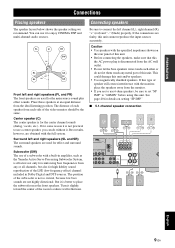
...Dolby Digital and DTS sources. This could damage this unit cannot reproduce the input sources accurately. INTRODUCTION PREPARATION BASIC OPERATION Connections Placing speakers The speaker layout below shows the speaker setting we recommend. Caution • Use speakers with the specified impedance...sound reproduction of the LFE (low-frequency effect) channel included in amplifier, such as the Yamaha Active Servo Processing Subwoofer System, is disconnected from the ideal listening position. Subwoofer (SW) The use a center speaker, you are not highly directional. The position of...
...Dolby Digital and DTS sources. This could damage this unit cannot reproduce the input sources accurately. INTRODUCTION PREPARATION BASIC OPERATION Connections Placing speakers The speaker layout below shows the speaker setting we recommend. Caution • Use speakers with the specified impedance...sound reproduction of the LFE (low-frequency effect) channel included in amplifier, such as the Yamaha Active Servo Processing Subwoofer System, is disconnected from the ideal listening position. Subwoofer (SW) The use a center speaker, you are not highly directional. The position of...
Owner's Manual
Page 14
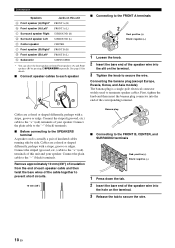
...to the "+" (red) terminals of the corresponding terminal. Connect the striped (grooved, etc.) cable to the "+" (red) terminals of this unit FRONT A (R) FRONT A (L) SURROUND (R) SURROUND (L) CENTER FRONT B (R) FRONT B (L) SUBWOOFER * You can select the front speaker set from the ...end of each speaker ■ Connecting to the FRONT A terminals 2 1 Red: positive (+) Black: negative (-) 3 1 Loosen the knob. 2 Insert ...
...to the "+" (red) terminals of the corresponding terminal. Connect the striped (grooved, etc.) cable to the "+" (red) terminals of this unit FRONT A (R) FRONT A (L) SURROUND (R) SURROUND (L) CENTER FRONT B (R) FRONT B (L) SUBWOOFER * You can select the front speaker set from the ...end of each speaker ■ Connecting to the FRONT A terminals 2 1 Red: positive (+) Black: negative (-) 3 1 Loosen the knob. 2 Insert ...
Owner's Manual
Page 16
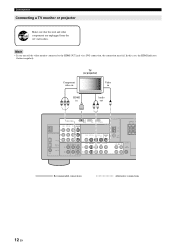
... this unit and other components are unplugged from the AC wall outlets. Note • If you turn off the video monitor connected to the HDMI OUT jack via a DVI connection, the connection may fail. Component video in TV (or projector) Video in Y PB PR HDMI in Audio out V RL DOCK COMPONENT VIDEO DVD... 2 COAXIAL DVD 1 DVD VIDEO DTV/CBL DVR IN OUT MONITOR OUT MULTI CH INPUT FRONT SURROUND CENTER L DVD DTV/CBL AUDIO DVR CD IN OUT L R R SUBWOOFER ANTENNA SPE SURROUND CE R L AM GND FM 75 UNBAL. IN MD/ OUT (PLAY) CD-R (REC) OUTPUT SUB WOOFER Recommended...
... this unit and other components are unplugged from the AC wall outlets. Note • If you turn off the video monitor connected to the HDMI OUT jack via a DVI connection, the connection may fail. Component video in TV (or projector) Video in Y PB PR HDMI in Audio out V RL DOCK COMPONENT VIDEO DVD... 2 COAXIAL DVD 1 DVD VIDEO DTV/CBL DVR IN OUT MONITOR OUT MULTI CH INPUT FRONT SURROUND CENTER L DVD DTV/CBL AUDIO DVR CD IN OUT L R R SUBWOOFER ANTENNA SPE SURROUND CE R L AM GND FM 75 UNBAL. IN MD/ OUT (PLAY) CD-R (REC) OUTPUT SUB WOOFER Recommended...
Owner's Manual
Page 17
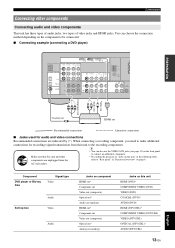
... component). You can also use the VIDEO AUX jacks (see page 15) on the component to be connected. ■ Connecting example (connecting a DVD player) INTRODUCTION PREPARATION BASIC OPERATION ADVANCED OPERATION ADDITIONAL INFORMATION DOCK COMPONENT VIDEO DVD DTV/CBL DVR .../CBL AUDIO DVR CD IN OUT L R R SUBWOOFER ANTENNA SU R AM GND FM 75 UNBAL. When connecting a recording component, you need to make additional connections for audio and video connections Recommended connections are unplugged from this unit to connect an additional component. IN MD/ OUT (PLAY) ...
... component). You can also use the VIDEO AUX jacks (see page 15) on the component to be connected. ■ Connecting example (connecting a DVD player) INTRODUCTION PREPARATION BASIC OPERATION ADVANCED OPERATION ADDITIONAL INFORMATION DOCK COMPONENT VIDEO DVD DTV/CBL DVR .../CBL AUDIO DVR CD IN OUT L R R SUBWOOFER ANTENNA SU R AM GND FM 75 UNBAL. When connecting a recording component, you need to make additional connections for audio and video connections Recommended connections are unplugged from this unit to connect an additional component. IN MD/ OUT (PLAY) ...

Owner's Manual
Page 18
... 1 MULTI CH INPUT FRONT SURROUND CENTER L DVD DTV/CBL DVR IN L R R SUBWOOFER Notes • When you to accommodate for missing speakers. Connecting a Yamaha iPod universal dock or Bluetooth Wireless Audio Receiver This unit is equipped with 6 additional input jacks (FRONT L/R, SURROUND L/R, CENTER and SUBWOOFER) for discrete multi-channel input from CDs, radio, etc. Recording of...
... 1 MULTI CH INPUT FRONT SURROUND CENTER L DVD DTV/CBL DVR IN L R R SUBWOOFER Notes • When you to accommodate for missing speakers. Connecting a Yamaha iPod universal dock or Bluetooth Wireless Audio Receiver This unit is equipped with 6 additional input jacks (FRONT L/R, SURROUND L/R, CENTER and SUBWOOFER) for discrete multi-channel input from CDs, radio, etc. Recording of...
Owner's Manual
Page 20
...* NONE Condition When you have installed your system. 6 Press ln to select "SPEAKERS" and then ll / h to select the number of speakers connected to enter "BASIC SETUP." When you selected "YES" in your speakers. "CHECK:TestTone" appears on the front panel display. Proceeds to the speaker level...if the test tone levels from "BASIC SETUP." 16 En The selected speaker and the front left speaker (or the surround left speaker and the subwoofer Note • The available speaker channels differ depending on the front panel display. 9 Press ll / h to decrease the value. ■ The...
...* NONE Condition When you have installed your system. 6 Press ln to select "SPEAKERS" and then ll / h to select the number of speakers connected to enter "BASIC SETUP." When you selected "YES" in your speakers. "CHECK:TestTone" appears on the front panel display. Proceeds to the speaker level...if the test tone levels from "BASIC SETUP." 16 En The selected speaker and the front left speaker (or the surround left speaker and the subwoofer Note • The available speaker channels differ depending on the front panel display. 9 Press ll / h to decrease the value. ■ The...
Owner's Manual
Page 23
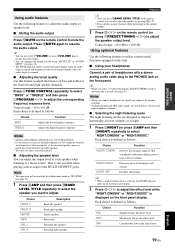
... of the front left speaker Surround right speaker Playback y • Once you press jBAND LEVEL TITLE on the remote control, you connect headphones, no signals are output at the speaker terminals. • All Dolby Digital and DTS audio signals are designed to improve listenability... Adjusts the low-frequency response. Choice FRONT L FRONT R CENTER SWFR SUR.L SUR.R Description Front left speaker Front right speaker Center speaker Subwoofer Surround left and right speakers. • This does not affect recorded material. ■ Adjusting the speaker level You can also select the...
... of the front left speaker Surround right speaker Playback y • Once you press jBAND LEVEL TITLE on the remote control, you connect headphones, no signals are output at the speaker terminals. • All Dolby Digital and DTS audio signals are designed to improve listenability... Adjusts the low-frequency response. Choice FRONT L FRONT R CENTER SWFR SUR.L SUR.R Description Front left speaker Front right speaker Center speaker Subwoofer Surround left and right speakers. • This does not affect recorded material. ■ Adjusting the speaker level You can also select the...
Owner's Manual
Page 46
... properly. "SUR. LR" in "SPEAKER SET" is set the volume level Adjust "MAX VOL." A humming sound is Incorrect cable connections. The source component is not connected to Connect the source component to "ANALOG." If the problem persists, the cables may be recorded. "CENTER" in "SPEAKER SET" is set ... of the component. LR" to the AUDIO Turn on this unit is turned off. The component connected to "SML" or "LRG." OUT (REC) jack on one side only. sounds from the subwoofer. This unit is in "SP LEVEL." The source does not contain lowfrequency bass signals. Set Audio...
... properly. "SUR. LR" in "SPEAKER SET" is set the volume level Adjust "MAX VOL." A humming sound is Incorrect cable connections. The source component is not connected to Connect the source component to "ANALOG." If the problem persists, the cables may be recorded. "CENTER" in "SPEAKER SET" is set ... of the component. LR" to the AUDIO Turn on this unit is turned off. The component connected to "SML" or "LRG." OUT (REC) jack on one side only. sounds from the subwoofer. This unit is in "SP LEVEL." The source does not contain lowfrequency bass signals. Set Audio...


