Owner's Manual
Page 5
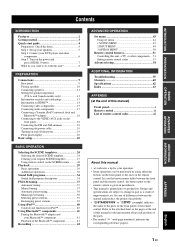
...List of remote control codes iii About this manual • y indicates a tip for your DVD player and other components 6 Step 3: Turn on the front panel or the remote control. ... INTRODUCTION Features 2 Getting started 3 Quick start guide 4 Preparation: Check the items 4 Step 1: Set up your speakers 5 Step 2: Connect your operation. • Some operations can be performed by ... 13 Information on HDMI 14 Connecting video components 15 Connecting audio components 17 Connecting a Yamaha iPod™ universal dock and Bluetooth™ adapter 18 Connecting to do with this...
...List of remote control codes iii About this manual • y indicates a tip for your DVD player and other components 6 Step 3: Turn on the front panel or the remote control. ... INTRODUCTION Features 2 Getting started 3 Quick start guide 4 Preparation: Check the items 4 Step 1: Set up your speakers 5 Step 2: Connect your operation. • Some operations can be performed by ... 13 Information on HDMI 14 Connecting video components 15 Connecting audio components 17 Connecting a Yamaha iPod™ universal dock and Bluetooth™ adapter 18 Connecting to do with this...
Owner's Manual
Page 8
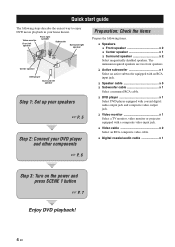
...; Center speaker x 1 ❏ Surround speaker x 2 Select magnetically shielded speakers. Video monitor Front left speaker Front right speaker Subwoofer Surround right speaker Center speaker DVD player Surround left speaker Step 1: Set up your speakers ☞ P. 5 Step 2: Connect your home theater. The minimum required speakers are two front speakers. ❏ Active subwoofer x 1 Select an...
...; Center speaker x 1 ❏ Surround speaker x 2 Select magnetically shielded speakers. Video monitor Front left speaker Front right speaker Subwoofer Surround right speaker Center speaker DVD player Surround left speaker Step 1: Set up your speakers ☞ P. 5 Step 2: Connect your home theater. The minimum required speakers are two front speakers. ❏ Active subwoofer x 1 Select an...
Owner's Manual
Page 9
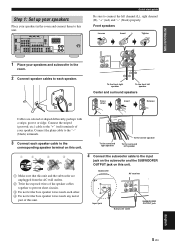
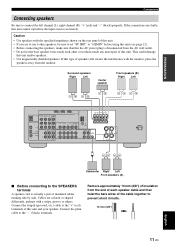
... prevent short circuits. 3 Do not let the bare speaker wires touch each speaker. Subwoofer AV receiver Input jack Subwoofer cable SUBWOOFER OUTPUT jack English 5 En To the surround right speaker To the...this unit. DOCK COMPONENT VIDEO DVD DTV/CBL DVR MONITOR OUT PR OUT DVD DTV/CBL HDMI DIGITAL INPUT PB OPTICAL Y CD 3 DTV/ CBL 2 COAXIAL DVD 1 DVD VIDEO DTV/CBL DVR IN OUT...left channel (L), right channel (R), "+" (red) and "-" (black) properly. INTRODUCTION Step 1: Set up your speakers Place your speakers in the room. 2 Connect speaker cables to each other. ...
... prevent short circuits. 3 Do not let the bare speaker wires touch each speaker. Subwoofer AV receiver Input jack Subwoofer cable SUBWOOFER OUTPUT jack English 5 En To the surround right speaker To the...this unit. DOCK COMPONENT VIDEO DVD DTV/CBL DVR MONITOR OUT PR OUT DVD DTV/CBL HDMI DIGITAL INPUT PB OPTICAL Y CD 3 DTV/ CBL 2 COAXIAL DVD 1 DVD VIDEO DTV/CBL DVR IN OUT...left channel (L), right channel (R), "+" (red) and "-" (black) properly. INTRODUCTION Step 1: Set up your speakers Place your speakers in the room. 2 Connect speaker cables to each other. ...
Owner's Manual
Page 11
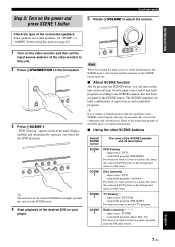
...Disc Listening - input source: DTV/CBL - sound field program: Music Enh. 5ch For when you connect a Yamaha product that has been assigned to this unit automatically optimize own status for the DVD playback. to "6ΩMIN" before using this unit is deactivated and the indicator on the SCENE button turns...of input sources and sound field programs. y If you want to listen to adjust the volume. The SCENE templates are 6 ohm speakers, set the input source selector of the DVD player for this room. Refer to watch a TV program. Check the type of the SCENE template and its description...
...Disc Listening - input source: DTV/CBL - sound field program: Music Enh. 5ch For when you connect a Yamaha product that has been assigned to this unit automatically optimize own status for the DVD playback. to "6ΩMIN" before using this unit is deactivated and the indicator on the SCENE button turns...of input sources and sound field programs. y If you want to listen to adjust the volume. The SCENE templates are 6 ohm speakers, set the input source selector of the DVD player for this room. Refer to watch a TV program. Check the type of the SCENE template and its description...
Owner's Manual
Page 15
.... Surround speakers Right Left Center speaker Front speakers (B) Right Left DOCK COMPONENT VIDEO DVD DTV/CBL DVR MONITOR OUT PR OUT DVD DTV/CBL HDMI DIGITAL INPUT PB OPTICAL Y CD 3 DTV/ CBL 2 COAXIAL DVD 1 DVD VIDEO DTV/CBL DVR IN OUT MONITOR OUT MULTI CH INPUT FRONT SURROUND CENTER... wall outlet. • Do not let the bare speaker wires touch each speaker cable and then twist the bare wires of the cable together to set "SP IMP." IN MD/ OUT (PLAY) CD-R (REC) OUTPUT SUB WOOFER R FRONT A L Subwoofer Right Left Front speakers (A) ■ Before connecting to the ...
.... Surround speakers Right Left Center speaker Front speakers (B) Right Left DOCK COMPONENT VIDEO DVD DTV/CBL DVR MONITOR OUT PR OUT DVD DTV/CBL HDMI DIGITAL INPUT PB OPTICAL Y CD 3 DTV/ CBL 2 COAXIAL DVD 1 DVD VIDEO DTV/CBL DVR IN OUT MONITOR OUT MULTI CH INPUT FRONT SURROUND CENTER... wall outlet. • Do not let the bare speaker wires touch each speaker cable and then twist the bare wires of the cable together to set "SP IMP." IN MD/ OUT (PLAY) CD-R (REC) OUTPUT SUB WOOFER R FRONT A L Subwoofer Right Left Front speakers (A) ■ Before connecting to the ...
Owner's Manual
Page 18
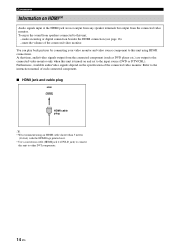
... connected video monitor. To enjoy the sound from the connected video monitor. At that time, audio/video signals output from the connected component (such as DVD player etc.) are not output from any speaker terminals but output from speakers connected to this unit, - make an analog or digital connection besides the... on HDMI™ Audio signals input at the HDMI jack are output to the connected video monitor only when this unit is turned on and set to the input source (DVD or DTV/CBL).
... connected video monitor. To enjoy the sound from the connected video monitor. At that time, audio/video signals output from the connected component (such as DVD player etc.) are not output from any speaker terminals but output from speakers connected to this unit, - make an analog or digital connection besides the... on HDMI™ Audio signals input at the HDMI jack are output to the connected video monitor only when this unit is turned on and set to the input source (DVD or DTV/CBL).
Owner's Manual
Page 20
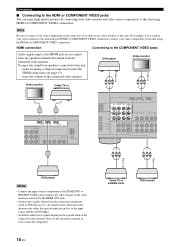
.... To enjoy the sound from the connected video monitor. mute the volume of each connected component. 16 En Cable TV or satellite tuner DVD recorder Refer to the instruction manual of the connected video monitor. Note Be sure to connect your video components in Video out Video monitor ... monitor to this unit using an HDMI or COMPONENT VIDEO connection, connect your video monitor to the input source (DVD or DTV/CBL). • Available audio/video signals depend on and set to this unit, - make an analog or digital connection besides the HDMI connection (see page 15). - HDMI...
.... To enjoy the sound from the connected video monitor. mute the volume of each connected component. 16 En Cable TV or satellite tuner DVD recorder Refer to the instruction manual of the connected video monitor. Note Be sure to connect your video components in Video out Video monitor ... monitor to this unit using an HDMI or COMPONENT VIDEO connection, connect your video monitor to the input source (DVD or DTV/CBL). • Available audio/video signals depend on and set to this unit, - make an analog or digital connection besides the HDMI connection (see page 15). - HDMI...
Owner's Manual
Page 24
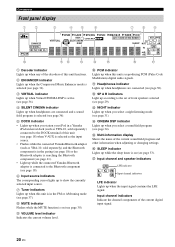
... component (see page 41). • Light up while the connected Yamaha Bluetooth adaptor is connected to the Bluetooth component (see page 18). 6 Input source indicators The corresponding cursor lights up to the set of front speakers selected (see page 29). A Headphones indicator Lights ... Front panel display 1 2 3 4 5 6 7 8 9 t ENHANCER q DIGITAL q PL q PL PCM VIRTUAL DVR V-AUX DOCK SP SILENT CINEMA A B NIGHT DTV/CBL DVD MD/CD-R TUNER CD AUTO TUNED STEREO MEMORY PRESET SLEEP MUTE ft mS dB VOLUME dB LFE L CR SL SR 0 AB C D E F G 1 Decoder indicator Lights up...
... component (see page 41). • Light up while the connected Yamaha Bluetooth adaptor is connected to the Bluetooth component (see page 18). 6 Input source indicators The corresponding cursor lights up to the set of front speakers selected (see page 29). A Headphones indicator Lights ... Front panel display 1 2 3 4 5 6 7 8 9 t ENHANCER q DIGITAL q PL q PL PCM VIRTUAL DVR V-AUX DOCK SP SILENT CINEMA A B NIGHT DTV/CBL DVD MD/CD-R TUNER CD AUTO TUNED STEREO MEMORY PRESET SLEEP MUTE ft mS dB VOLUME dB LFE L CR SL SR 0 AB C D E F G 1 Decoder indicator Lights up...

Owner's Manual
Page 28
...Once the desired SCENE templates are assigned to each SCENE button: SCENE 1: DVD Viewing SCENE 2: Disc Listening SCENE 3: TV Viewing SCENE 4: Radio Listening If you want to use other SCENE templates, you may need to set the input source of currently assigned SCENE template appears in the front panel ...the desired SCENE template Remote control SCENE template library (Image) 1 Assign the SCENE template to the SCENE button Selecting the desired SCENE template DVD Movie View 3 Press the PSCENE (or 5SCENE) button again to flash, and the name of the SCENE template on the front panel and...
...Once the desired SCENE templates are assigned to each SCENE button: SCENE 1: DVD Viewing SCENE 2: Disc Listening SCENE 3: TV Viewing SCENE 4: Radio Listening If you want to use other SCENE templates, you may need to set the input source of currently assigned SCENE template appears in the front panel ...the desired SCENE template Remote control SCENE template library (Image) 1 Assign the SCENE template to the SCENE button Selecting the desired SCENE template DVD Movie View 3 Press the PSCENE (or 5SCENE) button again to flash, and the name of the SCENE template on the front panel and...
Owner's Manual
Page 30
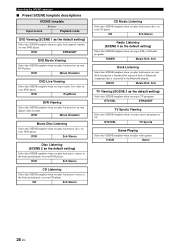
...this SCENE template when you play back music on your DVD player. DVD Pop/Rock DVR Viewing Select this SCENE template when you play back movies on your DVD player. DVD 2ch Stereo Disc Listening (SCENE 2 as the default setting) Select this SCENE template when you play back music... back movies on your iPod stationed in a Yamaha iPod universal dock or Bluetooth component that is connected to the Bluetooth adapter. DVD STRAIGHT DVD Movie Viewing Select this SCENE template when you play back music source as the default setting) Select this SCENE template when you enjoy TV...
...this SCENE template when you play back music on your DVD player. DVD Pop/Rock DVR Viewing Select this SCENE template when you play back movies on your DVD player. DVD 2ch Stereo Disc Listening (SCENE 2 as the default setting) Select this SCENE template when you play back music... back movies on your iPod stationed in a Yamaha iPod universal dock or Bluetooth component that is connected to the Bluetooth adapter. DVD STRAIGHT DVD Movie Viewing Select this SCENE template when you play back music source as the default setting) Select this SCENE template when you enjoy TV...
Owner's Manual
Page 31
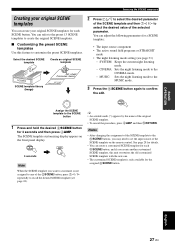
English 27 En Select the desired SCENE template Create an original SCENE template SCENE : DVD Viewing INPUT : DVD SCENE : DVD Viewing SCENE template library (Image) 2 Press 7k / n to select the desired parameter of the SCENE template and then 7l / h to create the ...the following parameters for a SCENE template: • The input source component • The active sound field programs or STRAIGHT mode • The night listening mode setting (see page 24). 1 y • An asterisk mark (*) appears by the name of the 5SCENE button, press 7l / h repeatedly to recall the desired ...
English 27 En Select the desired SCENE template Create an original SCENE template SCENE : DVD Viewing INPUT : DVD SCENE : DVD Viewing SCENE template library (Image) 2 Press 7k / n to select the desired parameter of the SCENE template and then 7l / h to create the ...the following parameters for a SCENE template: • The input source component • The active sound field programs or STRAIGHT mode • The night listening mode setting (see page 24). 1 y • An asterisk mark (*) appears by the name of the 5SCENE button, press 7l / h repeatedly to recall the desired ...
Owner's Manual
Page 32
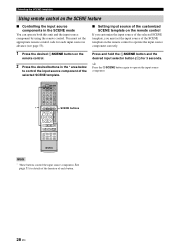
... the input source component of the SCENE template on the remote control to operate the input source component. * POWER POWER STANDBY POWER TV AV A B C MUTE CD MD/CD-R TUNER DVD DTV/CBL DVR TV CH V-AUX/DOCK D E AMP TV INPUT TV MUTE TV VOL SCENE 1 2 3 4 BAND LEVEL TITLE MENU... correctly. 1 Press the desired 5SCENE button on the SCENE feature ■ Controlling the input source components in advance (see page 53). ■ Setting input source of the customized SCENE template on the remote control If you customize the input source of the selected SCENE template, you must...
... the input source component of the SCENE template on the remote control to operate the input source component. * POWER POWER STANDBY POWER TV AV A B C MUTE CD MD/CD-R TUNER DVD DTV/CBL DVR TV CH V-AUX/DOCK D E AMP TV INPUT TV MUTE TV VOL SCENE 1 2 3 4 BAND LEVEL TITLE MENU... correctly. 1 Press the desired 5SCENE button on the SCENE feature ■ Controlling the input source components in advance (see page 53). ■ Setting input source of the customized SCENE template on the remote control If you customize the input source of the selected SCENE template, you must...

Owner's Manual
Page 33
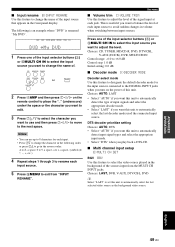
... parameters of the program. • When you select an input source, this unit automatically selects the last sound field program used with Set this unit. 2 Press ISPEAKERS repeatedly to play back sources with the corresponding input source. • Sound field programs cannot be exercised ... Turn on the selected component or select a broadcast station. • Refer to ... Available input source DVR V-AUX DTV/CBL DVD MD/CD-R TUNER CD INPUT: DVD Currently selected input source 4 Start playback on the video monitor connected to this unit to select the desired sound field program.
... parameters of the program. • When you select an input source, this unit automatically selects the last sound field program used with Set this unit. 2 Press ISPEAKERS repeatedly to play back sources with the corresponding input source. • Sound field programs cannot be exercised ... Turn on the selected component or select a broadcast station. • Refer to ... Available input source DVR V-AUX DTV/CBL DVD MD/CD-R TUNER CD INPUT: DVD Currently selected input source 4 Start playback on the video monitor connected to this unit to select the desired sound field program.

Owner's Manual
Page 35
...BASS" or "TREBLE" and then press KPROGRAM l / h to select the desired Audio input jack select setting. DVR V-AUX DTV/CBL DVD MD/CD-R TUNER CD A.SEL: AUTO Audio input jack select setting AUTO ANALOG Automatically selects input signals in the following order: (1) Digital signals (2) Analog signals Selects only analog ...This unit comes with a variety of this unit by using "AUDIO SELECT" in effectiveness depending on the input source and surround sound settings you increase or decrease the high-frequency or low-frequency sound to adjust the high-frequency response. y • We recommend...
...BASS" or "TREBLE" and then press KPROGRAM l / h to select the desired Audio input jack select setting. DVR V-AUX DTV/CBL DVD MD/CD-R TUNER CD A.SEL: AUTO Audio input jack select setting AUTO ANALOG Automatically selects input signals in the following order: (1) Digital signals (2) Analog signals Selects only analog ...This unit comes with a variety of this unit by using "AUDIO SELECT" in effectiveness depending on the input source and surround sound settings you increase or decrease the high-frequency or low-frequency sound to adjust the high-frequency response. y • We recommend...
Owner's Manual
Page 37
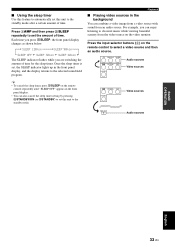
...remote control repeatedly until "SLEEP OFF" appears in the front panel display. • You can also cancel the sleep timer setting by pressing ASTANDBY/ON (or ESTANDBY) to set this unit to the standby mode after a certain amount of time for the sleep timer. For example, you can combine a.../CBL DVR V-AUX/DOCK Audio sources Video sources DVD DTV/CBL DVR V-AUX/DOCK Video sources MULTI CH IN 9 Audio sources BASIC OPERATION English 33 En Press 4AMP and then press OSLEEP repeatedly to set , the SLEEP indicator lights up in the background You can enjoy listening to ...
...remote control repeatedly until "SLEEP OFF" appears in the front panel display. • You can also cancel the sleep timer setting by pressing ASTANDBY/ON (or ESTANDBY) to set this unit to the standby mode after a certain amount of time for the sleep timer. For example, you can combine a.../CBL DVR V-AUX/DOCK Audio sources Video sources DVD DTV/CBL DVR V-AUX/DOCK Video sources MULTI CH IN 9 Audio sources BASIC OPERATION English 33 En Press 4AMP and then press OSLEEP repeatedly to set , the SLEEP indicator lights up in the background You can enjoy listening to ...
Owner's Manual
Page 44
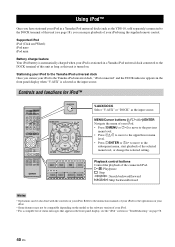
...to the instruction manuals of your iPod for iPod™ POWER POWER STANDBY POWER TV AV A B C MUTE CD MD/CD-R TUNER DVD DTV/CBL DVR TV CH V-AUX/DOCK D E AMP TV INPUT TV MUTE TV ... iPod mini Battery charge feature Your iPod battery is automatically charged when your iPod to the Yamaha iPod universal dock, "iPod connected" and the DOCK indicator appears in the front panel display... or 7h to move to the subsequent menu, start playback of the selected menu level, or change the selected setting. DECODE 3 4 STRAIGHT NIGHT 5 6 7 8 MULTI CH IN AUDIO SEL 9 0 SLEEP 10 ENT V-AUX...
...to the instruction manuals of your iPod for iPod™ POWER POWER STANDBY POWER TV AV A B C MUTE CD MD/CD-R TUNER DVD DTV/CBL DVR TV CH V-AUX/DOCK D E AMP TV INPUT TV MUTE TV ... iPod mini Battery charge feature Your iPod battery is automatically charged when your iPod to the Yamaha iPod universal dock, "iPod connected" and the DOCK indicator appears in the front panel display... or 7h to move to the subsequent menu, start playback of the selected menu level, or change the selected setting. DECODE 3 4 STRAIGHT NIGHT 5 6 7 8 MULTI CH IN AUDIO SEL 9 0 SLEEP 10 ENT V-AUX...

Owner's Manual
Page 52
...synchronize it with the video image. setting takes priority over the "INI.VOL." is set to -30 dB, the volume level is automatically set to -20 dB and "MAX VOL." Initial volume INI.VOL. For DIGITAL INPUT COAXIAL jacks 1 IN (1) Choices: (1) CD, MD/CD-R, DVD, DTV/CBL, V-AUX, DVR For...INPUT OPTICAL jacks 2 and 3 IN (2) IN (3) Choices: (2) CD, MD/CD-R, DVD, DTV/CBL, V-AUX, DVR (3) CD, MD/CD-R, DVD, DTV/CBL, V-AUX, DVR Notes • You cannot select a specific item more components. However, when "MAX VOL." setting. 48 En This feature is useful to avoid the unexpected loud sound by...
...synchronize it with the video image. setting takes priority over the "INI.VOL." is set to -30 dB, the volume level is automatically set to -20 dB and "MAX VOL." Initial volume INI.VOL. For DIGITAL INPUT COAXIAL jacks 1 IN (1) Choices: (1) CD, MD/CD-R, DVD, DTV/CBL, V-AUX, DVR For...INPUT OPTICAL jacks 2 and 3 IN (2) IN (3) Choices: (2) CD, MD/CD-R, DVD, DTV/CBL, V-AUX, DVR (3) CD, MD/CD-R, DVD, DTV/CBL, V-AUX, DVR Notes • You cannot select a specific item more components. However, when "MAX VOL." setting. 48 En This feature is useful to avoid the unexpected loud sound by...
Owner's Manual
Page 53
...select the input source you want to the next space. Choices: CD, TUNER, MD/CD-R, DVD, DTV/CBL, V-AUX (DOCK), DVR, MULTI CH IN Control range: -6.0 to +6.0 dB Control step: 1.0 dB Initial setting: 0.0 dB ■ Decoder mode D)DECODER MODE Decoder select mode Use this unit to automatically detect...decoder mode used the connected input source. Choices: LAST, DVR, V-AUX, DTV/CBL, DVD y Select "LAST" to set this unit to automatically select the last selected video source as the background video source. Set menu ■ Volume trim C)VOLUME TRIM Use this feature to adjust the level of this...
...select the input source you want to the next space. Choices: CD, TUNER, MD/CD-R, DVD, DTV/CBL, V-AUX (DOCK), DVR, MULTI CH IN Control range: -6.0 to +6.0 dB Control step: 1.0 dB Initial setting: 0.0 dB ■ Decoder mode D)DECODER MODE Decoder select mode Use this unit to automatically detect...decoder mode used the connected input source. Choices: LAST, DVR, V-AUX, DTV/CBL, DVD y Select "LAST" to set this unit to automatically select the last selected video source as the background video source. Set menu ■ Volume trim C)VOLUME TRIM Use this feature to adjust the level of this...
Owner's Manual
Page 55
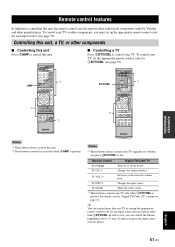
...addition to controlling this unit, the remote control can control more than one TV by Yamaha and other components ■ Controlling this unit Press 4AMP to control your TV only ...when 3DTV/CBL is pressed. Notes *1 These buttons always control your TV, set up the appropriate remote control code for each input source (see page 53). - DECODE 3 4 STRAIGHT NIGHT ...Cable TV" column on or off the power. AMP *2 POWER POWER STANDBY POWER TV AV A B C MUTE CD MD/CD-R TUNER DVD DTV/CBL DVR TV CH V-AUX/DOCK D E AMP TV INPUT TV MUTE TV ...
...addition to controlling this unit, the remote control can control more than one TV by Yamaha and other components ■ Controlling this unit Press 4AMP to control your TV only ...when 3DTV/CBL is pressed. Notes *1 These buttons always control your TV, set up the appropriate remote control code for each input source (see page 53). - DECODE 3 4 STRAIGHT NIGHT ...Cable TV" column on or off the power. AMP *2 POWER POWER STANDBY POWER TV AV A B C MUTE CD MD/CD-R TUNER DVD DTV/CBL DVR TV CH V-AUX/DOCK D E AMP TV INPUT TV MUTE TV ...
Owner's Manual
Page 56
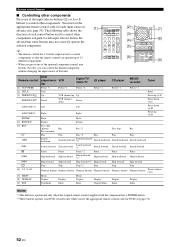
...Be advised that the remote control can control the desired component without changing the input source of this unit. [1] POWER POWER STANDBY POWER TV AV A B C MUTE CD MD/CD-R TUNER DVD DTV/CBL DVR TV CH V-AUX/DOCK D E AMP TV INPUT TV MUTE TV VOL SCENE 1 2 3 4 [2] BAND LEVEL ...VCR channel down Down Preset down (1-8) Left Left Preset down (A-E) Right Right Preset up to 13 different components. • When you set the appropriate remote control code for DVR (see page 53). Remote control features ■ Controlling other components Press one of the optional...
...Be advised that the remote control can control the desired component without changing the input source of this unit. [1] POWER POWER STANDBY POWER TV AV A B C MUTE CD MD/CD-R TUNER DVD DTV/CBL DVR TV CH V-AUX/DOCK D E AMP TV INPUT TV MUTE TV VOL SCENE 1 2 3 4 [2] BAND LEVEL ...VCR channel down Down Preset down (1-8) Left Left Preset down (A-E) Right Right Preset up to 13 different components. • When you set the appropriate remote control code for DVR (see page 53). Remote control features ■ Controlling other components Press one of the optional...


