
Owner's Manual
Page 2
... only with arrowhead symbol, within an equilateral triangle is located on a bed, sofa, rug or similar surfaces that may impede the flow of this owners manual in the space below. REFER SERVICING TO QUALIFIED SERVICE PERSONNEL. ÷ Explanation of Graphical Symbols The lightning flash with a cart or stand that is intended...
... only with arrowhead symbol, within an equilateral triangle is located on a bed, sofa, rug or similar surfaces that may impede the flow of this owners manual in the space below. REFER SERVICING TO QUALIFIED SERVICE PERSONNEL. ÷ Explanation of Graphical Symbols The lightning flash with a cart or stand that is intended...
Owner's Manual
Page 3
... frequencies and, if not installed and used . If the antenna lead-in is being affected by Yamaha Corporation of assurance that is too late, YAMAHA and the Electronic Industries Association's Consumer Electronics Group recommend you avoid prolonged exposure to coaxial type cable....occur in your unit is a sophisticated mini disc recorder. IMPORTANT NOTICE: DO NOT MODIFY THIS UNIT! IMPORTANT: When connecting this manual in hazardous radiation exposure. 3 Compliance with chemical solvents as indicated in the instructions contained in this product in direct sunlight or ...
... frequencies and, if not installed and used . If the antenna lead-in is being affected by Yamaha Corporation of assurance that is too late, YAMAHA and the Electronic Industries Association's Consumer Electronics Group recommend you avoid prolonged exposure to coaxial type cable....occur in your unit is a sophisticated mini disc recorder. IMPORTANT NOTICE: DO NOT MODIFY THIS UNIT! IMPORTANT: When connecting this manual in hazardous radiation exposure. 3 Compliance with chemical solvents as indicated in the instructions contained in this product in direct sunlight or ...
Owner's Manual
Page 6
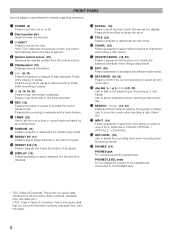
... for details regarding operation. ~ POWER (9) Press to turn the unit on all mini discs (track numbers, playback time, title data, etc.). Press while recording to manually add a track division. $ TIMER (23) Use to set the unit to play or record when activated by an external timer. › RANDOM (11) Press to...
... for details regarding operation. ~ POWER (9) Press to turn the unit on all mini discs (track numbers, playback time, title data, etc.). Press while recording to manually add a track division. $ TIMER (23) Use to set the unit to play or record when activated by an external timer. › RANDOM (11) Press to...
Owner's Manual
Page 7
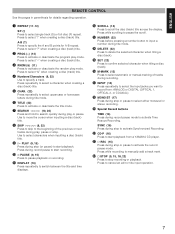
... Press repeatedly to switch between the title and time displays. fi SCROLL (10) Press to select automatic or manual marking of the previous or next tracks during stop recording or playback. RNDM (&) (11) Press to select "!" ... to scroll the disc (track) title across the display. REC (15) Press during play mode. Press while recording to manually add a track mark. , & STOP (9, 15, 18, 22) Press to stop or pause to activate Time Rescue Recording...when creating a disc (track) title. ! Press to record from a YAMAHA CD player. ) ? when creating a disc (track) title.
... Press repeatedly to switch between the title and time displays. fi SCROLL (10) Press to select automatic or manual marking of the previous or next tracks during stop recording or playback. RNDM (&) (11) Press to select "!" ... to scroll the disc (track) title across the display. REC (15) Press during play mode. Press while recording to manually add a track mark. , & STOP (9, 15, 18, 22) Press to stop or pause to activate Time Rescue Recording...when creating a disc (track) title. ! Press to record from a YAMAHA CD player. ) ? when creating a disc (track) title.
Owner's Manual
Page 8
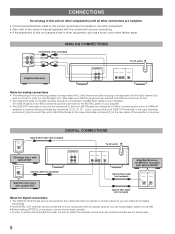
... on the MD recorder should be connected to the MD REC jacks on the other component. • Also refer to the owner's manual supplied with the component you can be connected to a any component with an optical or coaxial output so you can make sure that the...amplifier. • The LINE OUT terminals on the connecting cables corresponds to the L (left ) to L and R (right) to R. When connecting this unit to a YAMAHA amplifier or receiver whose terminals are numbered 1, 2, 3, 4 ... (etc.), connect this unit's LINE OUT terminals to the input terminals numbered 3 and connect this unit's LINE...
... on the MD recorder should be connected to the MD REC jacks on the other component. • Also refer to the owner's manual supplied with the component you can be connected to a any component with an optical or coaxial output so you can make sure that the...amplifier. • The LINE OUT terminals on the connecting cables corresponds to the L (left ) to L and R (right) to R. When connecting this unit to a YAMAHA amplifier or receiver whose terminals are numbered 1, 2, 3, 4 ... (etc.), connect this unit's LINE OUT terminals to the input terminals numbered 3 and connect this unit's LINE...

Owner's Manual
Page 15
...This operation will erase the selected track number (or point) and all subsequent material. To stop Press & (& STOP on the remote). MANUAL When recording analog signals Auto : Track numbers are written during recording. When recording is resumed, a new track number is recorded as described...signal falls below for analog and digital signals. After recording, eject the disc, or turn this unit to select automatic (MANUAL indicator out) or manual (MANUAL indicator lit) marking. The REC * indicators light up . In other hand, if one track is recorded in continuous ...
...This operation will erase the selected track number (or point) and all subsequent material. To stop Press & (& STOP on the remote). MANUAL When recording analog signals Auto : Track numbers are written during recording. When recording is resumed, a new track number is recorded as described...signal falls below for analog and digital signals. After recording, eject the disc, or turn this unit to select automatic (MANUAL indicator out) or manual (MANUAL indicator lit) marking. The REC * indicators light up . In other hand, if one track is recorded in continuous ...
Owner's Manual
Page 16
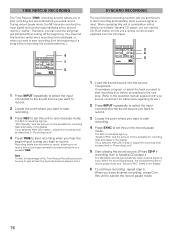
... between steps 3 and 4. 1 Load the sound source into the source component. Therefore, you set this unit to record pause mode. CD-P s MDX 4 1 3 SYNCHRO RECORDING The synchronized recording function lets you can use .) 2 Press INPUT repeatedly to select the input connected to the sound source...Recording starts from the memory cache, allowing you to record from before proceeding to the next step. (Refer to the operation manual supplied with a remote controllable Yamaha CD player, you want to start recording. 3 Press REC to set this unit to start recording automatically when a sound ...
... between steps 3 and 4. 1 Load the sound source into the source component. Therefore, you set this unit to record pause mode. CD-P s MDX 4 1 3 SYNCHRO RECORDING The synchronized recording function lets you can use .) 2 Press INPUT repeatedly to select the input connected to the sound source...Recording starts from the memory cache, allowing you to record from before proceeding to the next step. (Refer to the operation manual supplied with a remote controllable Yamaha CD player, you want to start recording. 3 Press REC to set this unit to start recording automatically when a sound ...
Owner's Manual
Page 23
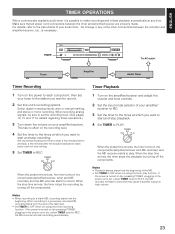
... TIMER to OFF when not using the timer recording function. TIMER NATURAL SOUND MINIDISC RECORDER MDX-793 POWER TIMER OFF REC PLAY 0EJECT 3˜8 7 REC RANDOM S/P REPEAT A-B DISPLAY SCROLL TITLE CHARA. Select digital or analog inputs, auto or manual marking, and stereo or mono recording. Timer Playback 1 Turn on (by pressing POWER, plugging...
... TIMER to OFF when not using the timer recording function. TIMER NATURAL SOUND MINIDISC RECORDER MDX-793 POWER TIMER OFF REC PLAY 0EJECT 3˜8 7 REC RANDOM S/P REPEAT A-B DISPLAY SCROLL TITLE CHARA. Select digital or analog inputs, auto or manual marking, and stereo or mono recording. Timer Playback 1 Turn on (by pressing POWER, plugging...


