
Owner's Manual
Page 2
... on the rear of time. 14 Object and Liquid Entry - The power-supply cord or the plug has been damaged; IMPORTANT! WARNING TO REDUCE THE RISK OF FIRE OR ELECTRIC SHOCK, DO NOT EXPOSE THIS APPLIANCE TO RAIN OR MOISTURE. 1 Read Instructions - The safety and operating instructions should be connected to a power supply only of this owners manual in a safe place...
... on the rear of time. 14 Object and Liquid Entry - The power-supply cord or the plug has been damaged; IMPORTANT! WARNING TO REDUCE THE RISK OF FIRE OR ELECTRIC SHOCK, DO NOT EXPOSE THIS APPLIANCE TO RAIN OR MOISTURE. 1 Read Instructions - The safety and operating instructions should be connected to a power supply only of this owners manual in a safe place...
Owner's Manual
Page 3
..., change the lead-in your FCC authorization to record from the wall outlet, always pull directly on the plug; If this unit, to distribute this unit with other electronic devices. Since hearing damage from loud sounds is being affected by turning the product "OFF" and "ON", please try to excessive volume levels. Do not apply excessive force when operating switches and knobs. 7. THIS CLASS B DIGITAL...
..., change the lead-in your FCC authorization to record from the wall outlet, always pull directly on the plug; If this unit, to distribute this unit with other electronic devices. Since hearing damage from loud sounds is being affected by turning the product "OFF" and "ON", please try to excessive volume levels. Do not apply excessive force when operating switches and knobs. 7. THIS CLASS B DIGITAL...

Owner's Manual
Page 4
... you output digital audio from an MD.* ¶ In addition to recover sound input from a point approximately four seconds before you start the recording operation. (So you start playback or recording at a preset time using an optional audio timer. * This is not possible if MD is a direct copy of a song when recording directly from Dolby Laboratories Licensing Corporation. CONTENTS PART DESCRIPTIONS 5 FRONT PANEL 6 REMOTE CONTROL 7 CONNECTIONS 8 ANALOG CONNECTIONS 8 DIGITAL CONNECTIONS 8 PLAYBACK 9 Skipping Tracks 9 Searching 10 Switching the Display 10 RANDOM PLAY...
... you output digital audio from an MD.* ¶ In addition to recover sound input from a point approximately four seconds before you start the recording operation. (So you start playback or recording at a preset time using an optional audio timer. * This is not possible if MD is a direct copy of a song when recording directly from Dolby Laboratories Licensing Corporation. CONTENTS PART DESCRIPTIONS 5 FRONT PANEL 6 REMOTE CONTROL 7 CONNECTIONS 8 ANALOG CONNECTIONS 8 DIGITAL CONNECTIONS 8 PLAYBACK 9 Skipping Tracks 9 Searching 10 Switching the Display 10 RANDOM PLAY...
Owner's Manual
Page 6
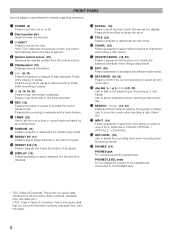
... to pause. Use to select characters when inputting a disc (track) title. ) SEARCH ! ⁄ (10, 22) Press and hold to the PHONES jack. * TOC (Table of the headphones connected to search quickly during stop recording or playback. PHONES LEVEL knob Turn to adjust the volume of Contents): This is ejected. ⁄ Remote control sensor (25) Receives the signals emitted from : ANALOG or DIGITAL (OPTICAL 1, OPTICAL 2, or COAXIAL). _ REC LEVEL (15) Use to start playback. If...
... to pause. Use to select characters when inputting a disc (track) title. ) SEARCH ! ⁄ (10, 22) Press and hold to the PHONES jack. * TOC (Table of the headphones connected to search quickly during stop recording or playback. PHONES LEVEL knob Turn to adjust the volume of Contents): This is ejected. ⁄ Remote control sensor (25) Receives the signals emitted from : ANALOG or DIGITAL (OPTICAL 1, OPTICAL 2, or COAXIAL). _ REC LEVEL (15) Use to start playback. If...
Owner's Manual
Page 7
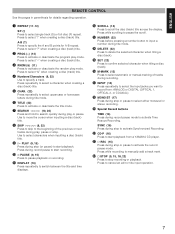
... or DIGITAL (OPTICAL 1, OPTICAL 2, or COAXIAL). ° MONO/ST (17) Press during stop recording or playback. Use to start playback from a YAMAHA CD player. ) ? Press while recording to manually add a track mark. , & STOP (9, 15, 18, 22) Press to stop (or pause) to select characters when inputting a disc (track) title. $ ‹ PLAY (9, 15) Press during stop to activate Synchronized Recording. · CD-P (16) Press to select single track (S) or full disc (F) repeat. ENGLISH REMOTE CONTROL See...
... or DIGITAL (OPTICAL 1, OPTICAL 2, or COAXIAL). ° MONO/ST (17) Press during stop recording or playback. Use to start playback from a YAMAHA CD player. ) ? Press while recording to manually add a track mark. , & STOP (9, 15, 18, 22) Press to stop (or pause) to select characters when inputting a disc (track) title. $ ‹ PLAY (9, 15) Press during stop to activate Synchronized Recording. · CD-P (16) Press to select single track (S) or full disc (F) repeat. ENGLISH REMOTE CONTROL See...
Owner's Manual
Page 9
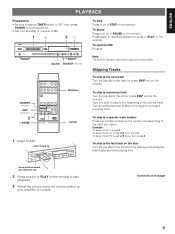
... ¡ INPUT REC LEVEL PHONES LEVEL 0 10 0 10 jog dial SEARCH ! ⁄ SEARCH ! ⁄ SKIP $ › 2 * PAUSE ! ? Turn an additional click to skip to start playback. 3 Adjust the volume using the volume control on the remote). Note The MONO indicator lights when playing monaural MDs. To skip to MD. 1 ) 2& NATURAL SOUND MINIDISC RECORDER MDX-793 POWER TIMER OFF REC PLAY 0EJECT 3˜8 7 REC RANDOM S/P REPEAT A-B DISPLAY SCROLL TITLE CHARA. Skipping Tracks To skip to the next track Turn the...
... ¡ INPUT REC LEVEL PHONES LEVEL 0 10 0 10 jog dial SEARCH ! ⁄ SEARCH ! ⁄ SKIP $ › 2 * PAUSE ! ? Turn an additional click to skip to start playback. 3 Adjust the volume using the volume control on the remote). Note The MONO indicator lights when playing monaural MDs. To skip to MD. 1 ) 2& NATURAL SOUND MINIDISC RECORDER MDX-793 POWER TIMER OFF REC PLAY 0EJECT 3˜8 7 REC RANDOM S/P REPEAT A-B DISPLAY SCROLL TITLE CHARA. Skipping Tracks To skip to the next track Turn the...
Owner's Manual
Page 10
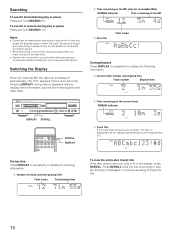
... stop or playback lets you display other information, such as the remaining time and track titles. Switching the Display When you locate the desired position within the track. NATURAL SOUND MINIDISC RECORDER MDX-793 POWER TIMER OFF REC PLAY 0EJECT 3˜8 7 REC RANDOM S/P REPEAT A-B DISPLAY SCROLL TITLE CHARA. DISPLAY SCROLL S/F A-B REPEAT & - ( ) RNDM PROG A B C 1 D E F 2 G H I 3 J K L 4 M N O 5 PQR STU VWX Y Z / 6 7 8 9 0 SPACE +10 SCROLL DISPLAY During stop Press DISPLAY to repeatedly to help you insert an MD the disc...
... stop or playback lets you display other information, such as the remaining time and track titles. Switching the Display When you locate the desired position within the track. NATURAL SOUND MINIDISC RECORDER MDX-793 POWER TIMER OFF REC PLAY 0EJECT 3˜8 7 REC RANDOM S/P REPEAT A-B DISPLAY SCROLL TITLE CHARA. DISPLAY SCROLL S/F A-B REPEAT & - ( ) RNDM PROG A B C 1 D E F 2 G H I 3 J K L 4 M N O 5 PQR STU VWX Y Z / 6 7 8 9 0 SPACE +10 SCROLL DISPLAY During stop Press DISPLAY to repeatedly to help you insert an MD the disc...
Owner's Manual
Page 11
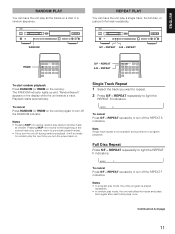
...next time you want to the beginning of a track repeatedly. Continued on . REPEAT RNDM ! ? DISPLAY SCROLL S/F A-B REPEAT & - ( ) RNDM PROG A B C 1 D E F 2 G H I 3 J K L 4 M N O 5 PQR STU VWX Y Z / 6 7 8 9 0 SPACE +10 Single Track Repeat 1 Select the track you turn off during random or program playback. REPEAT repeatedly to light the REPEAT F indicators. NATURAL SOUND MINIDISC RECORDER MDX-793 POWER TIMER OFF REC PLAY 0EJECT 3˜8 7 REC RANDOM S/P REPEAT A-B DISPLAY SCROLL TITLE CHARA. Notes • In program play mode, the entire program...
...next time you want to the beginning of a track repeatedly. Continued on . REPEAT RNDM ! ? DISPLAY SCROLL S/F A-B REPEAT & - ( ) RNDM PROG A B C 1 D E F 2 G H I 3 J K L 4 M N O 5 PQR STU VWX Y Z / 6 7 8 9 0 SPACE +10 Single Track Repeat 1 Select the track you turn off during random or program playback. REPEAT repeatedly to light the REPEAT F indicators. NATURAL SOUND MINIDISC RECORDER MDX-793 POWER TIMER OFF REC PLAY 0EJECT 3˜8 7 REC RANDOM S/P REPEAT A-B DISPLAY SCROLL TITLE CHARA. Notes • In program play mode, the entire program...
Owner's Manual
Page 12
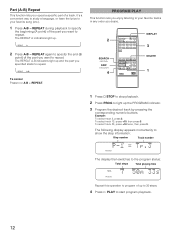
... INPUT SKIP $› REC TIME SYNC PLAY PAUSE STOP REC ‹ * & ? REPEAT A-BSF 2 Press A-B - REPEAT again to specify the end (B point) of the part you want to repeat. Part (A-B) Repeat This function lets you repeat a specific part of up to 30 steps. 4 Press # PLAY to start program playback. 12 The REPEAT A indicators light up the PROGRAM indicator. 3 Program the desired track by pressing the corresponding numeric buttons. Example: To select track 3, press 3. The following display...
... INPUT SKIP $› REC TIME SYNC PLAY PAUSE STOP REC ‹ * & ? REPEAT A-BSF 2 Press A-B - REPEAT again to specify the end (B point) of the part you want to repeat. Part (A-B) Repeat This function lets you repeat a specific part of up to 30 steps. 4 Press # PLAY to start program playback. 12 The REPEAT A indicators light up the PROGRAM indicator. 3 Program the desired track by pressing the corresponding numeric buttons. Example: To select track 3, press 3. The following display...
Owner's Manual
Page 13
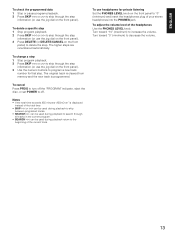
... original track is cleared from memory and the new track is displayed instead of your stereo headphones into the PHONES jack. Turn toward "10" (maximum) to delete the step. To cancel Press PROG to turn off the "PROGRAM" indicator, eject the disc, or set POWER to program a new track number for private listening Set the PHONES LEVEL knob on the front panel). 3 Use the numeric buttons to off. To change a step 1 Stop program playback. 2 Press...
... original track is cleared from memory and the new track is displayed instead of your stereo headphones into the PHONES jack. Turn toward "10" (maximum) to delete the step. To cancel Press PROG to turn off the "PROGRAM" indicator, eject the disc, or set POWER to program a new track number for private listening Set the PHONES LEVEL knob on the front panel). 3 Use the numeric buttons to off. To change a step 1 Stop program playback. 2 Press...
Owner's Manual
Page 14
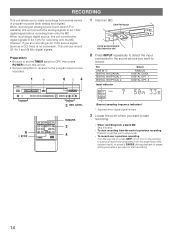
...; INPUT REC LEVEL PHONES LEVEL 0 10 0 10 2 REC LEVEL 6 & STOP TITLE CHAR. NUMBER DELETE SET SEARCH !⁄ M-MARK MONO/ST INPUT SKIP $› REC TIME SYNC PLAY PAUSE STOP REC ‹ * & ? Label facing up NATURAL SOUND MINIDISC RECORDER MDX-793 0 Arrow pointed toward disc insertion slot 2 Press INPUT repeatedly to select the input connected to the sound source you are recording a 44.1 kHz source signal (such as an LP or cassette) this unit converts the analog signals to 44.1 kHz digital signal before recording them...
...; INPUT REC LEVEL PHONES LEVEL 0 10 0 10 2 REC LEVEL 6 & STOP TITLE CHAR. NUMBER DELETE SET SEARCH !⁄ M-MARK MONO/ST INPUT SKIP $› REC TIME SYNC PLAY PAUSE STOP REC ‹ * & ? Label facing up NATURAL SOUND MINIDISC RECORDER MDX-793 0 Arrow pointed toward disc insertion slot 2 Press INPUT repeatedly to select the input connected to the sound source you are recording a 44.1 kHz source signal (such as an LP or cassette) this unit converts the analog signals to 44.1 kHz digital signal before recording them...

Owner's Manual
Page 15
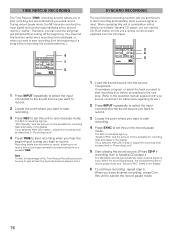
... recording analog signals Auto : Track numbers are written during recording. "REC Standby" and the amount of the signal being recorded. If you selected a track number or paused playback (in "Recording Level". To pause Press #/* (* PAUSE on the remote). Adjust the REC LEVEL control so that has a digital output (volume) control, set the output level (volume) to the disc. Note When recording is paused, the portion recorded up to the pause is counted as one track is recorded in the display. The REC * indicators light up . Note When using manual...
... recording analog signals Auto : Track numbers are written during recording. "REC Standby" and the amount of the signal being recorded. If you selected a track number or paused playback (in "Recording Level". To pause Press #/* (* PAUSE on the remote). Adjust the REC LEVEL control so that has a digital output (volume) control, set the output level (volume) to the disc. Note When recording is paused, the portion recorded up to the pause is counted as one track is recorded in the display. The REC * indicators light up . Note When using manual...
Owner's Manual
Page 16
.... (Refer to record. If necessary, program, or select the track you want to the operation manual supplied with a remote controllable Yamaha CD player, you can record a song that just started without recording lots commercials (etc.). CD-P s MDX 4 1 3 SYNCHRO RECORDING The synchronized recording function lets you want to start recording from the beginning of time available for instructions regarding its use the CD-PLAY button on this unit to record pause mode and "Synchro REC" blinks in "Recording Level". 5 Start playing the sound source...
.... (Refer to record. If necessary, program, or select the track you want to the operation manual supplied with a remote controllable Yamaha CD player, you can record a song that just started without recording lots commercials (etc.). CD-P s MDX 4 1 3 SYNCHRO RECORDING The synchronized recording function lets you want to start recording from the beginning of time available for instructions regarding its use the CD-PLAY button on this unit to record pause mode and "Synchro REC" blinks in "Recording Level". 5 Start playing the sound source...
Owner's Manual
Page 17
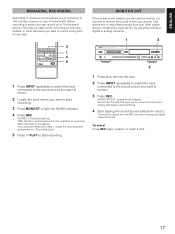
... recording in stereo you can use the monitor out function to monitor the sound of the input source. NUMBER DELETE SET SEARCH !⁄ M-MARK MONO/ST INPUT SKIP $› REC TIME SYNC PLAY PAUSE STOP REC ‹ * & ? MONITOR OUT When a disc is output from this unit as described in "Recording Level". 5 Press # PLAY to start recording. 3 Press MONO/ST to light the MONO indicator. 4 Press REC. Sound from the selected input will be useful when recording an interview, debate, or other digital...
... recording in stereo you can use the monitor out function to monitor the sound of the input source. NUMBER DELETE SET SEARCH !⁄ M-MARK MONO/ST INPUT SKIP $› REC TIME SYNC PLAY PAUSE STOP REC ‹ * & ? MONITOR OUT When a disc is output from this unit as described in "Recording Level". 5 Press # PLAY to start recording. 3 Press MONO/ST to light the MONO indicator. 4 Press REC. Sound from the selected input will be useful when recording an interview, debate, or other digital...
Owner's Manual
Page 18
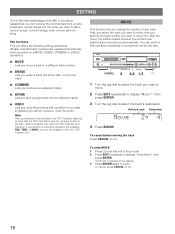
... disc. Note After performing an edit operation, the TOC indicator lights up to show that track numbers are renumbered automatically. After the move, the tracks located between the old and new positions are updated automatically when you perform a MOVE, ERASE, COMBINE or DIVIDE operation.) ¶ MOVE Lets you move it to. DELETE CANCEL EDIT 4 - NATURAL SOUND MINIDISC RECORDER MDX-793 POWER TIMER OFF REC PLAY 0EJECT 3˜8 7 REC RANDOM S/P REPEAT A-B DISPLAY...
... disc. Note After performing an edit operation, the TOC indicator lights up to show that track numbers are renumbered automatically. After the move, the tracks located between the old and new positions are updated automatically when you perform a MOVE, ERASE, COMBINE or DIVIDE operation.) ¶ MOVE Lets you move it to. DELETE CANCEL EDIT 4 - NATURAL SOUND MINIDISC RECORDER MDX-793 POWER TIMER OFF REC PLAY 0EJECT 3˜8 7 REC RANDOM S/P REPEAT A-B DISPLAY...
Owner's Manual
Page 19
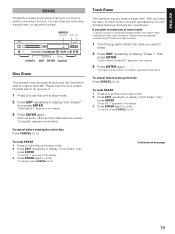
... set this unit to stop mode. 2 Press EDIT repeatedly to display "Disc Erase?", then press ENTER. SEARCH ! ⁄ #/* & NATURAL SOUND MINIDISC RECORDER MDX-793 POWER TIMER OFF REC PLAY 0EJECT 3˜8 7 REC RANDOM S/P REPEAT A-B DISPLAY SCROLL TITLE CHARA. "DiscEraseOK?" appears in the display. 3 Press ENTER again to undo. ENGLISH ERASE The ability to erase sound without having to re-record is erased and "Complete" appears momentarily. This prevents accidental renumbering of tracks you plan to erase. 1 Turn...
... set this unit to stop mode. 2 Press EDIT repeatedly to display "Disc Erase?", then press ENTER. SEARCH ! ⁄ #/* & NATURAL SOUND MINIDISC RECORDER MDX-793 POWER TIMER OFF REC PLAY 0EJECT 3˜8 7 REC RANDOM S/P REPEAT A-B DISPLAY SCROLL TITLE CHARA. "DiscEraseOK?" appears in the display. 3 Press ENTER again to undo. ENGLISH ERASE The ability to erase sound without having to re-record is erased and "Complete" appears momentarily. This prevents accidental renumbering of tracks you plan to erase. 1 Turn...
Owner's Manual
Page 20
... momentarily. To erase parts spanning more than one track Use the COMBINE function described below to combine the tracks into one and the tracks following the combined tracks are combined and "Complete" appears momentarily. "Check" appears, then the part you have edited the same track many times. To undo ERASE 1 Press & to set this operation. NATURAL SOUND MINIDISC RECORDER MDX-793 POWER TIMER OFF REC PLAY 0EJECT 3˜8 7 REC RANDOM S/P REPEAT A-B DISPLAY SCROLL TITLE...
... momentarily. To erase parts spanning more than one track Use the COMBINE function described below to combine the tracks into one and the tracks following the combined tracks are combined and "Complete" appears momentarily. "Check" appears, then the part you have edited the same track many times. To undo ERASE 1 Press & to set this operation. NATURAL SOUND MINIDISC RECORDER MDX-793 POWER TIMER OFF REC PLAY 0EJECT 3˜8 7 REC RANDOM S/P REPEAT A-B DISPLAY SCROLL TITLE...
Owner's Manual
Page 23
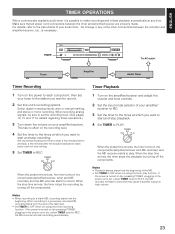
... analog inputs, auto or manual marking, and stereo or mono recording. When recording analog signals, be sure to set to PLAY, the MD recorder will start to play . TIMER OFF REC PLAY When the preset time arrives, the timer turns on the amplifier/receiver and adjust the volume and tone controls. 2 Set the input mode selector of the MD. • Set TIMER to OFF when not using the timer recording function. Timer Playback 1 Turn on the components (amplifier/receiver, tuner and MD recorder...
... analog inputs, auto or manual marking, and stereo or mono recording. When recording analog signals, be sure to set to PLAY, the MD recorder will start to play . TIMER OFF REC PLAY When the preset time arrives, the timer turns on the amplifier/receiver and adjust the volume and tone controls. 2 Set the input mode selector of the MD. • Set TIMER to OFF when not using the timer recording function. Timer Playback 1 Turn on the components (amplifier/receiver, tuner and MD recorder...
Owner's Manual
Page 24
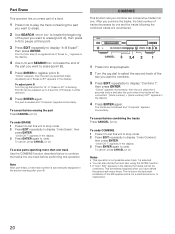
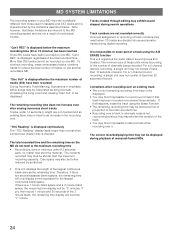
... track has been recorded over it. More than the maximum recording capacity. "Can't REC" is displayed before the maximum number of tracks (255) have been recorded on one MD, "Can't REC" is characterized by scratches. • This unit displays the length of channels being recorded. The correct recorded/playing time may be displayed. • You may exhibit sound dropout during playback of less than normal when a brand new (blank) disc...
... track has been recorded over it. More than the maximum recording capacity. "Can't REC" is displayed before the maximum number of tracks (255) have been recorded on one MD, "Can't REC" is characterized by scratches. • This unit displays the length of channels being recorded. The correct recorded/playing time may be displayed. • You may exhibit sound dropout during playback of less than normal when a brand new (blank) disc...
Owner's Manual
Page 26
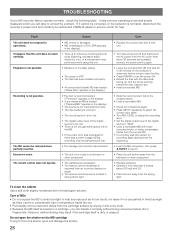
.... • Load a recordable MD. • Check all connections again. • Press INPUT repeatedly to select the correct input jacks. • Turn REC LEVEL to adjust the recording level. • Set the digital output level of the digital source to "MAX". • Load a recordable MD with mild detergent solution. Fault Cause The unit does not respond to operations. • MD is dirty or damaged. • MD is housed in strong direct light.
.... • Load a recordable MD. • Check all connections again. • Press INPUT repeatedly to select the correct input jacks. • Turn REC LEVEL to adjust the recording level. • Set the digital output level of the digital source to "MAX". • Load a recordable MD with mild detergent solution. Fault Cause The unit does not respond to operations. • MD is dirty or damaged. • MD is housed in strong direct light.


