
Owners Manual
Page 5
...44 Setting the auto-standby mode 45 Controlling External Components 46 Available operations 46 Setting remote control codes 48 Using iPod 49 Configuring the DVD Player Settings (Setup Menu 51 Setup menu items 52 Resetting the DVD player settings 56 ADDITIONAL INFORMATION Language Codes 57 Troubleshooting 58 Receiver (RX-E810 58 DVD player (DVD-E810 61 Remote control 62 Notes on the TV (OSD menu 34 Restricting Disc Playback 35 Setting the parental control level 35 Locking a disc 36 Changing the password 36 TUNER OPERATIONS FM/AM Tuning 37 Automatic tuning 37 Manual tuning...
...44 Setting the auto-standby mode 45 Controlling External Components 46 Available operations 46 Setting remote control codes 48 Using iPod 49 Configuring the DVD Player Settings (Setup Menu 51 Setup menu items 52 Resetting the DVD player settings 56 ADDITIONAL INFORMATION Language Codes 57 Troubleshooting 58 Receiver (RX-E810 58 DVD player (DVD-E810 61 Remote control 62 Notes on the TV (OSD menu 34 Restricting Disc Playback 35 Setting the parental control level 35 Locking a disc 36 Changing the password 36 TUNER OPERATIONS FM/AM Tuning 37 Automatic tuning 37 Manual tuning...

Owners Manual
Page 6
... connecting this manual are also available using a remote control except when it is not available. FEATURES Features Receiver (RX-E810) • Maximum RMS output power per channel 65W + 65W (6 Ω, 1 kHz, 1%THD) • 40-station FM/AM preset tuning • iPod dock terminal • Pure Direct mode DVD player (DVD-E810) • Plays DVDs, Video CDs, Audio CDs, MP3 CDs, WMA CDs, DivX CDs and JPEG CDs. • Progressive-scan video output • Optical and coaxial digital output jacks...
... connecting this manual are also available using a remote control except when it is not available. FEATURES Features Receiver (RX-E810) • Maximum RMS output power per channel 65W + 65W (6 Ω, 1 kHz, 1%THD) • 40-station FM/AM preset tuning • iPod dock terminal • Pure Direct mode DVD player (DVD-E810) • Plays DVDs, Video CDs, Audio CDs, MP3 CDs, WMA CDs, DivX CDs and JPEG CDs. • Progressive-scan video output • Optical and coaxial digital output jacks...
Owners Manual
Page 7
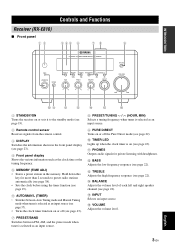
.... F VOLUME Adjusts the volume level. 3 En English B BASS Adjusts the low frequency responce (see page 22). D BALANCE Adjusts the volume level of each left and right speaker channel (see page 22). A PHONES Outputs audio signals for more than 2 seconds to the standby mode (see page 19). 2 Remote control sensor Receives signals from the remote control. 3 DISPLAY Switches the information shown in the front panel display (see page 23). 4 Front panel display Shows the various infomaiton such as an input source. 9 PURE DIRECT Turns on...
.... F VOLUME Adjusts the volume level. 3 En English B BASS Adjusts the low frequency responce (see page 22). D BALANCE Adjusts the volume level of each left and right speaker channel (see page 22). A PHONES Outputs audio signals for more than 2 seconds to the standby mode (see page 19). 2 Remote control sensor Receives signals from the remote control. 3 DISPLAY Switches the information shown in the front panel display (see page 23). 4 Front panel display Shows the various infomaiton such as an input source. 9 PURE DIRECT Turns on...
Owners Manual
Page 12
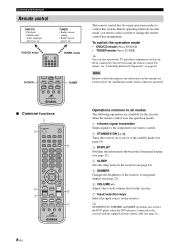
... receiver's front panel display (see "Controlling External Components" on or sets it to change the remote control key assignments. Note Remote control descriptions and illustrations in this system. Adjusts the overall volume level on the receiver. 7 Input selection keys Select the input source on the U.K. DVD/CD mode STANDBY/ON POWER TV 1 2 3 4 5 6 7 8 SCAN DIMMER 9 0 TUNER mode DVD/CD SLEEP DVD/CD TUNER BAND TAPE/MD AUX/TV DOCK SUBTITLE ANGLE ZOOM AUDIO TUNER This remote control has two main operation modes to the receiver using the remote control. For...
... receiver's front panel display (see "Controlling External Components" on or sets it to change the remote control key assignments. Note Remote control descriptions and illustrations in this system. Adjusts the overall volume level on the receiver. 7 Input selection keys Select the input source on the U.K. DVD/CD mode STANDBY/ON POWER TV 1 2 3 4 5 6 7 8 SCAN DIMMER 9 0 TUNER mode DVD/CD SLEEP DVD/CD TUNER BAND TAPE/MD AUX/TV DOCK SUBTITLE ANGLE ZOOM AUDIO TUNER This remote control has two main operation modes to the receiver using the remote control. For...

Owners Manual
Page 13
... the Program Play feature (see page 25). D SHUFFLE Turns on the TV screen or switches the time display of picture (see page 31). I Operations available in the menu screen or specify the selected parameter. Press and hold to return to specify parameters or chapter/track numbers. Controls and Functions 7 SET UP Displays the setup menu on a CD (see page 29). H AUDIO Selects the audio language (see page 31). 0 Number keys (1 to 9, 0) Input numerals...
... the Program Play feature (see page 25). D SHUFFLE Turns on the TV screen or switches the time display of picture (see page 31). I Operations available in the menu screen or specify the selected parameter. Press and hold to return to specify parameters or chapter/track numbers. Controls and Functions 7 SET UP Displays the setup menu on a CD (see page 29). H AUDIO Selects the audio language (see page 31). 0 Number keys (1 to 9, 0) Input numerals...
Owners Manual
Page 16
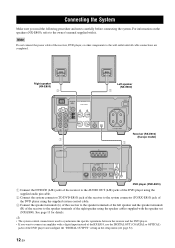
... SPEAKERS 6 MIN / SPEAKER R L SUBWOOFER OUT TO DVD-E810 AUX R L 1 MAINS AV MAINS AC OUTLETS SWITCHED 100W MAX. For information on the speakers (NX-E800), refer to the owner's manual supplied with the speaker set (NX-E800). See page 13 for details. TOTAL 2 Receiver (RX-E810) (Europe model) VIDEO OUT COMPONENT PR Y DIGITAL OUT AUDIO OUT L COAXIAL OPTICAL TO RX-E810 S VIDEO VIDEO PB R DVD player (DVD-E810) 1 Connect the DVD/CD (L/R) jacks of the receiver to the AUDIO OUT (L/R) jacks...
... SPEAKERS 6 MIN / SPEAKER R L SUBWOOFER OUT TO DVD-E810 AUX R L 1 MAINS AV MAINS AC OUTLETS SWITCHED 100W MAX. For information on the speakers (NX-E800), refer to the owner's manual supplied with the speaker set (NX-E800). See page 13 for details. TOTAL 2 Receiver (RX-E810) (Europe model) VIDEO OUT COMPONENT PR Y DIGITAL OUT AUDIO OUT L COAXIAL OPTICAL TO RX-E810 S VIDEO VIDEO PB R DVD player (DVD-E810) 1 Connect the DVD/CD (L/R) jacks of the receiver to the AUDIO OUT (L/R) jacks...
Owners Manual
Page 20
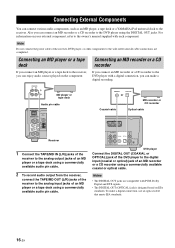
... the receiver. CONNECTING EXTERNAL COMPONENTS Connecting External Components You can enjoy audio sources played on the component. Note Do not connect the power cable of an MD recorder or a CD recorder using a commercially available audio pin cable. 2 To record audio output from the receiver, connect the TAPE/MD OUT (L/R) jacks of the receiver to the digital input (coaxial or optical) jack of the receiver, DVD player, or other components to the owner's manual supplied with PCM, Dolby Digital and DTS signals. • The DIGITAL OUT (OPTICAL) jack is...
... the receiver. CONNECTING EXTERNAL COMPONENTS Connecting External Components You can enjoy audio sources played on the component. Note Do not connect the power cable of an MD recorder or a CD recorder using a commercially available audio pin cable. 2 To record audio output from the receiver, connect the TAPE/MD OUT (L/R) jacks of the receiver to the digital input (coaxial or optical) jack of the receiver, DVD player, or other components to the owner's manual supplied with PCM, Dolby Digital and DTS signals. • The DIGITAL OUT (OPTICAL) jack is...

Owners Manual
Page 21
... your iPod using its dedicated cable compatible with the DOCK terminal of the receiver. • Do not connect any iPod accessories (such as headphones, a wired remote control, or an FM transmitter) to your iPod when it is stationed in a YAMAHA iPod universal dock (such as YDS-10 sold separately). • Unless your iPod is firmly stationed in a YAMAHA iPod universal dock (such as YDS-10 sold separately) connected to the DOCK terminal of the receiver, audio signals may need a YAMAHA iPod universal dock...
... your iPod using its dedicated cable compatible with the DOCK terminal of the receiver. • Do not connect any iPod accessories (such as headphones, a wired remote control, or an FM transmitter) to your iPod when it is stationed in a YAMAHA iPod universal dock (such as YDS-10 sold separately). • Unless your iPod is firmly stationed in a YAMAHA iPod universal dock (such as YDS-10 sold separately) connected to the DOCK terminal of the receiver, audio signals may need a YAMAHA iPod universal dock...
Owners Manual
Page 23
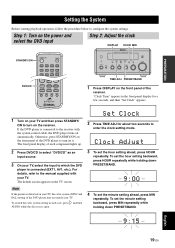
... connected to turn on the TV screen. 3 To set the minute setting ahead, press MIN repeatedly. English 19 En Step 1: Turn on the power and select the DVD input Step 2: Adjust the clock DISPLAY HOUR MIN STANDBY/ON DVD/CD STANDBY/ON POWER TV 1 2 3 4 5 6 7 8 SCAN DIMMER 9 0 SRLEEPEEAPT AB DVD/CD TUNER BAND TAPE/MD AUX/TV DOCK SUBTITLE ANGLE ZOOM AUDIO NATURAL SOUND STEREO RECEIVER RX-E810 PURE DIRECT TIMER STANDBY/ON PHONES DISPLAY MEMORY AUTO/MAN'L PRESET/BAND PRESET/TUNING BASS...
... connected to turn on the TV screen. 3 To set the minute setting ahead, press MIN repeatedly. English 19 En Step 1: Turn on the power and select the DVD input Step 2: Adjust the clock DISPLAY HOUR MIN STANDBY/ON DVD/CD STANDBY/ON POWER TV 1 2 3 4 5 6 7 8 SCAN DIMMER 9 0 SRLEEPEEAPT AB DVD/CD TUNER BAND TAPE/MD AUX/TV DOCK SUBTITLE ANGLE ZOOM AUDIO NATURAL SOUND STEREO RECEIVER RX-E810 PURE DIRECT TIMER STANDBY/ON PHONES DISPLAY MEMORY AUTO/MAN'L PRESET/BAND PRESET/TUNING BASS...
Owners Manual
Page 26
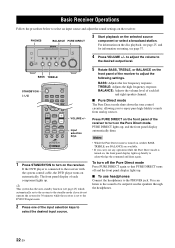
... on tuning, see page 45) which automatically set to the receiver with the system control cable, the DVD player turns on the selected source component or select a broadcast station. BASS: Adjusts the low frequency response. Basic Receiver Operations Basic Receiver Operations Follow the procedure below to select an input source and adjust the sound settings on the Pure Direct mode. To turn on the receiver. Press PURE DIRECT on the front panel of each left and right speaker channel. ■ Pure Direct mode The Pure Direct mode shuts down the tone control...
... on tuning, see page 45) which automatically set to the receiver with the system control cable, the DVD player turns on the selected source component or select a broadcast station. BASS: Adjusts the low frequency response. Basic Receiver Operations Basic Receiver Operations Follow the procedure below to select an input source and adjust the sound settings on the Pure Direct mode. To turn on the receiver. Press PURE DIRECT on the front panel of each left and right speaker channel. ■ Pure Direct mode The Pure Direct mode shuts down the tone control...

Owners Manual
Page 47
... turns the receiver on or sets to the standby mode automatically if it to the standby mode at the specified time. TIMER LED TIMER PRESET/BAND NATURAL SOUND STEREO RECEIVER RX-E810 PURE DIRECT 5 Press DISPLAY again to select "OFF Time", and then specify the time when you want to turn on . The TIMER indicator lights up . The DVD player also turns on or sets it is connected to the receiver using a system control connection...
... turns the receiver on or sets to the standby mode automatically if it to the standby mode at the specified time. TIMER LED TIMER PRESET/BAND NATURAL SOUND STEREO RECEIVER RX-E810 PURE DIRECT 5 Press DISPLAY again to select "OFF Time", and then specify the time when you want to turn on . The TIMER indicator lights up . The DVD player also turns on or sets it is connected to the receiver using a system control connection...

Owners Manual
Page 49
... playback. OTHER OPERATIONS English 45 En u / d NATURAL SOUND STEREO RECEIVER RX-E810 PURE DIRECT TIMER STANDBY/ON PHONES DISPLAY MEMORY AUTO/MAN'L PRESET/BAND PRESET/TUNING BASS TIME ADJ TIMER TREBLE HOUR BALANCE MIN INPUT L R VOLUME MIN MAX MEMORY INPUT 1 Rotate INPUT on /off the auto-standby feature which automatically set to the DVD/CD input mode. (The default setting is displayed in the receiver's front panel display for about five seconds. 3 While the current setting is "AUTO STANDBY ON".) Notes...
... playback. OTHER OPERATIONS English 45 En u / d NATURAL SOUND STEREO RECEIVER RX-E810 PURE DIRECT TIMER STANDBY/ON PHONES DISPLAY MEMORY AUTO/MAN'L PRESET/BAND PRESET/TUNING BASS TIME ADJ TIMER TREBLE HOUR BALANCE MIN INPUT L R VOLUME MIN MAX MEMORY INPUT 1 Rotate INPUT on /off the auto-standby feature which automatically set to the DVD/CD input mode. (The default setting is displayed in the receiver's front panel display for about five seconds. 3 While the current setting is "AUTO STANDBY ON".) Notes...
Owners Manual
Page 50
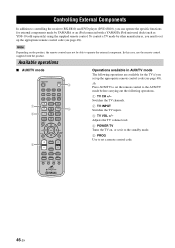
... to controlling the receiver (RX-E810) and DVD player (DVD-E810), you can operate the specific functions for the TV if you need to set up the appropriate remote control code (see page 48). Adjusts the TV volume level. 4 POWER TV Turns the TV on the product, the remote control may not be able to the AUX/TV mode before carrying out the following operations are available for external components made by YAMAHA or an iPod connected...
... to controlling the receiver (RX-E810) and DVD player (DVD-E810), you can operate the specific functions for the TV if you need to set up the appropriate remote control code (see page 48). Adjusts the TV volume level. 4 POWER TV Turns the TV on the product, the remote control may not be able to the AUX/TV mode before carrying out the following operations are available for external components made by YAMAHA or an iPod connected...

Owners Manual
Page 55
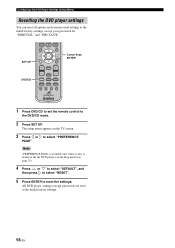
... some parameters, you can configure the various parameters or operate useful functions related to the DVD player. Number keys STANDBY/ON POWER TV 1 2 3 4 5 6 7 8 SCAN DIMMER 9 0 TV CH TV INPUT REPEAT A-B FREQ/TEXT PROG MODE PTY SEEK START SHUFFLE 1 Press DVD/CD to set the remote control to select "GENERAL SETUP PAGE", "AUDIO SETUP PAGE", "VIDEO SETUP PAGE" or "PREFERENCE PAGE". The setup menu appears on page 52. Note "PREFERENCE PAGE" is available...
... some parameters, you can configure the various parameters or operate useful functions related to the DVD player. Number keys STANDBY/ON POWER TV 1 2 3 4 5 6 7 8 SCAN DIMMER 9 0 TV CH TV INPUT REPEAT A-B FREQ/TEXT PROG MODE PTY SEEK START SHUFFLE 1 Press DVD/CD to set the remote control to select "GENERAL SETUP PAGE", "AUDIO SETUP PAGE", "VIDEO SETUP PAGE" or "PREFERENCE PAGE". The setup menu appears on page 52. Note "PREFERENCE PAGE" is available...

Owners Manual
Page 56
.... (Default: ON) ON: Turns on the setup menu items of the DVD player. ALL: Select this if your optional audio equipment connections. (Default: ALL) OFF: Disables the digital output. OSD LANGUAGE See page 20 for details. (Default: ENGLISH) SCREEN SAVER The screen saver function allows you connect the DVD player to rent or purchase videos using a digital connection, configure the LPCM output setting. VIRTUAL SURR: Reproduces the surround channel sounds virtually. LPCM OUTPUT If you to a multi-channel decoder/amplifier using an analog connection...
.... (Default: ON) ON: Turns on the setup menu items of the DVD player. ALL: Select this if your optional audio equipment connections. (Default: ALL) OFF: Disables the digital output. OSD LANGUAGE See page 20 for details. (Default: ENGLISH) SCREEN SAVER The screen saver function allows you connect the DVD player to rent or purchase videos using a digital connection, configure the LPCM output setting. VIRTUAL SURR: Reproduces the surround channel sounds virtually. LPCM OUTPUT If you to a multi-channel decoder/amplifier using an analog connection...

Owners Manual
Page 57
... high volume output and enhance the low volume output to the DVD player adopts the PAL system. OTHER OPERATIONS English 53 En and Canada models, MULTI for Korea model, and PAL for better sound quality. Configuring the DVD Player Settings (Setup Menu) Page Menu Submenu AUDIO CD UPSAMPLING *1 SETUP PAGE NIGHT MODE LIP SYNC VIDEO TV TYPE *3 SETUP PAGE *2 TV DISPLAY Parameter You can convert your music CD to the stereo mode. (Default: OFF) OFF: Disables the CD upsampling function...
... high volume output and enhance the low volume output to the DVD player adopts the PAL system. OTHER OPERATIONS English 53 En and Canada models, MULTI for Korea model, and PAL for better sound quality. Configuring the DVD Player Settings (Setup Menu) Page Menu Submenu AUDIO CD UPSAMPLING *1 SETUP PAGE NIGHT MODE LIP SYNC VIDEO TV TYPE *3 SETUP PAGE *2 TV DISPLAY Parameter You can convert your music CD to the stereo mode. (Default: OFF) OFF: Disables the CD upsampling function...

Owners Manual
Page 58
... compatible TV using a component video connection. The difference between the COMPONENT jacks and AV terminal. (Default: RGB) YUV: Select this for the hearing impaired. To set the black level to improve color contrast during disc playback. BRIGHT: Makes the TV picture brighter. PERSONAL: You can switch the jack (terminal) at which the component video signals are data hidden in detail. (Default: STANDARD) STANDARD: Uses standard TV picture settings. and Canada models only) You can set this function...
... compatible TV using a component video connection. The difference between the COMPONENT jacks and AV terminal. (Default: RGB) YUV: Select this for the hearing impaired. To set the black level to improve color contrast during disc playback. BRIGHT: Makes the TV picture brighter. PERSONAL: You can switch the jack (terminal) at which the component video signals are data hidden in detail. (Default: STANDARD) STANDARD: Uses standard TV picture settings. and Canada models only) You can set this function...

Owners Manual
Page 59
... or 625 progressive scan picture problems, it is compatible with this to be displayed in the picture. You can enable or disable the auto-display function of the disc. (This feature is played back. Configuring the DVD Player Settings (Setup Menu) Page Menu PREFERENCE AUDIO PAGE *5 SUBTITLE DISC MENU PARENTAL VR LIST Submenu MP3/JPEG NAV DIVX SUBTITLE *6 PASSWORD CHANGE PBC DEFAULT RESET Parameter See page 21 for details. (Default: ENGLISH) See page 21...
... or 625 progressive scan picture problems, it is compatible with this to be displayed in the picture. You can enable or disable the auto-display function of the disc. (This feature is played back. Configuring the DVD Player Settings (Setup Menu) Page Menu PREFERENCE AUDIO PAGE *5 SUBTITLE DISC MENU PARENTAL VR LIST Submenu MP3/JPEG NAV DIVX SUBTITLE *6 PASSWORD CHANGE PBC DEFAULT RESET Parameter See page 21 for details. (Default: ENGLISH) See page 21...
Owners Manual
Page 60
... initial factory settings. 56 En SET UP DVD/CD ON SCREEN INFO. All DVD player settings (except password) are reset to the initial factory settings, except your password for "PARENTAL" and "DISC LOCK". The setup menu appears on the TV screen. 3 Press or to reset the settings. Note "PREFERENCE PAGE" is available only when no disc is loaded or the the DVD player is in the Stop mode (see page 25). 4 Press or to select "DEFAULT...
... initial factory settings. 56 En SET UP DVD/CD ON SCREEN INFO. All DVD player settings (except password) are reset to the initial factory settings, except your password for "PARENTAL" and "DISC LOCK". The setup menu appears on the TV screen. 3 Press or to reset the settings. Note "PREFERENCE PAGE" is available only when no disc is loaded or the the DVD player is in the Stop mode (see page 25). 4 Press or to select "DEFAULT...
Owners Manual
Page 63
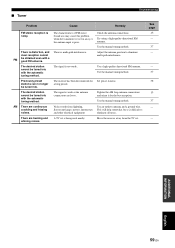
... FM antenna. Try using a high-quality directional FM antenna. The desired station cannot be tuned into with the automatic tuning method. The receiver has been disconnected for the best reception. A TV set . Use the manual tuning method. The desired station cannot be tuned into with the automatic tuning method. ■ Tuner Troubleshooting Problem Cause Remedy FM stereo reception is being used nearby. Check the antenna connections. Adjust the antenna position to eliminate all noise. Use the manual tuning...
... FM antenna. Try using a high-quality directional FM antenna. The desired station cannot be tuned into with the automatic tuning method. The receiver has been disconnected for the best reception. A TV set . Use the manual tuning method. The desired station cannot be tuned into with the automatic tuning method. ■ Tuner Troubleshooting Problem Cause Remedy FM stereo reception is being used nearby. Check the antenna connections. Adjust the antenna position to eliminate all noise. Use the manual tuning...


