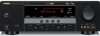
Owner's Manual
Page 5
... 2: Connect your DVD player and other components.... 52 Setting remote control codes 54 Advanced setup 55 PREPARATION Connections 10 Rear panel 10 Placing speakers 11 Connecting speakers 12 Setting the speaker impedance (U.S.A. In case the button names differ between the manual and product, the product has priority. • "1STANDBY/ON" or "AMULTI CH...
... 2: Connect your DVD player and other components.... 52 Setting remote control codes 54 Advanced setup 55 PREPARATION Connections 10 Rear panel 10 Placing speakers 11 Connecting speakers 12 Setting the speaker impedance (U.S.A. In case the button names differ between the manual and product, the product has priority. • "1STANDBY/ON" or "AMULTI CH...
Owner's Manual
Page 8
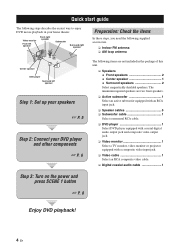
...3: Turn on the power and press SCENE 1 button ☞ P. 8 Enjoy DVD playback! 4 En Video monitor Front left speaker Front right speaker Subwoofer Surround right speaker Preparation: Check the items In these steps, you need the following supplied accessories. ❏ Indoor FM antenna ❏ AM loop... antenna Center speaker DVD player Surround left speaker Step 1: Set up your speakers ☞ P. 5 Step 2: Connect your home theater. Quick start guide Quick start guide The following steps...
...3: Turn on the power and press SCENE 1 button ☞ P. 8 Enjoy DVD playback! 4 En Video monitor Front left speaker Front right speaker Subwoofer Surround right speaker Preparation: Check the items In these steps, you need the following supplied accessories. ❏ Indoor FM antenna ❏ AM loop... antenna Center speaker DVD player Surround left speaker Step 1: Set up your speakers ☞ P. 5 Step 2: Connect your home theater. Quick start guide Quick start guide The following steps...

Owner's Manual
Page 9
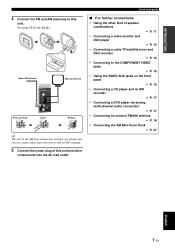
... Input jack Subwoofer cable SUBWOOFER OUTPUT jack English 5 En INTRODUCTION Step 1: Set up your speakers Place your speakers in the room. 2 Connect speaker cables to each other. 4 Do not let the bare speaker wires touch any metal part of this unit and the subwoofer are colored or shaped differently,... L VIDEO DVD DTV/CBL IN DVR OUT MONITOR OUT DVD DTV/CBL L AUDIO IN DVR OUT CD DVD 1 R COAXIAL R SUBWOOFER ANTENNA AM GND FM 75 SPEAKERS SURROUND CENTER FRONT B R L R L IN MD/ OUT (PLAY) CD-R (REC) OUTPUT SUB WOOFER R FRONT A L Quick start guide Be sure to the "+" (...
... Input jack Subwoofer cable SUBWOOFER OUTPUT jack English 5 En INTRODUCTION Step 1: Set up your speakers Place your speakers in the room. 2 Connect speaker cables to each other. 4 Do not let the bare speaker wires touch any metal part of this unit and the subwoofer are colored or shaped differently,... L VIDEO DVD DTV/CBL IN DVR OUT MONITOR OUT DVD DTV/CBL L AUDIO IN DVR OUT CD DVD 1 R COAXIAL R SUBWOOFER ANTENNA AM GND FM 75 SPEAKERS SURROUND CENTER FRONT B R L R L IN MD/ OUT (PLAY) CD-R (REC) OUTPUT SUB WOOFER R FRONT A L Quick start guide Be sure to the "+" (...

Owner's Manual
Page 10
... L VIDEO DVD DTV/CBL IN DVR OUT MONITOR OUT DVD DTV/CBL L AUDIO IN DVR OUT CD DVD 1 R COAXIAL R SUBWOOFER ANTENNA AM GND FM 75 SPEAKERS SURROUND CENTER FRONT B R L R L IN MD/ OUT (PLAY) CD-R (REC) OUTPUT SUB WOOFER R FRONT A L 2 Connect the video cable to the composite video output jack of your...
... L VIDEO DVD DTV/CBL IN DVR OUT MONITOR OUT DVD DTV/CBL L AUDIO IN DVR OUT CD DVD 1 R COAXIAL R SUBWOOFER ANTENNA AM GND FM 75 SPEAKERS SURROUND CENTER FRONT B R L R L IN MD/ OUT (PLAY) CD-R (REC) OUTPUT SUB WOOFER R FRONT A L 2 Connect the video cable to the composite video output jack of your...
Owner's Manual
Page 11
... antenna does not have any polarity and you can connect either end of the wire to AM or GND terminal. 5 Connect the power plug of speaker combinations ☞ P. 11 • Connecting a video monitor and DVD player ☞ P. 15 • Connecting a cable TV/satellite tuner and DVD recorder ☞ P. 15 • Connecting...
... antenna does not have any polarity and you can connect either end of the wire to AM or GND terminal. 5 Connect the power plug of speaker combinations ☞ P. 11 • Connecting a video monitor and DVD player ☞ P. 15 • Connecting a cable TV/satellite tuner and DVD recorder ☞ P. 15 • Connecting...

Owner's Manual
Page 12
... advance. y The indicator on the video monitor connected to watch a TV program..." Quick start guide Step 3: Turn on the front panel. 3 Press FSCENE 1. If the speakers are 6 ohm speakers, set "SP IMP." to "6ΩMIN" before using this unit (see page 13). 4 Start playback of the connected... speakers. Case B: "I want to this unit automatically optimize own status for the DVD playback. Case A: "I want to listen to select "TV Viewing". See page 15 for ...
... advance. y The indicator on the video monitor connected to watch a TV program..." Quick start guide Step 3: Turn on the front panel. 3 Press FSCENE 1. If the speakers are 6 ohm speakers, set "SP IMP." to "6ΩMIN" before using this unit (see page 13). 4 Start playback of the connected... speakers. Case B: "I want to this unit automatically optimize own status for the DVD playback. Case A: "I want to listen to select "TV Viewing". See page 15 for ...

Owner's Manual
Page 13
... into the desired radio station in order to receive infrared signals from the remote control. ■ Adjusting the parameters of this unit • Optimizing the speaker parameters for your listening room (BASIC SETUP) ☞ P. 21 • Manually adjusting various parameters of this unit... See page 23 for the SCENE buttons. Press...
... into the desired radio station in order to receive infrared signals from the remote control. ■ Adjusting the parameters of this unit • Optimizing the speaker parameters for your listening room (BASIC SETUP) ☞ P. 21 • Manually adjusting various parameters of this unit... See page 23 for the SCENE buttons. Press...
Owner's Manual
Page 14
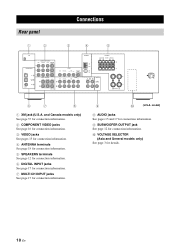
... VIDEO jacks See page 16 for connection information. 3 VIDEO jacks See pages 15 for connection information. 4 ANTENNA terminals See page 18 for connection information. 5 SPEAKERS terminals See page 12 for connection information. 6 DIGITAL INPUT jacks See page 17 for connection information. 7 MULTI CH INPUT jacks See page 17 for details...DVD DTV/CBL IN DVR OUT MONITOR OUT DVD DTV/CBL L AUDIO IN DVR OUT CD DVD 1 R COAXIAL R SUBWOOFER ANTENNA AM GND FM 75 SPEAKERS SURROUND CENTER FRONT B R L R L IN MD/ OUT (PLAY) CD-R (REC) OUTPUT SUB WOOFER R FRONT A L 6 7 8 1 XM jack...
... VIDEO jacks See page 16 for connection information. 3 VIDEO jacks See pages 15 for connection information. 4 ANTENNA terminals See page 18 for connection information. 5 SPEAKERS terminals See page 12 for connection information. 6 DIGITAL INPUT jacks See page 17 for connection information. 7 MULTI CH INPUT jacks See page 17 for details...DVD DTV/CBL IN DVR OUT MONITOR OUT DVD DTV/CBL L AUDIO IN DVR OUT CD DVD 1 R COAXIAL R SUBWOOFER ANTENNA AM GND FM 75 SPEAKERS SURROUND CENTER FRONT B R L R L IN MD/ OUT (PLAY) CD-R (REC) OUTPUT SUB WOOFER R FRONT A L 6 7 8 1 XM jack...
Owner's Manual
Page 15
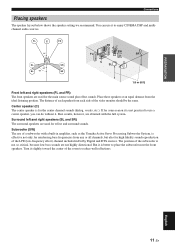
...Turn it to place the subwoofer near the front speakers. PREPARATION Connections Placing speakers The speaker layout below shows the speaker setting we recommend. The distance of each speaker from the ideal listening position. Center speaker (C) The center speaker is not so critical, because low bass sounds are... source sound plus effect sounds. The position of the LFE (low-frequency effect) channel included in amplifier, such as the Yamaha Active Servo Processing Subwoofer System, is effective not only for reinforcing bass frequencies from any or all channels, but also for ...
...Turn it to place the subwoofer near the front speakers. PREPARATION Connections Placing speakers The speaker layout below shows the speaker setting we recommend. The distance of each speaker from the ideal listening position. Center speaker (C) The center speaker is not so critical, because low bass sounds are... source sound plus effect sounds. The position of the LFE (low-frequency effect) channel included in amplifier, such as the Yamaha Active Servo Processing Subwoofer System, is effective not only for reinforcing bass frequencies from any or all channels, but also for ...
Owner's Manual
Page 16
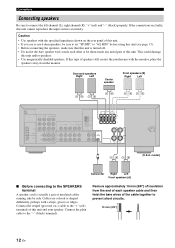
...using this unit (see page 13). • Before connecting the speakers, make sure that this unit is actually a pair of this unit and your speaker. This could damage this unit. Surround speakers Right Left Center speaker Front speakers (B) Right Left XM COMPONENT VIDEO DVD DTV/CBL DVR MONITOR ... L VIDEO DVD DTV/CBL IN DVR OUT MONITOR OUT DVD DTV/CBL L AUDIO IN DVR OUT CD DVD 1 R COAXIAL R SUBWOOFER ANTENNA AM GND FM 75 SPEAKERS SURROUND CENTER FRONT B R L R L IN MD/ OUT (PLAY) CD-R (REC) OUTPUT SUB WOOFER R FRONT A L (U.S.A. Connect the plain cable to connect ...
...using this unit (see page 13). • Before connecting the speakers, make sure that this unit is actually a pair of this unit and your speaker. This could damage this unit. Surround speakers Right Left Center speaker Front speakers (B) Right Left XM COMPONENT VIDEO DVD DTV/CBL DVR MONITOR ... L VIDEO DVD DTV/CBL IN DVR OUT MONITOR OUT DVD DTV/CBL L AUDIO IN DVR OUT CD DVD 1 R COAXIAL R SUBWOOFER ANTENNA AM GND FM 75 SPEAKERS SURROUND CENTER FRONT B R L R L IN MD/ OUT (PLAY) CD-R (REC) OUTPUT SUB WOOFER R FRONT A L (U.S.A. Connect the plain cable to connect ...
Owner's Manual
Page 17
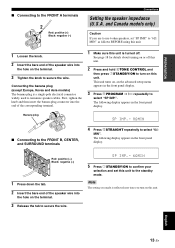
...Connecting to select "SP IMP.". Red: positive (+) Black: negative (-) 1 Press down the tab. 2 Insert the bare end of the speaker wire into the hole on , an the advanced setup menu appears in the front panel display. SP IMP.- 6 MIN 5 Press 1STANDBY/ON ...the front panel display. 3 Press APROGRAM l / h repeatedly to the FRONT A terminals 2 1 Red: positive (+) Black: negative (-) 3 Connections Setting the speaker impedance (U.S.A. Banana plug SP IMP.- 8 MIN ■ Connecting to the FRONT B, CENTER, and SURROUND terminals 4 Press BSTRAIGHT repeatedly to turn on this unit...
...Connecting to select "SP IMP.". Red: positive (+) Black: negative (-) 1 Press down the tab. 2 Insert the bare end of the speaker wire into the hole on , an the advanced setup menu appears in the front panel display. SP IMP.- 6 MIN 5 Press 1STANDBY/ON ...the front panel display. 3 Press APROGRAM l / h repeatedly to the FRONT A terminals 2 1 Red: positive (+) Black: negative (-) 3 Connections Setting the speaker impedance (U.S.A. Banana plug SP IMP.- 8 MIN ■ Connecting to the FRONT B, CENTER, and SURROUND terminals 4 Press BSTRAIGHT repeatedly to turn on this unit...

Owner's Manual
Page 20
... Y PB PR COMPONENT VIDEO DVD DTV/CBL DVR MONITOR OUT PR PB Y MULTI CH INPUT FRONT SURROUND CENTER L R SUBWOOFER VOLUME STANDBY /ON PHONES SILENT CINEMA SPEAKERS A/B/OFF EDIT SEARCH MODE PRESET/TUNING FM/AM CATEGORY A/B/C/D/E 1 l PRESET/TUNING/CH h SCENE 2 3 4 MEMORY DISPLAY TUNING AUTO/MAN'L TONE CONTROL l PROGRAM h STRAIGHT NIGHT l INPUT h AUDIO...
... Y PB PR COMPONENT VIDEO DVD DTV/CBL DVR MONITOR OUT PR PB Y MULTI CH INPUT FRONT SURROUND CENTER L R SUBWOOFER VOLUME STANDBY /ON PHONES SILENT CINEMA SPEAKERS A/B/OFF EDIT SEARCH MODE PRESET/TUNING FM/AM CATEGORY A/B/C/D/E 1 l PRESET/TUNING/CH h SCENE 2 3 4 MEMORY DISPLAY TUNING AUTO/MAN'L TONE CONTROL l PROGRAM h STRAIGHT NIGHT l INPUT h AUDIO...

Owner's Manual
Page 21
Make sure that you connect a 5.1-channel speaker system before using this feature. Connect the output jacks on your CD player via analog and digital connection, priority is equipped with 6 additional input jacks (...; Connecting to the MULTI CH INPUT jacks This unit is given to the signal input at the MULTI CH INPUT jacks to accommodate for missing speakers. We recommend that this unit and other components are unplugged from a multi-format player, external decoder or sound processor. Be sure to match the left...
Make sure that you connect a 5.1-channel speaker system before using this feature. Connect the output jacks on your CD player via analog and digital connection, priority is equipped with 6 additional input jacks (...; Connecting to the MULTI CH INPUT jacks This unit is given to the signal input at the MULTI CH INPUT jacks to accommodate for missing speakers. We recommend that this unit and other components are unplugged from a multi-format player, external decoder or sound processor. Be sure to match the left...
Owner's Manual
Page 23
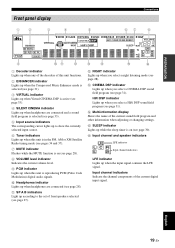
HiFi DSP indicator Lights up when the input signal contains the LFE signal. F Input channel and speaker indicators LFE L CR SL SR LFE indicator Input channel indicators LFE indicator Lights up when you select a HiFi DSP sound field program (see page 31). E ... indicator Lights up while the sleep timer is selected (see page 33). 5 Input source indicators The corresponding cursor lights up to the set of front speakers selected (see page 31). B NIGHT indicator Lights up when you select a CINEMA DSP sound field program (see page 27). D Multi-information display Shows the name...
HiFi DSP indicator Lights up when the input signal contains the LFE signal. F Input channel and speaker indicators LFE L CR SL SR LFE indicator Input channel indicators LFE indicator Lights up when you select a HiFi DSP sound field program (see page 31). E ... indicator Lights up while the sleep timer is selected (see page 33). 5 Input source indicators The corresponding cursor lights up to the set of front speakers selected (see page 31). B NIGHT indicator Lights up when you select a CINEMA DSP sound field program (see page 27). D Multi-information display Shows the name...

Owner's Manual
Page 24
... to operate. dusty places 20 En Connections ■ Using the remote control The remote control transmits a directional infrared ray. VOLUME STANDBY /ON PHONES SILENT CINEMA SPEAKERS A/B/OFF EDIT SEARCH MODE PRESET/TUNING FM/AM CATEGORY A/B/C/D/E 1 l PRESET/TUNING/CH h SCENE 2 3 4 MEMORY DISPLAY TUNING AUTO/MAN'L TONE CONTROL l PROGRAM h STRAIGHT NIGHT l INPUT h AUDIO...
... to operate. dusty places 20 En Connections ■ Using the remote control The remote control transmits a directional infrared ray. VOLUME STANDBY /ON PHONES SILENT CINEMA SPEAKERS A/B/OFF EDIT SEARCH MODE PRESET/TUNING FM/AM CATEGORY A/B/C/D/E 1 l PRESET/TUNING/CH h SCENE 2 3 4 MEMORY DISPLAY TUNING AUTO/MAN'L TONE CONTROL l PROGRAM h STRAIGHT NIGHT l INPUT h AUDIO...

Owner's Manual
Page 25
...ft2 (7.9 x 5.8 m, 45 m2) [Other models] S (small) 3.6 x 2.8 m, 10 m2 M (medium) 4.8 x 4.0 m, 20 m2 L (large) 6.3 x 5.0 m, 30 m2 SPEAKERS ..5spk Choice Display Speakers 2spk L R Front L/R 3spk L C R Front L/R, Center 4spk L SL R SR Front L/R, Surround L/R 5spk L CR SL SR Front L/R, Center, Surround L/R English 21 En In general, the... room sizes are indicated in your speakers. PREPARATION Basic setup Basic setup The "BASIC SETUP" feature is a useful way to select the desired setting. YES .BASIC...
...ft2 (7.9 x 5.8 m, 45 m2) [Other models] S (small) 3.6 x 2.8 m, 10 m2 M (medium) 4.8 x 4.0 m, 20 m2 L (large) 6.3 x 5.0 m, 30 m2 SPEAKERS ..5spk Choice Display Speakers 2spk L R Front L/R 3spk L C R Front L/R, Center 4spk L SL R SR Front L/R, Surround L/R 5spk L CR SL SR Front L/R, Center, Surround L/R English 21 En In general, the... room sizes are indicated in your speakers. PREPARATION Basic setup Basic setup The "BASIC SETUP" feature is a useful way to select the desired setting. YES .BASIC...
Owner's Manual
Page 26
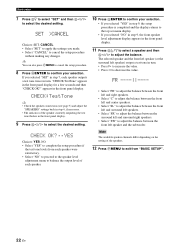
...If you selected "SET" in step 7, each speaker. 10 Press GENTER to select the desired setting. CHECK:TestTone y • Check the speaker connections (see page 5) and adjust the "SPEAKERS" settings back in step 6, if necessary. • The indicator of each speaker outputs a test tone twice in the front panel... the front panel display. appears in the front panel display for a few seconds and then "CHECK OK?" The selected speaker and the front left speaker (or the surround left speaker and the subwoofer. CHECK OK? ..YES Choices: YES, NO • Select "YES" to decrease the value. Basic...
...If you selected "SET" in step 7, each speaker. 10 Press GENTER to select the desired setting. CHECK:TestTone y • Check the speaker connections (see page 5) and adjust the "SPEAKERS" settings back in step 6, if necessary. • The indicator of each speaker outputs a test tone twice in the front panel... the front panel display. appears in the front panel display for a few seconds and then "CHECK OK?" The selected speaker and the front left speaker (or the surround left speaker and the subwoofer. CHECK OK? ..YES Choices: YES, NO • Select "YES" to decrease the value. Basic...

Owner's Manual
Page 31
..., this unit automatically selects the last sound field program used with Set this unit. 2 Press 9SPEAKERS repeatedly to select the front speakers you play back sources with the corresponding input source. • Sound field programs cannot be exercised when you play back CDs encoded... The name of the currently selected input source appears in the front panel display for details about XM Satellite Radio tuning instructions. The respective speaker indicators lights up in the front panel display. The name of the selected sound field program appears in the front panel display. 3 Press...
..., this unit automatically selects the last sound field program used with Set this unit. 2 Press 9SPEAKERS repeatedly to select the front speakers you play back sources with the corresponding input source. • Sound field programs cannot be exercised when you play back CDs encoded... The name of the currently selected input source appears in the front panel display for details about XM Satellite Radio tuning instructions. The respective speaker indicators lights up in the front panel display. The name of the selected sound field program appears in the front panel display. 3 Press...

Owner's Manual
Page 32
... the audio output Press NMUTE to resume the audio output. Notes • When you connect headphones, no signals are output at the speaker terminals. • All Dolby Digital and DTS audio signals are mixed down to the left and right channels. ■ Selecting the ... l / h repeatedly (or press AMULTI CH IN) so that "MULTI CH" appears in the front panel display. 28 En VOLUME STANDBY /ON PHONES SILENT CINEMA SPEAKERS A/B/OFF EDIT SEARCH MODE PRESET/TUNING FM/AM CATEGORY A/B/C/D/E 1 l PRESET/TUNING/CH h SCENE 2 3 4 MEMORY DISPLAY TUNING AUTO/MAN'L TONE CONTROL l PROGRAM ...
... the audio output Press NMUTE to resume the audio output. Notes • When you connect headphones, no signals are output at the speaker terminals. • All Dolby Digital and DTS audio signals are mixed down to the left and right channels. ■ Selecting the ... l / h repeatedly (or press AMULTI CH IN) so that "MULTI CH" appears in the front panel display. 28 En VOLUME STANDBY /ON PHONES SILENT CINEMA SPEAKERS A/B/OFF EDIT SEARCH MODE PRESET/TUNING FM/AM CATEGORY A/B/C/D/E 1 l PRESET/TUNING/CH h SCENE 2 3 4 MEMORY DISPLAY TUNING AUTO/MAN'L TONE CONTROL l PROGRAM ...

Owner's Manual
Page 33
...CD XM A.SEL: AUTO Audio input jack select setting AUTO ANALOG Automatically selects input signals in the following cases: - Notes • Speaker and headphone adjustments are assigned to the currently selected input source. The control range is selected as the input source. - Note This feature... audio input jack select to "AUTO" in effectiveness depending on the remote control to an extreme level, the tonal quality of the surround speakers may not match that of bass and treble for maximum compression. Press 0TONE CONTROL repeatedly to select "BASS" or "TREBLE" and then ...
...CD XM A.SEL: AUTO Audio input jack select setting AUTO ANALOG Automatically selects input signals in the following cases: - Notes • Speaker and headphone adjustments are assigned to the currently selected input source. The control range is selected as the input source. - Note This feature... audio input jack select to "AUTO" in effectiveness depending on the remote control to an extreme level, the tonal quality of the surround speakers may not match that of bass and treble for maximum compression. Press 0TONE CONTROL repeatedly to select "BASS" or "TREBLE" and then ...


