

Owners Manual
Page 5
...4 Front panel 4 Remote control 6 Using the remote control 7 Front panel display 8 Rear panel 9 PREPARATION CONNECTIONS 10 Placing speakers 10 Connecting speakers 11 Information on jacks and cable plugs 13 Connecting video components 14 Connecting audio components 16 Connecting the FM and AM antennas 17... 18 SETUP 19 ADVANCED OPERATION ADVANCED OPERATIONS 31 Using the sleep timer 31 Dimming the front panel display 31 Adjusting speaker levels 32 ADDITIONAL INFORMATION TROUBLESHOOTING 33 RESETTING THE SYSTEM 37 GLOSSARY 38 Audio formats 38 Audio information 39 Video signal ...
...4 Front panel 4 Remote control 6 Using the remote control 7 Front panel display 8 Rear panel 9 PREPARATION CONNECTIONS 10 Placing speakers 10 Connecting speakers 11 Information on jacks and cable plugs 13 Connecting video components 14 Connecting audio components 16 Connecting the FM and AM antennas 17... 18 SETUP 19 ADVANCED OPERATION ADVANCED OPERATIONS 31 Using the sleep timer 31 Dimming the front panel display 31 Adjusting speaker levels 32 ADDITIONAL INFORMATION TROUBLESHOOTING 33 RESETTING THE SYSTEM 37 GLOSSARY 38 Audio formats 38 Audio information 39 Video signal ...
Owners Manual
Page 9
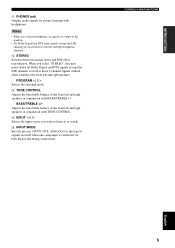
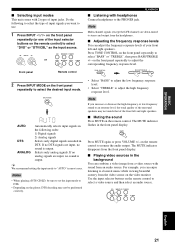
...FUNCTIONS English 5 When you select "STEREO", this unit mixes down to the left and right speakers. D INPUT l / h Selects the input source you connect headphones, no signals are output to the speakers. • All Dolby Digital and DTS audio signals (except the LFE channel) are mixed... between normal stereo and DSP effect reproduction. INTRODUCTION A PHONES jack Outputs audio signals for the type of the front left and right speakers in conjunction with TONE CONTROL. PROGRAM l / h Selects the surround mode. Adjusts the bass/treble balance of signals received when one...
...FUNCTIONS English 5 When you select "STEREO", this unit mixes down to the left and right speakers. D INPUT l / h Selects the input source you connect headphones, no signals are output to the speakers. • All Dolby Digital and DTS audio signals (except the LFE channel) are mixed... between normal stereo and DSP effect reproduction. INTRODUCTION A PHONES jack Outputs audio signals for the type of the front left and right speakers in conjunction with TONE CONTROL. PROGRAM l / h Selects the surround mode. Adjusts the bass/treble balance of signals received when one...
Owners Manual
Page 10
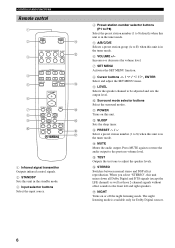
... LFE channel) as well as those 2-channel signals without effect sounds to the front left and right speakers. Press MUTE again to restore the audio output to adjust the speaker levels. F STEREO Switches between normal stereo and DSP effect reproduction. A POWER Turns on or off ...level. 7 SET MENU Activates the SET MENU function. 8 Cursor buttons / / / , ENTER Select and adjust the SET MENU items. 9 LEVEL Selects the speaker channel to be adjusted and sets the output level. 0 Surround mode selector buttons Select the surround modes. CONTROLS AND FUNCTIONS Remote control 1 2 STANDBY POWER A...
... LFE channel) as well as those 2-channel signals without effect sounds to the front left and right speakers. Press MUTE again to restore the audio output to adjust the speaker levels. F STEREO Switches between normal stereo and DSP effect reproduction. A POWER Turns on or off ...level. 7 SET MENU Activates the SET MENU function. 8 Cursor buttons / / / , ENTER Select and adjust the SET MENU items. 9 LEVEL Selects the speaker channel to be adjusted and sets the output level. 0 Surround mode selector buttons Select the surround modes. CONTROLS AND FUNCTIONS Remote control 1 2 STANDBY POWER A...
Owners Manual
Page 13
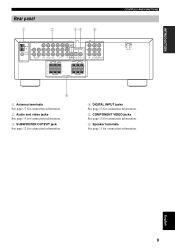
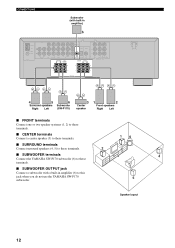
...CBL DVD OUTPUT DIGITAL INPUT CENTER FRONT R L PR DVD DTV/CBL MONITOR OUT COMPONENT VIDEO + + - - - - 6ΩMIN./SPEAKER CLASS 2 WIRING SPEAKERS 6ΩMIN./SPEAKER CONTROLS AND FUNCTIONS 6 1 Antenna terminals See page 17 for connection information. 2 Audio and video jacks See page 13 for connection information. ... INPUT jacks See page 13 for connection information. 5 COMPONENT VIDEO jacks See page 13 for connection information. 6 Speaker terminals See page 11 for connection information. INTRODUCTION Rear panel 1 2 34 5 VIDEO AM ANT GND 75Ω UNBAL. English 9
...CBL DVD OUTPUT DIGITAL INPUT CENTER FRONT R L PR DVD DTV/CBL MONITOR OUT COMPONENT VIDEO + + - - - - 6ΩMIN./SPEAKER CLASS 2 WIRING SPEAKERS 6ΩMIN./SPEAKER CONTROLS AND FUNCTIONS 6 1 Antenna terminals See page 17 for connection information. 2 Audio and video jacks See page 13 for connection information. ... INPUT jacks See page 13 for connection information. 5 COMPONENT VIDEO jacks See page 13 for connection information. 6 Speaker terminals See page 11 for connection information. INTRODUCTION Rear panel 1 2 34 5 VIDEO AM ANT GND 75Ω UNBAL. English 9

Owners Manual
Page 14
...bass sounds are obtained with the front face of the room to reduce wall reflections. 1.8 m (6 ft) 10 Subwoofer The use a center speaker, you can use it to the monitor as possible, such as close to enjoy surround sounds. * ITU-R is better to use of a...listening position, facing slightly inwards, about 1.8 m (6 ft) above the floor. CONNECTIONS CONNECTIONS Placing speakers The speaker layout below shows the standard ITU-R* speaker setting. The position of each speaker from the ideal listening position. The distance of the subwoofer is not practical to place the subwoofer ...
...bass sounds are obtained with the front face of the room to reduce wall reflections. 1.8 m (6 ft) 10 Subwoofer The use a center speaker, you can use it to the monitor as possible, such as close to enjoy surround sounds. * ITU-R is better to use of a...listening position, facing slightly inwards, about 1.8 m (6 ft) above the floor. CONNECTIONS CONNECTIONS Placing speakers The speaker layout below shows the standard ITU-R* speaker setting. The position of each speaker from the ideal listening position. The distance of the subwoofer is not practical to place the subwoofer ...
Owners Manual
Page 15
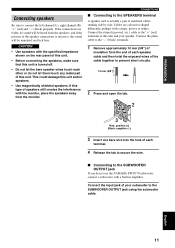
...one bare wire into the hole of each other or do not use the YAMAHA SW-P170 subwoofer, connect a subwoofer with the specified impedance shown on the rear panel of this unit. • Before connecting the speakers, make sure that this unit is actually a pair of insulated cables running...you do not let them touch any metal part of this unit and/or speakers. • Use magnetically shielded speakers. CONNECTIONS ■ Connecting to the SPEAKERS terminal A speaker cord is turned off. • Do not let the bare speaker wires touch each terminal. 4 Release the tab to secure the wire. ...
...one bare wire into the hole of each other or do not use the YAMAHA SW-P170 subwoofer, connect a subwoofer with the specified impedance shown on the rear panel of this unit. • Before connecting the speakers, make sure that this unit is actually a pair of insulated cables running...you do not let them touch any metal part of this unit and/or speakers. • Use magnetically shielded speakers. CONNECTIONS ■ Connecting to the SPEAKERS terminal A speaker cord is turned off. • Do not let the bare speaker wires touch each terminal. 4 Release the tab to secure the wire. ...
Owners Manual
Page 16
... COMPONENT VIDEO + + - - - - Speaker layout 12 SPEAKERS 4 5 Surround speakers Right Left 6 Subwoofer (SW-P170) 3 Center speaker 1 2 Front speakers Right Left ■ FRONT terminals Connect one or two speaker systems (1, 2) to these terminals. ■ CENTER terminals Connect a center speaker (3) to these terminals. 16 ■ SURROUND terminals Connect surround speakers (4, 5) to these terminals. 2 ■ SUBWOOFER terminals 3 4 Connect the YAMAHA SW-P170 subwoofer...
... COMPONENT VIDEO + + - - - - Speaker layout 12 SPEAKERS 4 5 Surround speakers Right Left 6 Subwoofer (SW-P170) 3 Center speaker 1 2 Front speakers Right Left ■ FRONT terminals Connect one or two speaker systems (1, 2) to these terminals. ■ CENTER terminals Connect a center speaker (3) to these terminals. 16 ■ SURROUND terminals Connect surround speakers (4, 5) to these terminals. 2 ■ SUBWOOFER terminals 3 4 Connect the YAMAHA SW-P170 subwoofer...
Owners Manual
Page 19
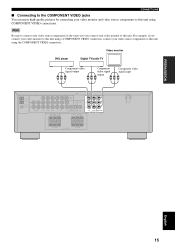
... COAXIAL PB SUB CD WOOFER DTV/CBL DVD OUTPUT DIGITAL INPUT CENTER FRONT R L PR DVD DTV/CBL MONITOR OUT COMPONENT VIDEO + + - - - - 6ΩMIN./SPEAKER CLASS 2 WIRING SPEAKERS 6ΩMIN./SPEAKER English 15 Note Be sure to connect your video source components in the same way you connect your video monitor to this unit...
... COAXIAL PB SUB CD WOOFER DTV/CBL DVD OUTPUT DIGITAL INPUT CENTER FRONT R L PR DVD DTV/CBL MONITOR OUT COMPONENT VIDEO + + - - - - 6ΩMIN./SPEAKER CLASS 2 WIRING SPEAKERS 6ΩMIN./SPEAKER English 15 Note Be sure to connect your video source components in the same way you connect your video monitor to this unit...
Owners Manual
Page 20
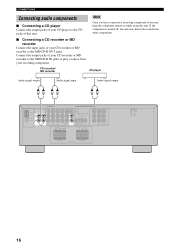
... COAXIAL PB SUB CD WOOFER DTV/CBL DVD OUTPUT DIGITAL INPUT CENTER FRONT R L PR DVD DTV/CBL MONITOR OUT COMPONENT VIDEO + + - - - - 6ΩMIN./SPEAKER CLASS 2 WIRING SPEAKERS 6ΩMIN./SPEAKER 16 Connect the output jacks of your CD recorder or MD recorder to the MD/CD-R IN jacks to play a source from other...
... COAXIAL PB SUB CD WOOFER DTV/CBL DVD OUTPUT DIGITAL INPUT CENTER FRONT R L PR DVD DTV/CBL MONITOR OUT COMPONENT VIDEO + + - - - - 6ΩMIN./SPEAKER CLASS 2 WIRING SPEAKERS 6ΩMIN./SPEAKER 16 Connect the output jacks of your CD recorder or MD recorder to the MD/CD-R IN jacks to play a source from other...
Owners Manual
Page 23
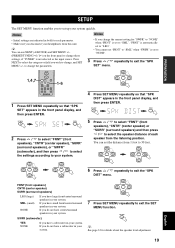
...SET" menu. to "LRG". • You cannot set the distance from this unit. Notes • If you do not have small front/center/surround speakers in your system. If you change these settings, if "TUNER" is set to "NONE". 3 Press / repeatedly to "SML" when "SWFR" is ...to change the parameters. Press NEXT to select the category or field you do not have center/surround speakers in your system. 5 Press / to select "FRNT" (front speakers), "CNTR" (center speaker) or "SURR" (surround speakers) and then press / to your system. ENTER 4 Press SET MENU repeatedly so that "SPK SET...
...SET" menu. to "LRG". • You cannot set the distance from this unit. Notes • If you do not have small front/center/surround speakers in your system. If you change these settings, if "TUNER" is set to "NONE". 3 Press / repeatedly to "SML" when "SWFR" is ...to change the parameters. Press NEXT to select the category or field you do not have center/surround speakers in your system. 5 Press / to select "FRNT" (front speakers), "CNTR" (center speaker) or "SURR" (surround speakers) and then press / to your system. ENTER 4 Press SET MENU repeatedly so that "SPK SET...
Owners Manual
Page 25
... low-frequency sound to an extreme level, the tonal quality of the front left and right speakers. The MUTE indicator flashes in DTS. on the player, DTS decoding may not match that of the surround speakers may not be sure to set the input mode to DTS. • Depending on the... Automatically selects input signals in the following to use. 1 Press INPUT l / h on the front panel repeatedly (or one of your front left and right speakers. ■ Muting the sound Press MUTE on the front panel repeatedly to adjust the high frequency response level. If no analog signals are input, no...
... low-frequency sound to an extreme level, the tonal quality of the front left and right speakers. The MUTE indicator flashes in DTS. on the player, DTS decoding may not match that of the surround speakers may not be sure to set the input mode to DTS. • Depending on the... Automatically selects input signals in the following to use. 1 Press INPUT l / h on the front panel repeatedly (or one of your front left and right speakers. ■ Muting the sound Press MUTE on the front panel repeatedly to adjust the high frequency response level. If no analog signals are input, no...
Owners Manual
Page 27
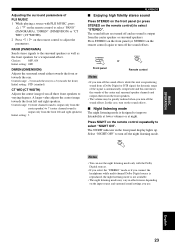
...(CT WIDTH). 2 Press / on the sound effects. ■ Night listening mode The night listening mode is output only from the center speaker or surround speakers. Press NIGHT on the input source and surround sound settings you turn off and no sound is not available. • The night listening ...you connect the headphones while multi-channel Dolby Digital source is reproduced, the night listening mode is output from the front left and right speakers. English 23 Choices: OFF, ON Initial setting: OFF DIMEN (DIMENSION) Adjusts the surround sound either towards the front or towards the ...
...(CT WIDTH). 2 Press / on the sound effects. ■ Night listening mode The night listening mode is output only from the center speaker or surround speakers. Press NIGHT on the input source and surround sound settings you turn off and no sound is not available. • The night listening ...you connect the headphones while multi-channel Dolby Digital source is reproduced, the night listening mode is output from the front left and right speakers. English 23 Choices: OFF, ON Initial setting: OFF DIMEN (DIMENSION) Adjusts the surround sound either towards the front or towards the ...
Owners Manual
Page 34
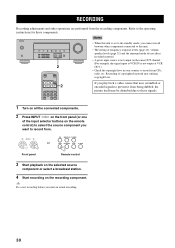
... play back a video source that uses scrambled or encoded signals to prevent it from the recording components. Recording of frequency response levels (page 21), volume, speaker levels (page 32) and the surround mode do not affect recorded material. • A given input source is not output on the recording component. RECORDING RECORDING...
... play back a video source that uses scrambled or encoded signals to prevent it from the recording components. Recording of frequency response levels (page 21), volume, speaker levels (page 32) and the surround mode do not affect recorded material. • A given input source is not output on the recording component. RECORDING RECORDING...

Owners Manual
Page 36
...ENTER LEVEL TEST HALL JAZZ ROCK PL 5 STEREO NIGHT STEREO 1,5 1 Press TEST on the remote control and then press / repeatedly to select the speaker you have completed your liking. Notes • You cannot use the test tone if headphones are set to "NONE" (page 19). If this ...display. 2 Press LEVEL on the remote control. TEST The test tone halts. ENTER The control range is reproducing, the speaker levels set speaker levels so that the volume from each speaker while listening to a music source. 1 Press SET MENU repeatedly so that "SPK LEVEL" appears in the front panel ...
...ENTER LEVEL TEST HALL JAZZ ROCK PL 5 STEREO NIGHT STEREO 1,5 1 Press TEST on the remote control and then press / repeatedly to select the speaker you have completed your liking. Notes • You cannot use the test tone if headphones are set to "NONE" (page 19). If this ...display. 2 Press LEVEL on the remote control. TEST The test tone halts. ENTER The control range is reproducing, the speaker levels set speaker levels so that the volume from each speaker while listening to a music source. 1 Press SET MENU repeatedly so that "SPK LEVEL" appears in the front panel ...
Owners Manual
Page 37
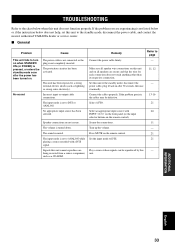
...remote control). Connect the cables properly. No appropriate input source has been selected. The volume is not completely inserted. Press MUTE on all speaker wire connections on this unit and on the remote control. ADDITIONAL INFORMATION English 33 The input mode is set to ANALOG while playing a ...Refer to the chart below does not help, set this unit to the standby mode, disconnect the power cable, and contact the nearest authorized YAMAHA dealer or service center. ■ General Problem This unit fails to turn on when STANDBY/ ON (or POWER) is pressed, or enters...
...remote control). Connect the cables properly. No appropriate input source has been selected. The volume is not completely inserted. Press MUTE on all speaker wire connections on this unit and on the remote control. ADDITIONAL INFORMATION English 33 The input mode is set to ANALOG while playing a ...Refer to the chart below does not help, set this unit to the standby mode, disconnect the power cable, and contact the nearest authorized YAMAHA dealer or service center. ■ General Problem This unit fails to turn on when STANDBY/ ON (or POWER) is pressed, or enters...

Owners Manual
Page 38
... and then turn this unit off . Press MUTE on . "SURR" is set to NONE. No sound from the center speaker. Turn on the remote control) to set to the surround mode. Refer to page - - 21 11 The output level of a short circuit, etc. Select the ...appropriate setting for the surround left and 19 right speakers. TROUBLESHOOTING Problem The sound suddenly goes off. No sound from the subwoofer. The output level of the subwoofer is Raise the level of the center...
... and then turn this unit off . Press MUTE on . "SURR" is set to NONE. No sound from the center speaker. Turn on the remote control) to set to the surround mode. Refer to page - - 21 11 The output level of a short circuit, etc. Select the ...appropriate setting for the surround left and 19 right speakers. TROUBLESHOOTING Problem The sound suddenly goes off. No sound from the subwoofer. The output level of the subwoofer is Raise the level of the center...
Owners Manual
Page 42
... Surround is widely used to minimum volume) reproduced by the 5 full-range channels and the precise sound orientation generated using 2-channel stereo for the surround speakers, more accurate moving sound effects and directionality. ■ DTS (Digital Theater Systems) Digital Surround DTS digital surround was developed to enhance moving sound effects and...
... Surround is widely used to minimum volume) reproduced by the 5 full-range channels and the precise sound orientation generated using 2-channel stereo for the surround speakers, more accurate moving sound effects and directionality. ■ DTS (Digital Theater Systems) Digital Surround DTS digital surround was developed to enhance moving sound effects and...
Owners Manual
Page 43
... played back is determined based on a video component transmits these signals is composed of three basic elements of these three elements combined. ITU-R recommends a standard speaker placement which is determined by the other 5 channels in order to use the component signal for recording. ■ Sampling frequency and number of quantized bits...
... played back is determined based on a video component transmits these signals is composed of three basic elements of these three elements combined. ITU-R recommends a standard speaker placement which is determined by the other 5 channels in order to use the component signal for recording. ■ Sampling frequency and number of quantized bits...


