

Owner's Manual
Page 3
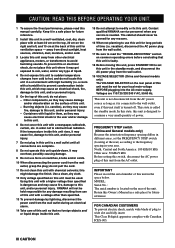
... INTRODUCTION PREPARATION BASIC OPERATION 19 For US customers only: Outdoor Antenna Grounding - IMPORTANT : When connecting this product MUST be determined by turning the unit "OFF" and "ON", please try to eliminate the problem by using one of America or its subsidiaries. Follow all... digital devices. PART H) FCC INFORMATION (for proper grounding and, in the USA. 3. and, most out of your equipment by Yamaha Corporation of the following measures: Relocate either this product or the device that your FCC authorization to accessories and/or another product use of...
... INTRODUCTION PREPARATION BASIC OPERATION 19 For US customers only: Outdoor Antenna Grounding - IMPORTANT : When connecting this product MUST be determined by turning the unit "OFF" and "ON", please try to eliminate the problem by using one of America or its subsidiaries. Follow all... digital devices. PART H) FCC INFORMATION (for proper grounding and, in the USA. 3. and, most out of your equipment by Yamaha Corporation of the following measures: Relocate either this product or the device that your FCC authorization to accessories and/or another product use of...
Owner's Manual
Page 4
... not be held responsible for any service is located on the rear of this unit with a newspaper, tablecloth, curtain, etc. Contact qualified YAMAHA service personnel when any damage resulting from use of the unit. North, Central and South America: 100 kHz/10 kHz Other area: 50 kHz/9 kHz ... interstation frequency spacing differs in a safe place for any type of liquid. 4 Do not expose this unit to the frequency spacing in this unit is turned off. IMPORTANT Please record the serial number of plug to obstruct heat radiation.
... not be held responsible for any service is located on the rear of this unit with a newspaper, tablecloth, curtain, etc. Contact qualified YAMAHA service personnel when any damage resulting from use of the unit. North, Central and South America: 100 kHz/10 kHz Other area: 50 kHz/9 kHz ... interstation frequency spacing differs in a safe place for any type of liquid. 4 Do not expose this unit to the frequency spacing in this unit is turned off. IMPORTANT Please record the serial number of plug to obstruct heat radiation.
Owner's Manual
Page 8
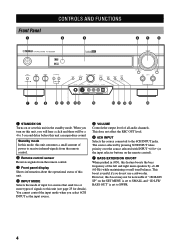
... EDIT PHONES S VIDEO VIDEO L AUDIO R OPTICAL MAN'L/AUTO FM AUTO/MAN'L MONO INPUT MODE INPUT 6CH INPUT 78 9 SILENT 0 q w er VIDEO AUX t yuio p 1 STANDBY/ON Turns on or sets this feature boosts the bass frequency of the left and right main speakers by pressing 6CH INPUT takes priority over the source... l / h (or the input selector buttons on the remote control). 7 BASS EXTENSION ON/OFF When pushed in (ON), this unit in the standby mode. When you turn on this unit, you will hear a click and there will be noticeable if "1B MAIN SP" on the SET MENU is set to SMALL and...
... EDIT PHONES S VIDEO VIDEO L AUDIO R OPTICAL MAN'L/AUTO FM AUTO/MAN'L MONO INPUT MODE INPUT 6CH INPUT 78 9 SILENT 0 q w er VIDEO AUX t yuio p 1 STANDBY/ON Turns on or sets this feature boosts the bass frequency of the left and right main speakers by pressing 6CH INPUT takes priority over the source... l / h (or the input selector buttons on the remote control). 7 BASS EXTENSION ON/OFF When pushed in (ON), this unit in the standby mode. When you turn on this unit, you will hear a click and there will be noticeable if "1B MAIN SP" on the SET MENU is set to SMALL and...
Owner's Manual
Page 9
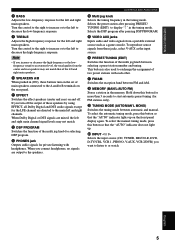
...frequency or the lowfrequency sound to the speakers. Selects the DSP program after pressing PRESET/ TUNING (EDIT) to display " z " in (ON), these buttons turn off . This button is also used to decrease the high-frequency response. i MEMORY (MAN'L/AUTO FM) Stores a station in the tuning mode. w ...of two preset stations with headphones. To select the manual tuning mode, press this button so that the "AUTO" indicator lights up . Turn the control to the right to increase or to start automatic preset tuning (for FM stations only). To select the automatic tuning mode, ...
...frequency or the lowfrequency sound to the speakers. Selects the DSP program after pressing PRESET/ TUNING (EDIT) to display " z " in (ON), these buttons turn off . This button is also used to decrease the high-frequency response. i MEMORY (MAN'L/AUTO FM) Stores a station in the tuning mode. w ...of two preset stations with headphones. To select the manual tuning mode, press this button so that the "AUTO" indicator lights up . Turn the control to the right to increase or to start automatic preset tuning (for FM stations only). To select the automatic tuning mode, ...
Owner's Manual
Page 10
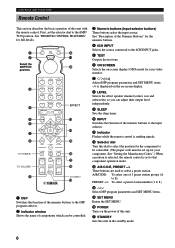
y POWER Turns on the power of this unit in the standby mode. 6 See "REMOTE CONTROL FEATURES" for full details. 1 0 2 q Select the AMP/TUN w position. 3 4 5 6 7 8 TV POWER TV ... one of 5 preset station groups (A to E) PRESET -/+: To select a preset station number (1 to select a preset station. First, set to that component operation mode. w Selector dial Turn this unit with the remote control. See "Description of the Numeric Buttons" for the numeric buttons. 4 6CH INPUT Selects the source connected to the 6CH...
y POWER Turns on the power of this unit in the standby mode. 6 See "REMOTE CONTROL FEATURES" for full details. 1 0 2 q Select the AMP/TUN w position. 3 4 5 6 7 8 TV POWER TV ... one of 5 preset station groups (A to E) PRESET -/+: To select a preset station number (1 to select a preset station. First, set to that component operation mode. w Selector dial Turn this unit with the remote control. See "Description of the Numeric Buttons" for the numeric buttons. 4 6CH INPUT Selects the source connected to the 6CH...
Owner's Manual
Page 11
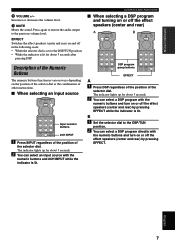
...about 3 seconds after pressing DSP. The indicator lights up for about 3 seconds. 2 You can select a DSP program directly with the numeric buttons and turn on and off the effect speakers (center and rear) A B DSP program group buttons EFFECT A 1 Press DSP regardless of the position of other instructions... INFORMATION APPENDIX English 7 The indicator lights up for about 3 seconds. 2 You can select a DSP program with the numeric buttons and turn on the position of the selector dial or the combination of the selector dial. Press again to restore the audio output to the DSP/TUN...
...about 3 seconds after pressing DSP. The indicator lights up for about 3 seconds. 2 You can select a DSP program directly with the numeric buttons and turn on and off the effect speakers (center and rear) A B DSP program group buttons EFFECT A 1 Press DSP regardless of the position of other instructions... INFORMATION APPENDIX English 7 The indicator lights up for about 3 seconds. 2 You can select a DSP program with the numeric buttons and turn on the position of the selector dial or the combination of the selector dial. Press again to restore the audio output to the DSP/TUN...

Owner's Manual
Page 15
... (R) Rear speaker (R) Main speaker (L) Subwoofer 1.8 m Center speaker Rear speaker (L) s Main speakers Place the left and right main speakers. Turn it slightly toward the center of your audio system. CAUTION Please use a center speaker, you use speakers from the same manufacturer to place the...are obtained with a 5-speaker system, using left and right main speakers, left and right rear speakers, and a center speaker. The YAMAHA Active Servo Processing Subwoofer System is better to ensure even tonal quality. But it is not used for the center sounds (dialog, vocals,...
... (R) Rear speaker (R) Main speaker (L) Subwoofer 1.8 m Center speaker Rear speaker (L) s Main speakers Place the left and right main speakers. Turn it slightly toward the center of your audio system. CAUTION Please use a center speaker, you use speakers from the same manufacturer to place the...are obtained with a 5-speaker system, using left and right main speakers, left and right rear speakers, and a center speaker. The YAMAHA Active Servo Processing Subwoofer System is better to ensure even tonal quality. But it is not used for the center sounds (dialog, vocals,...
Owner's Manual
Page 17
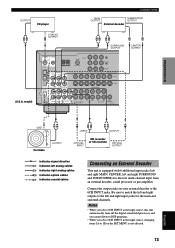
...-channel input from an external decoder, sound processor or pre-amplifier. Notes • When you select 6CH INPUT as the input source, this unit automatically turns off the digital sound field processor, and you cannot listen to DSP programs. • When you select 6CH INPUT as the input source, changing items...
...-channel input from an external decoder, sound processor or pre-amplifier. Notes • When you select 6CH INPUT as the input source, this unit automatically turns off the digital sound field processor, and you cannot listen to DSP programs. • When you select 6CH INPUT as the input source, changing items...
Owner's Manual
Page 22
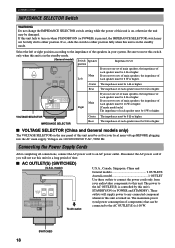
... each speaker must be 8 Ω or higher. Disconnect the AC power cord if you will supply power to any connected component whenever this unit is turned on the rear panel of this unit must be set for a long period of time. TOTAL IMPEDANCE SELECTOR SET BEFORE POWER ON MAIN A OR B: 4 MIN... components) that can be connected to the AC OUTLET(S) is controlled by this unit's STANDBY/ON (or POWER and STANDBY). If this unit fails to turn on , otherwise the unit may not be fully slid to either position fully when this unit is in your local main voltage BEFORE plugging into...
... each speaker must be 8 Ω or higher. Disconnect the AC power cord if you will supply power to any connected component whenever this unit is turned on the rear panel of this unit must be set for a long period of time. TOTAL IMPEDANCE SELECTOR SET BEFORE POWER ON MAIN A OR B: 4 MIN... components) that can be connected to the AC OUTLET(S) is controlled by this unit's STANDBY/ON (or POWER and STANDBY). If this unit fails to turn on , otherwise the unit may not be fully slid to either position fully when this unit is in your local main voltage BEFORE plugging into...
Owner's Manual
Page 23
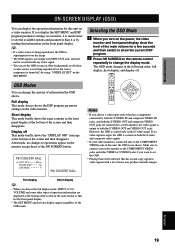
... your video monitor to change the amount of noise may produce unstable images. Make sure to connect your video monitor is connected only to turn on the power, the video monitor and front panel display show the current DSP program. 2 Press ON SCREEN on the remote control repeatedly... with any video signal. • You can change the display mode. y • If a video source is being reproduced (or the source component is turned off . DLY ROOM SIZE LIVENESS 45ms 1.0 5 P01 CONCERT HALL Notes • If you display the SET MENU and DSP program parameter settings on a monitor...
... your video monitor to change the amount of noise may produce unstable images. Make sure to connect your video monitor is connected only to turn on the power, the video monitor and front panel display show the current DSP program. 2 Press ON SCREEN on the remote control repeatedly... with any video signal. • You can change the display mode. y • If a video source is being reproduced (or the source component is turned off . DLY ROOM SIZE LIVENESS 45ms 1.0 5 P01 CONCERT HALL Notes • If you display the SET MENU and DSP program parameter settings on a monitor...

Owner's Manual
Page 25
... to this adjustment is heard from each speaker. Note • Since this unit cannot enter the test mode while headphones are using the test tone. Turn on the front panel to the center position and set BASS EXTENSION to unplug the headphones from the PHONES jack when using two sets of... be sure to OFF. This is produced for the best performance of each time. STANDBY /ON 2 Press SPEAKERS A or B to select the main speakers to turn on the power. If you can hear the test tone. When this unit, be made , the output level heard at your listening position with the...
... to this adjustment is heard from each speaker. Note • Since this unit cannot enter the test mode while headphones are using the test tone. Turn on the front panel to the center position and set BASS EXTENSION to unplug the headphones from the PHONES jack when using two sets of... be sure to OFF. This is produced for the best performance of each time. STANDBY /ON 2 Press SPEAKERS A or B to select the main speakers to turn on the power. If you can hear the test tone. When this unit, be made , the output level heard at your listening position with the...
Owner's Manual
Page 26
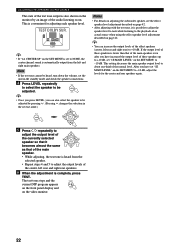
... repeatedly to select the speaker to be adjusted by an image of the audio listening room. Note • If the test tone cannot be heard, turn down the volume, set "1E MAIN LEVEL" on the SET MENU to -10 dB, adjust the levels for adjusting each speaker level. TEST DOLBY SUR...
... repeatedly to select the speaker to be adjusted by an image of the audio listening room. Note • If the test tone cannot be heard, turn down the volume, set "1E MAIN LEVEL" on the SET MENU to -10 dB, adjust the levels for adjusting each speaker level. TEST DOLBY SUR...
Owner's Manual
Page 27
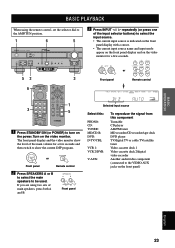
... L AUDIO R OPTICAL MAN'L/AUTO FM AUTO/MAN'L MONO SILENT VIDEO AUX INPUT MODE INPUT 6CH INPUT 52 3 6 A/B/C/D/E 1 3 5 A/B/C/D/E 1 Press STANDBY/ON (or POWER) to turn on the power. The front panel display and the video monitor show the level of the main volume for a few seconds and then switch to... cursor. • The current input source name and input mode appear on the front panel display and on the video monitor for a few seconds. Turn on the video monitor. INPUT Front panel or Remote control V-AUX VCR2/DVR VCR 1 D-TV/CBL DVD MD/CD-R TUNER CD PHONO VOLUME Selected...
... L AUDIO R OPTICAL MAN'L/AUTO FM AUTO/MAN'L MONO SILENT VIDEO AUX INPUT MODE INPUT 6CH INPUT 52 3 6 A/B/C/D/E 1 3 5 A/B/C/D/E 1 Press STANDBY/ON (or POWER) to turn on the power. The front panel display and the video monitor show the level of the main volume for a few seconds and then switch to... cursor. • The current input source name and input mode appear on the front panel display and on the video monitor for a few seconds. Turn on the video monitor. INPUT Front panel or Remote control V-AUX VCR2/DVR VCR 1 D-TV/CBL DVD MD/CD-R TUNER CD PHONO VOLUME Selected...
Owner's Manual
Page 28
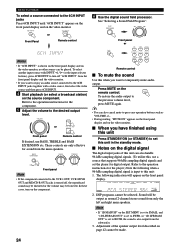
DSP PROGRAM Front panel or Notes • If "6CH INPUT" is turned off "6CH INPUT" from the subwoofer. 3. Press MUTE on the video monitor, no ...using this unit Press STANDBY/ON (or STANDBY) to this when you want to the desired output level. In these cases, turn off , the reproduced sound may be distorted or the volume may be made. 24 Refer to the operation instructions for the ...the player for sound from only the left and right main speakers. y • You can also cancel mute to turn on the SET MENU is set to SMALL and "1D LFE/BASS OUT" is set to SWFR, or "1D LFE...
DSP PROGRAM Front panel or Notes • If "6CH INPUT" is turned off "6CH INPUT" from the subwoofer. 3. Press MUTE on the video monitor, no ...using this unit Press STANDBY/ON (or STANDBY) to this when you want to the desired output level. In these cases, turn off , the reproduced sound may be distorted or the volume may be made. 24 Refer to the operation instructions for the ...the player for sound from only the left and right main speakers. y • You can also cancel mute to turn on the SET MENU is set to SMALL and "1D LFE/BASS OUT" is set to SWFR, or "1D LFE...
Owner's Manual
Page 31
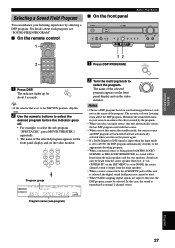
... PROGRAM". Minimize the sound reflections in the standby mode, the current source and DSP program are memorized and are automatically selected when you turn on the power again. • If a Dolby Digital or DTS signal is input when the input mode is set this unit, the.... Program group DIGITAL DSP V-AUX VCR2/DVR VCR 1 D-TV/CBL DVD MOVIE THEATER 1 MD/CD-R TUNER CD PHONO VOLUME Program name (sub-program) 2 Turn the multi jog knob to the appropriate decoding program. • When a monaural source is reproduced as normal 2-channel stereo. DSP PROGRAM A/B/C/D/E 1 Press DSP. ...
... PROGRAM". Minimize the sound reflections in the standby mode, the current source and DSP program are memorized and are automatically selected when you turn on the power again. • If a Dolby Digital or DTS signal is input when the input mode is set this unit, the.... Program group DIGITAL DSP V-AUX VCR2/DVR VCR 1 D-TV/CBL DVD MOVIE THEATER 1 MD/CD-R TUNER CD PHONO VOLUME Program name (sub-program) 2 Turn the multi jog knob to the appropriate decoding program. • When a monaural source is reproduced as normal 2-channel stereo. DSP PROGRAM A/B/C/D/E 1 Press DSP. ...

Owner's Manual
Page 32
... dynamic range of a virtual speaker. Press EFFECT again to enjoy the realistic feel of the DSP program without rear speakers. In this case turn off the sound effect for normal stereo reproduction. Normal Stereo Reproduction Press EFFECT to MIN. when the sound effect is played; - when the... the sound effect, no sound is output from the main speakers. • The volume may be greatly reduced when you turn off ; - Using YAMAHA original technology, natural surround reproduction is performed by connecting your headphones to enjoy the sound field effects of the DSP program while...
... dynamic range of a virtual speaker. Press EFFECT again to enjoy the realistic feel of the DSP program without rear speakers. In this case turn off the sound effect for normal stereo reproduction. Normal Stereo Reproduction Press EFFECT to MIN. when the sound effect is played; - when the... the sound effect, no sound is output from the main speakers. • The volume may be greatly reduced when you turn off ; - Using YAMAHA original technology, natural surround reproduction is performed by connecting your headphones to enjoy the sound field effects of the DSP program while...
Owner's Manual
Page 34
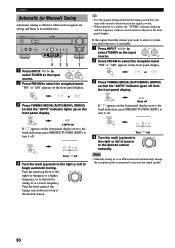
...) to increase the signal quality. 30 Note • Manually tuning in to an FM station will automatically change the reception mode to monaural to turn it off . 4 Turn the multi jog knob to the right or left to select the reception band. "FM" or "AM" appears on the front panel display. y •... you must tune in to it manually. 1 Press INPUT l / h to INPUT select TUNER as the input source. 2 Press FM/AM to select the reception band. Turn the multi jog knob to the right for tuning in to the desired sration manually. FM/AM or 3 Press TUNING MODE (AUTO/MAN'L MONO) so...
...) to increase the signal quality. 30 Note • Manually tuning in to an FM station will automatically change the reception mode to monaural to turn it off . 4 Turn the multi jog knob to the right or left to select the reception band. "FM" or "AM" appears on the front panel display. y •... you must tune in to it manually. 1 Press INPUT l / h to INPUT select TUNER as the input source. 2 Press FM/AM to select the reception band. Turn the multi jog knob to the right for tuning in to the desired sration manually. FM/AM or 3 Press TUNING MODE (AUTO/MAN'L MONO) so...

Owner's Manual
Page 35
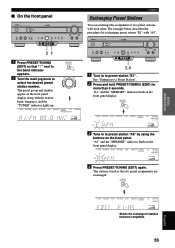
... than one week, the preset stations may be stored. The preset number, the "MEMORY" and "AUTO" indicators flash. Turn the multi jog knob to E8. 2. Press PRESET/TUNING (EDIT) to turn off " z " and then turn the multi jog knob to the left to power failure. If so, store the stations again by using...
... than one week, the preset stations may be stored. The preset number, the "MEMORY" and "AUTO" indicators flash. Turn the multi jog knob to E8. 2. Press PRESET/TUNING (EDIT) to turn off " z " and then turn the multi jog knob to the left to power failure. If so, store the stations again by using...
Owner's Manual
Page 36
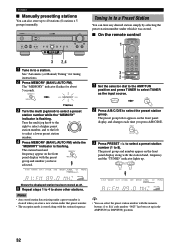
Turn the multi jog knob to the right to select a higher preset station number, and to the left to select a lower preset station number. 4 Press MEMORY (... panel display and changes each time you have selected. TUNING s Manually presetting stations You can also store up to 8). MEMORY MAN'L/AUTO FM MEMORY Flashes 3 Turn the multi jog knob to a station. See "Automatic (or Manual) Tuning" for about 5 seconds. s On the remote control 1 3 2,4 1 Tune in to select the preset station...
Turn the multi jog knob to the right to select a higher preset station number, and to the left to select a lower preset station number. 4 Press MEMORY (... panel display and changes each time you have selected. TUNING s Manually presetting stations You can also store up to 8). MEMORY MAN'L/AUTO FM MEMORY Flashes 3 Turn the multi jog knob to a station. See "Automatic (or Manual) Tuning" for about 5 seconds. s On the remote control 1 3 2,4 1 Tune in to select the preset station...
Owner's Manual
Page 37
... L AUDIO R OPTICAL MAN'L/AUTO FM AUTO/MAN'L MONO SILENT VIDEO AUX INPUT MODE INPUT 6CH INPUT 2,4 1 Tune in to preset station "E1". PRESET /TUNING EDIT 2 Turn the multi jog knob to the band indicator appears. STANDBY /ON D I G I TA L SURROUND BASS EXTENSION BASS TREBLE ON OFF -+ -+ SPEAKERS A B ON OFF D I G I TA L VOLUME EFFECT...
... L AUDIO R OPTICAL MAN'L/AUTO FM AUTO/MAN'L MONO SILENT VIDEO AUX INPUT MODE INPUT 6CH INPUT 2,4 1 Tune in to preset station "E1". PRESET /TUNING EDIT 2 Turn the multi jog knob to the band indicator appears. STANDBY /ON D I G I TA L SURROUND BASS EXTENSION BASS TREBLE ON OFF -+ -+ SPEAKERS A B ON OFF D I G I TA L VOLUME EFFECT...

